
User Manual
Page 8
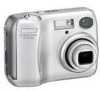
... battery chargers, batteries, and AC adapters) certified by Nikon specifically for use with you on Exif-compliant printers. THE USE OF NON-NIKON ELECTRONIC ACCESSORIES COULD DAMAGE YOUR CAMERA AND MAY VOID YOUR NIKON WARRANTY. vi The AF-Assist Illuminator LED The light-emitting diode (LED) used in the digital camera industry to the highest standards and includes complex electronic circuitry. Use Only Nikon Brand Electronic Accessories Your Nikon COOLPIX camera is functioning...
... battery chargers, batteries, and AC adapters) certified by Nikon specifically for use with you on Exif-compliant printers. THE USE OF NON-NIKON ELECTRONIC ACCESSORIES COULD DAMAGE YOUR CAMERA AND MAY VOID YOUR NIKON WARRANTY. vi The AF-Assist Illuminator LED The light-emitting diode (LED) used in the digital camera industry to the highest standards and includes complex electronic circuitry. Use Only Nikon Brand Electronic Accessories Your Nikon COOLPIX camera is functioning...

User Manual
Page 9
...: Using the Flash 24 Taking a Self-Portrait: Using the Self-Timer 26 Easy Close-ups: Macro Close-up Mode 27 Assist and Scene Modes 28 Framing Assist 29 e Scene Mode 34 More on Playback 40 Viewing Pictures on the Camera 40 Cropping Pictures 42 Voice Memos: Recording and Playback (E4100/E3200 only 43 Viewing Pictures on TV 44 Viewing Pictures on a Computer 45 Printing Pictures 48 Printing Via Direct USB Connection 52 Movies 56 W Recording Movies 56 Viewing Movies 60 vii Frame the Picture 18 Step 3 - Focus and Shoot...
...: Using the Flash 24 Taking a Self-Portrait: Using the Self-Timer 26 Easy Close-ups: Macro Close-up Mode 27 Assist and Scene Modes 28 Framing Assist 29 e Scene Mode 34 More on Playback 40 Viewing Pictures on the Camera 40 Cropping Pictures 42 Voice Memos: Recording and Playback (E4100/E3200 only 43 Viewing Pictures on TV 44 Viewing Pictures on a Computer 45 Printing Pictures 48 Printing Via Direct USB Connection 52 Movies 56 W Recording Movies 56 Viewing Movies 60 vii Frame the Picture 18 Step 3 - Focus and Shoot...

User Manual
Page 10
... Shooting Menu 61 Using the Shooting Menu 61 Image Mode 63 White Balance 65 Exp. +/- ...67 Continuous 68 Best Shot Selector 69 Color Options 70 The Playback Menu 71 Using the Playback Menu 71 Slide Show 72 Delete ...73 Protect ...75 Auto Transfer 76 Small Picture 78 Copy ...79 The Setup Menu 82 Using the Setup Menu 82 Welcome Screen 83 Date ...84 Monitor Settings 86 Date Imprint 87 Brightness ...89 Sound Settings 90 Blur Warning 91 Auto Off...92 Format memory/card 93 Language ...94 Video Mode 94 Reset All ...94 Battery...
... Shooting Menu 61 Using the Shooting Menu 61 Image Mode 63 White Balance 65 Exp. +/- ...67 Continuous 68 Best Shot Selector 69 Color Options 70 The Playback Menu 71 Using the Playback Menu 71 Slide Show 72 Delete ...73 Protect ...75 Auto Transfer 76 Small Picture 78 Copy ...79 The Setup Menu 82 Using the Setup Menu 82 Welcome Screen 83 Date ...84 Monitor Settings 86 Date Imprint 87 Brightness ...89 Sound Settings 90 Blur Warning 91 Auto Off...92 Format memory/card 93 Language ...94 Video Mode 94 Reset All ...94 Battery...

User Manual
Page 11
... format the memory, remove the memory card first. This icon marks tips, additional information you should read before use , and keep up-to-date with your Nikon digital camera. Internal Memory and SD Memory Card This camera uses both an internal memory and an SD memory card for contact information: http://nikonimaging.com/ 1 Additional information may find the information you should read before use to prevent damage to ongoing product support and education, continually-updated...
... format the memory, remove the memory card first. This icon marks tips, additional information you should read before use , and keep up-to-date with your Nikon digital camera. Internal Memory and SD Memory Card This camera uses both an internal memory and an SD memory card for contact information: http://nikonimaging.com/ 1 Additional information may find the information you should read before use to prevent damage to ongoing product support and education, continually-updated...

User Manual
Page 14
... 6 Internal memory/memory card indicator 16 7 Camera shake icon4 25 8 Time zone 84 9 "Date not set" icon5 14 10 Self-timer indicator 26 11 Date imprint indicator 87 1 Appears when taking pictures with Panorama Assist 2 Displayed when zoom buttons are pressed. 3 Appears when batteries are running low. 4 Appears at slow shutter speeds to warn that pictures may be blurred. 12 Date counter/ stored date number 88 13 Number of exposures remaining/ length of movie 16, 17, 56 14 Flash mode 24 15 Image mode 63...
... 6 Internal memory/memory card indicator 16 7 Camera shake icon4 25 8 Time zone 84 9 "Date not set" icon5 14 10 Self-timer indicator 26 11 Date imprint indicator 87 1 Appears when taking pictures with Panorama Assist 2 Displayed when zoom buttons are pressed. 3 Appears when batteries are running low. 4 Appears at slow shutter speeds to warn that pictures may be blurred. 12 Date counter/ stored date number 88 13 Number of exposures remaining/ length of movie 16, 17, 56 14 Flash mode 24 15 Image mode 63...

User Manual
Page 15
... or display indicators in the monitor, select the Monitor settings option in the setup menu. (Q 86) AUTO 19 Monitor shows current settings and view through lens Monitor shows view through lens only Monitor shows framing grid Monitor turns off 5 Monitor off while flash is charging (Q 20). Controlling the Monitor 9 Movie playback indicator 60 10 Voice memo icon2 43 11 Image mode 63 12 Movie indicator 57 13 Protect icon 75 14 Print-order icon 48 15 Transfer icon...
... or display indicators in the monitor, select the Monitor settings option in the setup menu. (Q 86) AUTO 19 Monitor shows current settings and view through lens Monitor shows view through lens only Monitor shows framing grid Monitor turns off 5 Monitor off while flash is charging (Q 20). Controlling the Monitor 9 Movie playback indicator 60 10 Voice memo icon2 43 11 Image mode 63 12 Movie indicator 57 13 Protect icon 75 14 Print-order icon 48 15 Transfer icon...
User Manual
Page 23
...; Press the power switch • Press the shutter-release button halfway • Press the x button to view the last picture taken • Press the MENU button to display the menu for three minutes after three minutes, and when pictures are being shown in the brightness of time before the time selected in standby mode, the power-on the batteries. While the camera is lit. Sleep Mode Turning sleep mode on lamp...
...; Press the power switch • Press the shutter-release button halfway • Press the x button to view the last picture taken • Press the MENU button to display the menu for three minutes after three minutes, and when pictures are being shown in the brightness of time before the time selected in standby mode, the power-on the batteries. While the camera is lit. Sleep Mode Turning sleep mode on lamp...

User Manual
Page 35
... the mode dial is used to check the results. More on the mode selected, the flash mode may change automatically when you choose a new shooting mode (Q 28-39). When the camera is zoomed all option in C (Beach/Snow), D (Sunset), I (Copy), J (Back light) and K (Panorama assist) modes. 25 era shake). An ISO icon will automatically be slightly mottled. When taking close-ups, play each picture back after shooting to restore the default setting (Q 94...
... the mode dial is used to check the results. More on the mode selected, the flash mode may change automatically when you choose a new shooting mode (Q 28-39). When the camera is zoomed all option in C (Beach/Snow), D (Sunset), I (Copy), J (Back light) and K (Panorama assist) modes. 25 era shake). An ISO icon will automatically be slightly mottled. When taking close-ups, play each picture back after shooting to restore the default setting (Q 94...

User Manual
Page 42
... the picture. Focus, exposure, and white balance are determined by holding the shutter-release button down , pictures are determined by first shot in each series. Number of shots that capture moving objects. j Sports While shutter-release button is held down . With E3200, camera records 3 shots when image mode is set to b Normal (2048), and with E2200, 6 shots when image mode is set to F Normal (2288). The assist menu lets you have no time to form a single picture. Camera focuses continuously...
... the picture. Focus, exposure, and white balance are determined by holding the shutter-release button down , pictures are determined by first shot in each series. Number of shots that capture moving objects. j Sports While shutter-release button is held down . With E3200, camera records 3 shots when image mode is set to b Normal (2048), and with E2200, 6 shots when image mode is set to F Normal (2288). The assist menu lets you have no time to form a single picture. Camera focuses continuously...

User Manual
Page 53
... original pictures, "SND_" for the current picture, [1] (voice memo icon) and . [1] (voice memo play voice memo. Press shutter-release button to copies), a four-digit file number copied from the associated picture, and the extension ".WAV" (e.g., "DSCN0015.WAV"). 43 Playback ends when voice memo ends or shutter-release button is released. Confirmation dialog will be recorded while shutter-release button is displayed on Playback Using the camera's microphone, you can also be adjusted using Sound settings > Volume option...
... original pictures, "SND_" for the current picture, [1] (voice memo icon) and . [1] (voice memo play voice memo. Press shutter-release button to copies), a four-digit file number copied from the associated picture, and the extension ".WAV" (e.g., "DSCN0015.WAV"). 43 Playback ends when voice memo ends or shutter-release button is released. Confirmation dialog will be recorded while shutter-release button is displayed on Playback Using the camera's microphone, you can also be adjusted using Sound settings > Volume option...

User Manual
Page 55
... can transfer (copy) pictures to your computer's operating system and the USB option selected in the camera setup menu. Windows 2000 Professional Windows Millennium Edition (Me) Windows 98 Second Edition (SE) Choose Mass Storage. ing table, select the appropriate option using : Operating system Camera a (V) PictureProject button* button Windows XP Home Edition Windows XP Professional Choose Mass Storage or PTP. SET-UP 1/5 Welcome screen Date Monitor settings SET-UP 4/5 Language USB Video mode USB PTP Mass Storage Pictures transferred using the USB item...
... can transfer (copy) pictures to your computer's operating system and the USB option selected in the camera setup menu. Windows 2000 Professional Windows Millennium Edition (Me) Windows 98 Second Edition (SE) Choose Mass Storage. ing table, select the appropriate option using : Operating system Camera a (V) PictureProject button* button Windows XP Home Edition Windows XP Professional Choose Mass Storage or PTP. SET-UP 1/5 Welcome screen Date Monitor settings SET-UP 4/5 Language USB Video mode USB PTP Mass Storage Pictures transferred using the USB item...

User Manual
Page 75
... setting is WHITE BALANCE 1/3 able to adapt to such changes in color, with the color of the light source. Cloudy Use when taking pictures under incandescent lighting. Daylight era's image sensor (CCD) according to suit lighting conditions. This process is known as a "white balance adjustment." • If you want to set white balance under unusual lighting conditions. Incandescent Use under overcast skies. Speedlight Use with Auto (M) or you cannot achieve the desired white balance with the flash. Digital cameras...
... setting is WHITE BALANCE 1/3 able to adapt to such changes in color, with the color of the light source. Cloudy Use when taking pictures under incandescent lighting. Daylight era's image sensor (CCD) according to suit lighting conditions. This process is known as a "white balance adjustment." • If you want to set white balance under unusual lighting conditions. Incandescent Use under overcast skies. Speedlight Use with Auto (M) or you cannot achieve the desired white balance with the flash. Digital cameras...

User Manual
Page 78
...-Shot 16 can not be selected when digital zoom is in the monitor. BSS (Q 69) is set to c Normal (1600). With E3200, camera records five pictures when image mode is set to F Normal (2288). Continuous Continuous Use the options in this menu to capture a fleeting expression on Camera Settings At settings other than Single, the flash (Q 24) turns off automatically and focus (Q 20), exposure (Q 67), and auto white balance (Q 65) for all the way, camera takes...
...-Shot 16 can not be selected when digital zoom is in the monitor. BSS (Q 69) is set to c Normal (1600). With E3200, camera records five pictures when image mode is set to F Normal (2288). Continuous Continuous Use the options in this menu to capture a fleeting expression on Camera Settings At settings other than Single, the flash (Q 24) turns off automatically and focus (Q 20), exposure (Q 67), and auto white balance (Q 65) for all the way, camera takes...

User Manual
Page 92
... Setup Menu The Setup Menu Using the Setup Menu The setup menu contains the following options: Option Welcome screen Date Monitor settings Date imprint Brightness Sound settings Blur warning Auto off Format memory/ card Language USB Video mode Reset all Battery type Firmware version Description Q Choose the welcome screen displayed when the camera is turned on. 83 Set the camera clock. 84-85 Hide or display the monitor indicators. 86 Imprint pictures with the date and/or time of recording. 87-88 Adjust monitor brightness. 89 Adjust volume of button, shutter and start-up sounds...
... Setup Menu The Setup Menu Using the Setup Menu The setup menu contains the following options: Option Welcome screen Date Monitor settings Date imprint Brightness Sound settings Blur warning Auto off Format memory/ card Language USB Video mode Reset all Battery type Firmware version Description Q Choose the welcome screen displayed when the camera is turned on. 83 Set the camera clock. 84-85 Hide or display the monitor indicators. 86 Imprint pictures with the date and/or time of recording. 87-88 Adjust monitor brightness. 89 Adjust volume of button, shutter and start-up sounds...

User Manual
Page 97
... displayed in the monitor during shooting. AUTO 19 When shooting with Off selected in the DATE IMPRINT menu. 87 At settings other than Off, a Date icon is recorded in the order selected in the DATE menu. With E4100, the continuous shooting function does not work when the date imprint option is set to the correct time and date. Image Mode Data imprinted at an Image mode setting of TV screen (640) may be used to imprint a date stamp on pictures. Print Set The Print set...
... displayed in the monitor during shooting. AUTO 19 When shooting with Off selected in the DATE IMPRINT menu. 87 At settings other than Off, a Date icon is recorded in the order selected in the DATE menu. With E4100, the continuous shooting function does not work when the date imprint option is set to the correct time and date. Image Mode Data imprinted at an Image mode setting of TV screen (640) may be used to imprint a date stamp on pictures. Print Set The Print set...

User Manual
Page 101
... display or hide the camera shake warning after you have just taken to be blurred. Blur Warning This option is used to delete it or not, select Yes to "On": C Continuous (Q 68), ] Multi-Shot 16 (Q 68), and D BSS (Q 69) modes, as well as j Sports Assist (Q 32), G Museum (Q 36), H Fireworks show (Q 37), and K Panorama assist (Q 38) of scene mode. No Yes The Setup Menu Shooting modes...
... display or hide the camera shake warning after you have just taken to be blurred. Blur Warning This option is used to delete it or not, select Yes to "On": C Continuous (Q 68), ] Multi-Shot 16 (Q 68), and D BSS (Q 69) modes, as well as j Sports Assist (Q 32), G Museum (Q 36), H Fireworks show (Q 37), and K Panorama assist (Q 38) of scene mode. No Yes The Setup Menu Shooting modes...

User Manual
Page 113
... the adapter, and turn the camera on solving the problems listed here. read • Monitor brightness needs adjustment. 89 • Monitor is caused by a strong external static charge. In most column for Monitor 86 in monitor settings option in the loss of any data not recorded to the memory or memory card at the time the problem occurred. Turn the camera off . 5 • USB cable is connected. - • AV/Video cable is connected...
... the adapter, and turn the camera on solving the problems listed here. read • Monitor brightness needs adjustment. 89 • Monitor is caused by a strong external static charge. In most column for Monitor 86 in monitor settings option in the loss of any data not recorded to the memory or memory card at the time the problem occurred. Turn the camera off . 5 • USB cable is connected. - • AV/Video cable is connected...

User Manual
Page 114
...; Green (AF) lamp flickers: camera unable to Standard color. 65 Technical Notes 104 release button is pressed • Camera is in playback mode. • Batteries are exhausted. • Red (!) lamp flickers: flash is charging. • Green (AF) lamp flickers: camera unable to focus. • Message "CARD IS NOT FORMATTED" appears in monitor: memory card is not formatted for use in your camera. • Message "OUT OF MEMORY" appears in monitor: insufficient memory to record picture at current Image mode setting...
...; Green (AF) lamp flickers: camera unable to Standard color. 65 Technical Notes 104 release button is pressed • Camera is in playback mode. • Batteries are exhausted. • Red (!) lamp flickers: flash is charging. • Green (AF) lamp flickers: camera unable to focus. • Message "CARD IS NOT FORMATTED" appears in monitor: memory card is not formatted for use in your camera. • Message "OUT OF MEMORY" appears in monitor: insufficient memory to record picture at current Image mode setting...
User Manual
Page 118
... Image mode ISO, 25 J JPEG, 23, 106 L Lamp, green (AF), 3, 7, 12, 20, 104 Lamp, red (!), 3, 12, 20, 104 Language, 14, 94 Language, choosing, 14 Lens, iii, 2, 99, 106 M Macro mode, 27, 30-33, 3538 Memory cards, ii, 2, 10-11, 106 approved, 97 capacity of, 16, 64 formatting, 11, 75, 93 insertion and removal of, 10-11 MENU button, 3 MH-70 battery charger, 97 MH-71 battery charger, 9, 97 Microphone, 2 Mode dial...
... Image mode ISO, 25 J JPEG, 23, 106 L Lamp, green (AF), 3, 7, 12, 20, 104 Lamp, red (!), 3, 12, 20, 104 Language, 14, 94 Language, choosing, 14 Lens, iii, 2, 99, 106 M Macro mode, 27, 30-33, 3538 Memory cards, ii, 2, 10-11, 106 approved, 97 capacity of, 16, 64 formatting, 11, 75, 93 insertion and removal of, 10-11 MENU button, 3 MH-70 battery charger, 97 MH-71 battery charger, 9, 97 Microphone, 2 Mode dial...
User Manual
Page 119
... Setup menu, 82-96 f (setup) mode, 6, 82-96 Shooting menu, 61-70 Shutter-release button, 2, 7 Shutter-release delay, see Video mode Number of exposures remain- timer Size, see Image mode Slide show, 71-72 Small pic, 71, 78 Smear, 98 Sound settings, 82, 90 Speaker, 2 Speedlight, see Flash Standby mode, 13, 92 Strap, camera, i, 2 Sunset, 28, 35 Support information, 1 T Telephoto, see Zoom Television, 44, 94 connecting to, 44 taking pictures for display on lamp, 2, 12-13, 16 Power switch, 2, 12-13 Printing pictures...
... Setup menu, 82-96 f (setup) mode, 6, 82-96 Shooting menu, 61-70 Shutter-release button, 2, 7 Shutter-release delay, see Video mode Number of exposures remain- timer Size, see Image mode Slide show, 71-72 Small pic, 71, 78 Smear, 98 Sound settings, 82, 90 Speaker, 2 Speedlight, see Flash Standby mode, 13, 92 Strap, camera, i, 2 Sunset, 28, 35 Support information, 1 T Telephoto, see Zoom Television, 44, 94 connecting to, 44 taking pictures for display on lamp, 2, 12-13, 16 Power switch, 2, 12-13 Printing pictures...


