
User Manual
Page 4
...Nikon for an extended period, the batteries may become hot. Avoid contact with product regulations. Particular care should be observed if photographing infants, when the flash should be taken to prevent infants from the monitor touching the skin or entering the eyes or mouth. Removing memory cards Memory cards... distributed should not be sure to remove the batteries when no less than one meter (39″) from the camera. Observe due caution when removing memory cards from the subject. Keep out of reach of children Particular care should be no charge remains. • When the...
...Nikon for an extended period, the batteries may become hot. Avoid contact with product regulations. Particular care should be observed if photographing infants, when the flash should be taken to prevent infants from the monitor touching the skin or entering the eyes or mouth. Removing memory cards Memory cards... distributed should not be sure to remove the batteries when no less than one meter (39″) from the camera. Observe due caution when removing memory cards from the subject. Keep out of reach of children Particular care should be no charge remains. • When the...

User Manual
Page 5
Notices/For Your Safety Cautions To ensure continued enjoyment of your Nikon product, observe the following precautions when storing or using or storing the camera. To prevent an accidental interruption of moisture. Avoid sudden changes in temperature Sudden changes in temperature, such as radio ...a cold day, can cause condensation inside the device. Handle the lens and all moving parts with the monitor, damage data stored on the memory card, or affect the product's internal circuitry. Do not drop The product may cause deterioration in the CCD image sensor, producing a white blur...
Notices/For Your Safety Cautions To ensure continued enjoyment of your Nikon product, observe the following precautions when storing or using or storing the camera. To prevent an accidental interruption of moisture. Avoid sudden changes in temperature Sudden changes in temperature, such as radio ...a cold day, can cause condensation inside the device. Handle the lens and all moving parts with the monitor, damage data stored on the memory card, or affect the product's internal circuitry. Do not drop The product may cause deterioration in the CCD image sensor, producing a white blur...

User Manual
Page 9
...up Mode 27 Assist and Scene Modes 28 Framing Assist 29 e Scene Mode 34 More on Playback 40 Viewing Pictures on the Camera 40 Cropping Pictures 42 Voice Memos: Recording and Playback (E4100/E3200 only 43 Viewing Pictures on TV 44 Viewing Pictures on a ...Your Safety i Cautions ...iii Notices ...iv Before You Begin 1 Introduction 1 Parts of the Camera 2 The Monitor 4 The Mode Dial 6 Navigating the Menus 7 The Shutter-Release Button 7 First Steps 8 Inserting Batteries 8 Inserting Memory Cards 10 Checking the Battery Level 12 Basic Setup 14 Basic Photography 16 Step 1 - Select ...
...up Mode 27 Assist and Scene Modes 28 Framing Assist 29 e Scene Mode 34 More on Playback 40 Viewing Pictures on the Camera 40 Cropping Pictures 42 Voice Memos: Recording and Playback (E4100/E3200 only 43 Viewing Pictures on TV 44 Viewing Pictures on a ...Your Safety i Cautions ...iii Notices ...iv Before You Begin 1 Introduction 1 Parts of the Camera 2 The Monitor 4 The Mode Dial 6 Navigating the Menus 7 The Shutter-Release Button 7 First Steps 8 Inserting Batteries 8 Inserting Memory Cards 10 Checking the Battery Level 12 Basic Setup 14 Basic Photography 16 Step 1 - Select ...

User Manual
Page 10
... Date Imprint 87 Brightness ...89 Sound Settings 90 Blur Warning 91 Auto Off...92 Format memory/card 93 Language ...94 Video Mode 94 Reset All ...94 Battery Type 96 Firmware Version 96 Technical Notes 97 Optional Accessories 97 Caring for Your Camera 98 Error Messages 100 Troubleshooting 103 Specifications 106 Index ...108 viii
... Date Imprint 87 Brightness ...89 Sound Settings 90 Blur Warning 91 Auto Off...92 Format memory/card 93 Language ...94 Video Mode 94 Reset All ...94 Battery Type 96 Firmware Version 96 Technical Notes 97 Optional Accessories 97 Caring for Your Camera 98 Error Messages 100 Troubleshooting 103 Specifications 106 Index ...108 viii

User Manual
Page 11
..., answers to format the memory, remove the memory card first. This manual has been written to your camera. This icon marks notes, information that more Q information is available on the card instead of a Nikon COOLPIX4100 (E4100)/COOLPIX3200 (E3200)/COOLPIX2200 (E2200) digital camera. Internal Memory and SD Memory Card This camera uses both an internal memory and an SD memory card for contact information: http://nikonimaging...
..., answers to format the memory, remove the memory card first. This manual has been written to your camera. This icon marks notes, information that more Q information is available on the card instead of a Nikon COOLPIX4100 (E4100)/COOLPIX3200 (E3200)/COOLPIX2200 (E2200) digital camera. Internal Memory and SD Memory Card This camera uses both an internal memory and an SD memory card for contact information: http://nikonimaging...
User Manual
Page 12
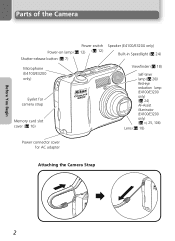
Before You Begin Parts of the Camera Power switch Power-on lamp (Q 12) (Q 12) Shutter-release button (Q 7) Speaker (E4100/E3200 only) Built-in Speedlight (Q 24) Microphone (E4100/E3200 only) Eyelet for camera strap Memory card slot cover (Q 10) Viewfinder (Q 18) Self-timer lamp (Q 26)/ Red-eye reduction lamp (E4100/E3200 only) (Q 24) AF-Assist illuminator (E4100/E3200 only) (Q vi, 25, 106) Lens (Q 18) Power connector cover for AC adapter Attaching the Camera Strap 2
Before You Begin Parts of the Camera Power switch Power-on lamp (Q 12) (Q 12) Shutter-release button (Q 7) Speaker (E4100/E3200 only) Built-in Speedlight (Q 24) Microphone (E4100/E3200 only) Eyelet for camera strap Memory card slot cover (Q 10) Viewfinder (Q 18) Self-timer lamp (Q 26)/ Red-eye reduction lamp (E4100/E3200 only) (Q 24) AF-Assist illuminator (E4100/E3200 only) (Q vi, 25, 106) Lens (Q 18) Power connector cover for AC adapter Attaching the Camera Strap 2

User Manual
Page 14
... AUTO 14 10 11 12 999 13 1 Shooting mode 16 2 AE-L1 38 3 Focus indicator 20 4 Zoom indicator2 18 5 Battery level indicator3 12 6 Internal memory/memory card indicator 16 7 Camera shake icon4 25 8 Time zone 84 9 "Date not set" icon5 14 10 Self-timer indicator 26 11 Date imprint indicator 87 1 Appears when taking... shooting mode . . . . . 68 19 Best Shot Selector (BSS 69 20 White balance 65 21 Color options 70 22 Macro close-up mode 27 5 Appears when camera clock has not been set. 6 Indicates that...
... AUTO 14 10 11 12 999 13 1 Shooting mode 16 2 AE-L1 38 3 Focus indicator 20 4 Zoom indicator2 18 5 Battery level indicator3 12 6 Internal memory/memory card indicator 16 7 Camera shake icon4 25 8 Time zone 84 9 "Date not set" icon5 14 10 Self-timer indicator 26 11 Date imprint indicator 87 1 Appears when taking... shooting mode . . . . . 68 19 Best Shot Selector (BSS 69 20 White balance 65 21 Color options 70 22 Macro close-up mode 27 5 Appears when camera clock has not been set. 6 Indicates that...

User Manual
Page 15
... Monitor Playback 17 2004.08.05 1 16 12:00 2 3 15 12 14 13 11 10 4 5 6 7 8 10 8 9 1 Current folder 23 2 File number and type 23 3 Internal memory/memory card indicator 16 4 Battery level indicator1 12 5 Volume indicator2 60 6 Voice memo recording guide2 . . .43 7 Voice memo playback guide2 . . . 43 8 Current frame number/total number of...
... Monitor Playback 17 2004.08.05 1 16 12:00 2 3 15 12 14 13 11 10 4 5 6 7 8 10 8 9 1 Current folder 23 2 File number and type 23 3 Internal memory/memory card indicator 16 4 Battery level indicator1 12 5 Volume indicator2 60 6 Voice memo recording guide2 . . .43 7 Voice memo playback guide2 . . . 43 8 Current frame number/total number of...
User Manual
Page 20
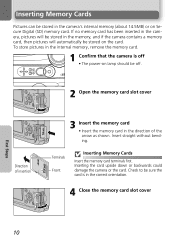
... card. Inserting Memory Cards Pictures can be sure the card is off . 2 Open the memory card slot cover Direction of insertion 3 Insert the memory card • Insert the memory card in the memory, and if the camera contains a memory card, then pictures will automatically be off • The power-on lamp should be stored on Secure Digital (SD) memory card. If no memory card has been inserted in the camera...
... card. Inserting Memory Cards Pictures can be sure the card is off . 2 Open the memory card slot cover Direction of insertion 3 Insert the memory card • Insert the memory card in the memory, and if the camera contains a memory card, then pictures will automatically be off • The power-on lamp should be stored on Secure Digital (SD) memory card. If no memory card has been inserted in the camera...

User Manual
Page 21
... or edited, and the card can not be formatted. Do not lock the card when taking, deleting, or editing pictures. For information on lamp is lit. Memory Cards • Use only Secure Digital (SD) memory cards. • Do not ...camera a (V) button. 11 First Steps Inserting Memory Cards Formatting Memory Cards Memory cards must be removed without loss of data when the camera is off . Do not open the memory card slot cover while the power-on lamp is off . Removing Memory Cards Memory cards can then be removed by hand. Open the memory card slot cover and press the memory card...
... or edited, and the card can not be formatted. Do not lock the card when taking, deleting, or editing pictures. For information on lamp is lit. Memory Cards • Use only Secure Digital (SD) memory cards. • Do not ...camera a (V) button. 11 First Steps Inserting Memory Cards Formatting Memory Cards Memory cards must be removed without loss of data when the camera is off . Do not open the memory card slot cover while the power-on lamp is off . Removing Memory Cards Memory cards can then be removed by hand. Open the memory card slot cover and press the memory card...
User Manual
Page 26
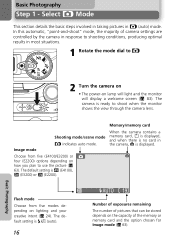
.... Basic Photography Step 1 - Select P Mode This section details the basic steps involved in taking pictures in the camera, } is displayed. The camera is F (E4100), b (E3200) or c (E2200). When the camera contains a memory card, / is displayed, and when there is !# (auto). 16 AUTO 19 Number of exposures remaining The number of pictures that can be stored...
.... Basic Photography Step 1 - Select P Mode This section details the basic steps involved in taking pictures in the camera, } is displayed. The camera is F (E4100), b (E3200) or c (E2200). When the camera contains a memory card, / is displayed, and when there is !# (auto). 16 AUTO 19 Number of exposures remaining The number of pictures that can be stored...

User Manual
Page 27
Step 1 - Select P Mode Number of Exposures Remaining If the number of exposures remaining is zero, the message "OUT OF MEMORY" will be taken until you: • choose a lower Image mode setting (Q 63) • insert a new memory card (Q 10) • delete some pictures (Q 22-23, 73-74) 17 Basic Photography No further pictures can be displayed in the monitor.
Step 1 - Select P Mode Number of Exposures Remaining If the number of exposures remaining is zero, the message "OUT OF MEMORY" will be taken until you: • choose a lower Image mode setting (Q 63) • insert a new memory card (Q 10) • delete some pictures (Q 22-23, 73-74) 17 Basic Photography No further pictures can be displayed in the monitor.
User Manual
Page 31
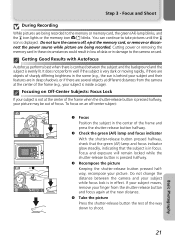
.... Basic Photography 21 You can continue to the memory or memory card, the green (AF) lamp blinks, and the < icon lights or the memory icon }// blinks. Getting Good Results with Autofocus Autofocus performs best when there is contrast between the camera and your subject is behind your subject and their...halfway. Focusing on an off , eject the memory card, or remove or disconnect the power source while picture are being recorded. To focus on Off-Center Subjects: Focus Lock If your picture may be out of the way down to the camera or card. o Check the green (AF) lamp ...
.... Basic Photography 21 You can continue to the memory or memory card, the green (AF) lamp blinks, and the < icon lights or the memory icon }// blinks. Getting Good Results with Autofocus Autofocus performs best when there is contrast between the camera and your subject is behind your subject and their...halfway. Focusing on an off , eject the memory card, or remove or disconnect the power source while picture are being recorded. To focus on Off-Center Subjects: Focus Lock If your picture may be out of the way down to the camera or card. o Check the green (AF) lamp ...
User Manual
Page 33
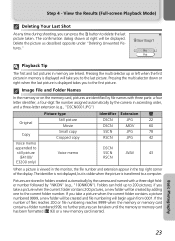
...memory is displayed will take a picture when the current folder contains a picture numbered 9999, a new folder will be created by "NIKON" (e.g., "100NIKON"). No Yes Playback Tip The first and last pictures in folders created automatically by the camera and named with three parts: a four letter identifier, a four-digit...up or left when the first picture in the top right corner of files reaches 200 or file numbering reaches 9999 when the memory or memory card contains a folder numbered 999, no further pictures can press the u button to a computer. If the number of the display...
...memory is displayed will take a picture when the current folder contains a picture numbered 9999, a new folder will be created by "NIKON" (e.g., "100NIKON"). No Yes Playback Tip The first and last pictures in folders created automatically by the camera and named with three parts: a four letter identifier, a four-digit...up or left when the first picture in the top right corner of files reaches 200 or file numbering reaches 9999 when the memory or memory card contains a folder numbered 999, no further pictures can press the u button to a computer. If the number of the display...
User Manual
Page 45
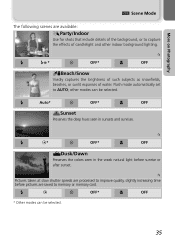
Flash mode automatically set to memory or memory card. ! $ Y OFF* & OFF * Other modes can be selected. 35 other indoor background lighting. ! %* Y OFF* œ & OFF CBeach/Snow Vividly captures the brightness of such subjects as ...
Flash mode automatically set to memory or memory card. ! $ Y OFF* & OFF * Other modes can be selected. 35 other indoor background lighting. ! %* Y OFF* œ & OFF CBeach/Snow Vividly captures the brightness of such subjects as ...
User Manual
Page 46
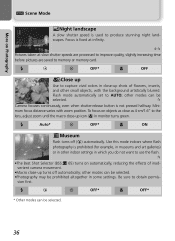
...4 cm/1.6" to produce stunning night landscapes. Auto* Y OFF* & ON GMuseum Flash turns off automatically; other modes can be selected. œ Camera focuses continuously, even when shutter-release button is not pressed halfway. other modes can be prohibited altogether in some settings. Mini- sion first. !.... œœ Pictures taken at slow shutter speeds are processed to improve quality, slightly increasing time before pictures are saved to memory or memory card. ! $ Y OFF* & OFF AClose up Use to capture vivid colors in close-up shots of flowers, insects, and...
...4 cm/1.6" to produce stunning night landscapes. Auto* Y OFF* & ON GMuseum Flash turns off automatically; other modes can be selected. œ Camera focuses continuously, even when shutter-release button is not pressed halfway. other modes can be prohibited altogether in some settings. Mini- sion first. !.... œœ Pictures taken at slow shutter speeds are processed to improve quality, slightly increasing time before pictures are saved to memory or memory card. ! $ Y OFF* & OFF AClose up Use to capture vivid colors in close-up shots of flowers, insects, and...

User Manual
Page 50
... highlight option, press Erase 1 image ? More on Playback More on Playback Viewing Pictures on the Camera Viewing Multiple Pictures: Thumbnail Playback Pressing the l (W) button in full-screen playback displays the pictures in the memory or on the memory card in " from nine thumbnails to four-thumbnail view, or, when four thumbnails are displayed: 1 2 3 4 To...
... highlight option, press Erase 1 image ? More on Playback More on Playback Viewing Pictures on the Camera Viewing Multiple Pictures: Thumbnail Playback Pressing the l (W) button in full-screen playback displays the pictures in the memory or on the memory card in " from nine thumbnails to four-thumbnail view, or, when four thumbnails are displayed: 1 2 3 4 To...

User Manual
Page 52
...600 × 1,200, 1,280 × 960, 1,024 × 768, 640 × 480, 320 × 240, or 160 × 120 pixels in the memory or on the memory card with the same recording date and time as the original. • Resized copies and cropped copies can not be possible to transfer it to...(compression ratio 1 : 8). Cropping Pictures This option lets you crop part of a picture and save it as a separate file. 1 X4.0 2 X4.0 More on a different digital camera, the picture may not be displayed or it may not be cropped. • If a cropped copy created using the E4100/E3200/E2200 is displayed in...
...600 × 1,200, 1,280 × 960, 1,024 × 768, 640 × 480, 320 × 240, or 160 × 120 pixels in the memory or on the memory card with the same recording date and time as the original. • Resized copies and cropped copies can not be possible to transfer it to...(compression ratio 1 : 8). Cropping Pictures This option lets you crop part of a picture and save it as a separate file. 1 X4.0 2 X4.0 More on a different digital camera, the picture may not be displayed or it may not be cropped. • If a cropped copy created using the E4100/E3200/E2200 is displayed in...

User Manual
Page 55
... Computer Using the UC-E6 USB cable and PictureProject software provided with your camera, you can not be copied from the camera memory and Mass Storage is selected for the USB option • When the memory card write-protect switch is Mass Storage. Unlock by : • Pressing the... a (V) button on the camera (Q 76) • Clicking the button in PictureProject Which method you will need to transfer pictures in the camera setup menu. Use the PictureProject ...
... Computer Using the UC-E6 USB cable and PictureProject software provided with your camera, you can not be copied from the camera memory and Mass Storage is selected for the USB option • When the memory card write-protect switch is Mass Storage. Unlock by : • Pressing the... a (V) button on the camera (Q 76) • Clicking the button in PictureProject Which method you will need to transfer pictures in the camera setup menu. Use the PictureProject ...
User Manual
Page 58
...order. • By a printer that supports PictBridge (Q 52) Connect the camera to a printer that supports PictBridge to print pictures. If a print order has been created, the printer or photo lab must be printed by inserting a memory card containing pictures into a printer or having prints made at a photo lab ...Pictures can be copied to the memory card (Q 79). They must support DPOF. Print order data can be printed in the same way as follows. • By printer or at a digital photo lab. Pictures stored in the playback menu, you can specify the...
...order. • By a printer that supports PictBridge (Q 52) Connect the camera to a printer that supports PictBridge to print pictures. If a print order has been created, the printer or photo lab must be printed by inserting a memory card containing pictures into a printer or having prints made at a photo lab ...Pictures can be copied to the memory card (Q 79). They must support DPOF. Print order data can be printed in the same way as follows. • By printer or at a digital photo lab. Pictures stored in the playback menu, you can specify the...

