FS726T User Manual
Page 12
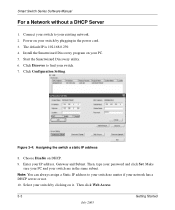
... default IP is 192.168.0.239. 4. Start the Smartwizard Discovery utility. 6. Figure 3-4: Assigning the switch a static IP address 8. Note: You can always assign a Static IP address to your switch no matter if your PC. 5. Install the Smartwizard Discovery program on it. Click Configuration Setting. Select your switch...Getting Started July 2005 Click Discover to your switch are in the power cord. 3. Make sure your PC and your existing network. 2. Connect your switch to find your IP address, Gateway and Subnet. Then, type your switch by clicking on your network has a DHCP...
... default IP is 192.168.0.239. 4. Start the Smartwizard Discovery utility. 6. Figure 3-4: Assigning the switch a static IP address 8. Note: You can always assign a Static IP address to your switch no matter if your PC. 5. Install the Smartwizard Discovery program on it. Click Configuration Setting. Select your switch...Getting Started July 2005 Click Discover to your switch are in the power cord. 3. Make sure your PC and your existing network. 2. Connect your switch to find your IP address, Gateway and Subnet. Then, type your switch by clicking on your network has a DHCP...
FS726T User Manual
Page 16
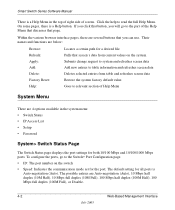
...set for the port. If you click that screen's data from table and refreshes screen data Restore the system factory default value. Pulls that button, you can use. The default setting for a desired file. The possible entries are 4 options available in the top of right side of Help...Interface July 2005 Goes to read the full Help Menu. Smart Switch Series Software Manual There is a Help Menu in the system menu: • Switch Status • IP Access List • Setup • Password System> Switch Status Page The Switch Status page displays the port settings for both 10/100 Mbps ...
...set for the port. If you click that screen's data from table and refreshes screen data Restore the system factory default value. Pulls that button, you can use. The default setting for a desired file. The possible entries are 4 options available in the top of right side of Help...Interface July 2005 Goes to read the full Help Menu. Smart Switch Series Software Manual There is a Help Menu in the system menu: • Switch Status • IP Access List • Setup • Password System> Switch Status Page The Switch Status page displays the port settings for both 10/100 Mbps ...

FS726T User Manual
Page 17
... Name and Location Name Web-Based Management Interface 4-3 July 2005 Make sure that are using VLAN, users can only be defined for the port. The default duration is all host IP addresses allowed. Smart Switch Series Software Manual • Flow Control: Indicates whether Flow Control support is all groups disabled. The...
... Name and Location Name Web-Based Management Interface 4-3 July 2005 Make sure that are using VLAN, users can only be defined for the port. The default duration is all host IP addresses allowed. Smart Switch Series Software Manual • Flow Control: Indicates whether Flow Control support is all groups disabled. The...
FS726T User Manual
Page 18
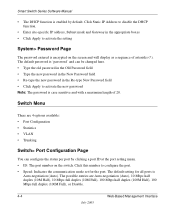
... as a sequence of 20. Click this number to activate the new password Note: The password is Auto-negotiation (Auto). The default setting for the port. Switch Menu There are Auto-negotiation (Auto), 10 Mbps half duplex (10M Half), 10 Mbps full duplex (10M Full), 100 Mbps half...100M Full), or Disable. 4-4 Web-Based Management Interface July 2005 Smart Switch Series Software Manual • The DHCP function is encrypted on the switch. Click Static IP Address to disable the DHCP function. • Enter site-specific IP address, Subnet mask and Gateway in the Re-type New Password field...
... as a sequence of 20. Click this number to activate the new password Note: The password is Auto-negotiation (Auto). The default setting for the port. Switch Menu There are Auto-negotiation (Auto), 10 Mbps half duplex (10M Half), 10 Mbps full duplex (10M Full), 100 Mbps half...100M Full), or Disable. 4-4 Web-Based Management Interface July 2005 Smart Switch Series Software Manual • The DHCP function is encrypted on the switch. Click Static IP Address to disable the DHCP function. • Enter site-specific IP address, Subnet mask and Gateway in the Re-type New Password field...
FS726T User Manual
Page 45
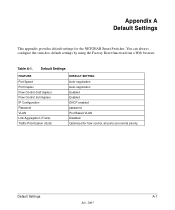
... Duplex Flow Control (half duplex) Flow Control (full duplex) IP Configuration Password VLAN Link Aggregation (Trunk) Traffic Prioritization (QoS) DEFAULT SETTING Auto-negotiation Auto-negotiation Enabled Enabled DHCP enabled password Port-Based VLAN Disabled Optimized for the NETGEAR Smart Switches. Appendix A Default Settings This appendix provides default settings for flow control, all ports set normal priority...
... Duplex Flow Control (half duplex) Flow Control (full duplex) IP Configuration Password VLAN Link Aggregation (Trunk) Traffic Prioritization (QoS) DEFAULT SETTING Auto-negotiation Auto-negotiation Enabled Enabled DHCP enabled password Port-Based VLAN Disabled Optimized for the NETGEAR Smart Switches. Appendix A Default Settings This appendix provides default settings for flow control, all ports set normal priority...
FS726T User Manual
Page 49
...Inbound Non-unicast Packet rate 4-5 Inbound Non-unicast Packets 4-6 Inbound Octet Rate 4-5 Inbound Octets 4-6 Inbound Unicast Packet Rate 4-5 Inbound Unicast Packets 4-6 IP Configuration 3-8, 4-13 L Last Saved option 3-19, 4-29 M MAC 4-21 MAC > Address Aging 4-38 MAC Address Manager 3-25 MAC Address Table... 4-20 Port Trunking 4-23 Primary VLAN 4-33 Priority 3-25, 4-37 Product updates 1-2 R RADIUS 4-20 Rate/Duplex field 3-9 Refresh Rate 4-8 Restore Factory Defaults 4-17 RS-232 serial port 2-1 S Save Configuration 4-16 Security 3-12 Set-Up 3-7 Set-Up> GBIC 3-10 SNMP 1-3, 3-29, 4-40 SNMP> Community...
...Inbound Non-unicast Packet rate 4-5 Inbound Non-unicast Packets 4-6 Inbound Octet Rate 4-5 Inbound Octets 4-6 Inbound Unicast Packet Rate 4-5 Inbound Unicast Packets 4-6 IP Configuration 3-8, 4-13 L Last Saved option 3-19, 4-29 M MAC 4-21 MAC > Address Aging 4-38 MAC Address Manager 3-25 MAC Address Table... 4-20 Port Trunking 4-23 Primary VLAN 4-33 Priority 3-25, 4-37 Product updates 1-2 R RADIUS 4-20 Rate/Duplex field 3-9 Refresh Rate 4-8 Restore Factory Defaults 4-17 RS-232 serial port 2-1 S Save Configuration 4-16 Security 3-12 Set-Up 3-7 Set-Up> GBIC 3-10 SNMP 1-3, 3-29, 4-40 SNMP> Community...

GS716Tv2/GS724Tv3 Hardware manual
Page 22
GS716T/GS724T Hardware Installation Guide Step 7: Managing the Switch using a Web Browser or the PC Utility The NETGEAR Smart Switch contains software for the switch to work. After powering up , there is a default IP address already configured on the Smart Switch Resource CD. The default IP address is not required for viewing, changing, and monitoring the way it works. Note: When...
GS716T/GS724T Hardware Installation Guide Step 7: Managing the Switch using a Web Browser or the PC Utility The NETGEAR Smart Switch contains software for the switch to work. After powering up , there is a default IP address already configured on the Smart Switch Resource CD. The default IP address is not required for viewing, changing, and monitoring the way it works. Note: When...
GS716Tv2/GS724Tv3 Hardware manual
Page 29
...-Pair 1-2 Checking the Installation 4-15 Class of Service 1-1 Combo Port 2-9 Combo Ports 1-2 Connecting Devices to the Switch 4-16 Copper 1-1 Crossover 2-8 D Default IP Address 4-18 Default Reset Button 2-5, 2-6 Device Hardware Interfaces 2-8 Duplex Mode 2-8 E Example of Desktop Switching 3-11 F Factory Default Button 2-9 Factory Defaults 2-5 Fiber Connectivity 1-1 Flat Surface 4-14 Full-duplex 1-2 G GBIC 1-2, 2-9 Gigabit Ports 1-1 H High-speed Servers 1-1 Hz 2-6, 2-7 v1...
...-Pair 1-2 Checking the Installation 4-15 Class of Service 1-1 Combo Port 2-9 Combo Ports 1-2 Connecting Devices to the Switch 4-16 Copper 1-1 Crossover 2-8 D Default IP Address 4-18 Default Reset Button 2-5, 2-6 Device Hardware Interfaces 2-8 Duplex Mode 2-8 E Example of Desktop Switching 3-11 F Factory Default Button 2-9 Factory Defaults 2-5 Fiber Connectivity 1-1 Flat Surface 4-14 Full-duplex 1-2 G GBIC 1-2, 2-9 Gigabit Ports 1-1 H High-speed Servers 1-1 Hz 2-6, 2-7 v1...

