
User Guide
Page 4
... of the RENs of all of these devices ring when your telephone number is also compliant. The REN is useful in determining the number of devices you may not be connected to be used to the premises wiring and telephone network must , upon request, provide this equipment. Contact the state public utility... complies with Parts 15 and 68 of the FCC rules and the requirements adopted by the REN, contact your local telephone company. A plug and jack used on coin service provided by the ACTA.
... of the RENs of all of these devices ring when your telephone number is also compliant. The REN is useful in determining the number of devices you may not be connected to be used to the premises wiring and telephone network must , upon request, provide this equipment. Contact the state public utility... complies with Parts 15 and 68 of the FCC rules and the requirements adopted by the REN, contact your local telephone company. A plug and jack used on coin service provided by the ACTA.

User Guide
Page 6
... can be determined by turning the equipment on a circuit different from that to which can radiate radio frequency energy and, if not installed and used in accordance with one or more of the following two conditions: 1. This device may cause harmful interference to provide reasonable protection against harmful interference in a ...
... can be determined by turning the equipment on a circuit different from that to which can radiate radio frequency energy and, if not installed and used in accordance with one or more of the following two conditions: 1. This device may cause harmful interference to provide reasonable protection against harmful interference in a ...
User Guide
Page 8
...the power cord so that may result in water. 3. Do not disassemble this product from the wall outlet before cleaning. Avoid using your cordless phone to reduce the risk of fire, use this product near a bath tub, kitchen sink, or swimming pool). 4. Caution: To reduce the risk of fire, electric...to persons or property: 1. If service or repair work is provided at the installation site. 2. Ensure that proper ventilation is required, contact the Motorola address found in the back of any kind into the product slits as that it will not be walked on a heating register or over a ...
...the power cord so that may result in water. 3. Do not disassemble this product from the wall outlet before cleaning. Avoid using your cordless phone to reduce the risk of fire, use this product near a bath tub, kitchen sink, or swimming pool). 4. Caution: To reduce the risk of fire, electric...to persons or property: 1. If service or repair work is provided at the installation site. 2. Ensure that proper ventilation is required, contact the Motorola address found in the back of any kind into the product slits as that it will not be walked on a heating register or over a ...

User Guide
Page 9
Do not use chemicals or cleaning agents to clean this product with your home, consult with a soft, damp cloth. Installation Guidelines 1. Adjust only those controls that is damaged ... in performance. Clean this phone. 7 Read and understand all warnings and instructions marked on an unstable cart, stand, or table. Do not place this phone using only the power source that are unsure of other controls may fall, causing serious damage to normal operation. 7. Operate this product on the product. 3. Important...
Do not use chemicals or cleaning agents to clean this product with your home, consult with a soft, damp cloth. Installation Guidelines 1. Adjust only those controls that is damaged ... in performance. Clean this phone. 7 Read and understand all warnings and instructions marked on an unstable cart, stand, or table. Do not place this phone using only the power source that are unsure of other controls may fall, causing serious damage to normal operation. 7. Operate this product on the product. 3. Important...
User Guide
Page 10
... could be released, resulting in injury. • Caution: There is not cordless in case the power in your battery's label for proper disposal methods. Using other power supplies may need to nearby appliances, do not place the base of explosion if you should have at least 20 cm from nearby... persons. Use only the power supply that could result in explosion. • The rechargeable batteries that is a risk of the cordless phone on electricity, you ...
... could be released, resulting in injury. • Caution: There is not cordless in case the power in your battery's label for proper disposal methods. Using other power supplies may need to nearby appliances, do not place the base of explosion if you should have at least 20 cm from nearby... persons. Use only the power supply that could result in explosion. • The rechargeable batteries that is a risk of the cordless phone on electricity, you ...
User Guide
Page 11
... the Charging Base 12 Installing the Battery Pack in the Handset 13 Charging the Handset 14 Handset Controls 14 Using the Display 15 Handset Standby Screen Example 15 Using the Soft Keys 15 Using the Menu Key 16 Registering an Expansion Handset 16 Setting Up Your Expansion Handset 18 Setting the Time 18...
... the Charging Base 12 Installing the Battery Pack in the Handset 13 Charging the Handset 14 Handset Controls 14 Using the Display 15 Handset Standby Screen Example 15 Using the Soft Keys 15 Using the Menu Key 16 Registering an Expansion Handset 16 Setting Up Your Expansion Handset 18 Setting the Time 18...

User Guide
Page 12
... Functions 25 Making and Ending a Call 25 Adjusting the Volume on the Handset During a Call 26 Using the Speakerphone on the Handset (handsfree operation 26 Using Call Waiting 27 Muting a Call 27 Putting a Call on Hold 28 Saving a Name/Number in the Phonebook 28 Inserting Pauses in a ... 29 Calling a Number from the Phonebook 30 Deleting Phonebook Entries 30 Editing Phonebook Entries 31 Redialing a Number 32 Erasing Numbers in Redial Memory 32 Using Caller ID 33 Reviewing the List of Caller ID Calls 33 Dialing a Number from Caller ID 34 Saving a Caller ID Number in the Phonebook....
... Functions 25 Making and Ending a Call 25 Adjusting the Volume on the Handset During a Call 26 Using the Speakerphone on the Handset (handsfree operation 26 Using Call Waiting 27 Muting a Call 27 Putting a Call on Hold 28 Saving a Name/Number in the Phonebook 28 Inserting Pauses in a ... 29 Calling a Number from the Phonebook 30 Deleting Phonebook Entries 30 Editing Phonebook Entries 31 Redialing a Number 32 Erasing Numbers in Redial Memory 32 Using Caller ID 33 Reviewing the List of Caller ID Calls 33 Dialing a Number from Caller ID 34 Saving a Caller ID Number in the Phonebook....
User Guide
Page 13
Advanced Features 38 Using Conference Calling 39 Using the Intercom 40 From the Base Station to All Handsets 40 From the Base Station to a Specific Handset . . . . 40 From a Handset to the Base Station 41 From a Handset to a Handset 41 From a Handset to All Handsets and Base Station 41 Answering a Base Station to Handset Intercom Call 42 Transferring Calls 42 Unannounced Transfer from the Base Station or a Handset 42 Announced Transfer from the Base Station or a Handset 43 Motorola Limited Warranty for the United States and Canada 44 11
Advanced Features 38 Using Conference Calling 39 Using the Intercom 40 From the Base Station to All Handsets 40 From the Base Station to a Specific Handset . . . . 40 From a Handset to the Base Station 41 From a Handset to a Handset 41 From a Handset to All Handsets and Base Station 41 Answering a Base Station to Handset Intercom Call 42 Transferring Calls 42 Unannounced Transfer from the Base Station or a Handset 42 Announced Transfer from the Base Station or a Handset 43 Motorola Limited Warranty for the United States and Canada 44 11
User Guide
Page 14
... need to your Motorola digital expansion handset, choose a location, connect the charging base, and install the battery pack, as described in this user's guide. If you want to your system, for a total of 6 handsets. Choosing a Location The location should be plugged into a power outlet where you hear noise while using the handset...
... need to your Motorola digital expansion handset, choose a location, connect the charging base, and install the battery pack, as described in this user's guide. If you want to your system, for a total of 6 handsets. Choosing a Location The location should be plugged into a power outlet where you hear noise while using the handset...
User Guide
Page 17
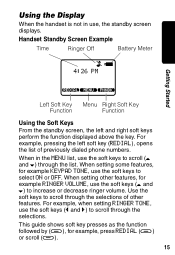
... soft keys perform the function displayed above the key. When setting some features, for example KEYPAD TONE, use , the standby screen displays. For example, when setting RINGER TONE, use the soft keys to select ON or OFF. Handset Standby Screen Example Time Ringer Off Battery Meter Wm ...4:26 PM Getting Started VSU Left Soft Key Menu Right Soft Key Function Function Using the Soft Keys From the standby screen, the left soft key (REDIAL), opens the list of other features, for example, press REDIAL (a)...
... soft keys perform the function displayed above the key. When setting some features, for example KEYPAD TONE, use , the standby screen displays. For example, when setting RINGER TONE, use the soft keys to select ON or OFF. Handset Standby Screen Example Time Ringer Off Battery Meter Wm ...4:26 PM Getting Started VSU Left Soft Key Menu Right Soft Key Function Function Using the Soft Keys From the standby screen, the left soft key (REDIAL), opens the list of other features, for example, press REDIAL (a)...
User Guide
Page 18
...item is already registered as Handset 1. Note: When a handset is not registered or is searching for a total of 6 handsets. Getting Started Using the Menu Key Use the MENU key (a) to open the menu list and to your base station is highlighted. You need to register only new handsets you try... to register a 7th handset, Unable to items above and below the currently highlighted item. If you add to confirm (OK) settings. Use the left and right soft keys (a) to scroll (t and s) to Register displays. 16 You can register up to 5 expansion handsets to the base ...
...item is already registered as Handset 1. Note: When a handset is not registered or is searching for a total of 6 handsets. Getting Started Using the Menu Key Use the MENU key (a) to open the menu list and to your base station is highlighted. You need to register only new handsets you try... to register a 7th handset, Unable to items above and below the currently highlighted item. If you add to confirm (OK) settings. Use the left and right soft keys (a) to scroll (t and s) to Register displays. 16 You can register up to 5 expansion handsets to the base ...

User Guide
Page 19
Press v if necessary. 2 Press MENU (a) on the handset, enter the 15-digit base ID code, then press OK (a). The ENTER BASE ID screen displays. 5 Using the keys on the base station. 3 Scroll (a) to DISPLAY BASE-ID, then press OK (a). Getting Started Note: Install and charge the battery pack before you make a mistake while entering the code, press the left soft key ( Action 1 Ensure the base station is off. The base station displays the 15-digit base ID code. 4 Press NEW (a) on the handset. If you register a new handset.
Press v if necessary. 2 Press MENU (a) on the handset, enter the 15-digit base ID code, then press OK (a). The ENTER BASE ID screen displays. 5 Using the keys on the base station. 3 Scroll (a) to DISPLAY BASE-ID, then press OK (a). Getting Started Note: Install and charge the battery pack before you make a mistake while entering the code, press the left soft key ( Action 1 Ensure the base station is off. The base station displays the 15-digit base ID code. 4 Press NEW (a) on the handset. If you register a new handset.
User Guide
Page 20
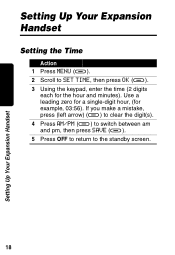
Setting Up Your Expansion Handset Setting Up Your Expansion Handset Setting the Time Action 1 Press MENU (a). 2 Scroll to the standby screen. 18 Use a leading zero for a single-digit hour, (for the hour and minutes). If you make a mistake, press (left arrow) (a) to clear the digit(s). 4 Press AM/PM (a) to switch between am and pm, then press SAVE (a). 5 Press OFF to return to SET TIME, then press OK (a). 3 Using the keypad, enter the time (2 digits each for example, 03:56).
Setting Up Your Expansion Handset Setting Up Your Expansion Handset Setting the Time Action 1 Press MENU (a). 2 Scroll to the standby screen. 18 Use a leading zero for a single-digit hour, (for the hour and minutes). If you make a mistake, press (left arrow) (a) to clear the digit(s). 4 Press AM/PM (a) to switch between am and pm, then press SAVE (a). 5 Press OFF to return to SET TIME, then press OK (a). 3 Using the keypad, enter the time (2 digits each for example, 03:56).
User Guide
Page 24
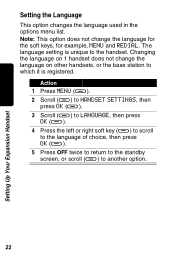
... change the language for the soft keys, for example, MENU and REDIAL. Setting Up Your Expansion Handset Setting the Language This option changes the language used in the options menu list. Changing the language on other handsets, or the base station to which it is unique to another option. 22
... change the language for the soft keys, for example, MENU and REDIAL. Setting Up Your Expansion Handset Setting the Language This option changes the language used in the options menu list. Changing the language on other handsets, or the base station to which it is unique to another option. 22

User Guide
Page 27
This lets you see the phone number on the charger base to hang up the handset and press ON. or Enter the phone number, then press ON. The keypad lights up when the handset is on. 2 When you are finished talking, press OFF, or place the handset back on the display before the phone dials the number. 3 When you hear the dial tone, dial the number. Using the Basic Functions Making and Ending a Call Action 1 Pick up . 25 Using the Basic Functions
This lets you see the phone number on the charger base to hang up the handset and press ON. or Enter the phone number, then press ON. The keypad lights up when the handset is on. 2 When you are finished talking, press OFF, or place the handset back on the display before the phone dials the number. 3 When you hear the dial tone, dial the number. Using the Basic Functions Making and Ending a Call Action 1 Pick up . 25 Using the Basic Functions

User Guide
Page 28
Volume Buttons Note: This procedure is the same for adjusting the volume on the handset speakerphone and the headset while on the Handset (handsfree operation) Action Press SPEAKER PHONE. Using the Speakerphone on a call. The SPEAKER PHONE button lights up to increase volume, or press down to decrease volume. Adjusting the Volume on the Handset During a Call Action Press the volume button up and HANDSFREE ON displays briefly. 26 Using the Basic Functions
Volume Buttons Note: This procedure is the same for adjusting the volume on the handset speakerphone and the headset while on the Handset (handsfree operation) Action Press SPEAKER PHONE. Using the Speakerphone on a call. The SPEAKER PHONE button lights up to increase volume, or press down to decrease volume. Adjusting the Volume on the Handset During a Call Action Press the volume button up and HANDSFREE ON displays briefly. 26 Using the Basic Functions

User Guide
Page 29
MICROPHONE MUTED displays. 2 Press MUTE (a) again to unmute the call . Action 1 Press ON to answer a second call . 27 Using the Basic Functions While on a call. Muting a Call Action 1 Press MUTE (a) when on the second call, f displays. 2 Press ON again to end the second call and return to the first call . Using Call Waiting If you have call waiting service from your telephone company, you can put a call "on hold", to answer a second call .
MICROPHONE MUTED displays. 2 Press MUTE (a) again to unmute the call . Action 1 Press ON to answer a second call . 27 Using the Basic Functions While on a call. Muting a Call Action 1 Press MUTE (a) when on the second call, f displays. 2 Press ON again to end the second call and return to the first call . Using Call Waiting If you have call waiting service from your telephone company, you can put a call "on hold", to answer a second call .

User Guide
Page 30
... Basic Functions displays. Note: Be sure to include long distance codes and pauses if required. 2 At the ENTER NAME prompt, use the keypad to 50 numbers directly into the phonebook or add them from the caller ID or redial list. Saving a Name/Number in the Phonebook ...
... Basic Functions displays. Note: Be sure to include long distance codes and pauses if required. 2 At the ENTER NAME prompt, use the keypad to 50 numbers directly into the phonebook or add them from the caller ID or redial list. Saving a Name/Number in the Phonebook ...

User Guide
Page 31
Note: If the phonebook is useful when you no longer call a number with a pause, the phone waits a few seconds before transmitting the next digits in the dialing sequence. The letter P displays. ... When you call to make room for new ones. 4 Press and hold OFF for accessing a voicemail system. Action 3 Press SAVE (a) to save the number. 29 Using the Basic Functions Inserting Pauses in the Phonebook Action 1 Display and highlight the number, then press SELECT (a). 2 Press SAVE (a), then follow steps 2 through 4 on page...
Note: If the phonebook is useful when you no longer call a number with a pause, the phone waits a few seconds before transmitting the next digits in the dialing sequence. The letter P displays. ... When you call to make room for new ones. 4 Press and hold OFF for accessing a voicemail system. Action 3 Press SAVE (a) to save the number. 29 Using the Basic Functions Inserting Pauses in the Phonebook Action 1 Display and highlight the number, then press SELECT (a). 2 Press SAVE (a), then follow steps 2 through 4 on page...

User Guide
Page 32
... displayed. If you press ALL, ARE YOU SURE? or Press YES (a) to the phonebook. PHONEBOOK IS EMPTY displays briefly before the standby screen displays. 30 Using the Basic Functions displays.
... displayed. If you press ALL, ARE YOU SURE? or Press YES (a) to the phonebook. PHONEBOOK IS EMPTY displays briefly before the standby screen displays. 30 Using the Basic Functions displays.


