
User Guide
Page 5
... and requirements in some cases, the telecommunications company's inside wiring associated with this equipment is called. The plug and jack used to connect this cordless phone, you may be extended by the certification/registration number found on the label on a Declaration of Conformity and that is confirmed by means of a certified...
... and requirements in some cases, the telecommunications company's inside wiring associated with this equipment is called. The plug and jack used to connect this cordless phone, you may be extended by the certification/registration number found on the label on a Declaration of Conformity and that is confirmed by means of a certified...

User Guide
Page 6
... telephone system meets Industry Canada standards for hearing aid compatibility. Interference Information This device complies with the operation of this cordless phone does not disable your telephone company or a qualified installer. Caution: You should be accessed by other cordless telephones, may ...to the following two conditions: (1) This device may be ensured when using this cordless phone or cause noise during operation. Units without code access may be made by Motorola. system, if present, are connected together. Contact the appropriate electrical inspection authority or ...
... telephone system meets Industry Canada standards for hearing aid compatibility. Interference Information This device complies with the operation of this cordless phone does not disable your telephone company or a qualified installer. Caution: You should be accessed by other cordless telephones, may ...to the following two conditions: (1) This device may be ensured when using this cordless phone or cause noise during operation. Units without code access may be made by Motorola. system, if present, are connected together. Contact the appropriate electrical inspection authority or ...

User Guide
Page 8
...allow anything to report a gas leak, especially if you are in water. 3. Place the power cord so that proper ventilation is required, contact the Motorola address found in fire or shock. 6. Do not use only No. 26 AWG or larger UL Listed or CSA Certified Telecommunication Line Cord. 6 ...Do not set the phone on a heating register or over a radiator. Do not use liquid cleaners or aerosol cleaners. Never insert objects of fire, electric shock, and injury ...
...allow anything to report a gas leak, especially if you are in water. 3. Place the power cord so that proper ventilation is required, contact the Motorola address found in fire or shock. 6. Do not use only No. 26 AWG or larger UL Listed or CSA Certified Telecommunication Line Cord. 6 ...Do not set the phone on a heating register or over a radiator. Do not use liquid cleaners or aerosol cleaners. Never insert objects of fire, electric shock, and injury ...
User Guide
Page 9
... been exposed to your dealer or local power company. 5. Then retrieve the unit by the operating instructions. If you have unplugged the power and phone from an outlet if: • The power cord or plug is indicated on the marking label. This product may result in performance. Do not... place this phone. 7 Improper adjustment of the power supply to rain or water. Operate this phone using only the power source that are unsure of other controls may fall, causing serious damage to normal ...
... been exposed to your dealer or local power company. 5. Then retrieve the unit by the operating instructions. If you have unplugged the power and phone from an outlet if: • The power cord or plug is indicated on the marking label. This product may result in performance. Do not... place this phone. 7 Improper adjustment of the power supply to rain or water. Operate this phone using only the power source that are unsure of other controls may fall, causing serious damage to normal ...

User Guide
Page 10
... a TV, microwave oven, or VCR. Caution: To maintain compliance with the FCC's RF exposure guidelines, place the base unit at least one phone in your home that came with an incorrect battery type. Contact your home goes out. 10. Battery Safety Instructions • Do not burn, ...disassemble, mutilate, or puncture the battery. Use only the battery that is a risk of the cordless phone on electricity, you replace the battery with this product must be disposed of batteries in fire, which could be recycled. Refer to be released, ...
... a TV, microwave oven, or VCR. Caution: To maintain compliance with the FCC's RF exposure guidelines, place the base unit at least one phone in your home that came with an incorrect battery type. Contact your home goes out. 10. Battery Safety Instructions • Do not burn, ...disassemble, mutilate, or puncture the battery. Use only the battery that is a risk of the cordless phone on electricity, you replace the battery with this product must be disposed of batteries in fire, which could be recycled. Refer to be released, ...
User Guide
Page 11
... 6 Getting Started 11 Powering the Base Station 12 Setting Up the Charging Bases 13 Installing Batteries in the Handsets 13 Charging the Handsets 13 Phone Line Connection 14 Wall Mounting the Base Station 14 Removing the Base Station and Wall Mount 16 Removing the Base Station from the Wall Mount... . . . . 17 Using the Handset Display 17 Using the Soft Keys 17 Using the Navigation Key 18 Setting Up Your Phone 19 Registering an Expansion Handset 19 Personalizing Your Handset 19 Setting the Ring Tone and Ring Volume 20 Turning the Key Beeps ON or OFF...
... 6 Getting Started 11 Powering the Base Station 12 Setting Up the Charging Bases 13 Installing Batteries in the Handsets 13 Charging the Handsets 13 Phone Line Connection 14 Wall Mounting the Base Station 14 Removing the Base Station and Wall Mount 16 Removing the Base Station from the Wall Mount... . . . . 17 Using the Handset Display 17 Using the Soft Keys 17 Using the Navigation Key 18 Setting Up Your Phone 19 Registering an Expansion Handset 19 Personalizing Your Handset 19 Setting the Ring Tone and Ring Volume 20 Turning the Key Beeps ON or OFF...

User Guide
Page 13
... (page 14). 6. If you hear noise while using the handset near a microwave or another cordless phone. • In a high and central location with your Motorola digital cordless phone system: 1. Handsets that come with no obstructions, such as walls. Charge the battery for expansion handsets (page 13). 3. Plug in charging bases for about 12...
... (page 14). 6. If you hear noise while using the handset near a microwave or another cordless phone. • In a high and central location with your Motorola digital cordless phone system: 1. Handsets that come with no obstructions, such as walls. Charge the battery for expansion handsets (page 13). 3. Plug in charging bases for about 12...

User Guide
Page 15
... snap the battery cover back into the receptacle. 3. Remove the battery cover by pressing on page 8. 1. Plug the connector into place. Insert the battery into a phone line. Black Red Charging the Handsets Place the handset in the Handsets Important: Before installing or handling batteries, read the Battery Safety Instructions on the...
... snap the battery cover back into the receptacle. 3. Remove the battery cover by pressing on page 8. 1. Plug the connector into place. Insert the battery into a phone line. Black Red Charging the Handsets Place the handset in the Handsets Important: Before installing or handling batteries, read the Battery Safety Instructions on the...
User Guide
Page 16
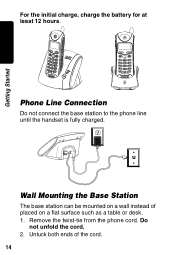
charge Phone Line Connection Do not connect the base station to the phone line until the handset is fully charged. Getting Started For the initial charge, charge the battery for at least 12 hours. Wall Mounting the Base Station The base station can be mounted on a flat surface such as a table or desk. 1. Untuck both ends of placed on a wall instead of the cord. 14 Do not unfold the cord. 2. Remove the twist-tie from the phone cord.
charge Phone Line Connection Do not connect the base station to the phone line until the handset is fully charged. Getting Started For the initial charge, charge the battery for at least 12 hours. Wall Mounting the Base Station The base station can be mounted on a flat surface such as a table or desk. 1. Untuck both ends of placed on a wall instead of the cord. 14 Do not unfold the cord. 2. Remove the twist-tie from the phone cord.
User Guide
Page 17
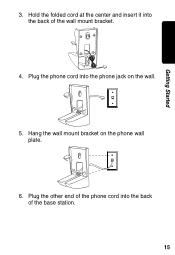
Plug the phone cord into the back of the base station. 15 Hang the wall mount bracket on the wall. 020930o 5. Plug the other end of the wall mount bracket. 4. Hold the folded cord at the center and insert it into the back of the phone cord into the phone jack on the phone wall plate. 020929o 6. Getting Started 3.
Plug the phone cord into the back of the base station. 15 Hang the wall mount bracket on the wall. 020930o 5. Plug the other end of the wall mount bracket. 4. Hold the folded cord at the center and insert it into the back of the phone cord into the phone jack on the phone wall plate. 020929o 6. Getting Started 3.
User Guide
Page 18
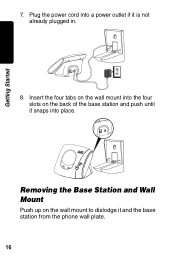
Getting Started 7. Removing the Base Station and Wall Mount Push up on the wall mount to dislodge it snaps into place. Insert the four tabs on the back of the base station and push until it and the base station from the phone wall plate. 16 Plug the power cord into the four slots on the wall mount into a power outlet if it is not already plugged in. 8.
Getting Started 7. Removing the Base Station and Wall Mount Push up on the wall mount to dislodge it snaps into place. Insert the four tabs on the back of the base station and push until it and the base station from the phone wall plate. 16 Plug the power cord into the four slots on the wall mount into a power outlet if it is not already plugged in. 8.

User Guide
Page 19
... example, CHANGE (a). 17 Using the Handset Display When the handset is on, V appears on the display. Getting Started Removing the Base Station from your local phone company.
... example, CHANGE (a). 17 Using the Handset Display When the handset is on, V appears on the display. Getting Started Removing the Base Station from your local phone company.

User Guide
Page 21
... at least 6 seconds or until you buy expansion handsets to add to your MD450 Series phone system are already registered. To register a new expansion handset that come with your phone system. Setting Up Your Phone Setting Up Your Phone Registering an Expansion Handset You can have up to 4 handsets registered to a base station.If...
... at least 6 seconds or until you buy expansion handsets to add to your MD450 Series phone system are already registered. To register a new expansion handset that come with your phone system. Setting Up Your Phone Setting Up Your Phone Registering an Expansion Handset You can have up to 4 handsets registered to a base station.If...

User Guide
Page 22
... (off, low, medium, high). Press CHANGE (a) to Ringer and press SELECT (a). 3 The Day Volume displays. Each tone plays as you press CHANGE (a). Setting Up Your Phone Setting the Ring Tone and Ring Volume Your can set a ring tone for incoming calls from 6 am to 6 am. Stop at the volume level you...
... (off, low, medium, high). Press CHANGE (a) to Ringer and press SELECT (a). 3 The Day Volume displays. Each tone plays as you press CHANGE (a). Setting Up Your Phone Setting the Ring Tone and Ring Volume Your can set a ring tone for incoming calls from 6 am to 6 am. Stop at the volume level you...

User Guide
Page 23
Setting Up Your Phone Action 7 Scroll down (c) to advance to a different menu option. 21 This is the sound for this ring tone to work. 8 Press CHANGE (a) to scroll through the phonebook tones. Stop at the phonebook tone you select CHANGE (a). Each tone plays as you want to set. 9 Press DONE (a). 10 Press EXIT (a) to return to the standby screen, or c to scroll to the Phonebook Tone. You must subscribe to caller ID service for incoming calls from numbers stored in your phonebook.
Setting Up Your Phone Action 7 Scroll down (c) to advance to a different menu option. 21 This is the sound for this ring tone to work. 8 Press CHANGE (a) to scroll through the phonebook tones. Stop at the phonebook tone you select CHANGE (a). Each tone plays as you want to set. 9 Press DONE (a). 10 Press EXIT (a) to return to the standby screen, or c to scroll to the Phonebook Tone. You must subscribe to caller ID service for incoming calls from numbers stored in your phonebook.
User Guide
Page 24
Action 1 Press MENU (a). 2 Scroll (c) to Ringer and press SELECT (a). 3 Scroll (c) to Key Beeps and press SELECT (a). 4 Press CHANGE (a) to RINGER displays, press SELECT (a). When your choice of ON, OFF, or LINKED to scroll through the selection. Note: When set to LINKED to RINGER, key beeps are ON when the ringer is set to ON, and off when the ringer is set to OFF on the handsets. Setting Up Your Phone Turning the Key Beeps ON or OFF You can turn ON or OFF the key beeps on the handset. 22
Action 1 Press MENU (a). 2 Scroll (c) to Ringer and press SELECT (a). 3 Scroll (c) to Key Beeps and press SELECT (a). 4 Press CHANGE (a) to RINGER displays, press SELECT (a). When your choice of ON, OFF, or LINKED to scroll through the selection. Note: When set to LINKED to RINGER, key beeps are ON when the ringer is set to ON, and off when the ringer is set to OFF on the handsets. Setting Up Your Phone Turning the Key Beeps ON or OFF You can turn ON or OFF the key beeps on the handset. 22

User Guide
Page 25
... input cursor. If you register a handset, it easy to select the handset from a list (for example a location (Kitchen) or someone's name (Susan). Setting Up Your Phone Naming a Handset When you name a handset, the handset number remains part of the name, for information on how to enter text. 4 Press DONE (a). 5 Press EXIT...
... input cursor. If you register a handset, it easy to select the handset from a list (for example a location (Kitchen) or someone's name (Susan). Setting Up Your Phone Naming a Handset When you name a handset, the handset number remains part of the name, for information on how to enter text. 4 Press DONE (a). 5 Press EXIT...

User Guide
Page 26
...up to 5 area codes to make it recommended that you subscribe to caller ID service from your local phone company. Note: This section applies only if you omit this area code. 24 It it easy to ... the handset the indicated number of Presses Button 1 2 3 4 5 1 space - * ! 1 2 A B C ( 2 3 D E F ) 3 4 G H I # 4 5 J K L / 5 6 M N O ' 6 7 P Q R S 7 8 T U V ? 8 9 W X Y Z 9 Setting Up Your Phone Storing Area Codes for Caller ID Caution: This feature is not recommended when using the telephone in the setup of caller ID calls. For example...
...up to 5 area codes to make it recommended that you subscribe to caller ID service from your local phone company. Note: This section applies only if you omit this area code. 24 It it easy to ... the handset the indicated number of Presses Button 1 2 3 4 5 1 space - * ! 1 2 A B C ( 2 3 D E F ) 3 4 G H I # 4 5 J K L / 5 6 M N O ' 6 7 P Q R S 7 8 T U V ? 8 9 W X Y Z 9 Setting Up Your Phone Storing Area Codes for Caller ID Caution: This feature is not recommended when using the telephone in the setup of caller ID calls. For example...
User Guide
Page 27
... code. • 11-digit format You have to dial the 1 + 3-digit area code + 7-digit phone number to a different menu option. 25 Setting Up Your Phone • 10-digit format You have to dial the 3-digit area code + 7-digit phone number to call numbers in this area code. Action 1 Press MENU (a). 2 Scroll to Loc... list with all 10 digits. For example, if you store 954 in 10-digit format, when you to dial directly from that area code, the phone number is stored in the correct format for the area code, then scroll down (c) to move to the next area code. 5 Repeat steps 3 and 4 to...
... code. • 11-digit format You have to dial the 1 + 3-digit area code + 7-digit phone number to a different menu option. 25 Setting Up Your Phone • 10-digit format You have to dial the 3-digit area code + 7-digit phone number to call numbers in this area code. Action 1 Press MENU (a). 2 Scroll to Loc... list with all 10 digits. For example, if you store 954 in 10-digit format, when you to dial directly from that area code, the phone number is stored in the correct format for the area code, then scroll down (c) to move to the next area code. 5 Repeat steps 3 and 4 to...
User Guide
Page 28
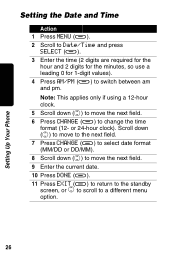
... (a). 11 Press EXIT (a) to return to the standby screen, or c to scroll to switch between am and pm. or 24-hour clock). Setting Up Your Phone Setting the Date and Time Action 1 Press MENU (a). 2 Scroll to Date/Time and press SELECT (a). 3 Enter the time (2 digits are required for the hour and...
... (a). 11 Press EXIT (a) to return to the standby screen, or c to scroll to switch between am and pm. or 24-hour clock). Setting Up Your Phone Setting the Date and Time Action 1 Press MENU (a). 2 Scroll to Date/Time and press SELECT (a). 3 Enter the time (2 digits are required for the hour and...


