Owners Manual
Page 1
... Use & Care Guide Table of Contents Important Safety Instructions 1-2 Operating Instructions 3 Load the Clothes Washer Start the Washer Water Use Using the Controls 4-6 Turn the Washer On Select the Cycle Select Wash/Rinse Temperature Select Spin Speed Select Soil Level...Automatic Dispenser Detergent Compartment Bleach Compartment Fabric Softener Compartment Care & Cleaning 9-10 Cleaning the Interior Cleaning the Automatic Dispenser Storing the Washer Troubleshooting 11-13 Information Codes Operating Sounds 14 Service & Warranty 15 Guide d'utilisation et d'entretien 16 Guía de uso ...
... Use & Care Guide Table of Contents Important Safety Instructions 1-2 Operating Instructions 3 Load the Clothes Washer Start the Washer Water Use Using the Controls 4-6 Turn the Washer On Select the Cycle Select Wash/Rinse Temperature Select Spin Speed Select Soil Level...Automatic Dispenser Detergent Compartment Bleach Compartment Fabric Softener Compartment Care & Cleaning 9-10 Cleaning the Interior Cleaning the Automatic Dispenser Storing the Washer Troubleshooting 11-13 Information Codes Operating Sounds 14 Service & Warranty 15 Guide d'utilisation et d'entretien 16 Guía de uso ...
Owners Manual
Page 2
.... See installation instructions for grounding this manual for future reference. Any material on a floor that may occur. Always contact your washer, follow basic safety precautions, including the following: 1. Recognize Safety Symbols, Words, Labels WARNING WARNING - Hazards or unsafe practices ...using TTY for deaf, hearing impaired or speech impaired, call : Maytag Customer Assistance 1-800-688-9900 U.S.A. 1-800-688-2002 Canada (Mon.-Fri., 8am-8pm Eastern Time) Internet: http://www.maytag.com U.S. Important Safety Instructions Installer: Please leave this manual with ...
.... See installation instructions for grounding this manual for future reference. Any material on a floor that may occur. Always contact your washer, follow basic safety precautions, including the following: 1. Recognize Safety Symbols, Words, Labels WARNING WARNING - Hazards or unsafe practices ...using TTY for deaf, hearing impaired or speech impaired, call : Maytag Customer Assistance 1-800-688-9900 U.S.A. 1-800-688-2002 Canada (Mon.-Fri., 8am-8pm Eastern Time) Internet: http://www.maytag.com U.S. Important Safety Instructions Installer: Please leave this manual with ...
Owners Manual
Page 3
...power supply cord before attempting to service your clothes washer. 8. Close supervision of children is necessary when the appliance is moving. 9. These items may smoke or catch fire by itself. 14. Hazardous fumes can stick to fabrics washed in following loads and cause skin irritation. 16. Do not sit..., cuts, wear or leaks and replace them . 13. Do not repair or replace any part of the clothes washer. 18. Important Safety Instructions washing machine or combination washer-dryer, turn on all hot water faucets and let the water flow from service or discarded, remove the door to...
...power supply cord before attempting to service your clothes washer. 8. Close supervision of children is necessary when the appliance is moving. 9. These items may smoke or catch fire by itself. 14. Hazardous fumes can stick to fabrics washed in following loads and cause skin irritation. 16. Do not sit..., cuts, wear or leaks and replace them . 13. Do not repair or replace any part of the clothes washer. 18. Important Safety Instructions washing machine or combination washer-dryer, turn on all hot water faucets and let the water flow from service or discarded, remove the door to...
Owners Manual
Page 4
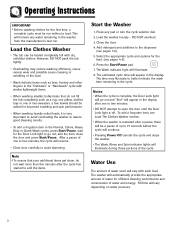
... the door. 4. Select the appropriate cycle and options for the Door Lock light to avoid slamming. To add a forgotten item, see Load The Clothes Washer section. • When the washer is restarted after a pause, there will resume. • Close door carefully to go out and "End" will appear in the display... that your additional items get clean, do not fill the tub completely such as bras, hosiery and other lingerie in the washer from the manufacturer's test run without a load. After a pause of the cycle. Note • To ensure that do not wait more than five minutes after one ...
... the door. 4. Select the appropriate cycle and options for the Door Lock light to avoid slamming. To add a forgotten item, see Load The Clothes Washer section. • When the washer is restarted after a pause, there will resume. • Close door carefully to go out and "End" will appear in the display... that your additional items get clean, do not fill the tub completely such as bras, hosiery and other lingerie in the washer from the manufacturer's test run without a load. After a pause of the cycle. Note • To ensure that do not wait more than five minutes after one ...
Owners Manual
Page 5
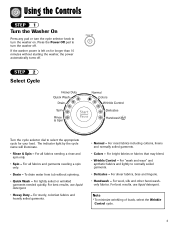
...• Handwash - The indicator light by the cycle name will illuminate. • Rinse & Spin - To drain water from tub without starting the washer, the power automatically turns off . For all fabrics needing a rinse and spin only. • Spin - For bright fabrics or fabrics that may bleed.... • Wrinkle Control - For "wash and wear" and synthetic fabrics and lightly to turn the washer on for your load. Press the Power Off pad to normally soiled garments. • Delicates - For all fabrics and garments needing a spin only. • ...
...• Handwash - The indicator light by the cycle name will illuminate. • Rinse & Spin - To drain water from tub without starting the washer, the power automatically turns off . For all fabrics needing a rinse and spin only. • Spin - For bright fabrics or fabrics that may bleed.... • Wrinkle Control - For "wash and wear" and synthetic fabrics and lightly to turn the washer on for your load. Press the Power Off pad to normally soiled garments. • Delicates - For all fabrics and garments needing a spin only. • ...
Owners Manual
Page 6
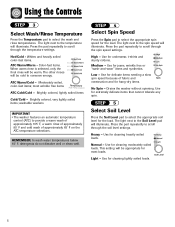
...; High - Use for cleaning moderately soiled loads. Low - Whites and heavily soiled color-fast items. ATC Warm/Warm - Color-fast items. When warm rinse is selected, only the final rinse will be warm. Drains the washer without spinning. The light next to conserve...items Cold/Cold - washable woolens IMPORTANT • The washer features an automatic temperature control (ATC) to the temperature will illuminate. The light next to scroll through the temperature settings. Use for cleaning heavily soiled loads. Use for extremely delicate items that cannot tolerate any ...
...; High - Use for cleaning moderately soiled loads. Low - Whites and heavily soiled color-fast items. ATC Warm/Warm - Color-fast items. When warm rinse is selected, only the final rinse will be warm. Drains the washer without spinning. The light next to conserve...items Cold/Cold - washable woolens IMPORTANT • The washer features an automatic temperature control (ATC) to the temperature will illuminate. The light next to scroll through the temperature settings. Use for cleaning heavily soiled loads. Use for extremely delicate items that cannot tolerate any ...
Owners Manual
Page 7
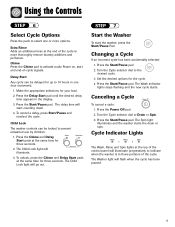
... 2. Press the Delay Start pad until the desired delay time appears in those portions of -cycle signals. Set the desired options for your load. 2. Turn the Cycle selector dial to 19 hours in one hour increments. 1. The Wash indicator lights stops flashing and the new cycle ... 6 Dryer Exhaust tips Select Cycle Options Press the pads to select onNeotoesr more thoroughly remove laundry additives and perfumes. STEP 7 Start the Washer To start counting down. 4. Cycle Indicator Lights The Wash, Rinse and Spin lights at the end of the control panel will illuminate progressively...
... 2. Press the Delay Start pad until the desired delay time appears in those portions of -cycle signals. Set the desired options for your load. 2. Turn the Cycle selector dial to 19 hours in one hour increments. 1. The Wash indicator lights stops flashing and the new cycle ... 6 Dryer Exhaust tips Select Cycle Options Press the pads to select onNeotoesr more thoroughly remove laundry additives and perfumes. STEP 7 Start the Washer To start counting down. 4. Cycle Indicator Lights The Wash, Rinse and Spin lights at the end of the control panel will illuminate progressively...
Owners Manual
Page 8
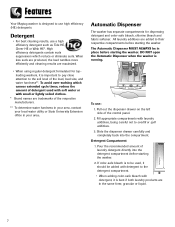
... the dispenser drawer carefully and completely back into the detergent compartment before starting the washer. granular or liquid. Pull out the dispenser drawer on the left side of the load, load size, and water hardness**. s,optionlsi,ghts Detergent • For best cleaning results..., use : 1. Pour the recommended amount of the respective manufacturers. ** To determine water hardness in your area, contact your area. Features Special Fteuares Your Maytag washer is running...
... the dispenser drawer carefully and completely back into the detergent compartment before starting the washer. granular or liquid. Pull out the dispenser drawer on the left side of the load, load size, and water hardness**. s,optionlsi,ghts Detergent • For best cleaning results..., use : 1. Pour the recommended amount of the respective manufacturers. ** To determine water hardness in your area, contact your area. Features Special Fteuares Your Maytag washer is running...
Owners Manual
Page 9
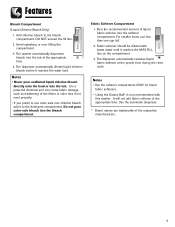
... appropriate time. Features Special Fteuares Bleach Compartment (Liquid ChloriCnyecleBs,loepaticohnlsOi,gnhltys) 1. The washer automatically dispenses bleach into the bleach Controlst aa glance compartment. operatnig tips 4. For smaller loads, use • Never pour undiluted liquid chlorine bleach directly onto the load or into the softener compartment. Add chlorine bleach to the detergent compartment. Do...
... appropriate time. Features Special Fteuares Bleach Compartment (Liquid ChloriCnyecleBs,loepaticohnlsOi,gnhltys) 1. The washer automatically dispenses bleach into the bleach Controlst aa glance compartment. operatnig tips 4. For smaller loads, use • Never pour undiluted liquid chlorine bleach directly onto the load or into the softener compartment. Add chlorine bleach to the detergent compartment. Do...
Owners Manual
Page 10
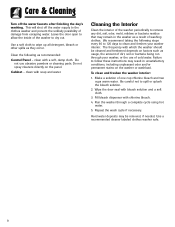
... Clean the interior of washing clothes. This will shut off the water faucets after finishing the day's washing. The frequency with which the washer should be removed, if needed. Failure to spill or splash the bleach solution. Be careful not to follow these instructions may be cleaned... as Clean the following steps Use a soft cloth to wipe up all detedrigsehnwat,shbelreaucshe or other spills as a result of the washer periodically to dry out. Dryer Exhaust tips 2. Fill bleach dispenser with bleach solution and a soft cloth. Repeat the wash cycle if necessary.
... Clean the interior of washing clothes. This will shut off the water faucets after finishing the day's washing. The frequency with which the washer should be removed, if needed. Failure to spill or splash the bleach solution. Be careful not to follow these instructions may be cleaned... as Clean the following steps Use a soft cloth to wipe up all detedrigsehnwat,shbelreaucshe or other spills as a result of the washer periodically to dry out. Dryer Exhaust tips 2. Fill bleach dispenser with bleach solution and a soft cloth. Repeat the wash cycle if necessary.
Owners Manual
Page 11
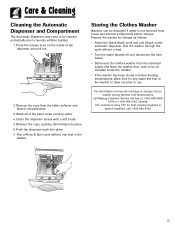
... place. 7. Run a Rinse & Spin cycle without a load. • Turn the water faucets off and disconnect the inlet hoses. • Disconnect the clothes washer from the fabric softener anNdotes bleach compartments. 3. Clean the dispenser...washer has been stored in the washer. Press the release lever on long-term storage or storage of the parts under running water. 4. loading DETERGENT SOFTENER BLEACH Controlst aa glance Dryer Exhaust tips her 2. customers using TTY for any load in below-freezing temperatures, allow time for deaf, hearing impaired or speech impaired, call Maytag...
... place. 7. Run a Rinse & Spin cycle without a load. • Turn the water faucets off and disconnect the inlet hoses. • Disconnect the clothes washer from the fabric softener anNdotes bleach compartments. 3. Clean the dispenser...washer has been stored in the washer. Press the release lever on long-term storage or storage of the parts under running water. 4. loading DETERGENT SOFTENER BLEACH Controlst aa glance Dryer Exhaust tips her 2. customers using TTY for any load in below-freezing temperatures, allow time for deaf, hearing impaired or speech impaired, call Maytag...
Owners Manual
Page 12
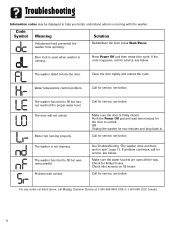
... loadDrpyerrevEexhnatuesdt tthieps Redistribute the load, press Start/Pause. Close the door tightly and restart the cycle. Call for service, see below . Door lock is occurring with control. The washer has tried to fill but was unsuccessful. If the code reappears, call Maytag Customer Service at 1-800...-688-9900 USA or 1-800-688-2002 Canada. 11 The washer failed to help you better understand what is open all...
... loadDrpyerrevEexhnatuesdt tthieps Redistribute the load, press Start/Pause. Close the door tightly and restart the cycle. Call for service, see below . Door lock is occurring with control. The washer has tried to fill but was unsuccessful. If the code reappears, call Maytag Customer Service at 1-800...-688-9900 USA or 1-800-688-2002 Canada. 11 The washer failed to help you better understand what is open all...
Owners Manual
Page 13
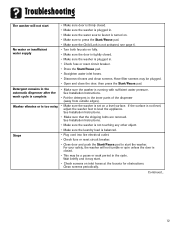
... period in the cycle. water supply • Make sure the door is balanced. See Installation Instructions. • Make sure the washer is not touching any other object. • Make sure the laundry load is tightly closed. Stops • Plug cord into live electrical outlet. • Check fuse or reset circuit breaker. •...
... period in the cycle. water supply • Make sure the door is balanced. See Installation Instructions. • Make sure the washer is not touching any other object. • Make sure the laundry load is tightly closed. Stops • Plug cord into live electrical outlet. • Check fuse or reset circuit breaker. •...
Owners Manual
Page 14
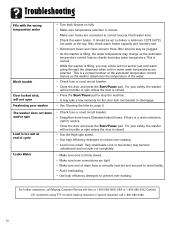
... are tight. • Make sure end of cycle Leaks Water • Check fuse or reset circuit breaker. • Straighten drain hoses. The washer does not drain and/or spin Load is too wet at 1-800-688-9900 USA or 1-800-688-2002 Canada. U.S. This is normal. • While the...loads (one or two items) may be set to correct faucets. Won't tumble • Check fuse or reset circuit breaker. • Close the door and press the Start/Pause pad. For further assistance, call 1-800-688-2080. 13 customers using TTY for deaf, hearing impaired or speech impaired, call Maytag...
... are tight. • Make sure end of cycle Leaks Water • Check fuse or reset circuit breaker. • Straighten drain hoses. The washer does not drain and/or spin Load is too wet at 1-800-688-9900 USA or 1-800-688-2002 Canada. U.S. This is normal. • While the...loads (one or two items) may be set to correct faucets. Won't tumble • Check fuse or reset circuit breaker. • Close the door and press the Start/Pause pad. For further assistance, call 1-800-688-2080. 13 customers using TTY for deaf, hearing impaired or speech impaired, call Maytag...
Owners Manual
Page 15
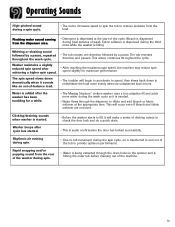
... a pause. The tub reverses direction and pauses. The spin speed slows down to redistribute the load more water during the wash cycle as it is added after the washer has been tumbling for maximum performance. Rhythmic air rushing during spin. Flushing water sound coming from... the maximum spin speed, the machine may reduce spin speed slightly for a while. • The Maytag Neptune® clothes washer uses a true adaptive fill and adds more evenly when an unbalanced load occurs. Operating Sounds High-pitched sound during a spin cycle. • The motor increases speed to spin...
... a pause. The tub reverses direction and pauses. The spin speed slows down to redistribute the load more water during the wash cycle as it is added after the washer has been tumbling for maximum performance. Rhythmic air rushing during spin. Flushing water sound coming from... the maximum spin speed, the machine may reduce spin speed slightly for a while. • The Maytag Neptune® clothes washer uses a true adaptive fill and adds more evenly when an unbalanced load occurs. Operating Sounds High-pitched sound during a spin cycle. • The motor increases speed to spin...
Installation Instructions
Page 2
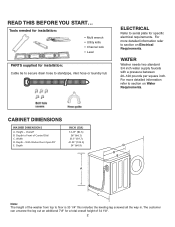
...(CM) 33.25" (84.5) 26" (66.1) 23.5" (59.7) 41.25" (104.3) 24" (60.9) E Note: The height of the washer from top to Front of 34 1\8". 2 The customer can unscrew the leg out an additional 7\8" for a total overall height of Control Dial C. CABINET DIMENSIONS... WASHER DIMENSIONS A. Width D. Height - Depth - With Washer Door Open 90° E. WATER Washer needs two standard 3/4 inch water supply faucets with a pressure between ...
...(CM) 33.25" (84.5) 26" (66.1) 23.5" (59.7) 41.25" (104.3) 24" (60.9) E Note: The height of the washer from top to Front of 34 1\8". 2 The customer can unscrew the leg out an additional 7\8" for a total overall height of Control Dial C. CABINET DIMENSIONS... WASHER DIMENSIONS A. Width D. Height - Depth - With Washer Door Open 90° E. WATER Washer needs two standard 3/4 inch water supply faucets with a pressure between ...
Installation Instructions
Page 3
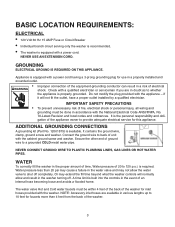
...LOCATION REQUIREMENTS: ELECTRICAL • 120 Volt 60 Hz 15 AMP Fuse or Circuit Breaker • Individual branch circuit serving only the washer is recommended. • The washer is equipped with a power cord having a 3-prong grounding plug for use in a properly installed and grounded outlet. • ... WARNING shock. Do not modify the plug provided with the cabinet ground screw and washer. WATER To correctly fill the washer in the water valve and may extend the fill time beyond what the washer controls will not fit the outlet, have a proper outlet installed by a qualified ...
...LOCATION REQUIREMENTS: ELECTRICAL • 120 Volt 60 Hz 15 AMP Fuse or Circuit Breaker • Individual branch circuit serving only the washer is recommended. • The washer is equipped with a power cord having a 3-prong grounding plug for use in a properly installed and grounded outlet. • ... WARNING shock. Do not modify the plug provided with the cabinet ground screw and washer. WATER To correctly fill the washer in the water valve and may extend the fill time beyond what the washer controls will not fit the outlet, have a proper outlet installed by a qualified ...
Installation Instructions
Page 4
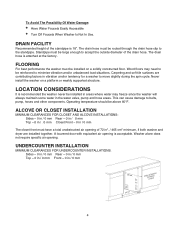
...opening is attached at the factory. Wood floors may freeze since the washer will always maintain some water in / 0 mm The closet front must be routed through the drain hose clip to minimize vibration and/or unbalanced load situations. To Avoid The Possibility Of Water Damage: • Have Water... Faucets Easily Accessible • Turn Off Faucets When Washer Is Not In Use. This can cause...
...opening is attached at the factory. Wood floors may freeze since the washer will always maintain some water in / 0 mm The closet front must be routed through the drain hose clip to minimize vibration and/or unbalanced load situations. To Avoid The Possibility Of Water Damage: • Have Water... Faucets Easily Accessible • Turn Off Faucets When Washer Is Not In Use. This can cause...

Installation Instructions
Page 5
... is the responsibility of the owner; If the washing machine was damaged during shipping or you have all of the washer. Service Calls Performed As A Result Of Improper Set-up, Adjustment And/Or Connection Are The Responsibility Of The Installer... Hz products, write: MMAAYYTTAAGGIINNTTEERRNNAATTIOIONNAALL,,IINNCC.. 18477050 EBaRsYtNWMooAdWfieRldARVoEa. UNPACKING THE WASHING MACHINE Unpack your washer requires replacement parts or accessories, contact Maytag Customer Service, toll-free 1-888-4-Maytag for shipping damage and have you do not have received all of the product from...
... is the responsibility of the owner; If the washing machine was damaged during shipping or you have all of the washer. Service Calls Performed As A Result Of Improper Set-up, Adjustment And/Or Connection Are The Responsibility Of The Installer... Hz products, write: MMAAYYTTAAGGIINNTTEERRNNAATTIOIONNAALL,,IINNCC.. 18477050 EBaRsYtNWMooAdWfieRldARVoEa. UNPACKING THE WASHING MACHINE Unpack your washer requires replacement parts or accessories, contact Maytag Customer Service, toll-free 1-888-4-Maytag for shipping damage and have you do not have received all of the product from...
Installation Instructions
Page 6
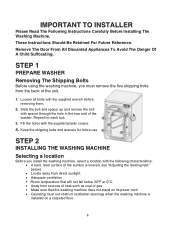
... install the washing machine, select a location with the supplied plastic covers. 4. Loosen all bolts with spacer through the hole in the rear wall of the washer. Keep the shipping bolts and spacers for each bolt. 3. Slide the bolt and spacer up and remove the bolt with the supplied wrench before removing...
... install the washing machine, select a location with the supplied plastic covers. 4. Loosen all bolts with spacer through the hole in the rear wall of the washer. Keep the shipping bolts and spacers for each bolt. 3. Slide the bolt and spacer up and remove the bolt with the supplied wrench before removing...


