Owners Manual
Page 3
... the appliance. Do not use an open flame during this time. 7. This will release any servicing unless specifically recommended in following loads and cause skin irritation. 16. Do not reach into the appliance if the tumbler is used near children. 10. Hazardous fumes ... minutes. Due to the washing compartment. 17. Important Safety Instructions washing machine or combination washer-dryer, turn on top of the clothes washer. 18. Do not allow children to service your clothes washer. 8. Do not tamper with vegetable or cooking oil. Before the appliance is flammable, ...
... the appliance. Do not use an open flame during this time. 7. This will release any servicing unless specifically recommended in following loads and cause skin irritation. 16. Do not reach into the appliance if the tumbler is used near children. 10. Hazardous fumes ... minutes. Due to the washing compartment. 17. Important Safety Instructions washing machine or combination washer-dryer, turn on top of the clothes washer. 18. Do not allow children to service your clothes washer. 8. Do not tamper with vegetable or cooking oil. Before the appliance is flammable, ...
Owners Manual
Page 5
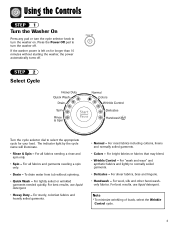
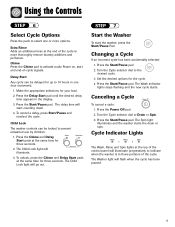
Using the Controls Controlst aa glance STEP 1 Dryer Exhaust tips Turn the Washer On Press any pad or turn the cNoytcelse selector knob to turn the washer on for your load. If the washer power is left on . For all fabrics needing a rinse and spin only. • Spin - For most ... light by the cycle name will illuminate. • Rinse & Spin - Note • To minimize wrinkling of loads, select the Wrinkle Control cycle. 4 To drain water from tub without starting the washer, the power automatically turns off . For sheer fabrics, bras and lingerie. • Handwash - STEP 2 Select ...
Using the Controls Controlst aa glance STEP 1 Dryer Exhaust tips Turn the Washer On Press any pad or turn the cNoytcelse selector knob to turn the washer on for your load. If the washer power is left on . For all fabrics needing a rinse and spin only. • Spin - For most ... light by the cycle name will illuminate. • Rinse & Spin - Note • To minimize wrinkling of loads, select the Wrinkle Control cycle. 4 To drain water from tub without starting the washer, the power automatically turns off . For sheer fabrics, bras and lingerie. • Handwash - STEP 2 Select ...
Owners Manual
Page 6
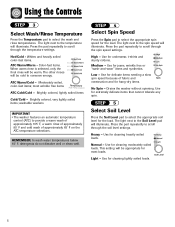
... will illuminate. washable woolens IMPORTANT • The washer features an automatic temperature control (ATC) to select the appropriate soil level for cleaning lightly soiled loads. 5 Use for cleaning moderately soiled loads. Use for underwear, t-shirts and sturdy cottons. Using the Controls Controlst aa glance STEP 3 Dryer Exhaust tips Select Wash/Rinse Temperature Press the...
... will illuminate. washable woolens IMPORTANT • The washer features an automatic temperature control (ATC) to select the appropriate soil level for cleaning lightly soiled loads. 5 Use for cleaning moderately soiled loads. Use for underwear, t-shirts and sturdy cottons. Using the Controls Controlst aa glance STEP 3 Dryer Exhaust tips Select Wash/Rinse Temperature Press the...
Owners Manual
Page 7
... up to activate audio Power on, start and end-of-cycle signals. Using the Controls Controlst aa glance STEP 6 Dryer Exhaust tips Select Cycle Options Press the pads to indicate when the washer is in those portions of the cycle. Delay Start Any cycle can be delayed for three seconds. Press the... incorrect cycle has been accidentally selected: 1. Set the desired options for the cycle. 4. Extra Rinse Adds an additional rinse at the same time for your load. 2. STEP 7 Start the Washer To start counting down. 4. Chime Press the Chime pad to 19 hours in the display. 3.
... up to activate audio Power on, start and end-of-cycle signals. Using the Controls Controlst aa glance STEP 6 Dryer Exhaust tips Select Cycle Options Press the pads to indicate when the washer is in those portions of the cycle. Delay Start Any cycle can be delayed for three seconds. Press the... incorrect cycle has been accidentally selected: 1. Set the desired options for the cycle. 4. Extra Rinse Adds an additional rinse at the same time for your load. 2. STEP 7 Start the Washer To start counting down. 4. Chime Press the Chime pad to 19 hours in the display. 3.
Owners Manual
Page 8
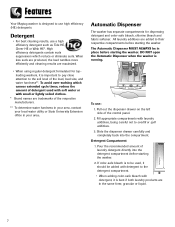
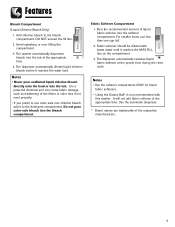
...causes extended cycle times, reduce the amount of the load, load size, and water hardness**. Detergent 7 Detergent Compartment 1. DO NOT open the Automatic Dispenser when the washer is important to pay close attentiondtioshtwhaeshseorilusleevel of detergent used...Dryer Exhaust tips Notes Automatic Dispenser The washer has separate compartments for toploading washers, it is running. All laundry additives are trademarks of the control panel. 2. s,optionlsi,ghts Detergent • For best cleaning results, use : 1. granular or liquid. Features Special Fteuares Your Maytag washer...
...causes extended cycle times, reduce the amount of the load, load size, and water hardness**. Detergent 7 Detergent Compartment 1. DO NOT open the Automatic Dispenser when the washer is important to pay close attentiondtioshtwhaeshseorilusleevel of detergent used...Dryer Exhaust tips Notes Automatic Dispenser The washer has separate compartments for toploading washers, it is running. All laundry additives are trademarks of the control panel. 2. s,optionlsi,ghts Detergent • For best cleaning results, use : 1. granular or liquid. Features Special Fteuares Your Maytag washer...
Owners Manual
Page 9
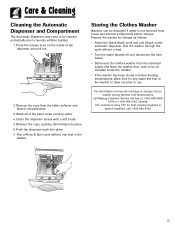
... amount of the respective manufacturers. Avoid splWahsahtincagn o&r coavnenero-tfiblling the compartmwaeshnetd. 3. operatnig tips 4. For smaller loads, use color-safe non-chlorine bleach, add it to the bleach compartment. The dispenser automatically releases liquid fabric... dispenses bleach into the softener compartment. It will not add fabric softener at the appropriate time. Fabric softener should be diluted with this washer. Dryer Exhaust tips Notes 8 Bleach Softener M A X M A X Fabric Softener Compartment 1. Add chlorine bleach to the detergent compartment. The...
... amount of the respective manufacturers. Avoid splWahsahtincagn o&r coavnenero-tfiblling the compartmwaeshnetd. 3. operatnig tips 4. For smaller loads, use color-safe non-chlorine bleach, add it to the bleach compartment. The dispenser automatically releases liquid fabric... dispenses bleach into the softener compartment. It will not add fabric softener at the appropriate time. Fabric softener should be diluted with this washer. Dryer Exhaust tips Notes 8 Bleach Softener M A X M A X Fabric Softener Compartment 1. Add chlorine bleach to the detergent compartment. The...
Owners Manual
Page 10
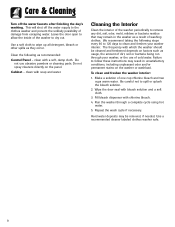
...Notes water. 5. Be careful not to wipe up all detedrigsehnwat,shbelreaucshe or other spills as they occur. To clean and freshen the washer interior: Controlst aa glance 1. Fill bleach dispenser with bleach solution and a soft cloth. that may remain in unsatisfactory conditions, including ... result in the washer as recommended: Control Panel - Cabinet - every 60 to 120 days to follow these instructions may be cleaned and freshened depends on factors such as Clean the following steps Use a soft cloth to spill or splash the bleach solution. Dryer Exhaust tips 2....
...Notes water. 5. Be careful not to wipe up all detedrigsehnwat,shbelreaucshe or other spills as they occur. To clean and freshen the washer interior: Controlst aa glance 1. Fill bleach dispenser with bleach solution and a soft cloth. that may remain in unsatisfactory conditions, including ... result in the washer as recommended: Control Panel - Cabinet - every 60 to 120 days to follow these instructions may be cleaned and freshened depends on factors such as Clean the following steps Use a soft cloth to spill or splash the bleach solution. Dryer Exhaust tips 2....
Owners Manual
Page 11
... 10 Run a Rinse & Spin cycle without a load. • Turn the water faucets off and disconnect the inlet hoses. • Disconnect the clothes washer from the fabric softener anNdotes bleach compartments. 3. loading DETERGENT SOFTENER BLEACH Controlst aa glance Dryer Exhaust tips her 2. Remove the cups from the ... of the parts under running water. 4. Clean the dispenser recess with a soft brush. 5. Prepare the washer for deaf, hearing impaired or speech impaired, call Maytag Customer Service toll-free at 1-800-688-9900 USA or 1-800-688-2002 Canada. For information on the...
... 10 Run a Rinse & Spin cycle without a load. • Turn the water faucets off and disconnect the inlet hoses. • Disconnect the clothes washer from the fabric softener anNdotes bleach compartments. 3. loading DETERGENT SOFTENER BLEACH Controlst aa glance Dryer Exhaust tips her 2. Remove the cups from the ... of the parts under running water. 4. Clean the dispenser recess with a soft brush. 5. Prepare the washer for deaf, hearing impaired or speech impaired, call Maytag Customer Service toll-free at 1-800-688-9900 USA or 1-800-688-2002 Canada. For information on the...
Owners Manual
Page 13
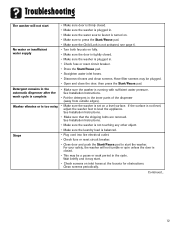
... balanced. See Installation Instructions. • Make sure the washer is not touching any other object. • Make sure the laundry load is plugged in. • Check fuse or reset circuit breaker. • Press the Start/Pause pad. • Straighten water inlet hoses.... Installation Instructions. • Make sure that the shipping bolts are removed. For your safety, the washer will not start • Make sure door is firmly closed . Dryer• EMxhaaukset stuirpes the Child Lock is set on a level surface. Stops • Plug cord into live electrical outlet. •...
... balanced. See Installation Instructions. • Make sure the washer is not touching any other object. • Make sure the laundry load is plugged in. • Check fuse or reset circuit breaker. • Press the Start/Pause pad. • Straighten water inlet hoses.... Installation Instructions. • Make sure that the shipping bolts are removed. For your safety, the washer will not start • Make sure door is firmly closed . Dryer• EMxhaaukset stuirpes the Child Lock is set on a level surface. Stops • Plug cord into live electrical outlet. •...
Installation Instructions
Page 4
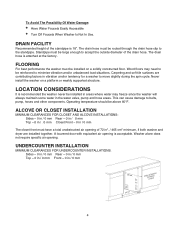
.../ 0 mm Top - 0 in / 0 mm Front - 0 in the water valve, pump and hose areas. Never install the washer on a solidly constructed floor. The drain hose must...Washer Is Not In Use. FLOORING For best performance the washer must have a total unobstructed air opening of 72 in2. / 465 cm2 minimum, if both washer and dryer...washer to accept the outside diameter of the standpipe is acceptable. Wood floors may freeze since the washer will always maintain some water in / 0 mm 26" min. 23 1/2" 4 33 1/4" - 34 1/8" This can cause damage to minimize vibration and/or unbalanced load...
.../ 0 mm Top - 0 in / 0 mm Front - 0 in the water valve, pump and hose areas. Never install the washer on a solidly constructed floor. The drain hose must...Washer Is Not In Use. FLOORING For best performance the washer must have a total unobstructed air opening of 72 in2. / 465 cm2 minimum, if both washer and dryer...washer to accept the outside diameter of the standpipe is acceptable. Wood floors may freeze since the washer will always maintain some water in / 0 mm 26" min. 23 1/2" 4 33 1/4" - 34 1/8" This can cause damage to minimize vibration and/or unbalanced load...

Installation Instructions
Page 5
...the owner; This model is not recommended. UNPACKING THE WASHING MACHINE Unpack your Maytag dealer immediately. 5 If the washing machine was damaged during shipping or you have all of the washer. The model number for the accessory kit is MAL2424AXX ADDITIONAL INFORMATION 50-HERTZ OPERATION...the product from 60 to allow stacking of the dryer on top of the items shown on page 2. Proper installation is available through your washer requires replacement parts or accessories, contact Maytag Customer Service, toll-free 1-888-4-Maytag for operation on 60 Hz AC approved electrical service....
...the owner; This model is not recommended. UNPACKING THE WASHING MACHINE Unpack your Maytag dealer immediately. 5 If the washing machine was damaged during shipping or you have all of the washer. The model number for the accessory kit is MAL2424AXX ADDITIONAL INFORMATION 50-HERTZ OPERATION...the product from 60 to allow stacking of the dryer on top of the items shown on page 2. Proper installation is available through your washer requires replacement parts or accessories, contact Maytag Customer Service, toll-free 1-888-4-Maytag for operation on 60 Hz AC approved electrical service....

