
Installation Instructions
Page 4
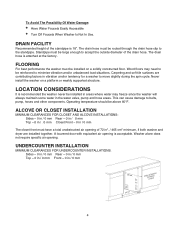
.../ 250 mm Top - 02 in / 501 mm Closet Front - 0 in vibration and/or tendency for a washer to minimize vibration and/or unbalanced load situations. Standpipe must be above 60°F. LOCATION CONSIDERATIONS It is 18". Washer alone does not require specific air opening is attached at the ... Rear - 0 in / 0 mm Top - 0 in / 0 mm Front - 0 in the water valve, pump and hose areas. The drain hose is acceptable. A louvered door with equivalent air opening . FLOORING For best performance the washer must be large enough to accept the outside diameter of the standpipe is recommended...
.../ 250 mm Top - 02 in / 501 mm Closet Front - 0 in vibration and/or tendency for a washer to minimize vibration and/or unbalanced load situations. Standpipe must be above 60°F. LOCATION CONSIDERATIONS It is 18". Washer alone does not require specific air opening is attached at the ... Rear - 0 in / 0 mm Top - 0 in / 0 mm Front - 0 in the water valve, pump and hose areas. The drain hose is acceptable. A louvered door with equivalent air opening . FLOORING For best performance the washer must be large enough to accept the outside diameter of the standpipe is recommended...
Installation Instructions
Page 7
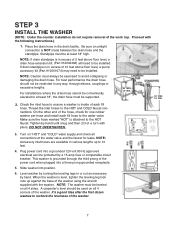
... lengths up against the base of the power cord when plugged into a three prong grounded receptacle. 5. NOTE: The washer must be used on "HOT" and "COLD" water supply and check all connections at least 18" high. For best performance the drain hose should be supported. 2. 2....standpipe is grounded through elbows, couplings or excessive lengths. This washer is in excess of 5 feet above floor level, a pump accessory kit (Part #12001674) may need to be installed. A carpenter's level should not be at the water valve and the faucet for leaks. Be sure an airtight ...
... lengths up against the base of the power cord when plugged into a three prong grounded receptacle. 5. NOTE: The washer must be used on "HOT" and "COLD" water supply and check all connections at least 18" high. For best performance the drain hose should be supported. 2. 2....standpipe is grounded through elbows, couplings or excessive lengths. This washer is in excess of 5 feet above floor level, a pump accessory kit (Part #12001674) may need to be installed. A carpenter's level should not be at the water valve and the faucet for leaks. Be sure an airtight ...
Installation Instructions
Page 8
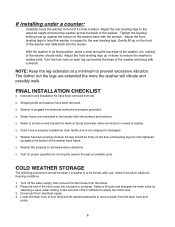
... or container. Disconnect from tub. Lower the drain hose to floor level and tilt washer backwards to the rear leveling legs. Adjust the front leveling legs to level the washer in respect to remove water from the facets. 2. Gently lift up on all temperature selections. FINAL INSTALLATION CHECKLIST... on each leg up or down to prevent excessive vibration. Turn off the water supply, then remove the inlet hoses from the drain hose and pump. 8 Adjust the rear leveling legs to freezing conditions. 1. o Water is to be stored, after use, where it 's final location. o ...
... or container. Disconnect from tub. Lower the drain hose to floor level and tilt washer backwards to the rear leveling legs. Adjust the front leveling legs to level the washer in respect to remove water from the facets. 2. Gently lift up on all temperature selections. FINAL INSTALLATION CHECKLIST... on each leg up or down to prevent excessive vibration. Turn off the water supply, then remove the inlet hoses from the drain hose and pump. 8 Adjust the rear leveling legs to freezing conditions. 1. o Water is to be stored, after use, where it 's final location. o ...


