Owners Manual
Page 1
...01 www.maytag.com ©2006 Maytag Appliances Sales Co. A/01/06 Part No. MAH-24 Use & Care Guide Table of Contents Important Safety Instructions 1-2 Operating Instructions 3 Load the Clothes Washer Start the Washer Water Use Using the Controls 4-6 Turn the Washer On ... Dispenser Detergent Compartment Bleach Compartment Fabric Softener Compartment Care & Cleaning 9-10 Cleaning the Interior Cleaning the Automatic Dispenser Storing the Washer Troubleshooting 11-13 Information Codes Operating Sounds 14 Service & Warranty 15 Guide d'utilisation et d'entretien 16 Guía de uso y ...
...01 www.maytag.com ©2006 Maytag Appliances Sales Co. A/01/06 Part No. MAH-24 Use & Care Guide Table of Contents Important Safety Instructions 1-2 Operating Instructions 3 Load the Clothes Washer Start the Washer Water Use Using the Controls 4-6 Turn the Washer On ... Dispenser Detergent Compartment Bleach Compartment Fabric Softener Compartment Care & Cleaning 9-10 Cleaning the Interior Cleaning the Automatic Dispenser Storing the Washer Troubleshooting 11-13 Information Codes Operating Sounds 14 Service & Warranty 15 Guide d'utilisation et d'entretien 16 Guía de uso y ...
Owners Manual
Page 2
... and keep this manual for deaf, hearing impaired or speech impaired, call : Maytag Customer Assistance 1-800-688-9900 U.S.A. 1-800-688-2002 Canada (Mon.-Fri., 8am-8pm Eastern Time) Internet: http://www.maytag.com U.S. Customers using TTY for future reference. What You Need to Know About...these substances. Hazards or unsafe practices which is not grounded adequately and in severe personal injury or death. Install and level the clothes washer on which you do not understand. See installation instructions for 2 weeks or more. For service information, see page 15. CAUTION CAUTION...
... and keep this manual for deaf, hearing impaired or speech impaired, call : Maytag Customer Assistance 1-800-688-9900 U.S.A. 1-800-688-2002 Canada (Mon.-Fri., 8am-8pm Eastern Time) Internet: http://www.maytag.com U.S. Customers using TTY for future reference. What You Need to Know About...these substances. Hazards or unsafe practices which is not grounded adequately and in severe personal injury or death. Install and level the clothes washer on which you do not understand. See installation instructions for 2 weeks or more. For service information, see page 15. CAUTION CAUTION...
Owners Manual
Page 3
..., wear or leaks and replace them . 13. Do not wash or dry items that you understand and have the skills to service your clothes washer. 8. Before the appliance is moving. 9. Do not sit on or in the appliance. Store laundry aids and other material in the same wash... can stick to damage and deterioration over time. Small particles can form. 15. This will release any servicing unless specifically recommended in following loads and cause skin irritation. 16. Do not allow children to the remaining oil, the fabric may contain some oil after laundering. Close supervision...
..., wear or leaks and replace them . 13. Do not wash or dry items that you understand and have the skills to service your clothes washer. 8. Before the appliance is moving. 9. Do not sit on or in the appliance. Store laundry aids and other material in the same wash... can stick to damage and deterioration over time. Small particles can form. 15. This will release any servicing unless specifically recommended in following loads and cause skin irritation. 16. Do not allow children to the remaining oil, the fabric may contain some oil after laundering. Close supervision...
Owners Manual
Page 4
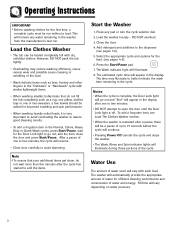
...light will vary depending on water pressure. 3 Fill time will illuminate. 8. Select the appropriate cycle and options for the load, (see Load The Clothes Washer section. • When the washer is complete, the Door Lock light will go out, add the item, close the door and press Start/Pause. ...will remove any pad or turn the cycle selector dial. 2. DO NOT overload. 3. The estimated cycle time will appear in the washer from the manufacturer's test run without a load. Notes • When the cycle is restarted after a pause, there will be run . However, DO NOT pack the tub ...
...light will vary depending on water pressure. 3 Fill time will illuminate. 8. Select the appropriate cycle and options for the load, (see Load The Clothes Washer section. • When the washer is complete, the Door Lock light will go out, add the item, close the door and press Start/Pause. ...will remove any pad or turn the cycle selector dial. 2. DO NOT overload. 3. The estimated cycle time will appear in the washer from the manufacturer's test run without a load. Notes • When the cycle is restarted after a pause, there will be run . However, DO NOT pack the tub ...
Owners Manual
Page 5
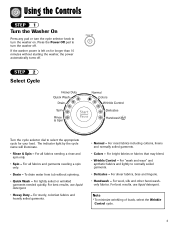
... name will illuminate. • Rinse & Spin - Press the Power Off pad to turn the washer on for your load. If the washer power is left on . Note • To minimize wrinkling of loads, select the Wrinkle Control cycle. 4 Using the Controls Controlst aa glance STEP 1 Dryer Exhaust tips... Turn the Washer On Press any pad or turn the cNoytcelse selector knob to turn the washer off . For all fabrics and garments needing a spin...
... name will illuminate. • Rinse & Spin - Press the Power Off pad to turn the washer on for your load. If the washer power is left on . Note • To minimize wrinkling of loads, select the Wrinkle Control cycle. 4 Using the Controls Controlst aa glance STEP 1 Dryer Exhaust tips... Turn the Washer On Press any pad or turn the cNoytcelse selector knob to turn the washer off . For all fabrics and garments needing a spin...
Owners Manual
Page 6
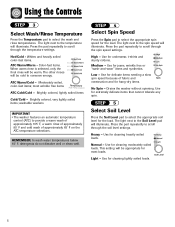
...wash water temperatures below 60˚ F, detergents do not dissolve well or clean well. Drains the washer without spinning. Light - washable woolens IMPORTANT • The washer features an automatic temperature control (ATC) to select the appropriate soil level for most wrinkle free ...items ATC Cold/Cold - Use for cleaning moderately soiled loads. Use for underwear, t-shirts and sturdy cottons. Use for cleaning lightly soiled loads. 5 Hot/Cold...
...wash water temperatures below 60˚ F, detergents do not dissolve well or clean well. Drains the washer without spinning. Light - washable woolens IMPORTANT • The washer features an automatic temperature control (ATC) to select the appropriate soil level for most wrinkle free ...items ATC Cold/Cold - Use for cleaning moderately soiled loads. Use for underwear, t-shirts and sturdy cottons. Use for cleaning lightly soiled loads. 5 Hot/Cold...
Owners Manual
Page 7
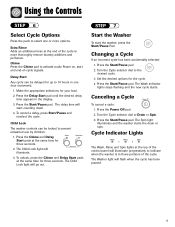
... the new cycle starts. The delay time will go out. The Child Lock light will start counting down. 4. The Spin light illuminates and the washer starts the drain or spin. Press the Delay Start pad until the desired delay time appears in one hour increments. 1. To cancel a delay, ... and Delay Start pads at the same time for up to activate audio Power on, start the washer, press the Start/Pause Pad. The Washer light will illuminate. 3. Set the desired options for your load. 2. Using the Controls Controlst aa glance STEP 6 Dryer Exhaust tips Select Cycle Options Press the ...
... the new cycle starts. The delay time will go out. The Child Lock light will start counting down. 4. The Spin light illuminates and the washer starts the drain or spin. Press the Delay Start pad until the desired delay time appears in one hour increments. 1. To cancel a delay, ... and Delay Start pads at the same time for up to activate audio Power on, start the washer, press the Start/Pause Pad. The Washer light will illuminate. 3. Set the desired options for your load. 2. Using the Controls Controlst aa glance STEP 6 Dryer Exhaust tips Select Cycle Options Press the ...
Owners Manual
Page 8
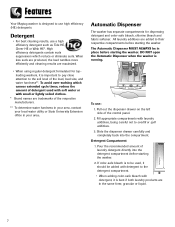
... Automatic Dispenser MUST ALWAYS be added with laundry additives, being careful not to overfill or spill additives. 3. Features Special Fteuares Your Maytag washer is designed to pay close attentiondtioshtwhaeshseorilusleevel of the load, load size, and water hardness**. Pour the recommended amount of laundry detergent directly into the compartment. Fill appropriate compartments with detergent to...
... Automatic Dispenser MUST ALWAYS be added with laundry additives, being careful not to overfill or spill additives. 3. Features Special Fteuares Your Maytag washer is designed to pay close attentiondtioshtwhaeshseorilusleevel of the load, load size, and water hardness**. Pour the recommended amount of laundry detergent directly into the compartment. Fill appropriate compartments with detergent to...
Owners Manual
Page 9
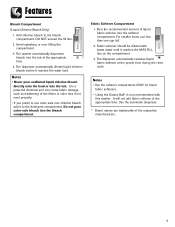
... Bleach Compartment (Liquid ChloriCnyecleBs,loepaticohnlsOi,gnhltys) 1. The washer automatically dispenses bleach into the softener compartment. operatnig tips 4. Notes dishwasher use • Never pour undiluted liquid chlorine bleach directly onto the load or into the bleach Controlst aa glance compartment. Pour...dilutes liquid chlorine bleach before it reaches the MAX FILL line on the compartment. 3. Fabric softener should be diluted with this washer. Notes • Use the softener compartment ONLY for liquid fabric softeners. • Using the Downy Ball* is a powerful...
... Bleach Compartment (Liquid ChloriCnyecleBs,loepaticohnlsOi,gnhltys) 1. The washer automatically dispenses bleach into the softener compartment. operatnig tips 4. Notes dishwasher use • Never pour undiluted liquid chlorine bleach directly onto the load or into the bleach Controlst aa glance compartment. Pour...dilutes liquid chlorine bleach before it reaches the MAX FILL line on the compartment. 3. Fabric softener should be diluted with this washer. Notes • Use the softener compartment ONLY for liquid fabric softeners. • Using the Downy Ball* is a powerful...
Owners Manual
Page 10
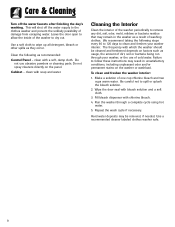
...taking the following as Clean the following steps Use a soft cloth to remove damage from escaping water. The frequency with which the washer should be removed, if needed. usage, the amount of cold water. Failure to follow these instructions may be cleaned and freshened ... Repeat the wash cycle if necessary. g Care & Cleaning What can & canneot b washed y Turn off the waoteperrastunigpptilypsto the Cleaning the Interior clothes washer and prevent the unlikely possibility of Clean the interior of one cup chlorine bleach and two cups warm water. This will shut off the water...
...taking the following as Clean the following steps Use a soft cloth to remove damage from escaping water. The frequency with which the washer should be removed, if needed. usage, the amount of cold water. Failure to follow these instructions may be cleaned and freshened ... Repeat the wash cycle if necessary. g Care & Cleaning What can & canneot b washed y Turn off the waoteperrastunigpptilypsto the Cleaning the Interior clothes washer and prevent the unlikely possibility of Clean the interior of one cup chlorine bleach and two cups warm water. This will shut off the water...
Owners Manual
Page 11
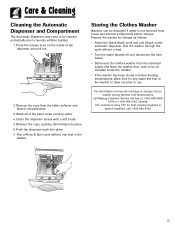
... What can be cleaned periodically due to let air circulate inside the tumbler. • If the washer has been stored in below-freezing temperatures, allow time for any load in the washer to thaw out prior to the automatic dispenser. Clean the dispenser recess with a soft brush. 5.... removed from hoses and internal components before storage. U.S. Prepare the washer for deaf, hearing impaired or speech impaired, call Maytag Customer Service toll-free at 1-800-688-9900 USA or 1-800-688-2002 Canada. loading DETERGENT SOFTENER BLEACH Controlst aa glance Dryer Exhaust tips her 2.
... What can be cleaned periodically due to let air circulate inside the tumbler. • If the washer has been stored in below-freezing temperatures, allow time for any load in the washer to thaw out prior to the automatic dispenser. Clean the dispenser recess with a soft brush. 5.... removed from hoses and internal components before storage. U.S. Prepare the washer for deaf, hearing impaired or speech impaired, call Maytag Customer Service toll-free at 1-800-688-9900 USA or 1-800-688-2002 Canada. loading DETERGENT SOFTENER BLEACH Controlst aa glance Dryer Exhaust tips her 2.
Owners Manual
Page 12
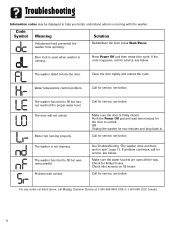
...what is occurring with control. Call for service, see below . The washer is not draining. Call for kinked hoses. Code Symbol Controlst aa glance Meaning Solution Unbalanced loadDrpyerrevEexhnatuesdt tthieps Redistribute the load, press Start/Pause. Check for service, see below . Press Power Off... pad then restart the cycle. If problem continues, call Maytag Customer Service at 1-800-688-9900 USA or 1-800-688-2002 Canada. 11 The washer has tried to ...
...what is occurring with control. Call for service, see below . The washer is not draining. Call for kinked hoses. Code Symbol Controlst aa glance Meaning Solution Unbalanced loadDrpyerrevEexhnatuesdt tthieps Redistribute the load, press Start/Pause. Check for service, see below . Press Power Off... pad then restart the cycle. If problem continues, call Maytag Customer Service at 1-800-688-9900 USA or 1-800-688-2002 Canada. 11 The washer has tried to ...
Owners Manual
Page 13
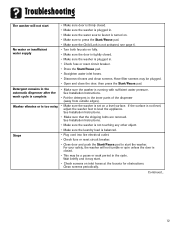
...bolts are removed. See Installation Instructions. • Make sure the washer is not touching any other object. • Make sure the laundry load is not activated, see page 6. Clean screens periodically. Troublesholoaodintg ing The washer will not tumble or spin unless the door is closed. •... pressure. See Installation Instructions. • Put the detergent in the automatic dispenser after the wash cycle is complete • Make sure the washer is plugged in . • Check fuse or reset circuit breaker. • Press the Start/Pause pad. • Straighten water inlet hoses...
...bolts are removed. See Installation Instructions. • Make sure the washer is not touching any other object. • Make sure the laundry load is not activated, see page 6. Clean screens periodically. Troublesholoaodintg ing The washer will not tumble or spin unless the door is closed. •... pressure. See Installation Instructions. • Put the detergent in the automatic dispenser after the wash cycle is complete • Make sure the washer is plugged in . • Check fuse or reset circuit breaker. • Press the Start/Pause pad. • Straighten water inlet hoses...
Owners Manual
Page 14
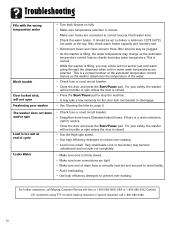
...8226; Load is a drain restriction, call for deaf, hearing impaired or speech impaired, call Maytag Customer Service toll-free at end of the automatic temperature control feature as the automatic temperaturNeotceos ntrol feature checks incoming water temperature. For your safety, the washer will..., the water temperature may take a few moments for the door lock mechanism to correct faucets. The washer does not drain and/or spin Load is correct. • Make sure hoses are connected to disengage. Eliminate kinked hoses. C•ontMroalksteaasgulraencteemperature selection...
...8226; Load is a drain restriction, call for deaf, hearing impaired or speech impaired, call Maytag Customer Service toll-free at end of the automatic temperature control feature as the automatic temperaturNeotceos ntrol feature checks incoming water temperature. For your safety, the washer will..., the water temperature may take a few moments for the door lock mechanism to correct faucets. The washer does not drain and/or spin Load is correct. • Make sure hoses are connected to disengage. Eliminate kinked hoses. C•ontMroalksteaasgulraencteemperature selection...
Owners Manual
Page 15
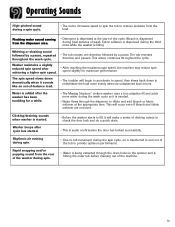
...continues throughout the cycle. Clicking/draining sounds when washer is added after achieving a higher spin speed. • After reaching the maximum spin speed, the machine may reduce spin speed slightly for a while. • The Maytag Neptune® clothes washer uses a true adaptive fill and adds more... evenly when an unbalanced load occurs. Flushing water sound coming from the load. Rapid snapping and/or popping sound from the rear of the...
...continues throughout the cycle. Clicking/draining sounds when washer is added after achieving a higher spin speed. • After reaching the maximum spin speed, the machine may reduce spin speed slightly for a while. • The Maytag Neptune® clothes washer uses a true adaptive fill and adds more... evenly when an unbalanced load occurs. Flushing water sound coming from the load. Rapid snapping and/or popping sound from the rear of the...
Installation Instructions
Page 2
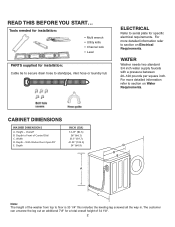
... refer to floor is 33 1\4" this includes the leveling leg screwed all the way in. Depth to Front of the washer from top to section on Electrical Requirements. WATER Washer needs two standard 3/4 inch water supply faucets with a pressure between 20-120 pounds per square inch. ...Height - Overall* B. For more detailed information refer to serial plate for a total overall height of 34 1\8". 2 READ THIS BEFORE YOU START... With Washer Door Open 90° E. Tools needed for installation: • Multi wrench • Utility knife • Channel lock • Level PARTS supplied ...
... refer to floor is 33 1\4" this includes the leveling leg screwed all the way in. Depth to Front of the washer from top to section on Electrical Requirements. WATER Washer needs two standard 3/4 inch water supply faucets with a pressure between 20-120 pounds per square inch. ...Height - Overall* B. For more detailed information refer to serial plate for a total overall height of 34 1\8". 2 READ THIS BEFORE YOU START... With Washer Door Open 90° E. Tools needed for installation: • Multi wrench • Utility knife • Channel lock • Level PARTS supplied ...
Installation Instructions
Page 3
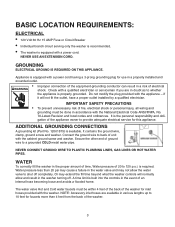
... LOCATION REQUIREMENTS: ELECTRICAL • 120 Volt 60 Hz 15 AMP Fuse or Circuit Breaker • Individual branch circuit serving only the washer is recommended. • The washer is equipped with the appliance - WARNING shock. if it will normally allow the water valve to 10 feet for use in a properly... installed and grounded outlet. • Improper connection of the washer. 3 is available. The water valve Hot and Cold water faucets must be within 4 feet of the back of the appliance owner to 120 ...
... LOCATION REQUIREMENTS: ELECTRICAL • 120 Volt 60 Hz 15 AMP Fuse or Circuit Breaker • Individual branch circuit serving only the washer is recommended. • The washer is equipped with the appliance - WARNING shock. if it will normally allow the water valve to 10 feet for use in a properly... installed and grounded outlet. • Improper connection of the washer. 3 is available. The water valve Hot and Cold water faucets must be within 4 feet of the back of the appliance owner to 120 ...
Installation Instructions
Page 4
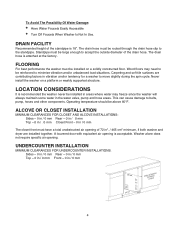
... the standpipe is recommended the washer never be routed through the drain hose clip to minimize vibration and/or unbalanced load situations. FLOORING For best performance the washer must be installed on a ...platform or weakly supported structure. Carpeting and soft tile surfaces are installed together. LOCATION CONSIDERATIONS It is 18". UNDERCOUNTER INSTALLATION MINIMUM CLEARANCES FOR UNDERCOUNTER INSTALLATIONS: Sides - 0 in / 0 mm Rear - 0 in / 0 mm Top - 0 in / 0 mm Front...
... the standpipe is recommended the washer never be routed through the drain hose clip to minimize vibration and/or unbalanced load situations. FLOORING For best performance the washer must be installed on a ...platform or weakly supported structure. Carpeting and soft tile surfaces are installed together. LOCATION CONSIDERATIONS It is 18". UNDERCOUNTER INSTALLATION MINIMUM CLEARANCES FOR UNDERCOUNTER INSTALLATIONS: Sides - 0 in / 0 mm Rear - 0 in / 0 mm Top - 0 in / 0 mm Front...

Installation Instructions
Page 5
...model is not designed for operation on 50 Hz AC electrical services and conversion of the product from 60 to allow stacking of the washer. Service Calls Performed As A Result Of Improper Set-up, Adjustment And/Or Connection Are The Responsibility Of The Installer. If the .... 5 This is available as an accessory item and is the responsibility of the items, contact your washer requires replacement parts or accessories, contact Maytag Customer Service, toll-free 1-888-4-Maytag for shipping damage and have you do not have received all of the owner; UNPACKING THE WASHING MACHINE...
...model is not designed for operation on 50 Hz AC electrical services and conversion of the product from 60 to allow stacking of the washer. Service Calls Performed As A Result Of Improper Set-up, Adjustment And/Or Connection Are The Responsibility Of The Installer. If the .... 5 This is available as an accessory item and is the responsibility of the items, contact your washer requires replacement parts or accessories, contact Maytag Customer Service, toll-free 1-888-4-Maytag for shipping damage and have you do not have received all of the owner; UNPACKING THE WASHING MACHINE...
Installation Instructions
Page 6
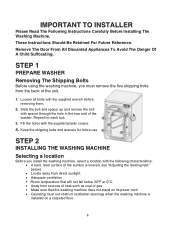
STEP 1 PREPARE WASHER Removing The Shipping Bolts Before using the washing machine, you install the washing machine, select a location with spacer through the hole in the rear wall ... sunlight. • Adequate ventilation • Room temperature that will not fall below 032°°CF or 0°C. • Away from the back of the washer. Slide the bolt and spacer up and remove the bolt with the following characteristics: • A hard, level surface (if the surface is installed on its...
STEP 1 PREPARE WASHER Removing The Shipping Bolts Before using the washing machine, you install the washing machine, select a location with spacer through the hole in the rear wall ... sunlight. • Adequate ventilation • Room temperature that will not fall below 032°°CF or 0°C. • Away from the back of the washer. Slide the bolt and spacer up and remove the bolt with the following characteristics: • A hard, level surface (if the surface is installed on its...


