User Guide
Page 3
... - Wireless-G PrintServer for USB 2.0 Table of Contents Chapter 1: Introduction 1 Welcome 1 What's in this Guide? 1 Chapter 2: Getting to Know the PrintServer 3 The Back Panel 3 The Front Panel 4 Chapter 3: Connecting the PrintServer 5 Overview 5 Connecting the PrintServer to Your Network 5 Chapter 4: Configuring the PrintServer Using the Setup Wizard 6 Installation 6 Chapter 5: Windows Driver Installation 13 Overview 13 Installation 13 Starting the Print Driver...
... - Wireless-G PrintServer for USB 2.0 Table of Contents Chapter 1: Introduction 1 Welcome 1 What's in this Guide? 1 Chapter 2: Getting to Know the PrintServer 3 The Back Panel 3 The Front Panel 4 Chapter 3: Connecting the PrintServer 5 Overview 5 Connecting the PrintServer to Your Network 5 Chapter 4: Configuring the PrintServer Using the Setup Wizard 6 Installation 6 Chapter 5: Windows Driver Installation 13 Overview 13 Installation 13 Starting the Print Driver...
User Guide
Page 4
Wireless-G PrintServer for USB 2.0 Starting the Bi-Admin Management Utility 30 The Bi-Admin Management Utility 31 Chapter 8: Internet Printing Protocol (IPP) 42 Overview 42 Windows IPP Client Setup 42 Appendix A: Troubleshooting 46 Common Problems and Solutions 46 Appendix B: Wireless Security 48 A Brief Overview 48 What Are The Risks? 48 Appendix C: About Bi-Directional Printing 55 Appendix D: Upgrading...
Wireless-G PrintServer for USB 2.0 Starting the Bi-Admin Management Utility 30 The Bi-Admin Management Utility 31 Chapter 8: Internet Printing Protocol (IPP) 42 Overview 42 Windows IPP Client Setup 42 Appendix A: Troubleshooting 46 Common Problems and Solutions 46 Appendix B: Wireless Security 48 A Brief Overview 48 What Are The Risks? 48 Appendix C: About Bi-Directional Printing 55 Appendix D: Upgrading...
User Guide
Page 5
NetBEUI 20 AppleTalk 19 Figure 6-5: Protocol Tab - Wireless-G PrintServer for USB 2.0 List of Figures Figure 2-1: PrintServer's Back Panel 3 Figure 2-2: PrintServer's Front Panel 4 Figure 3-1: Connecting to the LAN Port 5 Figure 3-2: Connecting to the USB Port 5 Figure 3-3: Connecting to the Parallel Port 5 Figure 3-4: Connecting to Access Web-based Utility 18 Figure 6-2: Setup 18 Figure 6-3: Protocol Tab - TCP/IP 19 Figure...
NetBEUI 20 AppleTalk 19 Figure 6-5: Protocol Tab - Wireless-G PrintServer for USB 2.0 List of Figures Figure 2-1: PrintServer's Back Panel 3 Figure 2-2: PrintServer's Front Panel 4 Figure 3-1: Connecting to the LAN Port 5 Figure 3-2: Connecting to the USB Port 5 Figure 3-3: Connecting to the Parallel Port 5 Figure 3-4: Connecting to Access Web-based Utility 18 Figure 6-2: Setup 18 Figure 6-3: Protocol Tab - TCP/IP 19 Figure...
User Guide
Page 6
... Wireless Tab - Security 23 Figure 6-9: Printer - TCP/IP 34 Figure 7-14: Configuration - Port 38 Figure 7-18: Configuration - Wireless-G PrintServer for... Device 30 Figure 7-7: Bi-Admin Management Utility 31 Figure 7-8: Device Information 31 Figure 7-9: Verify Password 32 Figure 7-10: Printer Status 32 Figure 7-11: Verify Password 33 Figure 7-12: Configuration - Internet Printing... 24 Figure 6-10: Printer - Logical Port 25 Figure 6-11: Status Tab - Wireless 27 Figure 6-14: Exit 27 Figure 7-1: Welcome 28 Figure 7-2: Bi-Admin Setup...
... Wireless Tab - Security 23 Figure 6-9: Printer - TCP/IP 34 Figure 7-14: Configuration - Port 38 Figure 7-18: Configuration - Wireless-G PrintServer for... Device 30 Figure 7-7: Bi-Admin Management Utility 31 Figure 7-8: Device Information 31 Figure 7-9: Verify Password 32 Figure 7-10: Printer Status 32 Figure 7-11: Verify Password 33 Figure 7-12: Configuration - Internet Printing... 24 Figure 6-10: Printer - Logical Port 25 Figure 6-11: Status Tab - Wireless 27 Figure 6-14: Exit 27 Figure 7-1: Welcome 28 Figure 7-2: Bi-Admin Setup...
User Guide
Page 8
... 's connected to install your office, you for choosing the Linksys Wireless-G PrintServer for each print server. Using a PrintServer frees up and using the Setup Wizard This chapter instructs you on all the time. Whichever way the PrintServer is most appropriate for USB 2.0. What's in your PrintServer. It also removes the printing bottleneck, and sets your network by 10/100 Ethernet cable...
... 's connected to install your office, you for choosing the Linksys Wireless-G PrintServer for each print server. Using a PrintServer frees up and using the Setup Wizard This chapter instructs you on all the time. Whichever way the PrintServer is most appropriate for USB 2.0. What's in your PrintServer. It also removes the printing bottleneck, and sets your network by 10/100 Ethernet cable...
User Guide
Page 13
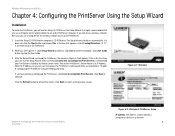
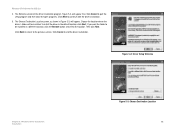
... List only new (unconfigured) Print Servers is selected and your CD-ROM drive). 2. Figure 4-1: Welcome Chapter 4: Configuring the PrintServer Using the Setup Wizard Installation Figure 4-2: Wireless-G PrintServer Setup IP address: the address used to identify a computer or device on the wired network to the previous screen. Wireless-G PrintServer for USB 2.0 Chapter 4: Configuring the PrintServer Using the Setup Wizard Installation To install the...
... List only new (unconfigured) Print Servers is selected and your CD-ROM drive). 2. Figure 4-1: Welcome Chapter 4: Configuring the PrintServer Using the Setup Wizard Installation Figure 4-2: Wireless-G PrintServer Setup IP address: the address used to identify a computer or device on the wired network to the previous screen. Wireless-G PrintServer for USB 2.0 Chapter 4: Configuring the PrintServer Using the Setup Wizard Installation To install the...
User Guide
Page 14
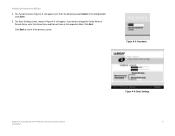
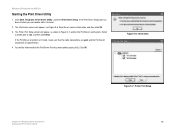
The Basic Settings screen, shown in the field provided. Figure 4-3: Password Chapter 4: Configuring the PrintServer Using the Setup Wizard Installation Figure 4-4: Basic Settings 7 If you want to the previous screen. Click Next. Click Back to return to change the Device Name or Domain Name, enter the Device Name and Domain Name in the respective fields. Enter the default password admin in Figure 4-4, will appear next. Wireless-G PrintServer for USB 2.0 4. Click Enter. 5. The Password screen, Figure 4-3, will appear.
The Basic Settings screen, shown in the field provided. Figure 4-3: Password Chapter 4: Configuring the PrintServer Using the Setup Wizard Installation Figure 4-4: Basic Settings 7 If you want to the previous screen. Click Next. Click Back to return to change the Device Name or Domain Name, enter the Device Name and Domain Name in the respective fields. Enter the default password admin in Figure 4-4, will appear next. Wireless-G PrintServer for USB 2.0 4. Click Enter. 5. The Password screen, Figure 4-3, will appear.
User Guide
Page 15
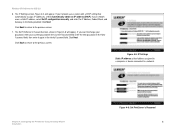
... Figure 4-5, will appear. If you want to the previous screen. 7. Wireless-G PrintServer for USB 2.0 6. Click Back to return to change your password, enter your current password in Figure 4-6 will appear. Chapter 4: Configuring the PrintServer Using the Setup Wizard Installation Figure 4-6: Set PrintServer's Password 8 Click Back to return to a network. Figure 4-5: IP ...your network uses a router with a DHCP setting that automatically assigns IP addresses, select Automatically obtain an IP address (DHCP). The Set PrintServer's Password screen, shown in the Current Password field.
... Figure 4-5, will appear. If you want to the previous screen. 7. Wireless-G PrintServer for USB 2.0 6. Click Back to return to change your password, enter your current password in Figure 4-6 will appear. Chapter 4: Configuring the PrintServer Using the Setup Wizard Installation Figure 4-6: Set PrintServer's Password 8 Click Back to return to a network. Figure 4-5: IP ...your network uses a router with a DHCP setting that automatically assigns IP addresses, select Automatically obtain an IP address (DHCP). The Set PrintServer's Password screen, shown in the Current Password field.
User Guide
Page 16
... the PrintServer Using the Setup Wizard 9 Installation In the SSID field, enter your wireless network's name. Select the channel at which a wireless network is bridged to a wired network via an access point. The Network Type setting shows a choice of wireless devices ...network broadcasts its wireless signal (available only if you selected Ad-Hoc for USB 2.0 8. The Wireless Settings screen will appear. Wireless-G PrintServer for the Network Type setting). Select Ad-Hoc if you want the PrintServer to continue. Figure 4-7: Wireless Settings SSID: your wireless network's SSID...
... the PrintServer Using the Setup Wizard 9 Installation In the SSID field, enter your wireless network's name. Select the channel at which a wireless network is bridged to a wired network via an access point. The Network Type setting shows a choice of wireless devices ...network broadcasts its wireless signal (available only if you selected Ad-Hoc for USB 2.0 8. The Wireless Settings screen will appear. Wireless-G PrintServer for the Network Type setting). Select Ad-Hoc if you want the PrintServer to continue. Figure 4-7: Wireless Settings SSID: your wireless network's SSID...

User Guide
Page 17
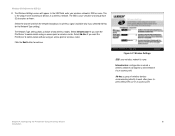
...encryption, keep the default, Disabled. The Passphrase is compatible with Linksys wireless products only. (You will have 16 alphanumeric characters or fewer. Chapter 4: Configuring the PrintServer Using the Setup Wizard 10 Installation If you want to continue. Passphrase: used... much like a password, a passphrase simplifies the WEP encryption process by automatically generating the WEP encryption for USB 2.0 9. The Wireless Security Settings screen...
...encryption, keep the default, Disabled. The Passphrase is compatible with Linksys wireless products only. (You will have 16 alphanumeric characters or fewer. Chapter 4: Configuring the PrintServer Using the Setup Wizard 10 Installation If you want to continue. Passphrase: used... much like a password, a passphrase simplifies the WEP encryption process by automatically generating the WEP encryption for USB 2.0 9. The Wireless Security Settings screen...
User Guide
Page 18
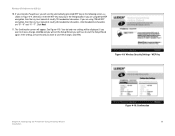
... are using 64-bit WEP encryption, then the key must consist of exactly 10 hexadecimal characters. WEP Key Chapter 4: Configuring the PrintServer Using the Setup Wizard Installation Figure 4-10: Confirmation 11 Wireless-G PrintServer for USB 2.0 10. If you want to make a change, click No and you are using 128-bit WEP encryption, then the key...
... are using 64-bit WEP encryption, then the key must consist of exactly 10 hexadecimal characters. WEP Key Chapter 4: Configuring the PrintServer Using the Setup Wizard Installation Figure 4-10: Confirmation 11 Wireless-G PrintServer for USB 2.0 10. If you want to make a change, click No and you are using 128-bit WEP encryption, then the key...

User Guide
Page 19
Figure 4-11: Congratulations Chapter 4: Configuring the PrintServer Using the Setup Wizard 12 Installation Click User Install at the bottom of the Congratulations screen, and go to install the driver next. Wireless-G PrintServer for USB 2.0 12. The Congratulations screen, shown in Figure 4-11, will need to "Chapter 5: Windows Driver Installation." The setup is complete. You will appear.
Figure 4-11: Congratulations Chapter 4: Configuring the PrintServer Using the Setup Wizard 12 Installation Click User Install at the bottom of the Congratulations screen, and go to install the driver next. Wireless-G PrintServer for USB 2.0 12. The Congratulations screen, shown in Figure 4-11, will need to "Chapter 5: Windows Driver Installation." The setup is complete. You will appear.
User Guide
Page 20
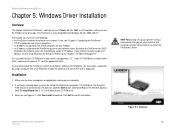
...following: • the PrintServer hardware installed on your computer. 2. In the field that appears, enter D:\setupWizard.exe (if "D" is designated as "D". Linksys recommends that your CD-ROM...Overview Wireless-G PrintServer for USB 2.0 Chapter 5: Windows Driver Installation Overview This section installs the PrintServer's software on your Windows 98, Me, 2000, or XP computers so they can create a setup disk ...you can use the PrintServer for print jobs. (The PrintServer is named another letter, replace all instances of your CD-ROM drive). 3. By default the PrintServer has DHCP enabled so ...
...following: • the PrintServer hardware installed on your computer. 2. In the field that appears, enter D:\setupWizard.exe (if "D" is designated as "D". Linksys recommends that your CD-ROM...Overview Wireless-G PrintServer for USB 2.0 Chapter 5: Windows Driver Installation Overview This section installs the PrintServer's software on your Windows 98, Me, 2000, or XP computers so they can create a setup disk ...you can use the PrintServer for print jobs. (The PrintServer is named another letter, replace all instances of your CD-ROM drive). 3. By default the PrintServer has DHCP enabled so ...
User Guide
Page 21
Figure 5-2: Driver Setup Welcome Chapter 5: Windows Driver Installation Installation Figure 5-3: Choose Destination Location 14 Then click Next. The Choose Destination Location screen, as shown in the default location, ... installation. To install the driver in Figure 5-3, will appear first. Click Cancel to the previous screen. Wireless-G PrintServer for USB 2.0 4. If you want the folder to continue with the driver installation. 5. Click Cancel to quit the setup program and then close the open programs. Click Next to be installed. The Welcome screen of the...
Figure 5-2: Driver Setup Welcome Chapter 5: Windows Driver Installation Installation Figure 5-3: Choose Destination Location 14 Then click Next. The Choose Destination Location screen, as shown in the default location, ... installation. To install the driver in Figure 5-3, will appear first. Click Cancel to the previous screen. Wireless-G PrintServer for USB 2.0 4. If you want the folder to continue with the driver installation. 5. Click Cancel to quit the setup program and then close the open programs. Click Next to be installed. The Welcome screen of the...

User Guide
Page 22
... 5-5: Setup Complete 15 When the driver is selected. You may change the name for USB 2.0 6. Click Back to return to end the driver installation and begin the driver configuration. Click Finish to the previous screen. Wireless-G PrintServer for the program folder, if you wish. Click Next. The Select Program Folder screen will appear. The Print...
... 5-5: Setup Complete 15 When the driver is selected. You may change the name for USB 2.0 6. Click Back to return to end the driver installation and begin the driver configuration. Click Finish to the previous screen. Wireless-G PrintServer for the program folder, if you wish. Click Next. The Select Program Folder screen will appear. The Print...
User Guide
Page 23
... 5-6: Information Chapter 5: Windows Driver Installation Starting the Print Driver Utility Figure 5-7: Printer Port Setup 16 Click Start, Programs, Print Server Utility, and then Print Driver Setup. You will appear, as shown in Figure 5-7, and list the PrintServer and its ports. The Information screen will appear; see Figure 5-6. Wireless-G PrintServer for USB 2.0 Starting the Print Driver Utility 1. Click OK. Read the on...
... 5-6: Information Chapter 5: Windows Driver Installation Starting the Print Driver Utility Figure 5-7: Printer Port Setup 16 Click Start, Programs, Print Server Utility, and then Print Driver Setup. You will appear, as shown in Figure 5-7, and list the PrintServer and its ports. The Information screen will appear; see Figure 5-6. Wireless-G PrintServer for USB 2.0 Starting the Print Driver Utility 1. Click OK. Read the on...

User Guide
Page 24
... to close the Printer Port Setup screen. Wireless-G PrintServer for USB 2.0 5. Click Refresh to cancel the setup. 6. You can now use the PrintServer's web-based utility. Select the printer you would like to associate the printer with your selected printer port. Figure 5-8: Configure Printer Port Chapter 5: Windows Driver Installation 17 Starting the Print Driver Utility The Configure...
... to close the Printer Port Setup screen. Wireless-G PrintServer for USB 2.0 5. Click Refresh to cancel the setup. 6. You can now use the PrintServer's web-based utility. Select the printer you would like to associate the printer with your selected printer port. Figure 5-8: Configure Printer Port Chapter 5: Windows Driver Installation 17 Starting the Print Driver Utility The Configure...
User Guide
Page 25
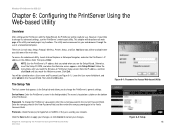
... the box(es) for use of the main tabs. Wireless-G PrintServer for USB 2.0 Chapter 6: Configuring the PrintServer Using the Web-based Utility Overview After setting up the PrintServer with the Setup Wizard, the PrintServer will be ready for AppleTalk or NetBEUI, if they are six main tabs: Setup, Protocol, Wireless, Printer, Status, and Exit. This chapter will be available...
... the box(es) for use of the main tabs. Wireless-G PrintServer for USB 2.0 Chapter 6: Configuring the PrintServer Using the Web-based Utility Overview After setting up the PrintServer with the Setup Wizard, the PrintServer will be ready for AppleTalk or NetBEUI, if they are six main tabs: Setup, Protocol, Wireless, Printer, Status, and Exit. This chapter will be available...
User Guide
Page 28
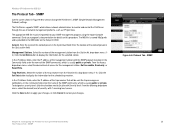
...SNMP community, which is usually public or private. To designate a severity level, click the checkbox next to cancel your program's documentation for USB 2.0 The Protocol Tab - SNMP SNMP Use the screen shown in the MiB folder on this management station, Not Accessible, Read-only, ... Click the Save button to apply your changes, or click Cancel to Enable with Severity level. Figure 6-6: Protocol Tab - Wireless-G PrintServer for details on the Setup CD-ROM. SNMP Chapter 6: Configuring the PrintServer Using the Web-based Utility 21 The Protocol Tab - drop-down menu (14).
...SNMP community, which is usually public or private. To designate a severity level, click the checkbox next to cancel your program's documentation for USB 2.0 The Protocol Tab - SNMP SNMP Use the screen shown in the MiB folder on this management station, Not Accessible, Read-only, ... Click the Save button to apply your changes, or click Cancel to Enable with Severity level. Figure 6-6: Protocol Tab - Wireless-G PrintServer for details on the Setup CD-ROM. SNMP Chapter 6: Configuring the PrintServer Using the Web-based Utility 21 The Protocol Tab - drop-down menu (14).
User Guide
Page 35
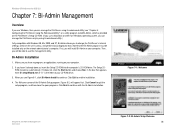
... of your computer. Figure 7-1: Welcome Chapter 8: Bi-Admin Management Overview Figure 7-2: Bi-Admin Setup Welcome 28 First, you to use the management utility. Wireless-G PrintServer for USB 2.0 Chapter 7: Bi-Admin Management Overview If you use Windows, then you can manage the PrintServer only by using its web-based utility (see Figure 8-1, click Bi-Admin Install...
... of your computer. Figure 7-1: Welcome Chapter 8: Bi-Admin Management Overview Figure 7-2: Bi-Admin Setup Welcome 28 First, you to use the management utility. Wireless-G PrintServer for USB 2.0 Chapter 7: Bi-Admin Management Overview If you use Windows, then you can manage the PrintServer only by using its web-based utility (see Figure 8-1, click Bi-Admin Install...


