User's Reference
Page 4
Chapter 7: Customizing your MFP configuration 23 Customize copy settings 23 Restore factory default settings 23 Manually set basic fax information 24 Create permanent fax destinations 25 Change fax send and receive settings 25 Adjust analog send fax options 26 Adjust analog ...
Chapter 7: Customizing your MFP configuration 23 Customize copy settings 23 Restore factory default settings 23 Manually set basic fax information 24 Create permanent fax destinations 25 Change fax send and receive settings 25 Adjust analog send fax options 26 Adjust analog ...
User's Reference
Page 13
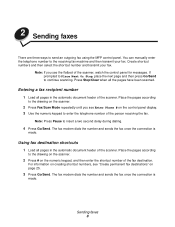
... Go/Send. If prompted to Place Next Or Stop, place the next page and then press Go/Send to send an outgoing fax using the MFP control panel. Entering a fax recipient number 1 Load all the pages have been scanned. Place the pages according to the drawing on the scanner. 2...automatic document feeder of the scanner. Sending faxes 8 Place the pages according to enter the telephone number of the person receiving the fax. You can manually enter the telephone number to insert a two second delay during dialing. 4 Press Go/Send. For information on creating shortcut numbers, see Enter Phone ...
... Go/Send. If prompted to Place Next Or Stop, place the next page and then press Go/Send to send an outgoing fax using the MFP control panel. Entering a fax recipient number 1 Load all the pages have been scanned. Place the pages according to the drawing on the scanner. 2...automatic document feeder of the scanner. Sending faxes 8 Place the pages according to enter the telephone number of the person receiving the fax. You can manually enter the telephone number to insert a two second delay during dialing. 4 Press Go/Send. For information on creating shortcut numbers, see Enter Phone ...
User's Reference
Page 14
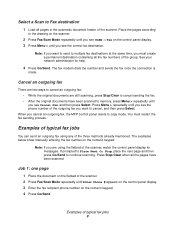
...time, you see the correct fax destination. Place the pages according to continue scanning. See your network administrator for messages. The examples below show manually entering the fax number on the numeric keypad. 4 Press Go/Send. The fax modem dials the number and sends the fax once the connection...sending the fax. • After the original documents have been scanned to memory, press Menu > repeatedly until you cancel an outgoing fax, the MFP control panel resets to Fax destination 1 Load all the pages have been scanned. Cancel an outgoing fax There are two ways to cancel an ...
...time, you see the correct fax destination. Place the pages according to continue scanning. See your network administrator for messages. The examples below show manually entering the fax number on the numeric keypad. 4 Press Go/Send. The fax modem dials the number and sends the fax once the connection...sending the fax. • After the original documents have been scanned to memory, press Menu > repeatedly until you cancel an outgoing fax, the MFP control panel resets to Fax destination 1 Load all the pages have been scanned. Cancel an outgoing fax There are two ways to cancel an ...
User's Reference
Page 17
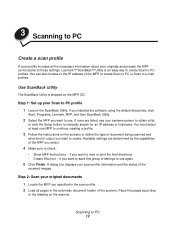
...mail profiles. Step 1: Set up your systems person to obtain a list, or click the Setup button to manually search for an IP address or hostname. You must select at least one MFP to continue creating a profile. 3 Follow the instructions on the screens to define the type of document being ... installed the software using the default directories, click Start, Programs, Lexmark, MFP, and then ScanBack Utility. 2 Select the MFP you want to the drawing on the MFP CD. Step 2: Scan your scan profile information and the status of the MFP to create Scan to PC or Scan to PC 12 Place the...
...mail profiles. Step 1: Set up your systems person to obtain a list, or click the Setup button to manually search for an IP address or hostname. You must select at least one MFP to continue creating a profile. 3 Follow the instructions on the screens to define the type of document being ... installed the software using the default directories, click Start, Programs, Lexmark, MFP, and then ScanBack Utility. 2 Select the MFP you want to the drawing on the MFP CD. Step 2: Scan your scan profile information and the status of the MFP to create Scan to PC or Scan to PC 12 Place the...
User's Reference
Page 24
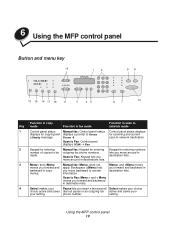
... Control panel displays SCAN → Fax 2 Keypad for entering Manual fax: Keypad for entering Keypad for scanning and current a Ready message. lets you destination lists. Scan to Fax: Keypad lets you move around in made. Phone #. 6 Using the MFP control panel Button and menu key 12 1 2 98 13 ...15 14 17 16 11 3 45 6 7 10 Function in copy Key mode Function in fax mode Function in scan to network mode 1 Control panel status Manual fax: Control panel status Control panel status...
... Control panel displays SCAN → Fax 2 Keypad for entering Manual fax: Keypad for entering Keypad for scanning and current a Ready message. lets you destination lists. Scan to Fax: Keypad lets you move around in made. Phone #. 6 Using the MFP control panel Button and menu key 12 1 2 98 13 ...15 14 17 16 11 3 45 6 7 10 Function in copy Key mode Function in fax mode Function in scan to network mode 1 Control panel status Manual fax: Control panel status Control panel status...
User's Reference
Page 25
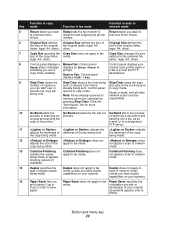
... or applies finishing options (if available). Duplex does not apply to scan to network mode, unless you have duplex being made . other ). 8 Control panel displays a Manual fax: Control panel Ready status message displays an Enter Phone # indicating you are in prompt. legal, A4, other). 7 Copy Size specifies the Copy Size does...
... or applies finishing options (if available). Duplex does not apply to scan to network mode, unless you have duplex being made . other ). 8 Control panel displays a Manual fax: Control panel Ready status message displays an Enter Phone # indicating you are in prompt. legal, A4, other). 7 Copy Size specifies the Copy Size does...
User's Reference
Page 27
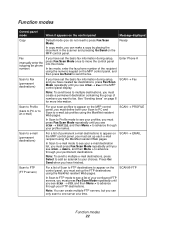
... # Scan to Fax (permanent destinations) If you have set the basic fax information during setup, and you have finished. Ready Fax (manually enter the outgoing fax phone number) If you have created fax destinations, press Fax/Scan Mode repeatedly until you see SCAN → EMAIL... Note: To send faxes to multiple destinations, you must create a permanent destination containing the group of permanent e-mail destinations to appear on the MFP control panel, you must press Fax/Scan Mode repeatedly until you see SCAN → FTP, and then Menu > to advance through your Scan...
... # Scan to Fax (permanent destinations) If you have set the basic fax information during setup, and you have finished. Ready Fax (manually enter the outgoing fax phone number) If you have created fax destinations, press Fax/Scan Mode repeatedly until you see SCAN → EMAIL... Note: To send faxes to multiple destinations, you must create a permanent destination containing the group of permanent e-mail destinations to appear on the MFP control panel, you must press Fax/Scan Mode repeatedly until you see SCAN → FTP, and then Menu > to advance through your Scan...
User's Reference
Page 28
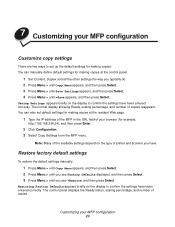
...example, http://192.168.236.24), and then press Enter. 2 Click Configuration. 3 Select Copy Settings from the MFP menu. Restore factory default settings To restore the default settings manually: 1 Press Menu > until Copy Menu appears, and then press Select. 2 Press Menu > until you see Factory... Defaults displayed, and then press Select. 3 Press Menu > until =Save appears, and then press Select. 7 Customizing your MFP configuration Customize copy settings ...
...example, http://192.168.236.24), and then press Enter. 2 Click Configuration. 3 Select Copy Settings from the MFP menu. Restore factory default settings To restore the default settings manually: 1 Press Menu > until Copy Menu appears, and then press Select. 2 Press Menu > until you see Factory... Defaults displayed, and then press Select. 3 Press Menu > until =Save appears, and then press Select. 7 Customizing your MFP configuration Customize copy settings ...
User's Reference
Page 29
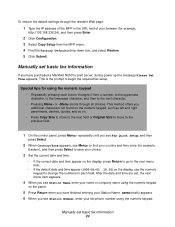
... and time are set, the next menu item appears. 4 When you see Station Number, enter your fax phone number using the numeric keypad. Manually set basic fax information If you have finished entering your Station Name. To restore the default settings through the resident Web page: 1 Type the IP... address of the MFP in the URL field of your browser (for example, http://192.168.236.24), and then press Enter. 2 Click Configuration. 3 Select Copy Setup from...
... and time are set, the next menu item appears. 4 When you see Station Number, enter your fax phone number using the numeric keypad. Manually set basic fax information If you have finished entering your Station Name. To restore the default settings through the resident Web page: 1 Type the IP... address of the MFP in the URL field of your browser (for example, http://192.168.236.24), and then press Enter. 2 Click Configuration. 3 Select Copy Setup from...
User's Reference
Page 37
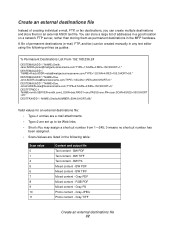
...;NUMBER=5544;SHORT=88;" Valid values for an external destinations file: • Type=1 entries are e-mail attachments. • Type=2 are set up to be created manually in any text editor using the following table: Scan value 0 1 4 5 6 7 8 9 10 11 Content and output file Text content - BW PS Mixed content - BW TIFF Mixed... a shortcut number from 1-245; 0 means no shortcut number has been assigned. • Scan=Values are listed in the following entries as permanent destinations in the MFP hardware.
...;NUMBER=5544;SHORT=88;" Valid values for an external destinations file: • Type=1 entries are e-mail attachments. • Type=2 are set up to be created manually in any text editor using the following table: Scan value 0 1 4 5 6 7 8 9 10 11 Content and output file Text content - BW PS Mixed content - BW TIFF Mixed... a shortcut number from 1-245; 0 means no shortcut number has been assigned. • Scan=Values are listed in the following entries as permanent destinations in the MFP hardware.
User's Reference
Page 43
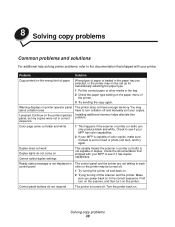
... media in correct sequence The printer does not have to mixed or photo (not text), and try again. Check the documentation that shipped with your MFP to the documentation that shipped with your copies. Solving copy problems 38 You may be turned off. 1 Try turning the printer off the scanner and... Copy printed on the wrong kind of paper Wrong type of paper is not capable of color copies, make sure Content is turned off and manually sort your printer. 8 Solving copy problems Common problems and solutions For additional help solving printer problems, refer to see if your...
... media in correct sequence The printer does not have to mixed or photo (not text), and try again. Check the documentation that shipped with your MFP to the documentation that shipped with your copies. Solving copy problems 38 You may be turned off. 1 Try turning the printer off the scanner and... Copy printed on the wrong kind of paper Wrong type of paper is not capable of color copies, make sure Content is turned off and manually sort your printer. 8 Solving copy problems Common problems and solutions For additional help solving printer problems, refer to see if your...
User's Reference
Page 46
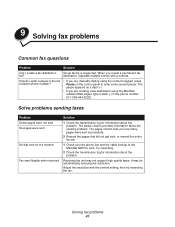
... the MarkNet N2501e card. 9 Solving fax problems Common fax questions Problem Solution Can I enter a pause in the fax recipient phone number? • If you are manually dialing using the MarkNet resident Web pages, type a dash (-) in the phone number (9-1-555-444-2222). When you how many pages were sent successfully. 2 Resend...
... the MarkNet N2501e card. 9 Solving fax problems Common fax questions Problem Solution Can I enter a pause in the fax recipient phone number? • If you are manually dialing using the MarkNet resident Web pages, type a dash (-) in the phone number (9-1-555-444-2222). When you how many pages were sent successfully. 2 Resend...
User's Reference
Page 53
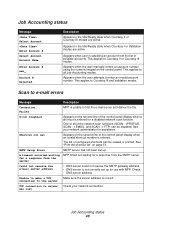
Appears when the user manually enters an account number using the numeric keypad on the second line of the... be viewed or printed. was lost Job Accounting status 48 Scan to e-mail errors Message Description Connection Failed MFP is unable to make a TCP Make sure the server address is selecting an account from the SMTP server.... Unable to find the e-mail server and deliver the file. A timeout occurred waiting MFP timed out waiting for use with MFP. S-cut Disabled Appears on page 51. See your network connection. Appears in the Idle/Ready...
Appears when the user manually enters an account number using the numeric keypad on the second line of the... be viewed or printed. was lost Job Accounting status 48 Scan to e-mail errors Message Description Connection Failed MFP is unable to make a TCP Make sure the server address is selecting an account from the SMTP server.... Unable to find the e-mail server and deliver the file. A timeout occurred waiting MFP timed out waiting for use with MFP. S-cut Disabled Appears on page 51. See your network connection. Appears in the Idle/Ready...

Setup Guide
Page 25
... on page 21 and begin with your printer documentation. If your network is not using DHCP, an IP address is using DHCP, then you must manually assign an IP address to the printer. 1 Press Menu until you see Network Menu, and then press Select. 2 Press Menu until you see Print Net...
... on page 21 and begin with your printer documentation. If your network is not using DHCP, an IP address is using DHCP, then you must manually assign an IP address to the printer. 1 Press Menu until you see Network Menu, and then press Select. 2 Press Menu until you see Print Net...

Setup Guide
Page 35
... minute. 1 On the MFP control panel, press the appropriate buttons to change the copy settings for individual jobs by changing settings on the control panel but not entering the Copy menu to indicate the current setting. Change your default copy settings 30 Manually changing settings Note: You can... change the Content, Copy Media, Duplex, or other settings to access the MFP IP address and enter the Configure menu. The indicator light next to the value ...
... minute. 1 On the MFP control panel, press the appropriate buttons to change the copy settings for individual jobs by changing settings on the control panel but not entering the Copy menu to indicate the current setting. Change your default copy settings 30 Manually changing settings Note: You can... change the Content, Copy Media, Duplex, or other settings to access the MFP IP address and enter the Configure menu. The indicator light next to the value ...
Setup Guide
Page 37
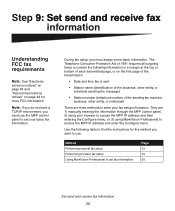
... Station number (telephone number of the sending fax machine, business, other entity, or individual) There are 1) manually entering the information through the MFP control panel, 2) using your browser to access the MFP IP address and then entering the Configure menu, or 3) using MarkVision Professional to set fax information Page 33 34...bottom of 1991 requires all outgoing faxes to contain the following table to find the instructions for more FCC information. Method Performing manual fax setup Performing browser fax setup Using MarkVision Professional to set your fax setup information.
... Station number (telephone number of the sending fax machine, business, other entity, or individual) There are 1) manually entering the information through the MFP control panel, 2) using your browser to access the MFP IP address and then entering the Configure menu, or 3) using MarkVision Professional to set fax information Page 33 34...bottom of 1991 requires all outgoing faxes to contain the following table to find the instructions for more FCC information. Method Performing manual fax setup Performing browser fax setup Using MarkVision Professional to set your fax setup information.

Setup Guide
Page 38
...number using the numeric keypad on the panel. 7 Press Return after entering your Station Number. Set send and receive fax information 33 To manually enter the fax setup information: 1 On the control panel, press Menu repeatedly until you have finished entering your Station Name. SAVED briefly ...appears. 6 When you want to change. SAVED briefly appears. Performing manual fax setup You can quickly change menu settings from the MFP control panel by pressing Menu and then selecting the menu for example, Eastern), and then press Select to...
...number using the numeric keypad on the panel. 7 Press Return after entering your Station Number. Set send and receive fax information 33 To manually enter the fax setup information: 1 On the control panel, press Menu repeatedly until you have finished entering your Station Name. SAVED briefly ...appears. 6 When you want to change. SAVED briefly appears. Performing manual fax setup You can quickly change menu settings from the MFP control panel by pressing Menu and then selecting the menu for example, Eastern), and then press Select to...
Setup Guide
Page 46
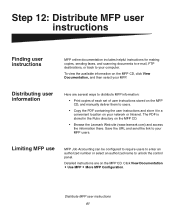
... of user instructions stored on the MFP CD, and manually deliver them to your network or Intranet. Distributing user information Here are on your MFP users. Distribute MFP user instructions 41 Step 12: Distribute MFP user instructions Finding user instructions MFP online documentation includes helpful instructions for...authorized number or select an authorized name to your MFP. The PDF is stored in a convenient location on the MFP CD. To view the available information on the MFP CD. • Browse the Lexmark Web site (www.lexmark.com) and access the information there. Save ...
... of user instructions stored on the MFP CD, and manually deliver them to your network or Intranet. Distributing user information Here are on your MFP users. Distribute MFP user instructions 41 Step 12: Distribute MFP user instructions Finding user instructions MFP online documentation includes helpful instructions for...authorized number or select an authorized name to your MFP. The PDF is stored in a convenient location on the MFP CD. To view the available information on the MFP CD. • Browse the Lexmark Web site (www.lexmark.com) and access the information there. Save ...
Setup Guide
Page 53
... cables or by unauthorized changes or modifications to Part 15 of this equipment. Telecommunications notices FCC rules Part 68 This equipment complies with the instruction manual, may be connected to operate this equipment in a residential area is likely to cause harmful interference, in which case the user will be connected to...
... cables or by unauthorized changes or modifications to Part 15 of this equipment. Telecommunications notices FCC rules Part 68 This equipment complies with the instruction manual, may be connected to operate this equipment in a residential area is likely to cause harmful interference, in which case the user will be connected to...


