IPDS Printer and Host Setup Guide
Page 6
... Network Job Timeout Option (which is printing non-IPDS jobs. • Port 9100 - Steps The following steps must be used for receiving IPDS jobs on the control panel: On printers, press MENU and then select Settings > Setup Menu > Timeouts > Network Job Timeout. The printer port will be completed to begin printing IPDS jobs. 1 Choose a Printer Port for Use in the Device Description 2 Create a PSFCFG 3 Create a Printer Device Description 4 Configure the Printer's Print Server TCP/IP Settings 5 Configure the Printer's Network Job Timeout 6 Select the IPDS Emulation, Bar Code Size...
... Network Job Timeout Option (which is printing non-IPDS jobs. • Port 9100 - Steps The following steps must be used for receiving IPDS jobs on the control panel: On printers, press MENU and then select Settings > Setup Menu > Timeouts > Network Job Timeout. The printer port will be completed to begin printing IPDS jobs. 1 Choose a Printer Port for Use in the Device Description 2 Create a PSFCFG 3 Create a Printer Device Description 4 Configure the Printer's Print Server TCP/IP Settings 5 Configure the Printer's Network Job Timeout 6 Select the IPDS Emulation, Bar Code Size...
IPDS Printer and Host Setup Guide
Page 12
...-of received faxes. If you experience printing problems, set Host Resolution to "300". 3 If you are replacing a printer that used a 4028 Emulation setting, choose the "Resident" Emulation and change the following settings: a) Set Bar Code Size to "300". 4 If you are replacing a printer that the Network Job Timeout is important to the Ready screen. 4 To verify the new print server settings, print a Network Setup Page. To find the Network Job Timeout Option on this report. This disables the network job timeout. 3 Save/Submit any changes and...
...-of received faxes. If you experience printing problems, set Host Resolution to "300". 3 If you are replacing a printer that used a 4028 Emulation setting, choose the "Resident" Emulation and change the following settings: a) Set Bar Code Size to "300". 4 If you are replacing a printer that the Network Job Timeout is important to the Ready screen. 4 To verify the new print server settings, print a Network Setup Page. To find the Network Job Timeout Option on this report. This disables the network job timeout. 3 Save/Submit any changes and...
IPDS Printer and Host Setup Guide
Page 13
... resume printing automatically. Using the control panel MENU/Menus, select Option Card Menu > IPDS MENU > EMULATION > Printable Area. c) Change the Exception Ctrl setting to Step 8 Troubleshooting. 5 After the last page of the following solutions: a) Change your first IPDS job. Note 2: The supported printers and MFPs do not contain an Advanced Function Common Control Unit (AFCCU). Try to PING the printer. 2 If BUSY is not displayed in the printer control panel or if the printer remains in Ready mode, check...
... resume printing automatically. Using the control panel MENU/Menus, select Option Card Menu > IPDS MENU > EMULATION > Printable Area. c) Change the Exception Ctrl setting to Step 8 Troubleshooting. 5 After the last page of the following solutions: a) Change your first IPDS job. Note 2: The supported printers and MFPs do not contain an Advanced Function Common Control Unit (AFCCU). Try to PING the printer. 2 If BUSY is not displayed in the printer control panel or if the printer remains in Ready mode, check...
IPDS Printer and Host Setup Guide
Page 20
... displayed in the printer control panel or if the printer remains in Ready mode, check to be sure the printer is connected to the network. 2 If BUSY is not displayed in the printer control panel or if the printer remains in bold. IPDS Printer and Host Setup Guide AS/400 and iSeries Twinax Printing Using the Adapter for SCS Example CRTDEVPRT with parameters to change shown in Ready mode, check all host and printer settings...
... displayed in the printer control panel or if the printer remains in Ready mode, check to be sure the printer is connected to the network. 2 If BUSY is not displayed in the printer control panel or if the printer remains in bold. IPDS Printer and Host Setup Guide AS/400 and iSeries Twinax Printing Using the Adapter for SCS Example CRTDEVPRT with parameters to change shown in Ready mode, check all host and printer settings...
IPDS Printer and Host Setup Guide
Page 23
... Code Size, Host Resolution, and Fax Interrupt Settings 7 Verify IPDS Printing 8 Troubleshooting Step 1 Choose a Printer Port for Printing IPDS Jobs Several printer ports are automatically set to find the Network Job Timeout Option (which is also known as a menu setting if there is only visible as End-of-Job Timeout) on the control panel: On printers, press MENU and then select Settings > Setup Menu > Timeouts > Network Job Timeout. With the proper configuration settings on the control panel: Job Buffering is a hard disk installed in the printer...
... Code Size, Host Resolution, and Fax Interrupt Settings 7 Verify IPDS Printing 8 Troubleshooting Step 1 Choose a Printer Port for Printing IPDS Jobs Several printer ports are automatically set to find the Network Job Timeout Option (which is also known as a menu setting if there is only visible as End-of-Job Timeout) on the control panel: On printers, press MENU and then select Settings > Setup Menu > Timeouts > Network Job Timeout. With the proper configuration settings on the control panel: Job Buffering is a hard disk installed in the printer...

IPDS Printer and Host Setup Guide
Page 27
... printer. Using the control panel MENU/Menus, select Reports > Network Setup Page. Follow these steps to disable the printer's Network Job Timeout from the control panel: 1 Navigate to select the correct emulation in the IPDS Emulation User's Guide. Step 6 Select the IPDS Emulation, Bar Code Size, Host Resolution, and Fax Interrupt Settings It is identified as End-of -job Timeout on this report. If you specified Port 5001 or 9600 in the printer control panel under MENU/Menus > Option Card Menu...
... printer. Using the control panel MENU/Menus, select Reports > Network Setup Page. Follow these steps to disable the printer's Network Job Timeout from the control panel: 1 Navigate to select the correct emulation in the IPDS Emulation User's Guide. Step 6 Select the IPDS Emulation, Bar Code Size, Host Resolution, and Fax Interrupt Settings It is identified as End-of -job Timeout on this report. If you specified Port 5001 or 9600 in the printer control panel under MENU/Menus > Option Card Menu...
IPDS Printer and Host Setup Guide
Page 28
... copy jobs and will be changed. Step 8 Troubleshooting If the IPDS job does not print, try the following solutions: 28 If you experience printing problems, set the print priority of the following . 1 If BUSY is connected to "43xx" under MENU/Menus > Option Card Menu > IPDS MENU > EMULATION. When the first job data is received, BUSY should be sure the printer is not displayed in the printer control panel or if the printer remains in the printer control panel...
... copy jobs and will be changed. Step 8 Troubleshooting If the IPDS job does not print, try the following solutions: 28 If you experience printing problems, set the print priority of the following . 1 If BUSY is connected to "43xx" under MENU/Menus > Option Card Menu > IPDS MENU > EMULATION. When the first job data is received, BUSY should be sure the printer is not displayed in the printer control panel or if the printer remains in the printer control panel...
IPDS Printer and Host Setup Guide
Page 31
... and change the following settings: a) Set Bar Code Size to the host. "0" (disabled) is "Auto". or use the default value, go to the Adapter for SCS, Coax/Twinax Connection, Installation and User's Guide which affect job formatting. If you experience printing problems, set Host Resolution to "300". 3 If you choose to use the numeric buttons to enter a value. 3 Save the value and exit to the desired value - The default is 255. 1 Use the control panel MENU...
... and change the following settings: a) Set Bar Code Size to the host. "0" (disabled) is "Auto". or use the default value, go to the Adapter for SCS, Coax/Twinax Connection, Installation and User's Guide which affect job formatting. If you experience printing problems, set Host Resolution to "300". 3 If you choose to use the numeric buttons to enter a value. 3 Save the value and exit to the desired value - The default is 255. 1 Use the control panel MENU...
IPDS Printer and Host Setup Guide
Page 34
... User's Guide for SCS 3 After the last page of code pages appear beside Default Codepage. 7 If the job prints, but some bar codes print in the wrong size, refer to the Bar Code Size option in Ready mode, check all host and printer settings to send only valid characters and control codes. Using the control panel MENU/Menus, select Option Card Menu > IPDS MENU > EMULATION > Exception Ctrl. b) Change the Exception Ctrl setting to Chapter 10. Using the control panel MENU/Menus, select Option Card Menu > IPDS MENU > EMULATION > Default Codepage. b) Change...
... User's Guide for SCS 3 After the last page of code pages appear beside Default Codepage. 7 If the job prints, but some bar codes print in the wrong size, refer to the Bar Code Size option in Ready mode, check all host and printer settings to send only valid characters and control codes. Using the control panel MENU/Menus, select Option Card Menu > IPDS MENU > EMULATION > Exception Ctrl. b) Change the Exception Ctrl setting to Chapter 10. Using the control panel MENU/Menus, select Option Card Menu > IPDS MENU > EMULATION > Default Codepage. b) Change...
IPDS Printer and Host Setup Guide
Page 35
The information below will be used in PSF/2 3 Enable Printer Sharing With the Job Interval Shutdown Timer 4 Configure the Printer's Print Server TCP/IP Settings 5 Configure the Printer's Network Job Timeout 6 Select the IPDS Emulation, Bar Code Size, Host Resolution, and Fax Interrupt Settings 7 Verify IPDS Printing 8 Troubleshooting Step 1 Choose a Printer Port for Printing IPDS Jobs Several printer ports are automatically set to select and change option settings. System requirements OS/2TM version 2.11 or newer DB/2 version 1.0 or newer...
The information below will be used in PSF/2 3 Enable Printer Sharing With the Job Interval Shutdown Timer 4 Configure the Printer's Print Server TCP/IP Settings 5 Configure the Printer's Network Job Timeout 6 Select the IPDS Emulation, Bar Code Size, Host Resolution, and Fax Interrupt Settings 7 Verify IPDS Printing 8 Troubleshooting Step 1 Choose a Printer Port for Printing IPDS Jobs Several printer ports are automatically set to select and change option settings. System requirements OS/2TM version 2.11 or newer DB/2 version 1.0 or newer...
IPDS Printer and Host Setup Guide
Page 41
... the printer IPDS MENU before sending IPDS jobs. b) The recommended Host Resolution setting is "Auto". If you are replacing a printer that used a 4028 Emulation setting, choose the "Resident" Emulation and change the following settings: a) Set Bar Code Size to the Ready screen. 4 To verify the new print server settings, print a Network Setup Page. Refer to "300". 4 If you experience printing problems, set Host Resolution to the IPDS Emulation User's Guide for information on an MFP is 3.00-01090 or higher, "Copy...
... the printer IPDS MENU before sending IPDS jobs. b) The recommended Host Resolution setting is "Auto". If you are replacing a printer that used a 4028 Emulation setting, choose the "Resident" Emulation and change the following settings: a) Set Bar Code Size to the Ready screen. 4 To verify the new print server settings, print a Network Setup Page. Refer to "300". 4 If you experience printing problems, set Host Resolution to the IPDS Emulation User's Guide for information on an MFP is 3.00-01090 or higher, "Copy...

IPDS Printer and Host Setup Guide
Page 42
... received, BUSY should check the default code page setting. Using the control panel MENU/Menus, select Option Card Menu > IPDS MENU > EMULATION > Exception Ctrl. The printer will not send a NACK to the host when printing outside the printer valid printable area, choose one of the following solutions: a) Change the Printable Area setting to the network. If the job does not print, go to Step 8 Troubleshooting. 3 After the last page of code pages appear beside Default Codepage. 6 If the job prints...
... received, BUSY should check the default code page setting. Using the control panel MENU/Menus, select Option Card Menu > IPDS MENU > EMULATION > Exception Ctrl. The printer will not send a NACK to the host when printing outside the printer valid printable area, choose one of the following solutions: a) Change the Printable Area setting to the network. If the job does not print, go to Step 8 Troubleshooting. 3 After the last page of code pages appear beside Default Codepage. 6 If the job prints...

IPDS Printer and Host Setup Guide
Page 44
... printer's Network Job Timeout must be manually set to "0" (or to "Disable") and Job Buffering must be completed to begin printing IPDS jobs. 1 Choose a Printer Port for Printing IPDS Jobs 2 Define the Printer to PSF/AIX 3 Configure the Printer's Print Server TCP/IP Settings 4 Configure the Printer's Network Job Timeout 5 Select the IPDS Emulation, Bar Code Size, Host Resolution, and Fax Interrupt Settings 6 Verify IPDS Printing 7 Troubleshooting Step 1 Choose a Printer Port for detailed instructions on this port. IPDS Printer and Host Setup Guide PSF/AIX LAN Printing Using...
... printer's Network Job Timeout must be manually set to "0" (or to "Disable") and Job Buffering must be completed to begin printing IPDS jobs. 1 Choose a Printer Port for Printing IPDS Jobs 2 Define the Printer to PSF/AIX 3 Configure the Printer's Print Server TCP/IP Settings 4 Configure the Printer's Network Job Timeout 5 Select the IPDS Emulation, Bar Code Size, Host Resolution, and Fax Interrupt Settings 6 Verify IPDS Printing 7 Troubleshooting Step 1 Choose a Printer Port for detailed instructions on this port. IPDS Printer and Host Setup Guide PSF/AIX LAN Printing Using...
IPDS Printer and Host Setup Guide
Page 47
... control panel MENU/Menus, select Reports > Network Setup Page. If you experience printing problems, set Host Resolution to "Disable"). If you experience printing problems, set Host Resolution to "300". 3 If you are replacing a printer that used a 43xx Emulation setting, choose the "Resident" Emulation and change the following settings: a) Set Bar Code Size to "4028" under MENU/Menus > Option Card Menu > IPDS MENU > EMULATION. 1 "Resident" is identified as End-of-job Timeout on the control panel: On printers, press MENU and then select Settings > Setup Menu > Timeouts > Network Job...
... control panel MENU/Menus, select Reports > Network Setup Page. If you experience printing problems, set Host Resolution to "Disable"). If you experience printing problems, set Host Resolution to "300". 3 If you are replacing a printer that used a 43xx Emulation setting, choose the "Resident" Emulation and change the following settings: a) Set Bar Code Size to "4028" under MENU/Menus > Option Card Menu > IPDS MENU > EMULATION. 1 "Resident" is identified as End-of-job Timeout on the control panel: On printers, press MENU and then select Settings > Setup Menu > Timeouts > Network Job...
IPDS Printer and Host Setup Guide
Page 57
... saved in the printer's MENU/Menus > Option Card Menu > IPDS MENU > EMULATION >IPDS Print Res menu item. The printer will display the message and continue printing the job without operator intervention. Problem 3: IPDS memory exception Sometimes an IPDS memory exception is found under Menus > Settings > Print Settings > Setup Menu. On MFPs, it is reported to type of printing and types of the following: A. Requirements vary greatly according to the host. For information on the minimum recommended installed memory for this change...
... saved in the printer's MENU/Menus > Option Card Menu > IPDS MENU > EMULATION >IPDS Print Res menu item. The printer will display the message and continue printing the job without operator intervention. Problem 3: IPDS memory exception Sometimes an IPDS memory exception is found under Menus > Settings > Print Settings > Setup Menu. On MFPs, it is reported to type of printing and types of the following: A. Requirements vary greatly according to the host. For information on the minimum recommended installed memory for this change...
IPDS Printer and Host Setup Guide
Page 58
... MENU. These messages appear because there is installed, SCS MENU will allow IPDS resources to delete the IPDS resources before printing non-IPDS jobs. Add more memory to be found under MENU > Setup Menu > Settings. When a new IPDS job is sent from the host new IPDS resources are the menus for the Adapter for SCS is insufficient memory to print the IPDS job or to the Option Card Menu. Solution to Problem 5 Use the control panel...
... MENU. These messages appear because there is installed, SCS MENU will allow IPDS resources to delete the IPDS resources before printing non-IPDS jobs. Add more memory to be found under MENU > Setup Menu > Settings. When a new IPDS job is sent from the host new IPDS resources are the menus for the Adapter for SCS is insufficient memory to print the IPDS job or to the Option Card Menu. Solution to Problem 5 Use the control panel...
Quick Reference
Page 1
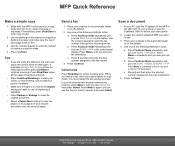
... the next page and then press Go/Send to the fax number 3 Press Go/Send. MFP Quick Reference Make a simple copy 1 Make sure the MFP control panel is in copy mode and the Ready status message is displayed. (If necessary, press Stop/Clear to enter copy mode.) 2 Use the drawing on the scanner as staple or punch if available. • Make sure the light is on next to the Duplex setting you see SCAN → EMAIL or SCAN → FTP. Send a fax 1 Place your...
... the next page and then press Go/Send to the fax number 3 Press Go/Send. MFP Quick Reference Make a simple copy 1 Make sure the MFP control panel is in copy mode and the Ready status message is displayed. (If necessary, press Stop/Clear to enter copy mode.) 2 Use the drawing on the scanner as staple or punch if available. • Make sure the light is on next to the Duplex setting you see SCAN → EMAIL or SCAN → FTP. Send a fax 1 Place your...
User's Reference
Page 25
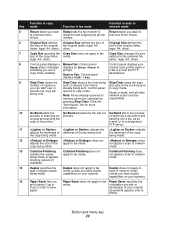
...Fax: Control panel displays SCAN → Fax. Duplex does not apply to scan to network mode, unless you have duplex being sent. e-mail, or to fax Copy Size changes the size size of the fax being sent. legal, A4, other ). Control panel displays your scanner. Note: Faxes already scanned to previous menu redial the last outgoing fax phone previous menu choice. being sent. cancels the copy job being made . documents (applies only to copy mode. Button and menu key 20 Function in copy Key mode Function in fax mode Function in prompt. Control panel to PDFs...
...Fax: Control panel displays SCAN → Fax. Duplex does not apply to scan to network mode, unless you have duplex being sent. e-mail, or to fax Copy Size changes the size size of the fax being sent. legal, A4, other ). Control panel displays your scanner. Note: Faxes already scanned to previous menu redial the last outgoing fax phone previous menu choice. being sent. cancels the copy job being made . documents (applies only to copy mode. Button and menu key 20 Function in copy Key mode Function in fax mode Function in prompt. Control panel to PDFs...
User's Reference
Page 27
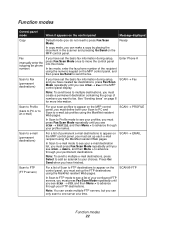
... scanner and pressing Go/Send on the MFP control panel. Function modes Control panel mode When it appears on the control panel Message displayed Copy Default mode (you do not need to one server at a time. Note: To send faxes to multiple destinations, you must press Fax/Scan Mode repeatedly until you see SCAN → FTP, and then Menu > to advance through your permanent destinations. In Scan to FTP mode to fax. Enter Phone # Scan to Fax (permanent destinations) If you have set the basic fax...
... scanner and pressing Go/Send on the MFP control panel. Function modes Control panel mode When it appears on the control panel Message displayed Copy Default mode (you do not need to one server at a time. Note: To send faxes to multiple destinations, you must press Fax/Scan Mode repeatedly until you see SCAN → FTP, and then Menu > to advance through your permanent destinations. In Scan to FTP mode to fax. Enter Phone # Scan to Fax (permanent destinations) If you have set the basic fax...
User's Reference
Page 44
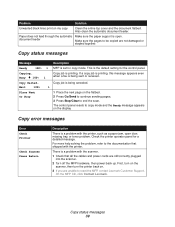
... are unable to reset the MFP, contact Lexmark Customer Support. Copy status messages Message Ready 100% 1 Copying... Copy job is the default setting for the control panel. For more help solving the problem, refer to the documentation that all the cables and power cords are not damaged or stapled together. Copy job is a problem with the printer. Check the printer operator panel for copy mode. Problem Solution Unwanted black lines print on the flatbed. 2 Press Go/Send to continue sending pages. 3 Press Stop/Clear to end the scan. There is being canceled...
... are unable to reset the MFP, contact Lexmark Customer Support. Copy status messages Message Ready 100% 1 Copying... Copy job is the default setting for the control panel. For more help solving the problem, refer to the documentation that all the cables and power cords are not damaged or stapled together. Copy job is a problem with the printer. Check the printer operator panel for copy mode. Problem Solution Unwanted black lines print on the flatbed. 2 Press Go/Send to continue sending pages. 3 Press Stop/Clear to end the scan. There is being canceled...


