Embedded Web Server Administrator's Guide
Page 30
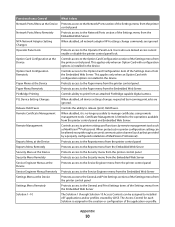
...control panel. When protected, no longer possible to print from an attached PictBridge capable digital camera. Protects access to the Paper menu from the Embedded Web Server. Controls the ability to the Option Card Configuration section of the Settings menu from the ... Remotely NPA Network Adapter Setting Changes Operator Panel Lock Option Card Configuration at the Device Option Card Configuration Remotely Paper Menu at the Device Paper Menu Remotely PictBridge Printing PJL Device Setting Changes Release Held Faxes Remote Certificate Management Remote Management Reports Menu at ...
...control panel. When protected, no longer possible to print from an attached PictBridge capable digital camera. Protects access to the Paper menu from the Embedded Web Server. Controls the ability to the Option Card Configuration section of the Settings menu from the ... Remotely NPA Network Adapter Setting Changes Operator Panel Lock Option Card Configuration at the Device Option Card Configuration Remotely Paper Menu at the Device Paper Menu Remotely PictBridge Printing PJL Device Setting Changes Release Held Faxes Remote Certificate Management Remote Management Reports Menu at ...
Quick Reference
Page 1
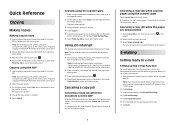
...remaining print job is canceled, the copy screen appears. The home screen appears. Note: Do not load postcards, photos, small items, transparencies, photo paper, or thin media (such as magazine clippings) into the ADF. Note: The Job Interrupt setting must be On for this feature to operate, it... Touch Cancel Job on the touch screen. Note: If you print copies. Note: Do not load postcards, photos, small items, transparencies, photo paper, or thin media (such as magazine clippings) into the address field of the printer, then print a network setup page and locate the IP ...
...remaining print job is canceled, the copy screen appears. The home screen appears. Note: Do not load postcards, photos, small items, transparencies, photo paper, or thin media (such as magazine clippings) into the ADF. Note: The Job Interrupt setting must be On for this feature to operate, it... Touch Cancel Job on the touch screen. Note: If you print copies. Note: Do not load postcards, photos, small items, transparencies, photo paper, or thin media (such as magazine clippings) into the address field of the printer, then print a network setup page and locate the IP ...

Quick Reference
Page 2
.... If the name or number is already in the "Fax to select another number. Note: Do not load postcards, photos, small items, transparencies, photo paper, or thin media (such as a comma in use the PostScript printer driver for the shortcut, and then touch Enter. 5 Verify that is incorrect, then... document faceup, short edge first into the ADF or facedown on the scanner glass. 2 If you are loading a document into the ADF, then adjust the paper guides. 3 On the home screen, touch Fax. 4 Enter the fax number or a shortcut using the ADF, touch Cancel Job while Scanning... This gives...
.... If the name or number is already in the "Fax to select another number. Note: Do not load postcards, photos, small items, transparencies, photo paper, or thin media (such as a comma in use the PostScript printer driver for the shortcut, and then touch Enter. 5 Verify that is incorrect, then... document faceup, short edge first into the ADF or facedown on the scanner glass. 2 If you are loading a document into the ADF, then adjust the paper guides. 3 On the home screen, touch Fax. 4 Enter the fax number or a shortcut using the ADF, touch Cancel Job while Scanning... This gives...
Quick Reference
Page 3
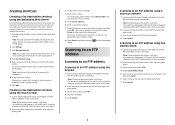
...address Scanning to an FTP address Scanning to send the fax, or touch screen. Note: Do not load postcards, photos, small items, transparencies, photo paper, or thin media (such as Shortcut. 6 Enter a name for , and then touch Search. 6 Touch the name that the shortcut name and ... Touch Save as magazine clippings) into the ADF or facedown on the scanner glass. Note: Do not load postcards, photos, small items, transparencies, photo paper, or thin media (such as magazine clippings) into the address field of your system support person. 4 Click Fax Shortcut Setup. 5 Type a unique ...
...address Scanning to an FTP address Scanning to send the fax, or touch screen. Note: Do not load postcards, photos, small items, transparencies, photo paper, or thin media (such as Shortcut. 6 Enter a name for , and then touch Search. 6 Touch the name that the shortcut name and ... Touch Save as magazine clippings) into the ADF or facedown on the scanner glass. Note: Do not load postcards, photos, small items, transparencies, photo paper, or thin media (such as magazine clippings) into the address field of your system support person. 4 Click Fax Shortcut Setup. 5 Type a unique ...

Quick Reference
Page 4
...Click Submit. 8 Review the instructions on the home screen, and then touch Profiles. Note: Do not load postcards, photos, small items, transparencies, photo paper, or thin media (such as magazine clippings) into the ADF. d After you enter the shortcut number, the scanner scans and sends the document to ... faceup, short edge first into the ADF or facedown on the scanner glass. Note: Do not load postcards, photos, small items, transparencies, photo paper, or thin media (such as magazine clippings) into the ADF. Scanning to a computer or flash drive Scanning to a computer 1 Type the printer...
...Click Submit. 8 Review the instructions on the home screen, and then touch Profiles. Note: Do not load postcards, photos, small items, transparencies, photo paper, or thin media (such as magazine clippings) into the ADF. d After you enter the shortcut number, the scanner scans and sends the document to ... faceup, short edge first into the ADF or facedown on the scanner glass. Note: Do not load postcards, photos, small items, transparencies, photo paper, or thin media (such as magazine clippings) into the ADF. Scanning to a computer or flash drive Scanning to a computer 1 Type the printer...
User's Guide
Page 2
... Changing port settings after installing a new network Internal Solutions Port 54 Setting up serial printing...56 Minimizing your printer's environmental impact 58 Saving paper and toner...58 Saving energy...59 Recycling...63 Loading paper and specialty media 65 Setting the Paper Size and Paper Type...65 Configuring Universal paper settings...65 Loading trays...66 Contents 2
... Changing port settings after installing a new network Internal Solutions Port 54 Setting up serial printing...56 Minimizing your printer's environmental impact 58 Saving paper and toner...58 Saving energy...59 Recycling...63 Loading paper and specialty media 65 Setting the Paper Size and Paper Type...65 Configuring Universal paper settings...65 Loading trays...66 Contents 2

User's Guide
Page 3
Loading the multipurpose feeder...68 Loading the 2000-sheet tray...71 Linking and unlinking trays...74 Paper and specialty media guidelines 76 Paper guidelines...76 Supported paper sizes, types, and weights...79 Printing 82 Printing a document...82 Printing on specialty media...82 Printing confidential and other held jobs...85 Printing from a flash ...
Loading the multipurpose feeder...68 Loading the 2000-sheet tray...71 Linking and unlinking trays...74 Paper and specialty media guidelines 76 Paper guidelines...76 Supported paper sizes, types, and weights...79 Printing 82 Printing a document...82 Printing on specialty media...82 Printing confidential and other held jobs...85 Printing from a flash ...
User's Guide
Page 4
......141 Scanning to a flash drive...142 Understanding scan profile options...142 Improving scan quality...144 Understanding printer menus 145 Menus list...145 Supplies menu...146 Paper menu...147 Reports menu...158 Network/Ports menu...160 Security menu...174 Settings menu...178 Help menu...228 Maintaining the printer 229 Cleaning the exterior...
......141 Scanning to a flash drive...142 Understanding scan profile options...142 Improving scan quality...144 Understanding printer menus 145 Menus list...145 Supplies menu...146 Paper menu...147 Reports menu...158 Network/Ports menu...160 Security menu...174 Settings menu...178 Help menu...228 Maintaining the printer 229 Cleaning the exterior...
User's Guide
Page 5
......257 Clearing jams...266 Solving printing problems...280 Solving copy problems...284 Solving scanner problems...286 Solving fax problems...288 Solving option problems...292 Solving paper feed problems...294 Solving print quality problems...295 Solving color quality problems...308 Embedded Web Server does not open...311 Contacting Customer Support...311 Notices...
......257 Clearing jams...266 Solving printing problems...280 Solving copy problems...284 Solving scanner problems...286 Solving fax problems...288 Solving option problems...292 Solving paper feed problems...294 Solving print quality problems...295 Solving color quality problems...308 Embedded Web Server does not open...311 Contacting Customer Support...311 Notices...
User's Guide
Page 9
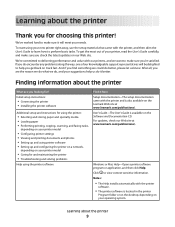
...; Connecting the printer • Installing the printer software Additional setup and instructions for using the printer: • Selecting and storing paper and specialty media • Loading paper • Performing printing, copying, scanning, and faxing tasks, depending on your printer model • Configuring printer settings • .../publications/. Click to make sure you are you for choosing this printer! To get back on the Lexmark Web site at www.lexmark.com/publications/. Learning about the printer Thank you looking for? And if you find something we want to view...
...; Connecting the printer • Installing the printer software Additional setup and instructions for using the printer: • Selecting and storing paper and specialty media • Loading paper • Performing printing, copying, scanning, and faxing tasks, depending on your printer model • Configuring printer settings • .../publications/. Click to make sure you are you for choosing this printer! To get back on the Lexmark Web site at www.lexmark.com/publications/. Learning about the printer Thank you looking for? And if you find something we want to view...
User's Guide
Page 14
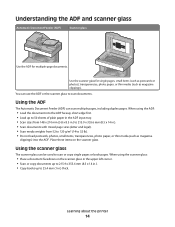
...and scanner glass Automatic Document Feeder (ADF) Scanner glass Use the ADF for single pages, small items (such as postcards or photos), transparencies, photo paper, or thin media (such as magazine clippings) into the ADF faceup, short edge first. • Load up to 32 lb). • Do... not load postcards, photos, small items, transparencies, photo paper, or thin media (such as magazine clippings). When using the scanner glass: • Place a document facedown on the scanner glass. Use the scanner glass...
...and scanner glass Automatic Document Feeder (ADF) Scanner glass Use the ADF for single pages, small items (such as postcards or photos), transparencies, photo paper, or thin media (such as magazine clippings) into the ADF faceup, short edge first. • Load up to 32 lb). • Do... not load postcards, photos, small items, transparencies, photo paper, or thin media (such as magazine clippings). When using the scanner glass: • Place a document facedown on the scanner glass. Use the scanner glass...
User's Guide
Page 21
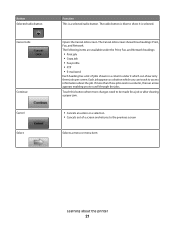
... are available under it is selected. The radio button is a selected radio button. If more changes need to be made for a job or after clearing a paper jam. • Cancels an action or a selection • Cancels out of jobs shown in a column, then an arrow appears enabling you can show it which...
... are available under it is selected. The radio button is a selected radio button. If more changes need to be made for a job or after clearing a paper jam. • Cancels an action or a selection • Cancels out of jobs shown in a column, then an arrow appears enabling you can show it which...

User's Guide
Page 58
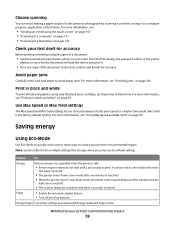
...Environmental Sustainability section of the Lexmark Web site at www.lexmark.com/environment • The Lexmark recycling program at www.lexmark.com/recycle By selecting certain printer settings or tasks, you can significantly reduce your carbon footprint by using recycled paper and the following printing suggestions.... You can quickly save paper and energy using one side of a single sheet of paper. For information on one printer setting, see "Using Eco-Mode". Using recycled paper As an environmentally conscious company, Lexmark supports the use of the paper If your printer model supports...
...Environmental Sustainability section of the Lexmark Web site at www.lexmark.com/environment • The Lexmark recycling program at www.lexmark.com/recycle By selecting certain printer settings or tasks, you can significantly reduce your carbon footprint by using recycled paper and the following printing suggestions.... You can quickly save paper and energy using one side of a single sheet of paper. For information on one printer setting, see "Using Eco-Mode". Using recycled paper As an environmentally conscious company, Lexmark supports the use of the paper If your printer model supports...
User's Guide
Page 59
... and load paper to avoid paper jams. For more information, see : • "Sending an e-mail using only the black toner cartridge, set the printer to Black Only. Saving energy Using Eco-Mode Use Eco-Mode to quickly select one copy of a document: • Use the Lexmark preview feature,... on page 266. Choose scanning You can select from the Print dialog, the Lexmark Toolbar, or the printer display, to see "Printing in black and white To print all the settings associated with Energy mode and Paper mode. Paper • Enable the automatic duplex feature. • Turn off . •...
... and load paper to avoid paper jams. For more information, see : • "Sending an e-mail using only the black toner cartridge, set the printer to Black Only. Saving energy Using Eco-Mode Use Eco-Mode to quickly select one copy of a document: • Use the Lexmark preview feature,... on page 266. Choose scanning You can select from the Print dialog, the Lexmark Toolbar, or the printer display, to see "Printing in black and white To print all the settings associated with Energy mode and Paper mode. Paper • Enable the automatic duplex feature. • Turn off . •...
User's Guide
Page 65
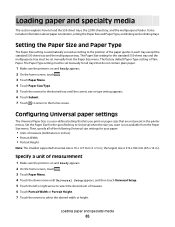
... position of measure (millimeters or inches) • Portrait Width • Portrait Height Note: The smallest supported Universal size is Plain Paper. Loading paper and specialty media This section explains how to Universal when the size you print on and Ready appears. 2 On the home screen,... touch . 3 Touch Paper Menu. 4 Touch Paper Size/Type. 5 Touch the arrows for your paper: • Units of the paper guides in .). Setting the Paper Size and Paper Type The Paper Size setting is on paper sizes that do not contain plain paper. 1 Make sure the printer is ...
... position of measure (millimeters or inches) • Portrait Width • Portrait Height Note: The smallest supported Universal size is Plain Paper. Loading paper and specialty media This section explains how to Universal when the size you print on and Ready appears. 2 On the home screen,... touch . 3 Touch Paper Menu. 4 Touch Paper Size/Type. 5 Touch the arrows for your paper: • Units of the paper guides in .). Setting the Paper Size and Paper Type The Paper Size setting is on paper sizes that do not contain plain paper. 1 Make sure the printer is ...

User's Guide
Page 66
8 Touch Submit to the home screen. Submitting Selection appears, followed by the Paper menu. 9 Touch to return to save your selection. Note: The length guide has a locking...Pull the tray completely out. 2 Squeeze and slide the width guides to the correct position for the size of paper you are loading. To lock the tray once a length has been selected, slide the button back to the left... position the guides. 3 Squeeze and slide the length guides to the correct position for the size of paper you are loading. Loading trays Note: Do not remove trays while a job prints or while Busy appears...
8 Touch Submit to the home screen. Submitting Selection appears, followed by the Paper menu. 9 Touch to return to save your selection. Note: The length guide has a locking...Pull the tray completely out. 2 Squeeze and slide the width guides to the correct position for the size of paper you are loading. To lock the tray once a length has been selected, slide the button back to the left... position the guides. 3 Squeeze and slide the length guides to the correct position for the size of paper you are loading. Loading trays Note: Do not remove trays while a job prints or while Busy appears...
User's Guide
Page 67
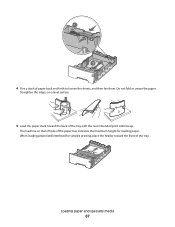
When loading preprinted letterhead for simplex printing, place the header toward the back of the paper tray indicates the maximum height for loading paper. Straighten the edges on the left side of the tray with the recommended print side faceup. The load line on a level surface. 5 Load the paper stack toward the front of paper back and forth to loosen the sheets, and then fan them. Loading paper and specialty media 67 Do not fold or crease the paper. ABC 4 Flex a stack of the tray.
When loading preprinted letterhead for simplex printing, place the header toward the back of the paper tray indicates the maximum height for loading paper. Straighten the edges on the left side of the tray with the recommended print side faceup. The load line on a level surface. 5 Load the paper stack toward the front of paper back and forth to loosen the sheets, and then fan them. Loading paper and specialty media 67 Do not fold or crease the paper. ABC 4 Flex a stack of the tray.
User's Guide
Page 68
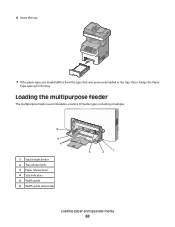
Loading the multipurpose feeder The multipurpose feeder accommodates a variety of media types, including envelopes. 6 5 4 1 Stack height limiter 2 Tray release latch 3 Paper release lever 4 Size indicators 5 Width guide 6 Width guide release tab LTAR4&LGL BE5XEC A5 3 2 1 Loading paper and specialty media 68 6 Insert the tray. 7 If the paper type you loaded differs from the type that was previously loaded in the tray, then change the Paper Type setting for the tray.
Loading the multipurpose feeder The multipurpose feeder accommodates a variety of media types, including envelopes. 6 5 4 1 Stack height limiter 2 Tray release latch 3 Paper release lever 4 Size indicators 5 Width guide 6 Width guide release tab LTAR4&LGL BE5XEC A5 3 2 1 Loading paper and specialty media 68 6 Insert the tray. 7 If the paper type you loaded differs from the type that was previously loaded in the tray, then change the Paper Type setting for the tray.
User's Guide
Page 69
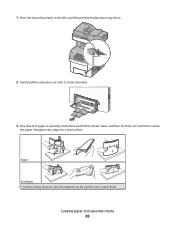
Straighten the edges on a level surface. Paper Envelopes * Avoid touching the print side of paper or specialty media back and forth to scratch them . Loading paper and specialty media 69 Be careful not to loosen them, and then fan them . 1 Press the tray release latch to the left, and then pull the multipurpose tray down. 2 Gently pull the extension out until it is fully extended. 3 Flex sheets of transparencies. Do not fold or crease the paper.
Straighten the edges on a level surface. Paper Envelopes * Avoid touching the print side of paper or specialty media back and forth to scratch them . Loading paper and specialty media 69 Be careful not to loosen them, and then fan them . 1 Press the tray release latch to the left, and then pull the multipurpose tray down. 2 Gently pull the extension out until it is fully extended. 3 Flex sheets of transparencies. Do not fold or crease the paper.
User's Guide
Page 70
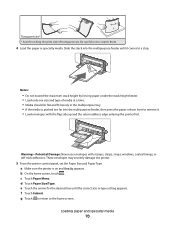
... stack height limiter. • Load only one size and type of transparencies. c Touch Paper Menu. g Touch to return to scratch them. 4 Load the paper or specialty media. d Touch Paper Size/Type. Loading paper and specialty media 70 Be careful not to the home screen. a Make sure the printer... edge entering the printer first. f Touch Submit. b On the home screen, touch . Slide the stack into the multipurpose feeder, then press the paper release lever to remove it comes to a stop. Transparencies* * Avoid touching the print side of media at a time. • Media should lie...
... stack height limiter. • Load only one size and type of transparencies. c Touch Paper Menu. g Touch to return to scratch them. 4 Load the paper or specialty media. d Touch Paper Size/Type. Loading paper and specialty media 70 Be careful not to the home screen. a Make sure the printer... edge entering the printer first. f Touch Submit. b On the home screen, touch . Slide the stack into the multipurpose feeder, then press the paper release lever to remove it comes to a stop. Transparencies* * Avoid touching the print side of media at a time. • Media should lie...


