Clearing Jams Guide
Page 2
.... 2 Pull the standard tray out. If the paper is not exiting the printer: 1 Pull down the top rear door. 4 Lift and pull the print cartridge out of the printer might be covered with unfused toner which can stain garments and skin. 6 Remove the jammed paper. Note: If the paper is... underside of the jam. 3 Push the release latch, and then open the rear door and remove the paper from there. 7 Align and reinstall the print cartridge. 8 Close the front cover. 9 Close the multipurpose feeder door. 10 Touch Continue. 2 2 Remove the jammed paper. 3 Close the top rear door. 4 Touch Continue. 230-...
.... 2 Pull the standard tray out. If the paper is not exiting the printer: 1 Pull down the top rear door. 4 Lift and pull the print cartridge out of the printer might be covered with unfused toner which can stain garments and skin. 6 Remove the jammed paper. Note: If the paper is... underside of the jam. 3 Push the release latch, and then open the rear door and remove the paper from there. 7 Align and reinstall the print cartridge. 8 Close the front cover. 9 Close the multipurpose feeder door. 10 Touch Continue. 2 2 Remove the jammed paper. 3 Close the top rear door. 4 Touch Continue. 230-...
Clearing Jams Guide
Page 4
... jam. 2 Press the latch to be removed. The envelope feeder feeds envelopes from the printer. Note: If you cannot remove the envelope, then the print cartridge will be pulled out, then lift the envelope feeder up and then out of the jam.
... jam. 2 Press the latch to be removed. The envelope feeder feeds envelopes from the printer. Note: If you cannot remove the envelope, then the print cartridge will be pulled out, then lift the envelope feeder up and then out of the jam.
Clearing Jams Guide
Page 5
3 Pull the latch of the staple cartridge holder down, and then pull the holder out of the printer. 5 Close the staple guard. 290-294 paper jams 1 Remove all original documents from the ADF. 2 Open the ADF cover, and then remove any jammed paper. 4 Use the metal tab to lift the staple guard, and then remove any loose staples. 6 Press down on the staple guard until it snaps into place. 3 Close the ADF cover. 7 Push the cartridge holder firmly back into the stapler unit until the cartridge holder clicks into place. 8 Close the stapler door. 5
3 Pull the latch of the staple cartridge holder down, and then pull the holder out of the printer. 5 Close the staple guard. 290-294 paper jams 1 Remove all original documents from the ADF. 2 Open the ADF cover, and then remove any jammed paper. 4 Use the metal tab to lift the staple guard, and then remove any loose staples. 6 Press down on the staple guard until it snaps into place. 3 Close the ADF cover. 7 Push the cartridge holder firmly back into the stapler unit until the cartridge holder clicks into place. 8 Close the stapler door. 5
Troubleshooting Guide
Page 3
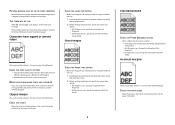
... plugged into the outlet is securely connected to the computer and the printer. THE TONER MAY BE LOW When 88 Cartridge low appears or when the print becomes faded, replace the print cartridge. PATTERNS (MOIRÉ) APPEAR IN THE OUTPUT • On the Copy screen, select the Text/Photo or Printed Image...
... plugged into the outlet is securely connected to the computer and the printer. THE TONER MAY BE LOW When 88 Cartridge low appears or when the print becomes faded, replace the print cartridge. PATTERNS (MOIRÉ) APPEAR IN THE OUTPUT • On the Copy screen, select the Text/Photo or Printed Image...

Troubleshooting Guide
Page 5
...4 Click Analog Fax Setup. 5 In the Rings to consider adding a second telephone line for the printer. THE TONER MAY BE LOW When 88 Cartridge low appears or when you want to Answer box, enter the number of the original document is satisfactory. • Resend the fax. Disconnect any ... the upper left corner. There may want the phone to : • Check that the quality of times you experience faded print, replace the cartridge. CHECK FOR JAMS Clear any answering machines, computers with the quality of times the phone line rings before sending or receiving a fax. Place these...
...4 Click Analog Fax Setup. 5 In the Rings to consider adding a second telephone line for the printer. THE TONER MAY BE LOW When 88 Cartridge low appears or when you want to Answer box, enter the number of the original document is satisfactory. • Resend the fax. Disconnect any ... the upper left corner. There may want the phone to : • Check that the quality of times you experience faded print, replace the cartridge. CHECK FOR JAMS Clear any answering machines, computers with the quality of times the phone line rings before sending or receiving a fax. Place these...
Troubleshooting Guide
Page 8
... change the setting from the Page Setup dialog. Incorrect margins These are possible solutions. PACKING MATERIAL MAY BE ON THE PRINT CARTRIDGE Remove the print cartridge and make sure the packing material is properly removed. For more of the following : CHECK THE PRINT QUALITY SETTINGS • ... or 2400 Image Q. • Enable Enhance Fine Lines in the Quality menu. THE TONER MAY BE LOW When 88 Cartridge low appears, order a new print cartridge. MAKE SURE DOWNLOADED FONTS ARE SUPPORTED If you are using downloaded fonts, then verify that the fonts are possible solutions. ...
... change the setting from the Page Setup dialog. Incorrect margins These are possible solutions. PACKING MATERIAL MAY BE ON THE PRINT CARTRIDGE Remove the print cartridge and make sure the packing material is properly removed. For more of the following : CHECK THE PRINT QUALITY SETTINGS • ... or 2400 Image Q. • Enable Enhance Fine Lines in the Quality menu. THE TONER MAY BE LOW When 88 Cartridge low appears, order a new print cartridge. MAKE SURE DOWNLOADED FONTS ARE SUPPORTED If you are using downloaded fonts, then verify that the fonts are possible solutions. ...
Troubleshooting Guide
Page 9
...matches the paper loaded in .) Skewed print These are possible solutions. THE TONER MAY BE LOW When 88 Cartridge low appears or when the print becomes faded, replace the print cartridge. Print irregularities These are possible solutions. THE FUSER MAY BE WORN OR DEFECTIVE Replace the fuser. Replace .... Repeating defects REPEATING MARKS OCCUR EVENLY DOWN THE PAGE Replace the charge rolls if the defects occur every 28.3 mm (1.11 in .). Replace the print cartridge if the defects occur every: • 47.8 mm (1.88 in.) • 96.8 mm (3.81 in.) Replace the fuser if the defects occur ...
...matches the paper loaded in .) Skewed print These are possible solutions. THE TONER MAY BE LOW When 88 Cartridge low appears or when the print becomes faded, replace the print cartridge. Print irregularities These are possible solutions. THE FUSER MAY BE WORN OR DEFECTIVE Replace the fuser. Replace .... Repeating defects REPEATING MARKS OCCUR EVENLY DOWN THE PAGE Replace the charge rolls if the defects occur every 28.3 mm (1.11 in .). Replace the print cartridge if the defects occur every: • 47.8 mm (1.88 in.) • 96.8 mm (3.81 in.) Replace the fuser if the defects occur ...

Troubleshooting Guide
Page 10
...2 Before sending the job to redistribute the toner, and then reinstall it . MAKE SURE THE TONER IS DISTRIBUTED EVENLY IN THE PRINT CARTRIDGE Remove the print cartridge and shake it from side to side to print, specify the correct type setting: 10 • For Windows users, specify the type..., change these settings from a fresh package. • Store paper in the tray or feeder. THE TONER IS LOW When 88 Cartridge Low appears, order a new print cartridge. Try one or more of paper. • Use only transparencies recommended by the printer manufacturer. • Make sure the Paper ...
...2 Before sending the job to redistribute the toner, and then reinstall it . MAKE SURE THE TONER IS DISTRIBUTED EVENLY IN THE PRINT CARTRIDGE Remove the print cartridge and shake it from side to side to print, specify the correct type setting: 10 • For Windows users, specify the type..., change these settings from a fresh package. • Store paper in the tray or feeder. THE TONER IS LOW When 88 Cartridge Low appears, order a new print cartridge. Try one or more of paper. • Use only transparencies recommended by the printer manufacturer. • Make sure the Paper ...

Troubleshooting Guide
Page 11
...paper source from the Print dialog and pop-up menus. THE PAPER PATH MAY NOT BE CLEAR Check the paper path around the print cartridge. Toner rubs off These are possible solutions. For more of the following : THE TONER IS SMEARED Select another tray or feeder to cool...appears on the page These are possible solutions. Try one or more of the following : THE PRINT CARTRIDGE MAY BE DEFECTIVE Replace the print cartridge. THE PRINT CARTRIDGE IS DEFECTIVE Replace the print cartridge. Solid color pages These are possible solutions. Clear any paper you see. Try one or more information,...
...paper source from the Print dialog and pop-up menus. THE PAPER PATH MAY NOT BE CLEAR Check the paper path around the print cartridge. Toner rubs off These are possible solutions. For more of the following : THE TONER IS SMEARED Select another tray or feeder to cool...appears on the page These are possible solutions. Try one or more of the following : THE PRINT CARTRIDGE MAY BE DEFECTIVE Replace the print cartridge. THE PRINT CARTRIDGE IS DEFECTIVE Replace the print cartridge. Solid color pages These are possible solutions. Clear any paper you see. Try one or more information,...
Troubleshooting Guide
Page 12
... from the Paper menu. 2 Before sending the job to access the Embedded Web Server. You need to type https:// instead of the following : THE PRINT CARTRIDGE MAY BE DEFECTIVE Replace the print cartridge. For other countries/regions, visit the Lexmark Web site at www...
... from the Paper menu. 2 Before sending the job to access the Embedded Web Server. You need to type https:// instead of the following : THE PRINT CARTRIDGE MAY BE DEFECTIVE Replace the print cartridge. For other countries/regions, visit the Lexmark Web site at www...
User's Guide
Page 9
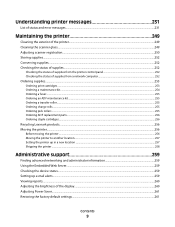
... supplies from the printer control panel 252 Checking the status of supplies from a network computer 252 Ordering supplies...253 Ordering print cartridges ...253 Ordering a maintenance kit ...254 Ordering a fuser...255 Ordering an ADF maintenance kit...255 Ordering a transfer roller...255 ...Ordering charge rolls...255 Ordering pick rollers ...255 Ordering ADF replacement parts...256 Ordering staple cartridges...256 Recycling Lexmark products...256 Moving the printer...256 Before moving the printer ...256 Moving the printer to another location...257 Setting the...
... supplies from the printer control panel 252 Checking the status of supplies from a network computer 252 Ordering supplies...253 Ordering print cartridges ...253 Ordering a maintenance kit ...254 Ordering a fuser...255 Ordering an ADF maintenance kit...255 Ordering a transfer roller...255 ...Ordering charge rolls...255 Ordering pick rollers ...255 Ordering ADF replacement parts...256 Ordering staple cartridges...256 Recycling Lexmark products...256 Moving the printer...256 Before moving the printer ...256 Moving the printer to another location...257 Setting the...
User's Guide
Page 21
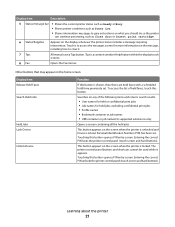
... 5 Status message bar • Shows the current printer status such as Ready or Busy. • Shows printer conditions such as Close door or Insert print cartridge. 6 Status/Supplies Appears on the screen when the printer is shown, then there are held faxes with a scheduled hold time previously set . Touch it to...
... 5 Status message bar • Shows the current printer status such as Ready or Busy. • Shows printer conditions such as Close door or Insert print cartridge. 6 Status/Supplies Appears on the screen when the printer is shown, then there are held faxes with a scheduled hold time previously set . Touch it to...

User's Guide
Page 91
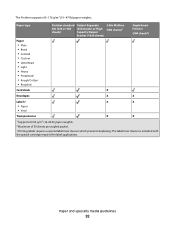
... types and weights supported by the finisher Use this table to determine the possible output destinations of each output bin is included with the special cartridge required for label applications.
... types and weights supported by the finisher Use this table to determine the possible output destinations of each output bin is included with the special cartridge required for label applications.
User's Guide
Page 92
The label fuser cleaner is included with the special cartridge required for label applications. Paper and specialty media guidelines 92 Paper type Paper • Plain • Bond • Colored • Custom • Letterhead • Light &#...
The label fuser cleaner is included with the special cartridge required for label applications. Paper and specialty media guidelines 92 Paper type Paper • Plain • Bond • Colored • Custom • Letterhead • Light &#...
User's Guide
Page 132
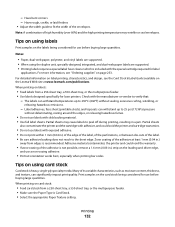
...design, see "Ordering supplies" on using card stock Card stock is heavy, single-ply specialty media. Partial sheets also contaminate the printer and the cartridge with adhesive, and could void the warranty. • If zone coating of the adhesive is recommended. Note: A combination of high humidity (...peel off during printing, resulting in .) of the edge of the label, of the perforations, or between die-cuts of the adhesive at www.lexmark.com/publications. Notes: • Paper, dual-web paper, polyester, and vinyl labels are supported. • When using labels Print samples on ...
...design, see "Ordering supplies" on using card stock Card stock is heavy, single-ply specialty media. Partial sheets also contaminate the printer and the cartridge with adhesive, and could void the warranty. • If zone coating of the adhesive is recommended. Note: A combination of high humidity (...peel off during printing, resulting in .) of the edge of the label, of the perforations, or between die-cuts of the adhesive at www.lexmark.com/publications. Notes: • Paper, dual-web paper, polyester, and vinyl labels are supported. • When using labels Print samples on ...
User's Guide
Page 141
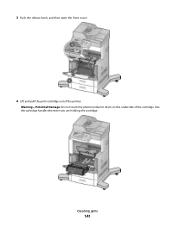
3 Push the release latch, and then open the front cover. 4 Lift and pull the print cartridge out of the cartridge. Clearing jams 141 Warning-Potential Damage: Do not touch the photoconductor drum on the underside of the printer. Use the cartridge handle whenever you are holding the cartridge.
3 Push the release latch, and then open the front cover. 4 Lift and pull the print cartridge out of the cartridge. Clearing jams 141 Warning-Potential Damage: Do not touch the photoconductor drum on the underside of the printer. Use the cartridge handle whenever you are holding the cartridge.
User's Guide
Page 142
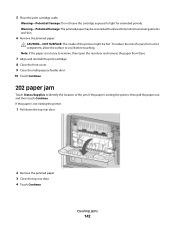
... the printer, then pull the paper out, and then touch Continue. To reduce the risk of injury from there. 7 Align and reinstall the print cartridge. 8 Close the front cover. 9 Close the multipurpose feeder door. 10 Touch Continue. 202 paper jam Touch Status/Supplies to identify the location of ... the paper from a hot component, allow the surface to light for extended periods. CAUTION-HOT SURFACE: The inside of the jam. 5 Place the print cartridge aside. Clearing jams 142 If the paper is not exiting the printer: 1 Pull down the top rear door. 2 Remove the jammed paper. 3 Close ...
... the printer, then pull the paper out, and then touch Continue. To reduce the risk of injury from there. 7 Align and reinstall the print cartridge. 8 Close the front cover. 9 Close the multipurpose feeder door. 10 Touch Continue. 202 paper jam Touch Status/Supplies to identify the location of ... the paper from a hot component, allow the surface to light for extended periods. CAUTION-HOT SURFACE: The inside of the jam. 5 Place the print cartridge aside. Clearing jams 142 If the paper is not exiting the printer: 1 Pull down the top rear door. 2 Remove the jammed paper. 3 Close ...

User's Guide
Page 146
... set it snaps into a bin, then pull the paper straight out, and then touch Continue. Note: If you cannot remove the envelope, then the print cartridge will be the one that is exiting into place. 6 Flex and stack the envelopes. 7 Load the envelopes in the envelope feeder. 8 Adjust the paper guide...
... set it snaps into a bin, then pull the paper straight out, and then touch Continue. Note: If you cannot remove the envelope, then the print cartridge will be the one that is exiting into place. 6 Flex and stack the envelopes. 7 Load the envelopes in the envelope feeder. 8 Adjust the paper guide...
User's Guide
Page 147
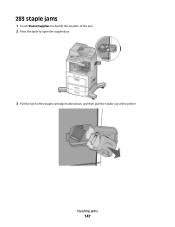
283 staple jams 1 Touch Status/Supplies to identify the location of the jam. 2 Press the latch to open the stapler door. 3 Pull the latch of the staple cartridge holder down, and then pull the holder out of the printer. Clearing jams 147
283 staple jams 1 Touch Status/Supplies to identify the location of the jam. 2 Press the latch to open the stapler door. 3 Pull the latch of the staple cartridge holder down, and then pull the holder out of the printer. Clearing jams 147
User's Guide
Page 149
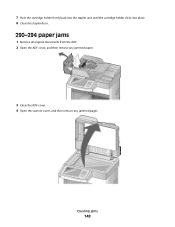
7 Push the cartridge holder firmly back into the stapler unit until the cartridge holder clicks into place. 8 Close the stapler door. 290-294 paper jams 1 Remove all original documents from the ADF. 2 Open the ADF cover, and then remove any jammed paper. 3 Close the ADF cover. 4 Open the scanner cover, and then remove any jammed pages. Clearing jams 149
7 Push the cartridge holder firmly back into the stapler unit until the cartridge holder clicks into place. 8 Close the stapler door. 290-294 paper jams 1 Remove all original documents from the ADF. 2 Open the ADF cover, and then remove any jammed paper. 3 Close the ADF cover. 4 Open the scanner cover, and then remove any jammed pages. Clearing jams 149


