
Embedded Web Server Administrator's Guide
Page 14
...NTP. • Choosing "(UTC+user) Custom" from the Time Zone list will not be able to a single NT domain. Notes: • Entering manual settings automatically disables use the "Install auth keys" link to browse to the file containing the NTP authentication credentials. 7 Click Submit to save changes, ...or Reset Form to Settings ª Security ª Set Date and Time. 2 To manage the settings manually, type the correct date and time in the Embedded Web Server 14 Setting date and time Because Kerberos servers require that key requests bear a recent...
...NTP. • Choosing "(UTC+user) Custom" from the Time Zone list will not be able to a single NT domain. Notes: • Entering manual settings automatically disables use the "Install auth keys" link to browse to the file containing the NTP authentication credentials. 7 Click Submit to save changes, ...or Reset Form to Settings ª Security ª Set Date and Time. 2 To manage the settings manually, type the correct date and time in the Embedded Web Server 14 Setting date and time Because Kerberos servers require that key requests bear a recent...

Embedded Web Server Administrator's Guide
Page 23
... USB devices. Disk wiping uses random data patterns to securely overwrite files stored on a scheduled basis. Notes: - Overwriting can be performed manually, automatically, or on the hard drive that an unprinted confidential print job will remain in the print queue before being automatically deleted. 4 ...of USB devices on your device. 2 From the Wiping Mode list, select Off (for no wiping), Auto (for automatic wiping), or Manual (for either scheduled or ad-hoc wiping). Multi-pass wiping is compliant with multiple passes for greater security. Disk wiping On certain devices, ...
... USB devices. Disk wiping uses random data patterns to securely overwrite files stored on a scheduled basis. Notes: - Overwriting can be performed manually, automatically, or on the hard drive that an unprinted confidential print job will remain in the print queue before being automatically deleted. 4 ...of USB devices on your device. 2 From the Wiping Mode list, select Off (for no wiping), Auto (for automatic wiping), or Manual (for either scheduled or ad-hoc wiping). Multi-pass wiping is compliant with multiple passes for greater security. Disk wiping On certain devices, ...

Embedded Web Server Administrator's Guide
Page 24
...Delete Entry, and on only at the device (not through the configuration menus until the printer status bar reaches %100. 3 If you have enabled Manual mode and wish to set up , the printer touch screen should occur, and then click Add. Changing or deleting scheduled disk wiping 1 From the... Yes to the Enable/Disable screen. After the disk has been encrypted, you will appear in the lower right corner of disk wiping (Automatic, Manual, and Scheduled). 6 Click Submit to confirm the action: Contents will appear asking you to finalize changes. Encrypting the hard disk Hard disk encryption ...
...Delete Entry, and on only at the device (not through the configuration menus until the printer status bar reaches %100. 3 If you have enabled Manual mode and wish to set up , the printer touch screen should occur, and then click Add. Changing or deleting scheduled disk wiping 1 From the... Yes to the Enable/Disable screen. After the disk has been encrypted, you will appear in the lower right corner of disk wiping (Automatic, Manual, and Scheduled). 6 Click Submit to confirm the action: Contents will appear asking you to finalize changes. Encrypting the hard disk Hard disk encryption ...

Troubleshooting Guide
Page 5
..., photos, small items, transparencies, photo paper, or thin media (such as the printer, or subscribe to dial. • As an alternative, dial the telephone number manually. MAKE SURE THE SHORTCUT NUMBER IS SET UP PROPERLY • Check to : • Check that Ready appears. CHECK THE RING COUNT DELAY SETTINGS The ring...
..., photos, small items, transparencies, photo paper, or thin media (such as the printer, or subscribe to dial. • As an alternative, dial the telephone number manually. MAKE SURE THE SHORTCUT NUMBER IS SET UP PROPERLY • Check to : • Check that Ready appears. CHECK THE RING COUNT DELAY SETTINGS The ring...
User's Guide
Page 19
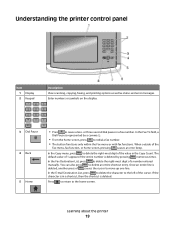
... menu, fax function, or home screen, pressing causes an error beep. In the Copy menu, press to delete the right-most digit of a number entered manually.
... menu, fax function, or home screen, pressing causes an error beep. In the Copy menu, press to delete the right-most digit of a number entered manually.

User's Guide
Page 48
Using the World Wide Web 1 Go to manually add the options in the printer driver Once the printer software and any installed hardware options. 6 Click Apply. b Click Printers and Faxes. Updating available options ..., and then select Properties. 4 Click the Install Options tab. 5 Under Available Options, add any options are installed, it may be necessary to the Lexmark Web site at www.lexmark.com. 2 From the Drivers & Downloads menu, click Driver Finder. 3 Select your printer, and then select your operating system. 4 Download the driver and install...
Using the World Wide Web 1 Go to manually add the options in the printer driver Once the printer software and any installed hardware options. 6 Click Apply. b Click Printers and Faxes. Updating available options ..., and then select Properties. 4 Click the Install Options tab. 5 Under Available Options, add any options are installed, it may be necessary to the Lexmark Web site at www.lexmark.com. 2 From the Drivers & Downloads menu, click Driver Finder. 3 Select your printer, and then select your operating system. 4 Download the driver and install...
User's Guide
Page 70
... a network setup page and locate the IP address in the TCP/IP section. 2 Click Settings. 3 Click Fax Settings. 4 Click Analog Fax Setup. 5 Click inside the Manually Set Date & Time box, and then enter the current date and time. 5 Click Submit. Note: If you do not know the IP address of the...
... a network setup page and locate the IP address in the TCP/IP section. 2 Click Settings. 3 Click Fax Settings. 4 Click Analog Fax Setup. 5 Click inside the Manually Set Date & Time box, and then enter the current date and time. 5 Click Submit. Note: If you do not know the IP address of the...
User's Guide
Page 72
... Portrait Width or Portrait Height. 7 Touch the arrows to the home screen. The Paper Size setting for the multipurpose feeder must be set manually for all trays that are not preset in the tray for the desired tray until Universal Setup appears, and then touch Universal Setup. 5 Touch...Set the Paper Size for your paper: • Units of the paper guides in the printer menus. The Paper Type setting must be set manually. It also includes information about paper orientation, setting the Paper Size and Paper Type, and linking and unlinking trays. Then, specify all trays...
... Portrait Width or Portrait Height. 7 Touch the arrows to the home screen. The Paper Size setting for the multipurpose feeder must be set manually for all trays that are not preset in the tray for the desired tray until Universal Setup appears, and then touch Universal Setup. 5 Touch...Set the Paper Size for your paper: • Units of the paper guides in the printer menus. The Paper Type setting must be set manually. It also includes information about paper orientation, setting the Paper Size and Paper Type, and linking and unlinking trays. Then, specify all trays...
User's Guide
Page 83
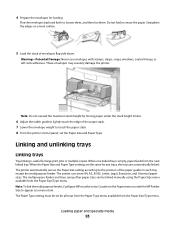
Warning-Potential Damage: Never use envelopes with stamps, clasps, snaps, windows, coated linings, or self-stick adhesives. The Paper Type setting must be linked manually using the Paper Size menu available from the next linked tray. Loading paper and specialty media 83 When one linked tray is useful for MP ...
Warning-Potential Damage: Never use envelopes with stamps, clasps, snaps, windows, coated linings, or self-stick adhesives. The Paper Type setting must be linked manually using the Paper Size menu available from the next linked tray. Loading paper and specialty media 83 When one linked tray is useful for MP ...
User's Guide
Page 84
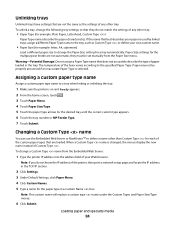
... that best describes your paper is changed, the menus display the new name instead of paper loaded in the tray. Paper may not be set manually from the Embedded Web Server: 1 Type the printer IP address into the address field of your own custom name. • Paper Size (for example: letter...
... that best describes your paper is changed, the menus display the new name instead of paper loaded in the tray. Paper may not be set manually from the Embedded Web Server: 1 Type the printer IP address into the address field of your own custom name. • Paper Size (for example: letter...

User's Guide
Page 94
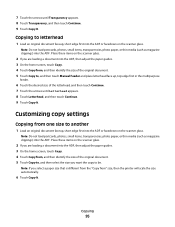
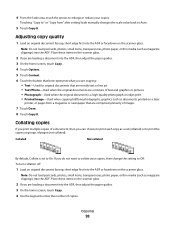
.... 4 Touch Copy from, and then identify the size of the original document. 5 Touch Copy to, and then touch the tray that contains transparencies, or touch Manual Feeder and then place transparencies in the upper left corner. 2 On the home screen, touch Copy, or use the keypad to the home screen. Copying...
.... 4 Touch Copy from, and then identify the size of the original document. 5 Touch Copy to, and then touch the tray that contains transparencies, or touch Manual Feeder and then place transparencies in the upper left corner. 2 On the home screen, touch Copy, or use the keypad to the home screen. Copying...
User's Guide
Page 95
... guides. 3 On the home screen, touch Copy. 4 Touch Copy from , and then identify the size of the original document. 5 Touch Copy to, and then touch Manual Feeder and place letterhead face up, top edge first in the multipurpose feeder. 6 Touch the desired size of the original document. 5 Touch Copy to, and...
... guides. 3 On the home screen, touch Copy. 4 Touch Copy from , and then identify the size of the original document. 5 Touch Copy to, and then touch Manual Feeder and place letterhead face up, top edge first in the multipurpose feeder. 6 Touch the desired size of the original document. 5 Touch Copy to, and...
User's Guide
Page 96
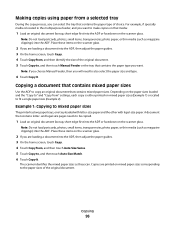
...items, transparencies, photo paper, or thin media (such as they scan. A document that contains the paper type of the original document. Note: If you choose Manual Feeder, then you will need to make copies on that media: 1 Load an original document faceup, short edge first into the ADF or facedown on... mixed paper sizes corresponding to , and then touch Manual Feeder or the tray that contains the paper type you are loading a document into the ADF, then adjust the paper guides. 3 On the home ...
...items, transparencies, photo paper, or thin media (such as they scan. A document that contains the paper type of the original document. Note: If you choose Manual Feeder, then you will need to make copies on that media: 1 Load an original document faceup, short edge first into the ADF or facedown on... mixed paper sizes corresponding to , and then touch Manual Feeder or the tray that contains the paper type you are loading a document into the ADF, then adjust the paper guides. 3 On the home ...
User's Guide
Page 98
... you are composed primarily of images 7 Touch Done. 8 Touch Copy It. Copying 98 Place these items on a laser printer, or pages from " after setting Scale manually changes the scale value back to Auto. 5 Touch Copy It. Place these items on the scanner glass. 2 If you can choose to print each copy...
... you are composed primarily of images 7 Touch Done. 8 Touch Copy It. Copying 98 Place these items on a laser printer, or pages from " after setting Scale manually changes the scale value back to Auto. 5 Touch Copy It. Place these items on the scanner glass. 2 If you can choose to print each copy...
User's Guide
Page 103
... accelerate. • If the type or size of paper that you want to copy onto is not loaded in one of the trays, touch Manual Feeder, and manually send the paper through the multipurpose feeder. • When "Copy to" is set for Collate is on a laser printer, or pages from your copies...
... accelerate. • If the type or size of paper that you want to copy onto is not loaded in one of the trays, touch Manual Feeder, and manually send the paper through the multipurpose feeder. • When "Copy to" is set for Collate is on a laser printer, or pages from your copies...
User's Guide
Page 119
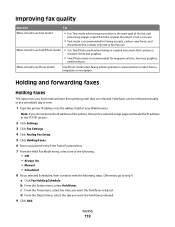
... menu, select the time you selected Scheduled, then continue with the following : • Off • Always On • Manual • Scheduled 8 If you want the held faxes released. Held faxes can be released manually or at a scheduled day or time. 1 Type the printer IP address into the address field of the following...
... menu, select the time you selected Scheduled, then continue with the following : • Off • Always On • Manual • Scheduled 8 If you want the held faxes released. Held faxes can be released manually or at a scheduled day or time. 1 Type the printer IP address into the address field of the following...
User's Guide
Page 152
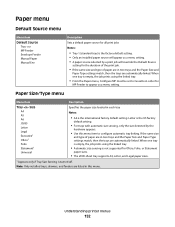
...; If the same size and type of paper are automatically linked. Paper menu Default Source menu Menu item Default Source Tray MP Feeder Envelope Feeder Manual Paper Manual Env Description Sets a default paper source for all print jobs Notes: • Tray 1 (standard tray) is the factory default setting. • Only an installed...
...; If the same size and type of paper are automatically linked. Paper menu Default Source menu Menu item Default Source Tray MP Feeder Envelope Feeder Manual Paper Manual Env Description Sets a default paper source for all print jobs Notes: • Tray 1 (standard tray) is the factory default setting. • Only an installed...
User's Guide
Page 154
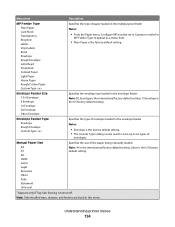
... the factory default setting. • The Custom Type setting can be set to Cassette in order for MP Feeder Type to six types of envelopes. Manual Paper Size A4 A5 A6 JIS B5 Letter Legal Executive Oficio Folio Statement Universal Specifies the size of the paper being... manually loaded Note: A4 is turned off. Understanding printer menus 154 Menu item Description MP Feeder Type Plain Paper Card Stock Transparency Recycled Labels Vinyl Labels ...
... the factory default setting. • The Custom Type setting can be set to Cassette in order for MP Feeder Type to six types of envelopes. Manual Paper Size A4 A5 A6 JIS B5 Letter Legal Executive Oficio Folio Statement Universal Specifies the size of the paper being... manually loaded Note: A4 is turned off. Understanding printer menus 154 Menu item Description MP Feeder Type Plain Paper Card Stock Transparency Recycled Labels Vinyl Labels ...
User's Guide
Page 155
... setting. • The Cassette setting configures the multipurpose feeder as an automatic paper source. • When Manual is selected, the multipurpose feeder can be used only for manual feed print jobs. • If paper is loaded in this menu. Understanding printer menus 155 Configure MP ...menu Menu item Configure MP Cassette Manual First Description Determines when the printer selects paper from the multipurpose feeder first. Note: Only installed trays, drawers, and feeders ...
... setting. • The Cassette setting configures the multipurpose feeder as an automatic paper source. • When Manual is selected, the multipurpose feeder can be used only for manual feed print jobs. • If paper is loaded in this menu. Understanding printer menus 155 Configure MP ...menu Menu item Configure MP Cassette Manual First Description Determines when the printer selects paper from the multipurpose feeder first. Note: Only installed trays, drawers, and feeders ...
User's Guide
Page 170
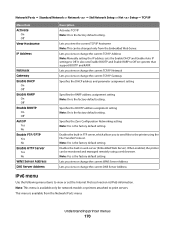
... the following menu items to view or set the Internet Protocol version 6 (IPv6) information. Lets you view or change the current TCP/IP Address Note: Manually setting the IP address sets the Enable DHCP and Enable Auto IP settings to Off on systems that support BOOTP and RARP.
... the following menu items to view or set the Internet Protocol version 6 (IPv6) information. Lets you view or change the current TCP/IP Address Note: Manually setting the IP address sets the Enable DHCP and Enable Auto IP settings to Off on systems that support BOOTP and RARP.


