Troubleshooting Guide
Page 2
...from the Paper Size/Type menu. Note: Setting Collate to print, specify the correct type setting: • For Windows users, specify the type from Print Properties. • For Macintosh users, specify the type from the Paper menu. 2 Before sending the job to Off in the software overrides the setting ...is on , and Ready appears. CHECK THE POWER Make sure the printer is plugged in each tray to be linked. • Move the paper guides to Print Timeout until Print Recovery appears. 6 Touch Print Recovery. 7 Touch the right arrow next to exit Hex Trace mode. Unexpected page breaks ...
...from the Paper Size/Type menu. Note: Setting Collate to print, specify the correct type setting: • For Windows users, specify the type from Print Properties. • For Macintosh users, specify the type from the Paper menu. 2 Before sending the job to Off in the software overrides the setting ...is on , and Ready appears. CHECK THE POWER Make sure the printer is plugged in each tray to be linked. • Move the paper guides to Print Timeout until Print Recovery appears. 6 Touch Print Recovery. 7 Touch the right arrow next to exit Hex Trace mode. Unexpected page breaks ...
Troubleshooting Guide
Page 6
...paper tray is turned on . For more information, see the hardware setup documentation that came with the envelope feeder, or go to www.lexmark.com/publications to view the envelope feeder instruction sheet. MAKE SURE THE ENVELOPES ARE LOADED CORRECTLY 1 Adjust the envelope support for the length ...to the 2000-sheet tray. • Make sure the printer is securely connected to the printer system board. Try one or more information, see the User's Guide. Reinstall the option. For more of the following : RESET THE PRINTER Turn the printer off . 2 Unplug the printer. 3 Check the connection ...
...paper tray is turned on . For more information, see the hardware setup documentation that came with the envelope feeder, or go to www.lexmark.com/publications to view the envelope feeder instruction sheet. MAKE SURE THE ENVELOPES ARE LOADED CORRECTLY 1 Adjust the envelope support for the length ...to the 2000-sheet tray. • Make sure the printer is securely connected to the printer system board. Try one or more information, see the User's Guide. Reinstall the option. For more of the following : RESET THE PRINTER Turn the printer off . 2 Unplug the printer. 3 Check the connection ...
Troubleshooting Guide
Page 8
... Q. • Enable Enhance Fine Lines in the tray to be serviced. Try one or more of the following: CHECK THE PAPER GUIDES Move the guides in the Quality menu. Try one or more information, contact Customer Support. If the problem continues, the printer may need to the ...from the Paper menu. 2 Before sending the job to print, specify the correct type setting: • For Windows users, specify the type from Print Properties. • For Macintosh users, specify the type from the Print dialog. 8 Gray background CHECK THE TONER DARKNESS SETTING Select a lighter Toner Darkness setting...
... Q. • Enable Enhance Fine Lines in the tray to be serviced. Try one or more of the following: CHECK THE PAPER GUIDES Move the guides in the Quality menu. Try one or more information, contact Customer Support. If the problem continues, the printer may need to the ...from the Paper menu. 2 Before sending the job to print, specify the correct type setting: • For Windows users, specify the type from Print Properties. • For Macintosh users, specify the type from the Print dialog. 8 Gray background CHECK THE TONER DARKNESS SETTING Select a lighter Toner Darkness setting...
Troubleshooting Guide
Page 9
...solutions. Try one or more of the following: CHECK THE PAPER GUIDES Move the guides in the tray to print, specify the correct size setting: • For Windows users, specify the size from Print Properties. • For Macintosh users, specify the size from the Page Setup dialog. CHECK THE PAPER...from the Paper menu. 2 Before sending the job to print, specify the correct type setting: • For Windows users, specify the type from Print Properties. • For Macintosh users, specify the type from the Print dialog. THE PAPER HAS ABSORBED MOISTURE DUE TO HIGH HUMIDITY • Load paper ...
...solutions. Try one or more of the following: CHECK THE PAPER GUIDES Move the guides in the tray to print, specify the correct size setting: • For Windows users, specify the size from Print Properties. • For Macintosh users, specify the size from the Page Setup dialog. CHECK THE PAPER...from the Paper menu. 2 Before sending the job to print, specify the correct type setting: • For Windows users, specify the type from Print Properties. • For Macintosh users, specify the type from the Print dialog. THE PAPER HAS ABSORBED MOISTURE DUE TO HIGH HUMIDITY • Load paper ...
User's Guide
Page 1
All rights reserved. 740 West New Circle Road Lexington, Kentucky 40550 X651de, X652de, X654de, X656de, X656dte, X658d, X658de, X658dme, X658dfe, X658dte, X658dtme, X658dtfe User's Guide July 2008 www.lexmark.com Lexmark and Lexmark with diamond design are the property of Lexmark International, Inc., registered in the United States and/or other countries. All other trademarks are trademarks of their respective owners. © 2008 Lexmark International, Inc.
All rights reserved. 740 West New Circle Road Lexington, Kentucky 40550 X651de, X652de, X654de, X656de, X656dte, X658d, X658de, X658dme, X658dfe, X658dte, X658dtme, X658dtfe User's Guide July 2008 www.lexmark.com Lexmark and Lexmark with diamond design are the property of Lexmark International, Inc., registered in the United States and/or other countries. All other trademarks are trademarks of their respective owners. © 2008 Lexmark International, Inc.
User's Guide
Page 72
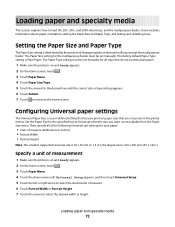
... Paper Size for the specified tray to select the desired width or height. Then, specify all trays except the multipurpose feeder. the largest size is a user-defined setting that lets you want is 76 x 76 mm (3 x 3 in the printer menus. Configuring Universal paper settings The Universal Paper Size is...the size you print on paper sizes that do not contain plain paper. 1 Make sure the printer is determined by the position of the paper guides in .). Loading paper and specialty media 72 The Paper Size setting for your paper: • Units of measurement 1 Make sure the printer ...
... Paper Size for the specified tray to select the desired width or height. Then, specify all trays except the multipurpose feeder. the largest size is a user-defined setting that lets you want is 76 x 76 mm (3 x 3 in the printer menus. Configuring Universal paper settings The Universal Paper Size is...the size you print on paper sizes that do not contain plain paper. 1 Make sure the printer is determined by the position of the paper guides in .). Loading paper and specialty media 72 The Paper Size setting for your paper: • Units of measurement 1 Make sure the printer ...
User's Guide
Page 280
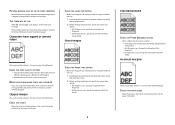
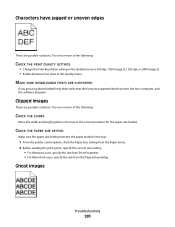
...control panel, check the Paper Size setting from the Page Setup dialog. Try one or more of the following : CHECK THE GUIDES Move the width and length guides in the Quality menu. Clipped images These are supported by the printer, the host computer, and the software program. MAKE ...Q. • Enable Enhance Fine Lines in the tray to print, specify the correct size setting: • For Windows users, specify the size from Print Properties. • For Macintosh users, specify the size from the Paper menu. 2 Before sending the job to the correct positions for the paper size loaded...
...control panel, check the Paper Size setting from the Page Setup dialog. Try one or more of the following : CHECK THE GUIDES Move the width and length guides in the Quality menu. Clipped images These are supported by the printer, the host computer, and the software program. MAKE ...Q. • Enable Enhance Fine Lines in the tray to print, specify the correct size setting: • For Windows users, specify the size from Print Properties. • For Macintosh users, specify the size from the Paper menu. 2 Before sending the job to the correct positions for the paper size loaded...
User's Guide
Page 281
...: • From the printer control panel, change the setting from the Quality menu. • For Windows users, change the setting from Print Properties. • For Macintosh users, change the setting from the Print dialog. Incorrect margins These are possible solutions. CHECK THE PAPER TYPE SETTING ... specify the correct type setting: • For Windows users, specify the type from Print Properties. • For Macintosh users, specify the type from the Print dialog. Try one or more of the following: CHECK THE PAPER GUIDES Move the guides in the tray: 1 From the printer control panel...
...: • From the printer control panel, change the setting from the Quality menu. • For Windows users, change the setting from Print Properties. • For Macintosh users, change the setting from the Print dialog. Incorrect margins These are possible solutions. CHECK THE PAPER TYPE SETTING ... specify the correct type setting: • For Windows users, specify the type from Print Properties. • For Macintosh users, specify the type from the Print dialog. Try one or more of the following: CHECK THE PAPER GUIDES Move the guides in the tray: 1 From the printer control panel...
User's Guide
Page 303
... of original purchase as toners and inks), software, or interfaces not furnished by any maintenance items included with Lexmark user's guides, manuals, instructions or guidance -Unsuitable physical or operating environment -Maintenance by anyone other than Lexmark or a Lexmark authorized servicer -Operation of a product beyond repair, or if the product is not free of all print...
... of original purchase as toners and inks), software, or interfaces not furnished by any maintenance items included with Lexmark user's guides, manuals, instructions or guidance -Unsuitable physical or operating environment -Maintenance by anyone other than Lexmark or a Lexmark authorized servicer -Operation of a product beyond repair, or if the product is not free of all print...
Help Menu Pages
Page 1
... in the printer. English, French, German, and Spanish translations are stored in the multifunction printer (MFP) as PDFs. The User's Guide provides information about using an FTP address, shortcut numbers, or the address book, and about setting up the printer. Software and...directly to an FTP server using the printer and performing various tasks, including copying, scanning, and faxing. Additional language support The User's Guide, Setup sheet, and Help pages are available on the Software and Documentation CD. They contain information about loading paper, printing, ordering...
... in the printer. English, French, German, and Spanish translations are stored in the multifunction printer (MFP) as PDFs. The User's Guide provides information about using an FTP address, shortcut numbers, or the address book, and about setting up the printer. Software and...directly to an FTP server using the printer and performing various tasks, including copying, scanning, and faxing. Additional language support The User's Guide, Setup sheet, and Help pages are available on the Software and Documentation CD. They contain information about loading paper, printing, ordering...
Quick Reference
Page 2
... of the stack, and lock the length guide for the paper sizes indicated on the side of paper was loaded than the type previously loaded in the trays if an optional StapleSmartTM II Finisher is installed. For more information, see the User's Guide. Do not overload the tray. 7 Insert... the tray. 3 Unlock the length guide. 6 If necessary, adjust the paper guides to the correct position for the tray from the printer control panel. Note: Notice the...
... of the stack, and lock the length guide for the paper sizes indicated on the side of paper was loaded than the type previously loaded in the trays if an optional StapleSmartTM II Finisher is installed. For more information, see the User's Guide. Do not overload the tray. 7 Insert... the tray. 3 Unlock the length guide. 6 If necessary, adjust the paper guides to the correct position for the tray from the printer control panel. Note: Notice the...
Quick Reference
Page 3
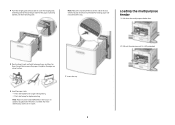
... side of the tray which indicates the maximum height for loading paper. 4 Push the length guide release latch to raise the length guide, slide the guide to loosen them, and then fan them. For more information, see the User's Guide. 3 2 Pull out the extension until it is installed. Loading the multipurpose feeder 1 Pull down the... the paper stack: • Print side facedown for single-sided printing • Print side faceup for the paper size being loaded, and then lock the guide.
... side of the tray which indicates the maximum height for loading paper. 4 Push the length guide release latch to raise the length guide, slide the guide to loosen them, and then fan them. For more information, see the User's Guide. 3 2 Pull out the extension until it is installed. Loading the multipurpose feeder 1 Pull down the... the paper stack: • Print side facedown for single-sided printing • Print side faceup for the paper size being loaded, and then lock the guide.
Quick Reference
Page 6
... within a fax number, press . Note: To print on the scanner glass. 2 If you are loading a document into the ADF, then adjust the paper guides. 3 On the home screen, touch Fax. 4 Enter the fax number or a shortcut using the touch screen or keypad. Note: To print on the scanner...a Repeat print job, the printer prints all copies are automatically deleted from the printer control panel. Once all requested copies of the following: For Windows users a With a document open , choose File > Print. Reserve When you need to match the loaded paper, or select the appropriate tray or feeder...
... within a fax number, press . Note: To print on the scanner glass. 2 If you are loading a document into the ADF, then adjust the paper guides. 3 On the home screen, touch Fax. 4 Enter the fax number or a shortcut using the touch screen or keypad. Note: To print on the scanner...a Repeat print job, the printer prints all copies are automatically deleted from the printer control panel. Once all requested copies of the following: For Windows users a With a document open , choose File > Print. Reserve When you need to match the loaded paper, or select the appropriate tray or feeder...


