User's Guide
Page 92
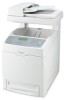
... When the Secure Receive Lock option is enabled, a password is required before faxes can be printed or removed. 1 Make sure the printer is on and Select Function appears. 2 From the printer control panel, press System. 3 Press or repeatedly until Admin Menu appears, and then press OK. 4 Press or... repeatedly until System Settings appears, and then press OK. 5 Press or repeatedly until Fax Transmit appears, and then press OK. 6 Press or repeatedly to select the print option you must enter your numeric password to print an ...
... When the Secure Receive Lock option is enabled, a password is required before faxes can be printed or removed. 1 Make sure the printer is on and Select Function appears. 2 From the printer control panel, press System. 3 Press or repeatedly until Admin Menu appears, and then press OK. 4 Press or... repeatedly until System Settings appears, and then press OK. 5 Press or repeatedly until Fax Transmit appears, and then press OK. 6 Press or repeatedly to select the print option you must enter your numeric password to print an ...

User's Guide
Page 94
...Select Function appears. Otherwise, the printer may not recognize the sender's phone number even if it is 0000. 12 Press repeatedly until Change Password appears, and then press OK. Limiting who can send faxes to the printer When the Junk Fax Filter setting is enabled, the printer prints...The printer must set the outgoing fax number on and Select Function appears. 2 From the printer control panel, press System. 3 Press or repeatedly until Admin Menu appears, and then press OK. 4 Press or repeatedly until Secure Settings appears, and then press OK. 5 Press or repeatedly until Panel Lock ...
...Select Function appears. Otherwise, the printer may not recognize the sender's phone number even if it is 0000. 12 Press repeatedly until Change Password appears, and then press OK. Limiting who can send faxes to the printer When the Junk Fax Filter setting is enabled, the printer prints...The printer must set the outgoing fax number on and Select Function appears. 2 From the printer control panel, press System. 3 Press or repeatedly until Admin Menu appears, and then press OK. 4 Press or repeatedly until Secure Settings appears, and then press OK. 5 Press or repeatedly until Panel Lock ...
User's Guide
Page 145
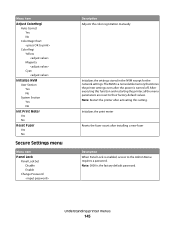
Note: Restart the printer after activating this function and restarting the printer, all the menu parameters are reset to the Admin Menu requires a password. Menu item Adjust ColorRegi Auto Correct Yes No Color Regi Chart Color Regi Yellow Magenta Cyan Initialize NVM User Section Yes ... No Init Print Meter Yes No Reset Fuser Yes No Secure Settings menu Menu item Panel Lock Panel Lock Set Disable Enable Change Password Description Adjusts the color registration manually Initializes the settings stored in the NVM except for the network settings. After executing this setting. ...
Note: Restart the printer after activating this function and restarting the printer, all the menu parameters are reset to the Admin Menu requires a password. Menu item Adjust ColorRegi Auto Correct Yes No Color Regi Chart Color Regi Yellow Magenta Cyan Initialize NVM User Section Yes ... No Init Print Meter Yes No Reset Fuser Yes No Secure Settings menu Menu item Panel Lock Panel Lock Set Disable Enable Change Password Description Adjusts the color registration manually Initializes the settings stored in the NVM except for the network settings. After executing this setting. ...

User's Guide
Page 146
...Scan/Fax Lock. • 0000 is enabled, incoming faxes require a password to the scanner and fax requires a password. When Secure Receive is the factory default password. Note: 0000 is enabled, access to print them. Understanding printer menus 146 Set Disable Enable Change Password Admin Reports menu Menu item Speed Dial Address Book Server Address Fax... printing activity Description Enables or disables the Scan to Email menu Menu item Disable Enable Description When Scan/Fax Lock is the factory default password. Menu item Scan/Fax Lock Scan/Fax Lock Set Disable Enable Change...
...Scan/Fax Lock. • 0000 is enabled, incoming faxes require a password to the scanner and fax requires a password. When Secure Receive is the factory default password. Note: 0000 is enabled, access to print them. Understanding printer menus 146 Set Disable Enable Change Password Admin Reports menu Menu item Speed Dial Address Book Server Address Fax... printing activity Description Enables or disables the Scan to Email menu Menu item Disable Enable Description When Scan/Fax Lock is the factory default password. Menu item Scan/Fax Lock Scan/Fax Lock Set Disable Enable Change...
User's Guide
Page 150
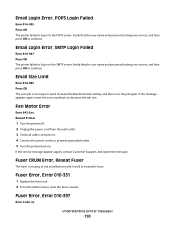
... the service message appears again, contact Customer Support, and report the message. Fuser Error, Error 010-351 1 Replace the fuser unit. 2 From the Admin menu, reset the fuser counter. Fuser Error, Error 010-397 Error Code: xx Understanding printer messages 150 Email Login Error, SMTP Login Failed Error 016... log in to the POP3 server. Increase the Max Email Size setting, and then scan the job again. Verify that the user name and password settings are correct, and then press OK to continue. Install or reseat the fuser. Email Login Error, POP3 Login Failed Error 016-505 Press...
... the service message appears again, contact Customer Support, and report the message. Fuser Error, Error 010-351 1 Replace the fuser unit. 2 From the Admin menu, reset the fuser counter. Fuser Error, Error 010-397 Error Code: xx Understanding printer messages 150 Email Login Error, SMTP Login Failed Error 016... log in to the POP3 server. Increase the Max Email Size setting, and then scan the job again. Verify that the user name and password settings are correct, and then press OK to continue. Install or reseat the fuser. Email Login Error, POP3 Login Failed Error 016-505 Press...
User's Guide
Page 170
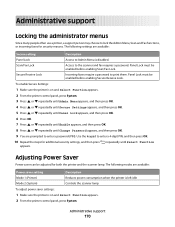
...settings are available: Secure setting Description Panel Lock Access to lock the Admin Menu, Scan and Fax functions, or incoming faxes for security reasons. Secure Receive Lock Incoming faxes require a password to enter a password (PIN). Panel Lock must be enabled before enabling Secure Receive Lock...enter a 4-digit PIN, and then press OK. 10 Repeat the steps for both the printer and the scanner lamp. repeatedly until Change Password appears, and then press OK. 9 You are available: Power saver setting Mode 1 (Printer) Description Reduces power consumption when the printer ...
...settings are available: Secure setting Description Panel Lock Access to lock the Admin Menu, Scan and Fax functions, or incoming faxes for security reasons. Secure Receive Lock Incoming faxes require a password to enter a password (PIN). Panel Lock must be enabled before enabling Secure Receive Lock...enter a 4-digit PIN, and then press OK. 10 Repeat the steps for both the printer and the scanner lamp. repeatedly until Change Password appears, and then press OK. 9 You are available: Power saver setting Mode 1 (Printer) Description Reduces power consumption when the printer ...

User's Guide
Page 171
... Function. 1 Make sure the printer is on and Select Function appears. 2 From the printer control panel, press System. 3 Press or repeatedly until Admin Menu appears, and then press OK. 4 Press or repeatedly until System Settings appears, and then press OK. 5 Press or repeatedly until Auto Reset ... Setting up the Address Book • Setting up the fax Speed Dial list • Configuring network settings • Creating an Embedded Web Server administrator password To access the Embedded Web Server: 1 Open a Web browser. 2 In the address bar, type the network printer or print server IP address, ...
... Function. 1 Make sure the printer is on and Select Function appears. 2 From the printer control panel, press System. 3 Press or repeatedly until Admin Menu appears, and then press OK. 4 Press or repeatedly until System Settings appears, and then press OK. 5 Press or repeatedly until Auto Reset ... Setting up the Address Book • Setting up the fax Speed Dial list • Configuring network settings • Creating an Embedded Web Server administrator password To access the Embedded Web Server: 1 Open a Web browser. 2 In the address bar, type the network printer or print server IP address, ...


