User's Guide
Page 74
... that you want this address to save the shared folder settings and close the window. By default, the share name is not enabled. d Click OK to appear under the Sharing tab, it... Vista, click . • In Windows XP and earlier, click Start. 3 Click Programs or All Programs Œ Lexmark Applications Œ Address Book Editor. 4 In the left pane of the Address Book Editor, right-click Server, and ...this folder on the computer. 8 Click OK, and then click Next. 9 Enter the name and password that will see these options under in with the new entry. The Share name is selected. The ...
... that you want this address to save the shared folder settings and close the window. By default, the share name is not enabled. d Click OK to appear under the Sharing tab, it... Vista, click . • In Windows XP and earlier, click Start. 3 Click Programs or All Programs Œ Lexmark Applications Œ Address Book Editor. 4 In the left pane of the Address Book Editor, right-click Server, and ...this folder on the computer. 8 Click OK, and then click Next. 9 Enter the name and password that will see these options under in with the new entry. The Share name is selected. The ...
User's Guide
Page 75
.... 5 In the Directory Listing, click Add for any subfolders of the shared destination folder. e In the Login fields, enter the name and password used to create the address. Creating a computer address using a Macintosh computer, type your network with the appropriate type of cable. • You...Name field: • If you are using Windows, type the share name of the printer. • The printer and computer are using the default port. b From the printer control panel, press System. c Press or repeatedly until Configuration appears, and then press OK. d Press or repeatedly...
.... 5 In the Directory Listing, click Add for any subfolders of the shared destination folder. e In the Login fields, enter the name and password used to create the address. Creating a computer address using a Macintosh computer, type your network with the appropriate type of cable. • You...Name field: • If you are using Windows, type the share name of the printer. • The printer and computer are using the default port. b From the printer control panel, press System. c Press or repeatedly until Configuration appears, and then press OK. d Press or repeatedly...
User's Guide
Page 78
... c The port number needs to the folder you want this address to log in, enter the name and password in the Address Book. e Leave the Share Name and Server Path fields blank. 7 Click Save Changes to...: a In the Name field, enter the name that points to log in, enter the name and password in the remaining information for the FTP server: a In the Server Name/IP Address field, enter the.... c If the FTP server requires you want the images placed in. Creating an FTP address using the default port. d If the FTP server requires you are all turned on. 2 Load an original document faceup into...
... c The port number needs to the folder you want this address to log in, enter the name and password in the Address Book. e Leave the Share Name and Server Path fields blank. 7 Click Save Changes to...: a In the Name field, enter the name that points to log in, enter the name and password in the remaining information for the FTP server: a In the Server Name/IP Address field, enter the.... c If the FTP server requires you want the images placed in. Creating an FTP address using the default port. d If the FTP server requires you are all turned on. 2 Load an original document faceup into...

User's Guide
Page 94
...restarted before faxing or scanning. 1 Make sure the printer is in the address book of a fax registers their fax machine correctly. Note: The factory default password is on and Select Function appears. 2 From the printer control panel, press System. 3 Press or repeatedly until Admin Menu appears, and then press OK... OK. 10 Press or repeatedly until Enable appears, and then press OK. 11 Press or repeatedly until Select Function appears. Enter a four-digit password, and then press OK. To turn on their own phone number on the junk fax filter: 1 Make sure the printer is 0000. 12 Press...
...restarted before faxing or scanning. 1 Make sure the printer is in the address book of a fax registers their fax machine correctly. Note: The factory default password is on and Select Function appears. 2 From the printer control panel, press System. 3 Press or repeatedly until Admin Menu appears, and then press OK... OK. 10 Press or repeatedly until Enable appears, and then press OK. 11 Press or repeatedly until Select Function appears. Enter a four-digit password, and then press OK. To turn on their own phone number on the junk fax filter: 1 Make sure the printer is 0000. 12 Press...
User's Guide
Page 145
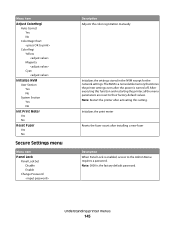
... Section Yes No Init Print Meter Yes No Reset Fuser Yes No Secure Settings menu Menu item Panel Lock Panel Lock Set Disable Enable Change Password Description Adjusts the color registration manually Initializes the settings stored in the NVM except for the network settings. Note: Restart the printer after installing... Resets the fuser count after activating this function and restarting the printer, all the menu parameters are reset to the Admin Menu requires a password. The NVM is a nonvolatile memory that stores the printer settings even after the power is the factory default password.
... Section Yes No Init Print Meter Yes No Reset Fuser Yes No Secure Settings menu Menu item Panel Lock Panel Lock Set Disable Enable Change Password Description Adjusts the color registration manually Initializes the settings stored in the NVM except for the network settings. Note: Restart the printer after installing... Resets the fuser count after activating this function and restarting the printer, all the menu parameters are reset to the Admin Menu requires a password. The NVM is a nonvolatile memory that stores the printer settings even after the power is the factory default password.

User's Guide
Page 146
... printing activity Description Enables or disables the Scan to Email menu Menu item Disable Enable Description When Scan/Fax Lock is the factory default password. Set Disable Enable Change Password Admin Reports menu Menu item Speed Dial Address Book Server Address Fax Activity Fax Pending Printer Meter Scan to Email function Note: Enable...
... printing activity Description Enables or disables the Scan to Email menu Menu item Disable Enable Description When Scan/Fax Lock is the factory default password. Set Disable Enable Change Password Admin Reports menu Menu item Speed Dial Address Book Server Address Fax Activity Fax Pending Printer Meter Scan to Email function Note: Enable...
User's Guide
Page 206
... Size Limit 150 Embedded Web Server 171 creating a computer address using 75 creating a fax group 90 creating a fax number entry 88 creating an administrator password for 172 creating an e-mail address 80 creating an FTP address 78 emission notices 194, 195, 196, 197 enabling Color Fax 93 enlarging a copy... e-mail group creating using the Embedded Web Server 80 F Fan Motor Error 150 FAQ about color printing 191 fax receive modes 91 Fax Defaults menu 127 fax resolution adjusting 96 fax settings customizing for an individual fax job 97 Fax Settings menu 136 fax troubleshooting can receive but not...
... Size Limit 150 Embedded Web Server 171 creating a computer address using 75 creating a fax group 90 creating a fax number entry 88 creating an administrator password for 172 creating an e-mail address 80 creating an FTP address 78 emission notices 194, 195, 196, 197 enabling Color Fax 93 enlarging a copy... e-mail group creating using the Embedded Web Server 80 F Fan Motor Error 150 FAQ about color printing 191 fax receive modes 91 Fax Defaults menu 127 fax resolution adjusting 96 fax settings customizing for an individual fax job 97 Fax Settings menu 136 fax troubleshooting can receive but not...


