User's Guide
Page 45
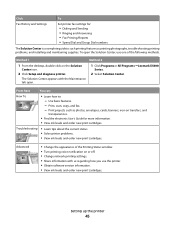
...cartridges. To open . Use basic features. - Print, scan, copy, and fax. - Method 1 Method 2 1 From the desktop, double-click on transfers, and transparencies. • Find the electronic User's Guide for : • Dialing and Sending • Ringing and Answering • Fax Printing/Reports • Speed Dial and Group Dial numbers... Center, use the printer. • Obtain software version information. • View ink levels and order new print cartridges. Print projects such as printing photographs, troubleshooting printing problems, and installing and maintaining ...
...cartridges. To open . Use basic features. - Print, scan, copy, and fax. - Method 1 Method 2 1 From the desktop, double-click on transfers, and transparencies. • Find the electronic User's Guide for : • Dialing and Sending • Ringing and Answering • Fax Printing/Reports • Speed Dial and Group Dial numbers... Center, use the printer. • Obtain software version information. • View ink levels and order new print cartridges. Print projects such as printing photographs, troubleshooting printing problems, and installing and maintaining ...
User's Guide
Page 70
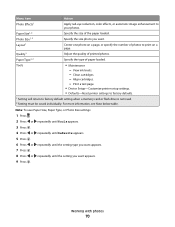
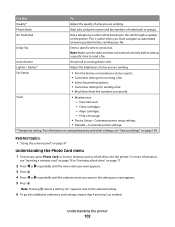
... . 8 Press or repeatedly until the setting you want appears. 9 Press . Working with photos 70 Paper Size1, 2 Specify the size of paper loaded. View ink levels. - For more information, see Note below table. Print a test page. • Device Setup-Customize printer setup settings. • Defaults-Reset printer settings to... must be saved individually. Photo Size1, 2 Specify the size photo you want . Paper Type1, 2 Specify the type of the paper loaded. Align cartridges. - Quality1 Adjust the quality of photos to print on a page. Tools • Maintenance - Clean...
... . 8 Press or repeatedly until the setting you want appears. 9 Press . Working with photos 70 Paper Size1, 2 Specify the size of paper loaded. View ink levels. - For more information, see Note below table. Print a test page. • Device Setup-Customize printer setup settings. • Defaults-Reset printer settings to... must be saved individually. Photo Size1, 2 Specify the size photo you want . Paper Type1, 2 Specify the type of the paper loaded. Align cartridges. - Quality1 Adjust the quality of photos to print on a page. Tools • Maintenance - Clean...

User's Guide
Page 91
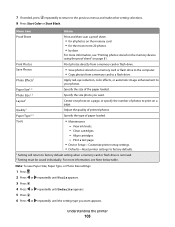
... you want. Lighter / Darker* Adjust the brightness of the original document. View ink levels. - Modifying the Copy settings 1 With your scanned image open on the Copy screen..., click the Settings tab. 2 From the Copies box, select the number of the original document. Resize* • Specify the percentage for enlarging or reducing the original ...Device Setup-Customize printer setup settings. • Defaults-Customize printer settings. * Temporary setting. Clean cartridges. - For best results with this To Copies* Specify how many pages to print on Saving ...
... you want. Lighter / Darker* Adjust the brightness of the original document. View ink levels. - Modifying the Copy settings 1 With your scanned image open on the Copy screen..., click the Settings tab. 2 From the Copies box, select the number of the original document. Resize* • Specify the percentage for enlarging or reducing the original ...Device Setup-Customize printer setup settings. • Defaults-Customize printer settings. * Temporary setting. Clean cartridges. - For best results with this To Copies* Specify how many pages to print on Saving ...
User's Guide
Page 113
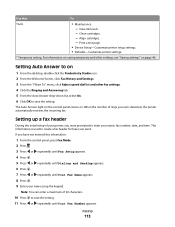
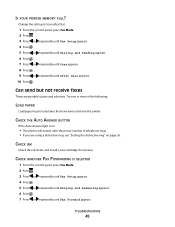
...this To Tools • Maintenance - Faxing 113 View ink levels. - The Auto Answer light on the control panel comes on page 40. When the number of rings you set is used to enter your name using the keypad. Clean cartridges. - For information on saving temporary and other fax ...click Adjust speed dial list and other settings, see "Saving settings" on . Align cartridges. - Setting Auto Answer to save the setting. 11 Press or repeatedly until Your Fax Name appears. 8 Press . 9 Enter your name, fax number, date, and time. If you send. Print a test page. • ...
...this To Tools • Maintenance - Faxing 113 View ink levels. - The Auto Answer light on the control panel comes on page 40. When the number of rings you set is used to enter your name using the keypad. Clean cartridges. - For information on saving temporary and other fax ...click Adjust speed dial list and other settings, see "Saving settings" on . Align cartridges. - Setting Auto Answer to save the setting. 11 Press or repeatedly until Your Fax Name appears. 8 Press . 9 Enter your name, fax number, date, and time. If you send. Print a test page. • ...
User's Guide
Page 137
...8226; In Windows XP and earlier, click Start. 2 Click Programs or All Programs ŒLexmark X5400 Series. 3 Click Solution Center. 4 If an exclamation point (!) appears on a cartridge, the ink level is low. The ink levels displayed in the Printing Status window when you are not updated during a print job;...photo. they represent the ink level at least 24 hours before stacking, displaying, or storing. For best results, remove each printed sheet individually from the paper exit tray, and allow the prints to dry at the beginning of graphics, or with a large number of a print job....
...8226; In Windows XP and earlier, click Start. 2 Click Programs or All Programs ŒLexmark X5400 Series. 3 Click Solution Center. 4 If an exclamation point (!) appears on a cartridge, the ink level is low. The ink levels displayed in the Printing Status window when you are not updated during a print job;...photo. they represent the ink level at least 24 hours before stacking, displaying, or storing. For best results, remove each printed sheet individually from the paper exit tray, and allow the prints to dry at the beginning of graphics, or with a large number of a print job....

User's Guide
Page 138
... the printer. 3 Check that the USB cable is not damaged and that the light is marked by the USB symbol. MAKE SURE THE CARTRIDGES ARE PROPERLY INSTALLED With the front of the following : ARE YOU PRINTING PHOTOS OR DOCUMENTS WITH A LARGE NUMBER OF GRAPHICS? Troubleshooting 138 ARE YOU... PRINTING WITH THE BEST QUALITY/SPEED SETTING? To reduce ink usage, select Best only...
... the printer. 3 Check that the USB cable is not damaged and that the light is marked by the USB symbol. MAKE SURE THE CARTRIDGES ARE PROPERLY INSTALLED With the front of the following : ARE YOU PRINTING PHOTOS OR DOCUMENTS WITH A LARGE NUMBER OF GRAPHICS? Troubleshooting 138 ARE YOU... PRINTING WITH THE BEST QUALITY/SPEED SETTING? To reduce ink usage, select Best only...
User's Guide
Page 166
... AUTO ANSWER BUTTON If the Auto Answer light is on page 117. CHECK INK Check the ink levels, and install a new cartridge if necessary. Try one or more of the following: LOAD PAPER Load paper to Scan after the preset number of telephone rings. • If you are using a distinctive ring, see "Setting the...
... AUTO ANSWER BUTTON If the Auto Answer light is on page 117. CHECK INK Check the ink levels, and install a new cartridge if necessary. Try one or more of the following: LOAD PAPER Load paper to Scan after the preset number of telephone rings. • If you are using a distinctive ring, see "Setting the...
User's Guide
Page 196
... 1104 173 error 1205 174 error 1206 174 fax error 169 fax mode unsupported 169 general printing problem 178 ink low 178 left cartridge error 174 left cartridge incorrect 174 left cartridge missing 174 memory full 174 no images have been selected 175 no photo/paper size selection has been made ...a broadcast fax immediately 104 sending while behind a PBX 36 setting Auto Answer to on 113 setting number of rings before automatic answering 118 setting up dialing prefix 117 using a calling card number 103 using digital telephone service 37 using DSL 37 using ISDN 37 using the control panel 104 using...
... 1104 173 error 1205 174 error 1206 174 fax error 169 fax mode unsupported 169 general printing problem 178 ink low 178 left cartridge error 174 left cartridge incorrect 174 left cartridge missing 174 memory full 174 no images have been selected 175 no photo/paper size selection has been made ...a broadcast fax immediately 104 sending while behind a PBX 36 setting Auto Answer to on 113 setting number of rings before automatic answering 118 setting up dialing prefix 117 using a calling card number 103 using digital telephone service 37 using DSL 37 using ISDN 37 using the control panel 104 using...
User's Guide
Page 198
...ADF) paper stop 26 control panel 25 EXT port 26 LINE port 26 memory card slots 25 paper exit tray 25 paper guide 25 paper support 25 PictBridge port 25 power supply port 26 print cartridge carrier 26 scanner glass 26 scanner unit 26 top cover 26 USB...76 Photo Card menu 69 photo cards, loading 52 Photo Greeting Cards button 43 photo ink low 173 Photo Packages 80 Photo Packages button 43 photo paper, loading 50 Photo ...glass 55 printing all from a memory device 81 printing by date range 85 printing by number 82 printing from a Web page 58 printing from CD using the computer 79 printing from...
...ADF) paper stop 26 control panel 25 EXT port 26 LINE port 26 memory card slots 25 paper exit tray 25 paper guide 25 paper support 25 PictBridge port 25 power supply port 26 print cartridge carrier 26 scanner glass 26 scanner unit 26 top cover 26 USB...76 Photo Card menu 69 photo cards, loading 52 Photo Greeting Cards button 43 photo ink low 173 Photo Packages 80 Photo Packages button 43 photo paper, loading 50 Photo ...glass 55 printing all from a memory device 81 printing by date range 85 printing by number 82 printing from a Web page 58 printing from CD using the computer 79 printing from...
User's Guide
Page 199
...cartridges aligning 122 cleaning 123 installing 120 ordering 126 preserving 124 refilling 122 removing 121 using genuine Lexmark 122 wiping 123 print is dark or smudged 141 print jobs canceling 60 print quality, improving 133 print settings saving and deleting 65 print speed is slow 136 print troubleshooting improving print quality 133 ink...60 multiple pages on one sheet 60 on both sides of the paper 59 Photo Packages 80 photos by date range 85 photos by number 82 photos from CD using the computer 79 photos from digital camera using DPOF 84 photos from digital camera using the computer 79 ...
...cartridges aligning 122 cleaning 123 installing 120 ordering 126 preserving 124 refilling 122 removing 121 using genuine Lexmark 122 wiping 123 print is dark or smudged 141 print jobs canceling 60 print quality, improving 133 print settings saving and deleting 65 print speed is slow 136 print troubleshooting improving print quality 133 ink...60 multiple pages on one sheet 60 on both sides of the paper 59 Photo Packages 80 photos by date range 85 photos by number 82 photos from CD using the computer 79 photos from digital camera using DPOF 84 photos from digital camera using the computer 79 ...

User's Guide
Page 101
...or repeatedly until the submenu item you want or the setting you want appears. 7 Press . Original Size* Specify the size of a scan. View ink levels. - Print a test page. • Device Setup-Customize printer setup settings. • Defaults-Customize printer settings. * Temporary setting. Understanding the ... menus and make other setting selections. 9 Press Start Color or Start Black. Align cartridges. - The fax default screen appears. 2 If you do not want to change a setting, enter the fax number and press Start Color or Start Black. 3 If you want to change a setting...
...or repeatedly until the submenu item you want or the setting you want appears. 7 Press . Original Size* Specify the size of a scan. View ink levels. - Print a test page. • Device Setup-Customize printer setup settings. • Defaults-Customize printer settings. * Temporary setting. Understanding the ... menus and make other setting selections. 9 Press Start Color or Start Black. Align cartridges. - The fax default screen appears. 2 If you do not want to change a setting, enter the fax number and press Start Color or Start Black. 3 If you want to change a setting...
User's Guide
Page 102
... setting you want appears. 5 Press . Tools • Maintenance - Note: Pressing selects a setting. An * appears next to send a fax. View ink levels. - For information on saving temporary and other settings, see "Inserting a memory card" on page 76 or "Inserting a flash drive" on the printer...your fax. Phone Book Add, edit, and print names and fax numbers of a fax you are sending. Note: Make sure the date and time are sending. Lighter / Darker* Adjust the brightness of individuals or groups. Align cartridges. - Print a test page. • Device Setup-Customize printer ...
... setting you want appears. 5 Press . Tools • Maintenance - Note: Pressing selects a setting. An * appears next to send a fax. View ink levels. - For information on saving temporary and other settings, see "Inserting a memory card" on page 76 or "Inserting a flash drive" on the printer...your fax. Phone Book Add, edit, and print names and fax numbers of a fax you are sending. Note: Make sure the date and time are sending. Lighter / Darker* Adjust the brightness of individuals or groups. Align cartridges. - Print a test page. • Device Setup-Customize printer ...
User's Guide
Page 103
...; Save photos stored on a page. Layout1 Center one photo on a page, or specify the number of the paper loaded. Understanding the printer 103 Photo Size1, 2 Specify the size photo you want . View ink levels. - Note: To save Paper Size, Paper Type, or Photo Size settings: 1 Press ... more information, see Note below table. Quality1 Adjust the quality of paper loaded. Paper Type1, 2 Specify the type of printed photos. Clean cartridges. - Paper Size1, 2 Specify the size of photos to print on a memory card or flash drive to the computer. • Copy ...
...; Save photos stored on a page. Layout1 Center one photo on a page, or specify the number of the paper loaded. Understanding the printer 103 Photo Size1, 2 Specify the size photo you want . View ink levels. - Note: To save Paper Size, Paper Type, or Photo Size settings: 1 Press ... more information, see Note below table. Quality1 Adjust the quality of paper loaded. Paper Type1, 2 Specify the type of printed photos. Clean cartridges. - Paper Size1, 2 Specify the size of photos to print on a memory card or flash drive to the computer. • Copy ...

User's Guide
Page 129
...; If you purchased a new, genuine Lexmark print cartridge, but the Out of Original Lexmark Ink message appears: 1 Click Learn More on the message. 2 Click Report a non-Lexmark print cartridge. Declared yield value in accordance with new Lexmark print cartridge(s). • If you are using the printer without a computer, press Cancel. Item USB cable Part number 1021294 Maintaining the printer 129...
...; If you purchased a new, genuine Lexmark print cartridge, but the Out of Original Lexmark Ink message appears: 1 Click Learn More on the message. 2 Click Report a non-Lexmark print cartridge. Declared yield value in accordance with new Lexmark print cartridge(s). • If you are using the printer without a computer, press Cancel. Item USB cable Part number 1021294 Maintaining the printer 129...

User's Guide
Page 159
... one or more of the following : CHECK MODE SELECTION To make sure the printer is on: • The printer will answer after the preset number of telephone rings. • If you are using a distinctive ring, see "Setting the distinctive ring" on page 68. CHECK WHETHER FAX FORWARDING...original document in the printer. Troubleshooting 159 Can send but not send faxes These are possible causes and solutions. CHECK INK Check the ink levels, and install a new cartridge if necessary. Can receive but not receive faxes These are possible causes and solutions. CHECK THE AUTO ANSWER BUTTON ...
... one or more of the following : CHECK MODE SELECTION To make sure the printer is on: • The printer will answer after the preset number of telephone rings. • If you are using a distinctive ring, see "Setting the distinctive ring" on page 68. CHECK WHETHER FAX FORWARDING...original document in the printer. Troubleshooting 159 Can send but not send faxes These are possible causes and solutions. CHECK INK Check the ink levels, and install a new cartridge if necessary. Can receive but not receive faxes These are possible causes and solutions. CHECK THE AUTO ANSWER BUTTON ...

Fax Guide
Page 32
... time to save the setting. Answer all incoming phone calls. View ink levels. - Using Fax 32 This is detected, the printer automatically receives the incoming fax. Adjust the brightness of your name, fax number, date, and time. Clean cartridges. - Print a test page. • Device Setup-Customize printer ...On. 6 Click OK to send a fax. Enter a specific time to on . Align cartridges. - This information is used to create a fax header for sending a fax. • Block faxes from the numbers you were prompted to the call through a speaker on the printer. Setting up a fax ...
... time to save the setting. Answer all incoming phone calls. View ink levels. - Using Fax 32 This is detected, the printer automatically receives the incoming fax. Adjust the brightness of your name, fax number, date, and time. Clean cartridges. - Print a test page. • Device Setup-Customize printer ...On. 6 Click OK to send a fax. Enter a specific time to on . Align cartridges. - This information is used to create a fax header for sending a fax. • Block faxes from the numbers you were prompted to the call through a speaker on the printer. Setting up a fax ...
Fax Guide
Page 45
CHECK INK Check the ink levels, and install a new cartridge if necessary. IS YOUR PRINTER MEMORY FULL? Can send but not receive faxes These are using a distinctive ring, see "Setting the distinctive ring" on : • ... or repeatedly until Ringing and Answering appears. 6 Press . 7 Press or repeatedly until After Dial appears. 10 Press . Change the setting to Scan after the preset number of the following: LOAD PAPER Load paper to print any faxes that have been stored in the printer. Troubleshooting 45 Try one or more of...
CHECK INK Check the ink levels, and install a new cartridge if necessary. IS YOUR PRINTER MEMORY FULL? Can send but not receive faxes These are using a distinctive ring, see "Setting the distinctive ring" on : • ... or repeatedly until Ringing and Answering appears. 6 Press . 7 Press or repeatedly until After Dial appears. 10 Press . Change the setting to Scan after the preset number of the following: LOAD PAPER Load paper to print any faxes that have been stored in the printer. Troubleshooting 45 Try one or more of...


