
User's Guide
Page 3
...Safety Information 2 Finding information about the printer 7 Setting up the printer 11 Checking the box contents...11 Installing another language control panel...12 Getting the printer ready to fax...12 Learning about the printer 21 Understanding the parts of the printer...21 Using the control panel buttons and... menus...23 Learning about the software 32 Using the printer software...32 Using the Imaging Studio......
...Safety Information 2 Finding information about the printer 7 Setting up the printer 11 Checking the box contents...11 Installing another language control panel...12 Getting the printer ready to fax...12 Learning about the printer 21 Understanding the parts of the printer...21 Using the control panel buttons and... menus...23 Learning about the software 32 Using the printer software...32 Using the Imaging Studio......
User's Guide
Page 5
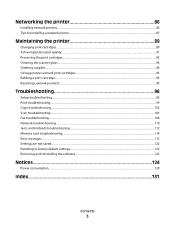
Networking the printer 86 Installing network printers...86 Tips for installing a network printer...87 Maintaining the printer 89 Changing print cartridges...89 Achieving better print quality...91 Preserving the print cartridges...93 Cleaning the scanner glass...94 Ordering supplies...94 Using genuine Lexmark print cartridges...95 Refilling a print cartridge...95 Recycling Lexmark products...95 Troubleshooting 96 Setup...
Networking the printer 86 Installing network printers...86 Tips for installing a network printer...87 Maintaining the printer 89 Changing print cartridges...89 Achieving better print quality...91 Preserving the print cartridges...93 Cleaning the scanner glass...94 Ordering supplies...94 Using genuine Lexmark print cartridges...95 Refilling a print cartridge...95 Recycling Lexmark products...95 Troubleshooting 96 Setup...

User's Guide
Page 7
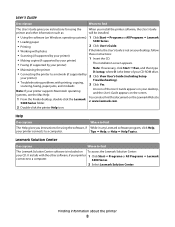
...Finder desktop, double-click the Lexmark 5400 Series folder. 2 Double-click the printer Help icon. You can find this document in the printer box or on the Lexmark Web site at www.lexmark.com. Finding information about the printer Setup sheet Description Where to solve printer setup problems. Note: These... documents do not ship with all printers. If you how to find The...
...Finder desktop, double-click the Lexmark 5400 Series folder. 2 Double-click the printer Help icon. You can find this document in the printer box or on the Lexmark Web site at www.lexmark.com. Finding information about the printer Setup sheet Description Where to solve printer setup problems. Note: These... documents do not ship with all printers. If you how to find The...
User's Guide
Page 8
...; Working with photos If the link to the User's Guide is not on the Lexmark Web site at www.lexmark.com. 5400 Series folder. 2 Double-click the printer Help icon. Finding information about the printer 8 User's Guide Description Where to find The User's Guide gives you instructions for using... the When you instructions for using the software, if While in any Lexmark software program, click Help, your printer connects to a computer. Tips ΠHelp, or Help ΠHelp Topics. Note: If your printer supports Macintosh operating systems, see the Mac Help: An icon of your...
...; Working with photos If the link to the User's Guide is not on the Lexmark Web site at www.lexmark.com. 5400 Series folder. 2 Double-click the printer Help icon. Finding information about the printer 8 User's Guide Description Where to find The User's Guide gives you instructions for using... the When you instructions for using the software, if While in any Lexmark software program, click Help, your printer connects to a computer. Tips ΠHelp, or Help ΠHelp Topics. Note: If your printer supports Macintosh operating systems, see the Mac Help: An icon of your...
User's Guide
Page 9
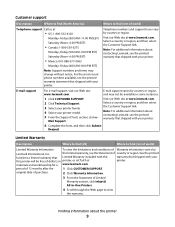
...Limited Warranty Information To view the limitations and conditions of 12 months after the 1 Click CUSTOMER SUPPORT. this printer will be available in printer, or set forth at www.lexmark.com. original date of purchase. 2 Click Warranty Information. 3 From the Statement of country or region....with this warranty that shipped with your this limited warranty, see the printed warranty statement that shipped with your printer. materials and workmanship for a www.lexmark.com. For the most recent phone numbers available, see the Statement of Limited Warranty section, click Inkjet &...
...Limited Warranty Information To view the limitations and conditions of 12 months after the 1 Click CUSTOMER SUPPORT. this printer will be available in printer, or set forth at www.lexmark.com. original date of purchase. 2 Click Warranty Information. 3 From the Statement of country or region....with this warranty that shipped with your this limited warranty, see the printed warranty statement that shipped with your printer. materials and workmanship for a www.lexmark.com. For the most recent phone numbers available, see the Statement of Limited Warranty section, click Inkjet &...

User's Guide
Page 10
Record the following information (located on the store receipt and the back of the printer), and have it ready when you contact us so that we may serve you faster: • Machine Type number • Serial number • Date purchased • Store where purchased Finding information about the printer 10
Record the following information (located on the store receipt and the back of the printer), and have it ready when you contact us so that we may serve you faster: • Machine Type number • Serial number • Date purchased • Store where purchased Finding information about the printer 10
User's Guide
Page 11
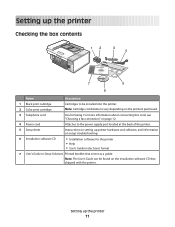
... 4 Power cord Attaches to be found on setup troubleshooting. 6 Installation software CD • Installation software for faxing. Setting up the printer Checking the box contents 12 3 4 7 5 6 Name Description 1 Black print cartridge 2 Color print cartridge Cartridges to the power supply... port located at the back of the printer. 5 Setup sheet Instructions on setting up printer hardware and software, and information on the installation software CD that serves as a guide. Note: The User's...
... 4 Power cord Attaches to be found on setup troubleshooting. 6 Installation software CD • Installation software for faxing. Setting up the printer Checking the box contents 12 3 4 7 5 6 Name Description 1 Black print cartridge 2 Color print cartridge Cartridges to the power supply... port located at the back of the printer. 5 Setup sheet Instructions on setting up printer hardware and software, and information on the installation software CD that serves as a guide. Note: The User's...

User's Guide
Page 12
...telephone, an answering machine, or a computer modem. Do not set up this section "Connecting directly to the wall jack. Getting the printer ready to pass through the printer, as described in the setup steps. Other devices (such as a telephone or answering machine) can be successfully attached to fax CAUTION-...if you do not need to connect it to a telephone line to send and receive faxes. Choosing a fax connection You can connect the printer to set up the printer. If you want a digital connection such as ISDN, DSL, or ADSL, a third-party device (such as a DSL filter) is an...
...telephone, an answering machine, or a computer modem. Do not set up this section "Connecting directly to the wall jack. Getting the printer ready to pass through the printer, as described in the setup steps. Other devices (such as a telephone or answering machine) can be successfully attached to fax CAUTION-...if you do not need to connect it to a telephone line to send and receive faxes. Choosing a fax connection You can connect the printer to set up the printer. If you want a digital connection such as ISDN, DSL, or ADSL, a third-party device (such as a DSL filter) is an...
User's Guide
Page 13
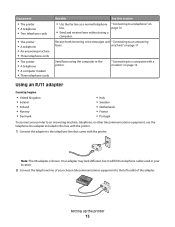
...answering faxes. Your adapter may look different, but it will fit the telephone outlet used in the box with the printer. 1 Connect the adapter to a telephone" on page 17 Send faxes using a computer. "Connecting to the telephone line that came with ...• Italy • Sweden • Netherlands • France • Portugal To connect your chosen telecommunications equipment to the left outlet of your printer to an answering machine, telephone, or other telecommunications equipment, use the telephone line adapter included in your location. 2 Connect the telephone line of the...
...answering faxes. Your adapter may look different, but it will fit the telephone outlet used in the box with the printer. 1 Connect the adapter to a telephone" on page 17 Send faxes using a computer. "Connecting to the telephone line that came with ...• Italy • Sweden • Netherlands • France • Portugal To connect your chosen telecommunications equipment to the left outlet of your printer to an answering machine, telephone, or other telecommunications equipment, use the telephone line adapter included in your location. 2 Connect the telephone line of the...
User's Guide
Page 14
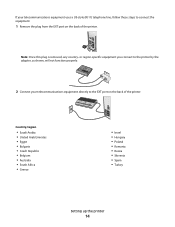
... • Greece • Israel • Hungary • Poland • Romania • Russia • Slovenia • Spain • Turkey Setting up the printer 14 If your telecommunications equipment directly to connect the equipment: 1 Remove the plug from the EXT port on the back of the... printer. Note: Once this plug is removed, any country- or region-specific equipment you connect to the printer by the adapter, as shown, will not function properly. 2 Connect your telecommunications equipment uses ...
... • Greece • Israel • Hungary • Poland • Romania • Russia • Slovenia • Spain • Turkey Setting up the printer 14 If your telecommunications equipment directly to connect the equipment: 1 Remove the plug from the EXT port on the back of the... printer. Note: Once this plug is removed, any country- or region-specific equipment you connect to the printer by the adapter, as shown, will not function properly. 2 Connect your telecommunications equipment uses ...
User's Guide
Page 15
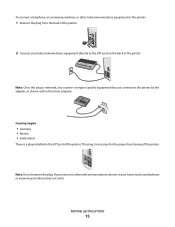
... in the EXT port of the printer. 2 Connect your home (such as shown, will not function properly. or region-specific equipment that you remove it, other telecommunications equipment to the printer: 1 Remove the plug from the back of the printer. This plug is a plug installed... in your telecommunications equipment directly to the printer by the adapter, as telephones or answering machines) may not work....
... in the EXT port of the printer. 2 Connect your home (such as shown, will not function properly. or region-specific equipment that you remove it, other telecommunications equipment to the printer: 1 Remove the plug from the back of the printer. This plug is a plug installed... in your telecommunications equipment directly to the printer by the adapter, as telephones or answering machines) may not work....
User's Guide
Page 16
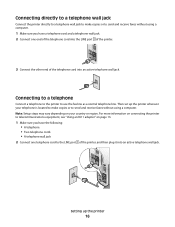
...is located to make copies or to send and receive faxes without using a computer. Setting up the printer wherever your country or region. Connecting to a telephone Connect a telephone to the printer to the LINE port of the telephone cord into an active telephone wall jack. Then set up the... A telephone • Two telephone cords • A telephone wall jack 2 Connect one end of the telephone cord into the LINE port of the printer. 3 Connect the other end of the printer, and then plug it into an active telephone wall jack. Connecting directly to a telephone wall jack Connect the...
...is located to make copies or to send and receive faxes without using a computer. Setting up the printer wherever your country or region. Connecting to a telephone Connect a telephone to the printer to the LINE port of the telephone cord into an active telephone wall jack. Then set up the... A telephone • Two telephone cords • A telephone wall jack 2 Connect one end of the telephone cord into the LINE port of the printer. 3 Connect the other end of the printer, and then plug it into an active telephone wall jack. Connecting directly to a telephone wall jack Connect the...

User's Guide
Page 17
... an RJ11 adapter" on your country or region. Connecting to an answering machine Connect an answering machine to the printer to a telephone, and then plug it into the EXT port of the printer. 4 Connect the other telephone cord to receive both incoming voice messages and faxes. Note: Setup steps may vary depending... page 13. 1 Make sure you have the following: • A telephone • An answering machine • Three telephone cords • A telephone wall jack Setting up the printer 17 3 Remove the protective plug from the EXT port of the...
... an RJ11 adapter" on your country or region. Connecting to an answering machine Connect an answering machine to the printer to a telephone, and then plug it into the EXT port of the printer. 4 Connect the other telephone cord to receive both incoming voice messages and faxes. Note: Setup steps may vary depending... page 13. 1 Make sure you have the following: • A telephone • An answering machine • Three telephone cords • A telephone wall jack Setting up the printer 17 3 Remove the protective plug from the EXT port of the...

User's Guide
Page 18
2 Connect one telephone cord into the LINE port of the printer, and then plug it into an active telephone wall jack. 3 Remove the protective plug from the EXT port of the printer. 4 Connect a second telephone cord from the telephone to the answering machine. 5 Connect a third telephone cord from the answering machine to the EXT port of the printer. Setting up the printer 18
2 Connect one telephone cord into the LINE port of the printer, and then plug it into an active telephone wall jack. 3 Remove the protective plug from the EXT port of the printer. 4 Connect a second telephone cord from the telephone to the answering machine. 5 Connect a third telephone cord from the answering machine to the EXT port of the printer. Setting up the printer 18

User's Guide
Page 19
... Connecting to a computer with a modem Connect the printer to send faxes from the EXT port of the printer, and then plug it into an active telephone wall jack. 3 Remove the protective plug from the software application. Note: Setup steps may vary depending on ... • A computer with a modem to a computer with a modem • Three telephone cords • A telephone wall jack 2 Connect a telephone cord into the LINE port of the printer. For more information on connecting the printer to telecommunications equipment, see "Using an RJ11 adapter" on your country or region.
... Connecting to a computer with a modem Connect the printer to send faxes from the EXT port of the printer, and then plug it into an active telephone wall jack. 3 Remove the protective plug from the software application. Note: Setup steps may vary depending on ... • A computer with a modem to a computer with a modem • Three telephone cords • A telephone wall jack 2 Connect a telephone cord into the LINE port of the printer. For more information on connecting the printer to telecommunications equipment, see "Using an RJ11 adapter" on your country or region.

User's Guide
Page 20
4 Connect a second telephone cord from the telephone to the computer modem. 5 Connect a third telephone cord from the computer modem to the EXT port of the printer. Setting up the printer 20
4 Connect a second telephone cord from the telephone to the computer modem. 5 Connect a third telephone cord from the computer modem to the EXT port of the printer. Setting up the printer 20

User's Guide
Page 21
... paper as it exits. 3 PictBridge port Connect a PictBridge-enabled digital camera or a flash drive to the printer. 4 Memory card slots Insert a memory card. 5 Control panel Operate the printer. Learning about the printer Understanding the parts of the printer 10 9 8 11 1 7 12 6 54 2 3 Use the To 1 Paper support Load paper. 2 Automatic Document Feeder (ADF) paper... size documents. 9 Automatic Document Feeder (ADF) tray Load original documents in the ADF. Recommended for scanning, copying, or faxing multiple-page documents. Learning about the printer 21
... paper as it exits. 3 PictBridge port Connect a PictBridge-enabled digital camera or a flash drive to the printer. 4 Memory card slots Insert a memory card. 5 Control panel Operate the printer. Learning about the printer Understanding the parts of the printer 10 9 8 11 1 7 12 6 54 2 3 Use the To 1 Paper support Load paper. 2 Automatic Document Feeder (ADF) paper... size documents. 9 Automatic Document Feeder (ADF) tray Load original documents in the ADF. Recommended for scanning, copying, or faxing multiple-page documents. Learning about the printer 21
User's Guide
Page 22
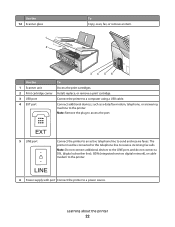
...the port. Note: Remove the plug to receive incoming fax calls. Learning about the printer 22 LINE 6 Power supply with port Connect the printer to send and receive faxes. EXT 5 LINE port Connect the printer to an active telephone line to a power source. Use the 12 Scanner glass 1 ... the To 1 Scanner unit Access the print cartridges. 2 Print cartridge carrier Install, replace, or remove a print cartridge. 3 USB port Connect the printer to a computer using a USB cable. 4 EXT port Connect additional devices, such as a data/fax modem, telephone, or answering machine to the...
...the port. Note: Remove the plug to receive incoming fax calls. Learning about the printer 22 LINE 6 Power supply with port Connect the printer to send and receive faxes. EXT 5 LINE port Connect the printer to an active telephone line to a power source. Use the 12 Scanner glass 1 ... the To 1 Scanner unit Access the print cartridges. 2 Print cartridge carrier Install, replace, or remove a print cartridge. 3 USB port Connect the printer to a computer using a USB cable. 4 EXT port Connect additional devices, such as a data/fax modem, telephone, or answering machine to the...
User's Guide
Page 23
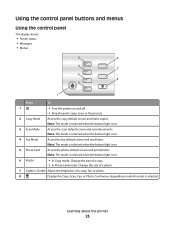
... Copy, Scan, Fax, or Photo Card menu, depending on . 5 Photo Card Access the photo default screen and print photos. Learning about the printer 23 Note: The mode is selected when the button light is selected. Note: The mode is selected when the button light is on . 4 Fax...screen and scan documents. Using the control panel buttons and menus Using the control panel The display shows: • Printer status • Messages • Menus 2 6 3 7 4 8 5 1 Press To 1 • Turn the printer on and off. • Stop the print, copy, scan, or fax process. 2 Copy Mode Access the...
... Copy, Scan, Fax, or Photo Card menu, depending on . 5 Photo Card Access the photo default screen and print photos. Learning about the printer 23 Note: The mode is selected when the button light is selected. Note: The mode is selected when the button light is on . 4 Fax...screen and scan documents. Using the control panel buttons and menus Using the control panel The display shows: • Printer status • Messages • Menus 2 6 3 7 4 8 5 1 Press To 1 • Turn the printer on and off. • Stop the print, copy, scan, or fax process. 2 Copy Mode Access the...
User's Guide
Page 24
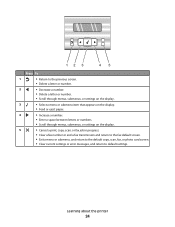
... to the default copy, scan, fax, or photo card screen. • Clear current settings or error messages, and return to default settings. Learning about the printer 24
... to the default copy, scan, fax, or photo card screen. • Clear current settings or error messages, and return to default settings. Learning about the printer 24


