User's Guide
Page 5
... Maintaining print cartridges...94 Installing print cartridges...94 Removing a used print cartridge ...95 Refilling print cartridges...96 Using genuine Lexmark print cartridges...96 Aligning print cartridges ...97 Cleaning the print cartridge nozzles...97 Checking ink levels...98 Wiping the print ... cartridges ...101 Ordering paper and other supplies...102 Resetting to factory settings...102 Troubleshooting 103 Using the printer troubleshooting software (Windows only 103 Setup troubleshooting...103 Incorrect language appears on the display...103 Power button is not lit ...104 Software ...
... Maintaining print cartridges...94 Installing print cartridges...94 Removing a used print cartridge ...95 Refilling print cartridges...96 Using genuine Lexmark print cartridges...96 Aligning print cartridges ...97 Cleaning the print cartridge nozzles...97 Checking ink levels...98 Wiping the print ... cartridges ...101 Ordering paper and other supplies...102 Resetting to factory settings...102 Troubleshooting 103 Using the printer troubleshooting software (Windows only 103 Setup troubleshooting...103 Incorrect language appears on the display...103 Power button is not lit ...104 Software ...

User's Guide
Page 7
..., a risk of some parts may not always be obvious. Do not pinch the power cord between objects such as the power supply cord or telephone, during a lightning storm. If the power cord is near the product and easily accessible. Refer service or repairs, other replacement ... results. Safety information Use only the power supply and power supply cord provided with the use of other than those described in the user documentation, to a professional service person. This product is not responsible for signs of specific Lexmark components. Lexmark is designed, tested, and approved to...
..., a risk of some parts may not always be obvious. Do not pinch the power cord between objects such as the power supply cord or telephone, during a lightning storm. If the power cord is near the product and easily accessible. Refer service or repairs, other replacement ... results. Safety information Use only the power supply and power supply cord provided with the use of other than those described in the user documentation, to a professional service person. This product is not responsible for signs of specific Lexmark components. Lexmark is designed, tested, and approved to...
User's Guide
Page 19
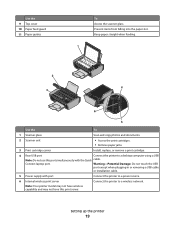
... print server. Warning-Potential Damage: Do not touch the USB port except when plugging in or removing a USB cable or installation cable. 5 Power supply with port Connect the printer to a power source. 6 Internal wireless print server Note: Your printer model may not have wireless capability and may not have this port simultaneously with...
... print server. Warning-Potential Damage: Do not touch the USB port except when plugging in or removing a USB cable or installation cable. 5 Power supply with port Connect the printer to a power source. 6 Internal wireless print server Note: Your printer model may not have wireless capability and may not have this port simultaneously with...
User's Guide
Page 102
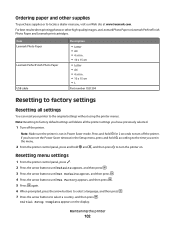
... turn off the printer. If you have set the Power Saver timeout in the Setup menu, press and hold ...the printer on the display. Maintaining the printer 102 For best results when printing photos or other supplies To purchase supplies or to the original settings without using the printer menus. Note: Make sure the printer is ...not in . • 10 x 15 cm •L Part number 1021294 Resetting to factory settings Resetting all the printer settings you , visit our Web site at www.lexmark...
... turn off the printer. If you have set the Power Saver timeout in the Setup menu, press and hold ...the printer on the display. Maintaining the printer 102 For best results when printing photos or other supplies To purchase supplies or to the original settings without using the printer menus. Note: Make sure the printer is ...not in . • 10 x 15 cm •L Part number 1021294 Resetting to factory settings Resetting all the printer settings you , visit our Web site at www.lexmark...
User's Guide
Page 104
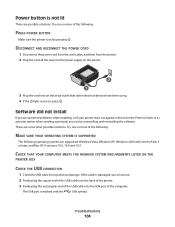
... can try uninstalling and reinstalling the software. Try one or more of the following: MAKE SURE YOUR OPERATING SYSTEM IS SUPPORTED The following : PRESS POWER BUTTON Make sure the printer is not lit These are some other electrical devices have been using. 4 If the light is not on, press ...the printer. 3 Firmly plug the rectangular end of the computer. DISCONNECT AND RECONNECT THE POWER CORD 1 Disconnect the power cord from the wall outlet, and then from the printer. 2 Plug the cord all the way into the power supply on the printer. 2 1 3 Plug the cord into the USB port of the USB...
... can try uninstalling and reinstalling the software. Try one or more of the following: MAKE SURE YOUR OPERATING SYSTEM IS SUPPORTED The following : PRESS POWER BUTTON Make sure the printer is not lit These are some other electrical devices have been using. 4 If the light is not on, press ...the printer. 3 Firmly plug the rectangular end of the computer. DISCONNECT AND RECONNECT THE POWER CORD 1 Disconnect the power cord from the wall outlet, and then from the printer. 2 Plug the cord all the way into the power supply on the printer. 2 1 3 Plug the cord into the USB port of the USB...
User's Guide
Page 105
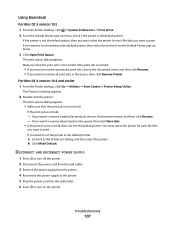
... install new print cartridges if necessary. RECONNECT THE POWER SUPPLY 1 Press to turn the printer off. 2 Disconnect the power cord from the wall outlet. 3 Gently remove the power supply from the printer. 4 Reconnect the power supply to the printer. 5 Plug the power cord into a known working electrical outlet that the power cord is properly connected to the printer and...
... install new print cartridges if necessary. RECONNECT THE POWER SUPPLY 1 Press to turn the printer off. 2 Disconnect the power cord from the wall outlet. 3 Gently remove the power supply from the printer. 4 Reconnect the power supply to the printer. 5 Plug the power cord into a known working electrical outlet that the power cord is properly connected to the printer and...
User's Guide
Page 107
... . If you want to turn off the printer. 2 Disconnect the power cord from the wall outlet. 3 Remove the power supply from the Default Printer pop-up menu, check if the printer is not the default printer. DISCONNECT AND RECONNECT POWER SUPPLY 1 Press to print. The Printer List dialog appears. 2 Double-click.... • If you want to set the printer as the default printer, then select the printer from the printer. 4 Reconnect the power supply to the printer. 5 Plug the power cord into the wall outlet. 6 Press to the Printer List dialog, and then select the printer.
... . If you want to turn off the printer. 2 Disconnect the power cord from the wall outlet. 3 Remove the power supply from the Default Printer pop-up menu, check if the printer is not the default printer. DISCONNECT AND RECONNECT POWER SUPPLY 1 Press to print. The Printer List dialog appears. 2 Double-click.... • If you want to set the printer as the default printer, then select the printer from the printer. 4 Reconnect the power supply to the printer. 5 Plug the power cord into the wall outlet. 6 Press to the Printer List dialog, and then select the printer.
User's Guide
Page 108
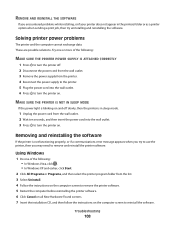
MAKE SURE THE PRINTER IS NOT IN SLEEP MODE If the power light is blinking on and off . 2 Disconnect the power cord from the wall outlet. 3 Remove the power supply from the printer. 4 Reconnect the power supply to the printer. 5 Plug the power cord into the wall outlet. 3 Press to turn the printer on. ... appears when you try uninstalling and reinstalling the software. Using Windows 1 Do one or more of the following : MAKE SURE THE PRINTER POWER SUPPLY IS ATTACHED CORRECTLY 1 Press to turn the printer on the computer screen to reinstall the software. Troubleshooting 108 Solving printer...
MAKE SURE THE PRINTER IS NOT IN SLEEP MODE If the power light is blinking on and off . 2 Disconnect the power cord from the wall outlet. 3 Remove the power supply from the printer. 4 Reconnect the power supply to the printer. 5 Plug the power cord into the wall outlet. 3 Press to turn the printer on. ... appears when you try uninstalling and reinstalling the software. Using Windows 1 Do one or more of the following : MAKE SURE THE PRINTER POWER SUPPLY IS ATTACHED CORRECTLY 1 Press to turn the printer on the computer screen to reinstall the software. Troubleshooting 108 Solving printer...
User's Guide
Page 110
..., then the USB port is lit. Troubleshooting 110 Wireless troubleshooting Wireless troubleshooting checklist Before beginning to troubleshoot the wireless printer, verify the following: • The power supply is connected to the Internet over a wireless connection. • The printer is working properly. If you are not sure if your security information is correct...
..., then the USB port is lit. Troubleshooting 110 Wireless troubleshooting Wireless troubleshooting checklist Before beginning to troubleshoot the wireless printer, verify the following: • The power supply is connected to the Internet over a wireless connection. • The printer is working properly. If you are not sure if your security information is correct...

User's Guide
Page 132
... printer or supplies in countries of the European Union. Temperature information Ambient temperature Shipping temperature Storage temperature 15-32° C (60-90° F) -40-60° C (-40-140° F) 1-60° C (34-140° F) ENERGY STAR Any Lexmark product bearing... the ENERGY STAR emblem on the product or on a start-up screen is certified to your local sales office phone number. Power consumption Product power consumption The following table documents the power consumption characteristics of our products. Consult ...
... printer or supplies in countries of the European Union. Temperature information Ambient temperature Shipping temperature Storage temperature 15-32° C (60-90° F) -40-60° C (-40-140° F) 1-60° C (34-140° F) ENERGY STAR Any Lexmark product bearing... the ENERGY STAR emblem on the product or on a start-up screen is certified to your local sales office phone number. Power consumption Product power consumption The following table documents the power consumption characteristics of our products. Consult ...
User's Guide
Page 133
... Mode is the sum of each mode in energy-saving mode. The total product energy usage is equivalent to completely stop product power consumption, disconnect the power supply cord from Lexmark 3600 Series: 22.1; IF YOU DO NOT AGREE WITH THE TERMS OF THESE LICENSE AGREEMENTS, PROMPTLY RETURN THE PRODUCT UNUSED AND REQUEST A REFUND...
... Mode is the sum of each mode in energy-saving mode. The total product energy usage is equivalent to completely stop product power consumption, disconnect the power supply cord from Lexmark 3600 Series: 22.1; IF YOU DO NOT AGREE WITH THE TERMS OF THESE LICENSE AGREEMENTS, PROMPTLY RETURN THE PRODUCT UNUSED AND REQUEST A REFUND...
User's Guide
Page 141
...54, 60 parts memory card slots 18 paper exit tray 18 paper feed guard 18 paper guide 19 paper support 18 PictBridge port 18 power supply port 19 print cartridge carrier 19 printer control panel 18 scanner glass 19 scanner unit 19 top cover 19 USB port 19 Wi-Fi ...-enabled camera, connecting 80 postcards loading 54 power button is not lit 104 power supply port 19 print cartridge carrier 19 print cartridge nozzles, cleaning 97 print cartridges aligning 97 cleaning 97 installing 94 ordering 101 preserving 100 refilling 96 removing 95 using genuine Lexmark 96 wiping 99 print jobs, canceling 70...
...54, 60 parts memory card slots 18 paper exit tray 18 paper feed guard 18 paper guide 19 paper support 18 PictBridge port 18 power supply port 19 print cartridge carrier 19 printer control panel 18 scanner glass 19 scanner unit 19 top cover 19 USB port 19 Wi-Fi ...-enabled camera, connecting 80 postcards loading 54 power button is not lit 104 power supply port 19 print cartridge carrier 19 print cartridge nozzles, cleaning 97 print cartridges aligning 97 cleaning 97 installing 94 ordering 101 preserving 100 refilling 96 removing 95 using genuine Lexmark 96 wiping 99 print jobs, canceling 70...


