User's Guide
Page 2
... the parts of the printer...18 Using the printer control panel buttons and menus 20 Using the printer control panel ...20 Using the printer menus ...21 Using the Copy menu...23 Using the Scan menu ...24 Using the Photo menu...24 Using the PictBridge menu ...25 Using the Setup menu ...25 Saving settings...26 Using the printer software...28 Installing printer software ...28 Installing the optional XPS driver (Windows Vista users only 29 Using the Windows printer software...30 Using the Macintosh printer software...31 Switching between the rear USB port and the Quick Connect laptop port...
... the parts of the printer...18 Using the printer control panel buttons and menus 20 Using the printer control panel ...20 Using the printer menus ...21 Using the Copy menu...23 Using the Scan menu ...24 Using the Photo menu...24 Using the PictBridge menu ...25 Using the Setup menu ...25 Saving settings...26 Using the printer software...28 Installing printer software ...28 Installing the optional XPS driver (Windows Vista users only 29 Using the Windows printer software...30 Using the Macintosh printer software...31 Switching between the rear USB port and the Quick Connect laptop port...

User's Guide
Page 4
...-enabled digital camera 80 Printing photos stored on a memory device using the proof sheet 81 Printing photos from a digital camera using DPOF ...82 Copying 83 Making copies...83 Copying photos...83 Enlarging or reducing images...83 Adjusting copy quality...84 Making a copy lighter or darker...84 Collating copies using the printer control panel...85 Repeating an image on one page...85 Copying multiple pages on one sheet (N-Up)...86 Canceling a copy job...86 Scanning 87 Scanning original documents...87 Scanning color or black-and-white original documents 89 Scanning photos for...
...-enabled digital camera 80 Printing photos stored on a memory device using the proof sheet 81 Printing photos from a digital camera using DPOF ...82 Copying 83 Making copies...83 Copying photos...83 Enlarging or reducing images...83 Adjusting copy quality...84 Making a copy lighter or darker...84 Collating copies using the printer control panel...85 Repeating an image on one page...85 Copying multiple pages on one sheet (N-Up)...86 Canceling a copy job...86 Scanning 87 Scanning original documents...87 Scanning color or black-and-white original documents 89 Scanning photos for...
User's Guide
Page 5
... cartridges ...101 Ordering paper and other supplies...102 Resetting to factory settings...102 Troubleshooting 103 Using the printer troubleshooting software (Windows only 103 Setup troubleshooting...103 Incorrect language appears on the display...103 Power button is not lit ...104 Software did not install...104 Page does not print...105 Solving printer power problems ...108 Removing and reinstalling the software ...108 Enabling the USB port in Windows ...109 Wireless troubleshooting...110 Wireless troubleshooting checklist ...110 Printing a network setup page ...111 Wireless configuration...
... cartridges ...101 Ordering paper and other supplies...102 Resetting to factory settings...102 Troubleshooting 103 Using the printer troubleshooting software (Windows only 103 Setup troubleshooting...103 Incorrect language appears on the display...103 Power button is not lit ...104 Software did not install...104 Page does not print...105 Solving printer power problems ...108 Removing and reinstalling the software ...108 Enabling the USB port in Windows ...109 Wireless troubleshooting...110 Wireless troubleshooting checklist ...110 Printing a network setup page ...111 Wireless configuration...

User's Guide
Page 18
...printer using a USB Notes: • Your printer model may not have this port. Check wireless status: • Off indicates that the printer is not turned on or that a memory card is ready to the printer. 5 Card reader light Check card reader status. indicates that the printer is installed. • Orange - port. 7 Memory card slots Insert a memory card. 8 Paper exit tray Hold paper as it exits. Setting up the printer 18 Understanding the parts of the printer 11 10 1 9 8 WI F I PRINTING 2 7 6 5 3 4 Use the To 1 Paper support Load paper. 2 Printer control panel...
...printer using a USB Notes: • Your printer model may not have this port. Check wireless status: • Off indicates that the printer is not turned on or that a memory card is ready to the printer. 5 Card reader light Check card reader status. indicates that the printer is installed. • Orange - port. 7 Memory card slots Insert a memory card. 8 Paper exit tray Hold paper as it exits. Setting up the printer 18 Understanding the parts of the printer 11 10 1 9 8 WI F I PRINTING 2 7 6 5 3 4 Use the To 1 Paper support Load paper. 2 Printer control panel...

User's Guide
Page 21
... this button is selected. • Decrease a number. • Move the cursor one level deeper in a submenu. • Feed or eject paper. Access the setup menu and change printer settings: Setting up the printer 21 Using the printer menus A number of the previous mode. • Clear current settings or error messages, and return to the left. • Scroll through menus or settings on the display. • Save settings. • Move one place to default settings. • Select a menu...
... this button is selected. • Decrease a number. • Move the cursor one level deeper in a submenu. • Feed or eject paper. Access the setup menu and change printer settings: Setting up the printer 21 Using the printer menus A number of the previous mode. • Clear current settings or error messages, and return to the left. • Scroll through menus or settings on the display. • Save settings. • Move one place to default settings. • Select a menu...
User's Guide
Page 22
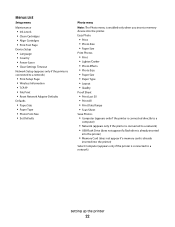
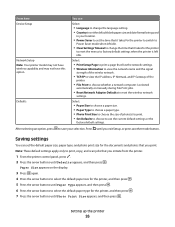
Menus List Setup menu Maintenance • Ink Levels • Clean Cartridges • Align Cartridges • Print Test Page Device Setup • Language • Country • Power Saver • Clear Settings Timeout Network Setup (appears only if the printer is connected to a network) • Print Setup Page • Wireless Information • TCP/IP • File Print • Reset Network Adapter Defaults Defaults • Paper Size • Paper Type • Photo Print Size • Set Defaults Photo menu Note: The Photo menu is connected to a network) • USB Flash Drive ...
Menus List Setup menu Maintenance • Ink Levels • Clean Cartridges • Align Cartridges • Print Test Page Device Setup • Language • Country • Power Saver • Clear Settings Timeout Network Setup (appears only if the printer is connected to a network) • Print Setup Page • Wireless Information • TCP/IP • File Print • Reset Network Adapter Defaults Defaults • Paper Size • Paper Type • Photo Print Size • Set Defaults Photo menu Note: The Photo menu is connected to a network) • USB Flash Drive ...
User's Guide
Page 26
...; Set Defaults to choose to print a page that you print. Select: • Print Setup Page to use the current default settings or the factory default settings. From here Device Setup Network Setup Note: Your printer model may not have wireless capability and may not have this option. Defaults You can set the default blank paper size and date format being used in your selection. Saving settings You can Select: • Language to change the time that you exit Setup, or press another mode button.
...; Set Defaults to choose to print a page that you print. Select: • Print Setup Page to use the current default settings or the factory default settings. From here Device Setup Network Setup Note: Your printer model may not have wireless capability and may not have this option. Defaults You can set the default blank paper size and date format being used in your selection. Saving settings You can Select: • Language to change the time that you exit Setup, or press another mode button.
User's Guide
Page 29
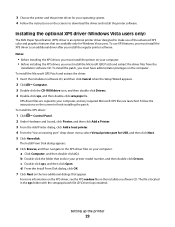
... administrator privileges on the screen to download the driver and install the printer software. XPS driver files are copied to your computer: a Click Computer, and then double-click (C:). To install the XPS driver: 1 Click Control Panel. 2 Under Hardware and Sound, click Printer, and then click Add a Printer. 3 From the Add Printer dialog, click Add a local printer. 4 From the "Use an existing port" drop-down menu, select Virtual printer port for your printer model number, and then double-click Drivers. The file...
... administrator privileges on the screen to download the driver and install the printer software. XPS driver files are copied to your computer: a Click Computer, and then double-click (C:). To install the XPS driver: 1 Click Control Panel. 2 Under Hardware and Sound, click Printer, and then click Add a Printer. 3 From the Add Printer dialog, click Add a local printer. 4 From the "Use an existing port" drop-down menu, select Virtual printer port for your printer model number, and then double-click Drivers. The file...
User's Guide
Page 32
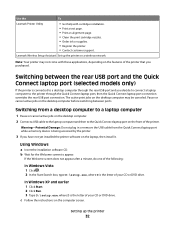
... USB port and the Quick Connect laptop port (selected models only) If the printer is the letter of your CD or DVD drive. Use the To Lexmark Printer Utility • Get help with these applications, depending on the features of the printer that you purchased. The active print jobs on the desktop computer may not come with cartridge installation. • Print a test page. • Print an alignment page. • Clean the print cartridge nozzles. • Order ink...
... USB port and the Quick Connect laptop port (selected models only) If the printer is the letter of your CD or DVD drive. Use the To Lexmark Printer Utility • Get help with these applications, depending on the features of the printer that you purchased. The active print jobs on the desktop computer may not come with cartridge installation. • Print a test page. • Print an alignment page. • Clean the print cartridge nozzles. • Order ink...
User's Guide
Page 36
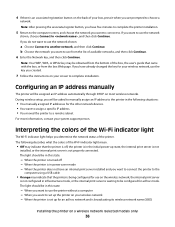
...-Fi indicator light helps you want to assign a specific IP address. • You moved the printer to set up for an ad hoc network and is turned off , the printer is in the initial power-up the printer on the wireless network, the internal print server is not configured in infrastructure mode, or the internal print server is being configured for ad hoc mode. Configuring an IP address manually The printer will be configured for use the...
...-Fi indicator light helps you want to assign a specific IP address. • You moved the printer to set up for an ad hoc network and is turned off , the printer is in the initial power-up the printer on the wireless network, the internal print server is not configured in infrastructure mode, or the internal print server is being configured for ad hoc mode. Configuring an IP address manually The printer will be configured for use the...

User's Guide
Page 37
... printer has been configured, any time you turn it back on, the internal print server in this state when you may be prompted to connect the printer to the computer again using the printer that is already set up on your wireless network. • Blinking green indicates that the printer is trying to your wireless access point (wireless router). - The printer is being updated. Changing wireless settings after installation To change wireless settings on the printer, such as part...
... printer has been configured, any time you turn it back on, the internal print server in this state when you may be prompted to connect the printer to the computer again using the printer that is already set up on your wireless network. • Blinking green indicates that the printer is trying to your wireless access point (wireless router). - The printer is being updated. Changing wireless settings after installation To change wireless settings on the printer, such as part...
User's Guide
Page 38
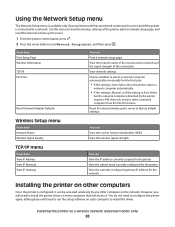
... wireless signal strength. However, you need to install the printer driver on each computer to factory default settings. Installing the printer on the network. View the network name of the current active network and the signal strength of the printer, print a network setup page, and reset the internal wireless print server. 1 From the printer control panel, press . 2 Press the arrow buttons until Network Setup appears, and then press . Installing the printer on other computer on a wireless network (selected models only) 38 Using the Network Setup menu The Network Setup menu...
... wireless signal strength. However, you need to install the printer driver on each computer to factory default settings. Installing the printer on the network. View the network name of the current active network and the signal strength of the printer, print a network setup page, and reset the internal wireless print server. 1 From the printer control panel, press . 2 Press the arrow buttons until Network Setup appears, and then press . Installing the printer on other computer on a wireless network (selected models only) 38 Using the Network Setup menu The Network Setup menu...
User's Guide
Page 40
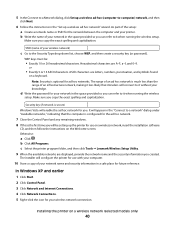
... Control Panel. 3 Click Network and Internet Connections. 4 Click Network Connections. 5 Right-click the icon for you copy the exact spelling and capitalization. SSID (name of an infrastructure network, making it less likely that the computer is configured for the ad hoc network. 7 Close the Control Panel and any remaining windows. 8 If this is optional for use on a wireless network, insert the installation software CD, and then follow the instructions on...
... Control Panel. 3 Click Network and Internet Connections. 4 Click Network Connections. 5 Right-click the icon for you copy the exact spelling and capitalization. SSID (name of an infrastructure network, making it less likely that the computer is configured for the ad hoc network. 7 Close the Control Panel and any remaining windows. 8 If this is optional for use on a wireless network, insert the installation software CD, and then follow the instructions on...

User's Guide
Page 50
... wireless access point (wireless router), see the Web page associated with the hardware of communicating on a wireless network (selected models only) 50 Every device capable of network equipment. You must know the security key and security mode to properly set up to 32 alphanumeric characters. A Media Access Control (MAC) address is not the same as both a wireless and locally attached printer at the same time? The MAC address is using a USB cable) • Wireless network • Wireless network...
... wireless access point (wireless router), see the Web page associated with the hardware of communicating on a wireless network (selected models only) 50 Every device capable of network equipment. You must know the security key and security mode to properly set up to 32 alphanumeric characters. A Media Access Control (MAC) address is not the same as both a wireless and locally attached printer at the same time? The MAC address is using a USB cable) • Wireless network • Wireless network...

User's Guide
Page 64
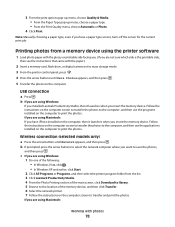
... Help for the printer software associated with your operating system. • Use the arrow buttons to increase or decrease the value for printing professional quality photos with the printer software to print or the folder where the document is saved in the memory device. When the printer detects the memory device, the message Memory Card Detected or Storage Device Detected appears on the printer control panel display. 2 If only document files are fade- Wireless connection (selected models...
... Help for the printer software associated with your operating system. • Use the arrow buttons to increase or decrease the value for printing professional quality photos with the printer software to print or the folder where the document is saved in the memory device. When the printer detects the memory device, the message Memory Card Detected or Storage Device Detected appears on the printer control panel display. 2 If only document files are fade- Wireless connection (selected models...
User's Guide
Page 78
... printer control panel, press . 4 Press the arrow buttons until Network appears, and then press . Follow the instructions on the computer screen to transfer the photos to the computer, and then use the programs installed on the computer, then it launches when you have a paper type sensor, turns off the sensor for the current print job. c If you insert the memory device. If you are using Windows: If you installed Lexmark...
... printer control panel, press . 4 Press the arrow buttons until Network appears, and then press . Follow the instructions on the computer screen to transfer the photos to the computer, and then use the programs installed on the computer, then it launches when you have a paper type sensor, turns off the sensor for the current print job. c If you insert the memory device. If you are using Windows: If you installed Lexmark...
User's Guide
Page 111
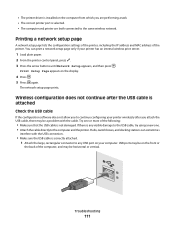
... a problem with the USB connection. • Make sure the USB cable is attached Check the USB cable If the configuration software does not allow you are performing a task. • The correct printer port is selected. • The computer and printer are both connected to the USB cable, try using a new one or more of the printer. Hubs, switch boxes, and docking stations can print a network setup page only if your computer. • The printer driver is installed on...
... a problem with the USB connection. • Make sure the USB cable is attached Check the USB cable If the configuration software does not allow you are performing a task. • The correct printer port is selected. • The computer and printer are both connected to the USB cable, try using a new one or more of the printer. Hubs, switch boxes, and docking stations can print a network setup page only if your computer. • The printer driver is installed on...
User's Guide
Page 139
...20 C cable installation 46 USB 46 camera connecting 80 canceling copying 86 print jobs 70 scan job 90 cards loading 54 memory card 72 cartridges, print aligning 97 cleaning 97 installing 94 ordering 101 preserving 100 removing 95 using genuine Lexmark 96 wiping 99 changing default settings 26 Power Saver timeout 26 temporary settings 26 changing wireless settings after installation (Mac) 37 changing wireless settings after installation (Windows) 37 checking ink levels 98 cleaning exterior of the printer 100 cleaning print cartridge nozzles 97 Club Internet 35 collating copies 85 color effects...
...20 C cable installation 46 USB 46 camera connecting 80 canceling copying 86 print jobs 70 scan job 90 cards loading 54 memory card 72 cartridges, print aligning 97 cleaning 97 installing 94 ordering 101 preserving 100 removing 95 using genuine Lexmark 96 wiping 99 changing default settings 26 Power Saver timeout 26 temporary settings 26 changing wireless settings after installation (Mac) 37 changing wireless settings after installation (Windows) 37 checking ink levels 98 cleaning exterior of the printer 100 cleaning print cartridge nozzles 97 Club Internet 35 collating copies 85 color effects...
User's Guide
Page 141
... Network Setup menu 38 printer software installing 28 reinstalling 108 removing 108 printing collate 61 custom-size paper 67 documents 60 documents from memory card or flash drive 63 envelopes 65 labels 66 last page first 62 multiple copies 61 multiple pages on one sheet 63 network setup page 111 photos from digital camera using DPOF 82 photos using printer control panel 76 Index 141 photos using printer software 77, 78 photos using the proof sheet 81 reverse page order 62 Web page 60 proof sheet, using 81 protocol 51 publications, finding 8 Q Quick Connect laptop port 32 R rear USB port...
... Network Setup menu 38 printer software installing 28 reinstalling 108 removing 108 printing collate 61 custom-size paper 67 documents 60 documents from memory card or flash drive 63 envelopes 65 labels 66 last page first 62 multiple copies 61 multiple pages on one sheet 63 network setup page 111 photos from digital camera using DPOF 82 photos using printer control panel 76 Index 141 photos using printer software 77, 78 photos using the proof sheet 81 reverse page order 62 Web page 60 proof sheet, using 81 protocol 51 publications, finding 8 Q Quick Connect laptop port 32 R rear USB port...
User's Guide
Page 142
using the printer control panel 87 security information 11 wireless network 50 security key 50 Service Center 103 setting up printer on wireless network (Mac) 35 on wireless network (Windows) 35 settings changing Power Saver timeout 26 disabling timeout 26 saving 26 Settings menu Defaults 26 Device Setup 26 Maintenance 25 Paper Setup 25 setup troubleshooting incorrect language appears on display 103 page does not print 105 power button is not lit 104 software did not install 104 setup, printer 11 software removing and reinstalling 108 Service Center 103 XPS driver 29 software did...
using the printer control panel 87 security information 11 wireless network 50 security key 50 Service Center 103 setting up printer on wireless network (Mac) 35 on wireless network (Windows) 35 settings changing Power Saver timeout 26 disabling timeout 26 saving 26 Settings menu Defaults 26 Device Setup 26 Maintenance 25 Paper Setup 25 setup troubleshooting incorrect language appears on display 103 page does not print 105 power button is not lit 104 software did not install 104 setup, printer 11 software removing and reinstalling 108 Service Center 103 XPS driver 29 software did...


