
Embedded Web Server Administrator's Guide
Page 14
... each session by the Kerberos server. 1 From the Embedded Web Server Home screen, browse to Settings ª Security ª Set Date and Time. 2 To manage the settings manually, type the correct date and time in YYYY-MM-DD HH:MM format, and then choose from communicating with the authenticating server. ...14 Using NTLM authentication NTLM (Windows NT LAN Manager) is being used by selecting Log out on the printer control panel. Setting date and time Because Kerberos servers require that key requests bear a recent timestamp (usually within 300 seconds), the printer clock must be able to...
... each session by the Kerberos server. 1 From the Embedded Web Server Home screen, browse to Settings ª Security ª Set Date and Time. 2 To manage the settings manually, type the correct date and time in YYYY-MM-DD HH:MM format, and then choose from communicating with the authenticating server. ...14 Using NTLM authentication NTLM (Windows NT LAN Manager) is being used by selecting Log out on the printer control panel. Setting date and time Because Kerberos servers require that key requests bear a recent timestamp (usually within 300 seconds), the printer clock must be able to...
Embedded Web Server Administrator's Guide
Page 16
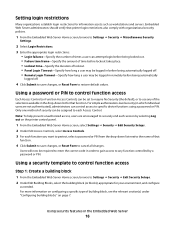
... also comply with organizational security policies. 1 From the Embedded Web Server Home screen, browse to Settings ª Security ª Miscellaneous Security Settings. 2 Select Login Restrictions. 3 Enter the appropriate login restrictions: • Login failures-Specify the number of times a user can control access to securely end each Access Control. For simple authorization-level security...
... also comply with organizational security policies. 1 From the Embedded Web Server Home screen, browse to Settings ª Security ª Miscellaneous Security Settings. 2 Select Login Restrictions. 3 Enter the appropriate login restrictions: • Login failures-Specify the number of times a user can control access to securely end each Access Control. For simple authorization-level security...
Embedded Web Server Administrator's Guide
Page 22
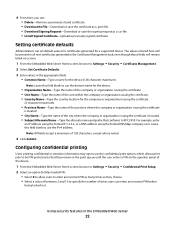
...Management task, even though those fields will remain blank on the operator panel of times users can enter an incorrect PIN before being locked out. Setting certificate defaults Administrators can set default values for certificates generated for the company or organization issuing the certificate (2-character... Print Setup. 2 Select an option for Max Invalid PIN: • Select 0 to allow users to enter an incorrect PIN as many times as a .csr file. • Install Signed Certificate-Upload a previously signed certificate. Leave this field blank to use the IPv4 address. Note...
...Management task, even though those fields will remain blank on the operator panel of times users can enter an incorrect PIN before being locked out. Setting certificate defaults Administrators can set default values for certificates generated for the company or organization issuing the certificate (2-character... Print Setup. 2 Select an option for Max Invalid PIN: • Select 0 to allow users to enter an incorrect PIN as many times as a .csr file. • Install Signed Certificate-Upload a previously signed certificate. Leave this field blank to use the IPv4 address. Note...

Embedded Web Server Administrator's Guide
Page 23
...a value of 1 hour, 4 hours, 24 hours, or 1 week to specify the amount of time that have been marked for deletion. Disk wiping uses random data patterns to Settings ª Security ª Disk Wiping. Setting up memory space. Overwriting can be performed manually, automatically, or on your device. 2 From the Wiping...). To create a schedule: • From the Action list, select Enable or Disable to specify which action should occur at the specified time. • From the Time list, select the hour at which the selected action should begin (example: 06:00, to start at 6 AM). • From the...
...a value of 1 hour, 4 hours, 24 hours, or 1 week to specify the amount of time that have been marked for deletion. Disk wiping uses random data patterns to Settings ª Security ª Disk Wiping. Setting up memory space. Overwriting can be performed manually, automatically, or on your device. 2 From the Wiping...). To create a schedule: • From the Action list, select Enable or Disable to specify which action should occur at the specified time. • From the Time list, select the hour at which the selected action should begin (example: 06:00, to start at 6 AM). • From the...

Embedded Web Server Administrator's Guide
Page 24
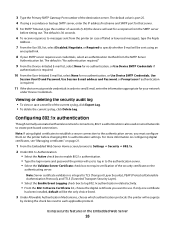
... or deleting scheduled disk wiping 1 From the Embedded Web Server Home screen, browse to Settings ª Security ª Disk Wiping. 2 Select Scheduled Disk Wiping. 3 Choose an existing Start value (the scheduled time and day will appear in the drop-down arrow to scroll through the Embedded Web Server... stolen. After the disk has been encrypted, you will appear as "Exit Config Menu." 4 Press the down menus). • To change scheduled settings, modify the time and day as needed , and then click Modify to save changes. • To delete a scheduled disk wiping, click Delete Entry, and on ...
... or deleting scheduled disk wiping 1 From the Embedded Web Server Home screen, browse to Settings ª Security ª Disk Wiping. 2 Select Scheduled Disk Wiping. 3 Choose an existing Start value (the scheduled time and day will appear in the drop-down arrow to scroll through the Embedded Web Server... stolen. After the disk has been encrypted, you will appear as "Exit Config Menu." 4 Press the down menus). • To change scheduled settings, modify the time and day as needed , and then click Modify to save changes. • To delete a scheduled disk wiping, click Delete Entry, and on ...
Embedded Web Server Administrator's Guide
Page 26
...information appropriate for your SMTP server requires user credentials, select an authentication method from the SMTP server before changing 802.1x authentication settings. If only one certificate has been installed, default will recognize by clicking the check box next to log in the Embedded ...802.1x Device Certificate list, choose the digital certificate you must provide credentials in case of the security certificate on the printer before timing out. The default is required. 10 From the User-Initiated E-mail list, select None for a response from the SMTP Server Authentication...
...information appropriate for your SMTP server requires user credentials, select an authentication method from the SMTP server before changing 802.1x authentication settings. If only one certificate has been installed, default will recognize by clicking the check box next to log in the Embedded ...802.1x Device Certificate list, choose the digital certificate you must provide credentials in case of the security certificate on the printer before timing out. The default is required. 10 From the User-Initiated E-mail list, select None for a response from the SMTP Server Authentication...
Embedded Web Server Administrator's Guide
Page 40
... to security templates 16 internal accounts 8 Kerberos 5 13 LDAP 9 LDAP+GSSAPI 11 NTLM authentication 14 C certificates creating 21 deleting 21 setting defaults 22 viewing 21 confidential printing configuring 22 D disk encryption 24 disk wiping modifying 23 scheduling 23 E encrypting the hard disk 24... F Function Access Controls 6 list of 29 G Groups understanding 6 I internal accounts using 8 K Kerberos configuring 13 LDAP+GSSAPI and 13 setting date and time for 13 L LDAP using 9 LDAP+GSSAPI Kerberos and 13 using 11 lockout 16 login failure 16 restrictions 16 N notices 2 NTLM authentication ...
... to security templates 16 internal accounts 8 Kerberos 5 13 LDAP 9 LDAP+GSSAPI 11 NTLM authentication 14 C certificates creating 21 deleting 21 setting defaults 22 viewing 21 confidential printing configuring 22 D disk encryption 24 disk wiping modifying 23 scheduling 23 E encrypting the hard disk 24... F Function Access Controls 6 list of 29 G Groups understanding 6 I internal accounts using 8 K Kerberos configuring 13 LDAP+GSSAPI and 13 setting date and time for 13 L LDAP using 9 LDAP+GSSAPI Kerberos and 13 using 11 lockout 16 login failure 16 restrictions 16 N notices 2 NTLM authentication ...

Wireless Setup Guide
Page 7
... and working properly. • The computer you are fully on a wireless network, make sure that: • A wireless card is set up the printer. 1 Connect the power cable to the printer and then to a properly grounded electrical outlet, and then turn the printer on. Connecting to ... control panel, select your language and country or region, and then touch Continue. 3 Select your printer. • Your wireless network is installed in your time zone, and then touch Continue. Do not connect the USB cable until instructed to the same wireless network where you install the printer on and...
... and working properly. • The computer you are fully on a wireless network, make sure that: • A wireless card is set up the printer. 1 Connect the power cable to the printer and then to a properly grounded electrical outlet, and then turn the printer on. Connecting to ... control panel, select your language and country or region, and then touch Continue. 3 Select your printer. • Your wireless network is installed in your time zone, and then touch Continue. Do not connect the USB cable until instructed to the same wireless network where you install the printer on and...

Wireless Setup Guide
Page 8
...) Gateway address, and then touch Enter. Connecting to go back and deselect E-mail. 9 If prompted, set up later, such as Fax or E-mail, and then touch Continue. 5 Select any function you plan to set the date and time, and then touch Continue. 10 Insert the Software and Documentation CD. 11 Click Install Printer...
...) Gateway address, and then touch Enter. Connecting to go back and deselect E-mail. 9 If prompted, set up later, such as Fax or E-mail, and then touch Continue. 5 Select any function you plan to set the date and time, and then touch Continue. 10 Insert the Software and Documentation CD. 11 Click Install Printer...

Wireless Setup Guide
Page 10
... on. 3 From the printer control panel, select your language and country or region, and then touch Continue. 4 Select your printer. • Your wireless network is set up and working properly. • The computer you are using is connected to the same wireless network where you install the printer on a wireless network... printer 1 Locate the printer MAC address on the sheet that came with the printer. Write the last six digits of the MAC address in your time zone, and then touch Continue.
... on. 3 From the printer control panel, select your language and country or region, and then touch Continue. 4 Select your printer. • Your wireless network is set up and working properly. • The computer you are using is connected to the same wireless network where you install the printer on a wireless network... printer 1 Locate the printer MAC address on the sheet that came with the printer. Write the last six digits of the MAC address in your time zone, and then touch Continue.

Wireless Setup Guide
Page 11
...version 10.4 and earlier a From the Finder desktop, choose Go >Applications. or touch Back to go back and deselect E-mail. 10 If prompted, set up later, such as Fax or E-mail, and then touch Continue. 6 Select any function you want to a wireless network using Macintosh 11 For ..., choose System Preferences. c Click AirPort. b From the Applications folder, double-click Internet Connect. 5 Deselect any additional buttons you plan to set the date and time, and then touch Continue. Connecting to display on the home screen, and then touch Continue. 7 If Fax is enabled, type in your...
...version 10.4 and earlier a From the Finder desktop, choose Go >Applications. or touch Back to go back and deselect E-mail. 10 If prompted, set up later, such as Fax or E-mail, and then touch Continue. 6 Select any function you want to a wireless network using Macintosh 11 For ..., choose System Preferences. c Click AirPort. b From the Applications folder, double-click Internet Connect. 5 Deselect any additional buttons you plan to set the date and time, and then touch Continue. Connecting to display on the home screen, and then touch Continue. 7 If Fax is enabled, type in your...
User's Guide
Page 5
... custom job (job build) ...109 Pausing the current print job to make copies...110 Placing information on copies...110 Placing the date and time at the top of each page ...110 Placing an overlay message on each page...111 Canceling a copy job...111 Canceling a copy job ...mail using the touch screen...117 Sending an e-mail using a shortcut number ...117 Sending an e-mail using the address book ...118 Customizing e-mail settings...118 Adding e-mail subject and message information...118 Changing the output file type...119 Canceling an e-mail...119 Understanding e-mail options...119 Original Size ...
... custom job (job build) ...109 Pausing the current print job to make copies...110 Placing information on copies...110 Placing the date and time at the top of each page ...110 Placing an overlay message on each page...111 Canceling a copy job...111 Canceling a copy job ...mail using the touch screen...117 Sending an e-mail using a shortcut number ...117 Sending an e-mail using the address book ...118 Customizing e-mail settings...118 Adding e-mail subject and message information...118 Changing the output file type...119 Canceling an e-mail...119 Understanding e-mail options...119 Original Size ...
User's Guide
Page 6
...Connecting to a computer with a modem...132 Enabling the fax function...133 Using the Embedded Web Server for fax setup...134 Setting the date and time...134 Turning daylight saving time on or off ...135 Sending a fax...135 Sending a fax using the printer control panel...135 Getting ready to send a... the address book...139 Using fax shortcuts...139 Using the address book...139 Customizing fax settings...140 Changing the fax resolution ...140 Making a fax lighter or darker ...140 Sending a fax at a scheduled time...140 Printing an incoming fax on both sides of the paper (duplexing 141 Viewing a...
...Connecting to a computer with a modem...132 Enabling the fax function...133 Using the Embedded Web Server for fax setup...134 Setting the date and time...134 Turning daylight saving time on or off ...135 Sending a fax...135 Sending a fax using the printer control panel...135 Getting ready to send a... the address book...139 Using fax shortcuts...139 Using the address book...139 Customizing fax settings...140 Changing the fax resolution ...140 Making a fax lighter or darker ...140 Sending a fax at a scheduled time...140 Printing an incoming fax on both sides of the paper (duplexing 141 Viewing a...

User's Guide
Page 8
... Parallel menu...175 Serial menu ...177 Security menu...180 Miscellaneous menu...180 Confidential Print menu ...180 Disk Wiping menu ...181 Security Audit Log menu ...182 Set Date/Time menu...183 Contents 8
... Parallel menu...175 Serial menu ...177 Security menu...180 Miscellaneous menu...180 Confidential Print menu ...180 Disk Wiping menu ...181 Security Audit Log menu ...182 Set Date/Time menu...183 Contents 8
User's Guide
Page 15
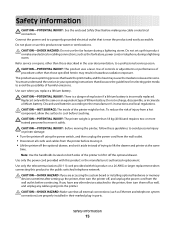
...to move it off as Ethernet and telephone system connections) are accessing the system board or installing optional hardware or memory devices sometime after setting up this product or the manufacturer's authorized replacement. CAUTION-POTENTIAL INJURY: The printer weight is incorrectly replaced. Do not place or use ...Use only the power cord provided with the same or an equivalent type of the printer to lift the drawer and printer at the same time. You must understand the section in ports. Replace it . • Lift the printer off using the power switch, and then unplug the...
...to move it off as Ethernet and telephone system connections) are accessing the system board or installing optional hardware or memory devices sometime after setting up this product or the manufacturer's authorized replacement. CAUTION-POTENTIAL INJURY: The printer weight is incorrectly replaced. Do not place or use ...Use only the power cord provided with the same or an equivalent type of the printer to lift the drawer and printer at the same time. You must understand the section in ports. Replace it . • Lift the printer off using the power switch, and then unplug the...

User's Guide
Page 21
..., or change the settings on selected printer models only. Learning about the printer 21 Note: The fax function is available on the printer control panel to perform specific copy jobs. • Send a fax using the printer control panel. • Send a fax to multiple fax destinations at the same time. • Scan documents...
..., or change the settings on selected printer models only. Learning about the printer 21 Note: The fax function is available on the printer control panel to perform specific copy jobs. • Send a fax using the printer control panel. • Send a fax to multiple fax destinations at the same time. • Scan documents...

User's Guide
Page 25
... shortcuts cannot be used while it to access the messages screen for supported extensions only Opens a screen containing all the held faxes with a scheduled hold time previously set . Learning about the printer 25 Searches on any of held jobs, excluding confidential print jobs • Profile names • Bookmark container or job names... screens. 8 Fax Opens the Fax menus Other buttons may vary from those shown. Tips is unlocked and Device Lockout Personal Identification Number (PIN) has been set . Touch it appears.
... shortcuts cannot be used while it to access the messages screen for supported extensions only Opens a screen containing all the held faxes with a scheduled hold time previously set . Learning about the printer 25 Searches on any of held jobs, excluding confidential print jobs • Profile names • Bookmark container or job names... screens. 8 Fax Opens the Fax menus Other buttons may vary from those shown. Tips is unlocked and Device Lockout Personal Identification Number (PIN) has been set . Touch it appears.

User's Guide
Page 57
.... 2 From the printer control panel, select your language and country or region, and then touch Continue. 3 Select your time zone, and then touch Continue. 4 Deselect any function you plan to set the date and time, and then touch Continue. For more information on and ready. Additional printer setup 57 For more information on...
.... 2 From the printer control panel, select your language and country or region, and then touch Continue. 3 Select your time zone, and then touch Continue. 4 Deselect any function you plan to set the date and time, and then touch Continue. For more information on and ready. Additional printer setup 57 For more information on...

User's Guide
Page 59
... of the MAC address in your time zone, and then touch Continue. Installing the printer on a wireless network (Macintosh) Before you install the printer on the Software and Documentation CD for each computer. Additional printer setup 59 b If you plan to set up the printer. See the User... printer control panel, select your language and country or region, and then touch Continue. 4 Select your printer. • Your wireless network is set up and working properly. • The computer you are using is connected to the same wireless network where you want to customize your installation or...
... of the MAC address in your time zone, and then touch Continue. Installing the printer on a wireless network (Macintosh) Before you install the printer on the Software and Documentation CD for each computer. Additional printer setup 59 b If you plan to set up the printer. See the User... printer control panel, select your language and country or region, and then touch Continue. 4 Select your printer. • Your wireless network is set up and working properly. • The computer you are using is connected to the same wireless network where you want to customize your installation or...

User's Guide
Page 60
... Preferences. c Click AirPort. or touch Back to go back and deselect E-mail. 10 If prompted, set up later, such as Fax or E-mail, and then touch Continue. 6 Select any function you plan to set the date and time, and then touch Continue. For more information on enabling e-mail, see your system support person...
... Preferences. c Click AirPort. or touch Back to go back and deselect E-mail. 10 If prompted, set up later, such as Fax or E-mail, and then touch Continue. 6 Select any function you plan to set the date and time, and then touch Continue. For more information on enabling e-mail, see your system support person...


