
Getting Started
Page 3
...Setting up the printer using a USB cable...17 Installing an optional internal wireless print server 17 Configuring the optional internal wireless print server 19 Installing the printer on additional network computers 19 Wireless networking...20 Networking overview...20 Learning about the printer 25 Understanding the ...Copy menu ...29 Using the Scan menu ...30 Using the Photo Card menu ...31 Using the PictBridge menu ...32 Using the Settings menu ...33 Saving settings ...35 Learning about the software 37 Using the printer software...37 Using the Lexmark Imaging Studio...37 Using the Solution...
...Setting up the printer using a USB cable...17 Installing an optional internal wireless print server 17 Configuring the optional internal wireless print server 19 Installing the printer on additional network computers 19 Wireless networking...20 Networking overview...20 Learning about the printer 25 Understanding the ...Copy menu ...29 Using the Scan menu ...30 Using the Photo Card menu ...31 Using the PictBridge menu ...32 Using the Settings menu ...33 Saving settings ...35 Learning about the software 37 Using the printer software...37 Using the Lexmark Imaging Studio...37 Using the Solution...
Getting Started
Page 6
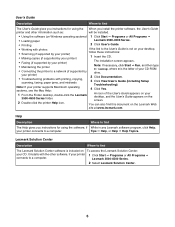
...find The User's Guide gives you instructions for using the When you instructions for using the software, if While in any Lexmark software program, click Help, your printer supports Macintosh operating systems, see the Mac Help: 4 Click Yes. 1 From the Finder desktop, ... Start Œ Programs or All Programs Œ • Loading paper Lexmark 3500-4500 Series. • Printing 2 Click User's Guide. • Working with photos If the link to the User's Guide is not on your desktop, • Scanning (if supported by your printer) follow these instructions: • Making copies...
...find The User's Guide gives you instructions for using the When you instructions for using the software, if While in any Lexmark software program, click Help, your printer supports Macintosh operating systems, see the Mac Help: 4 Click Yes. 1 From the Finder desktop, ... Start Œ Programs or All Programs Œ • Loading paper Lexmark 3500-4500 Series. • Printing 2 Click User's Guide. • Working with photos If the link to the User's Guide is not on your desktop, • Scanning (if supported by your printer) follow these instructions: • Making copies...
Getting Started
Page 27
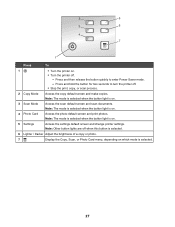
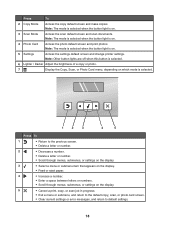
Note: The mode is selected when the button light is on. 4 Photo Card Access the photo default screen and print photos. Press and hold the button for two seconds to enter Power Saver mode. - Note: The mode is selected when the button light is on. 5 Settings... lights are off when this button is selected. 6 Lighter / Darker Adjust the brightness of a copy or photo. 7 Display the Copy, Scan, or Photo Card menu, depending on which mode is on. 3 Scan Mode Access the scan default screen and scan documents. Note: The mode is selected when the button light is selected. 27 Press and then...
Note: The mode is selected when the button light is on. 4 Photo Card Access the photo default screen and print photos. Press and hold the button for two seconds to enter Power Saver mode. - Note: The mode is selected when the button light is on. 5 Settings... lights are off when this button is selected. 6 Lighter / Darker Adjust the brightness of a copy or photo. 7 Display the Copy, Scan, or Photo Card menu, depending on which mode is on. 3 Scan Mode Access the scan default screen and scan documents. Note: The mode is selected when the button light is selected. 27 Press and then...
Getting Started
Page 28
... a space between letters or numbers. • Scroll through menus, submenus, or settings on the display. 5 • Cancel a print, copy, or scan job in progress. • Exit a menu or submenu, and return to the default copy, scan, or photo card screen. • Clear current settings or error messages, and return to default settings. 28
... a space between letters or numbers. • Scroll through menus, submenus, or settings on the display. 5 • Cancel a print, copy, or scan job in progress. • Exit a menu or submenu, and return to the default copy, scan, or photo card screen. • Clear current settings or error messages, and return to default settings. 28
Getting Started
Page 29
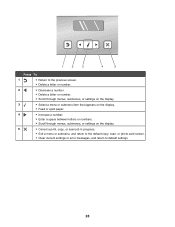
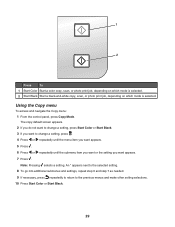
... appears. 5 Press . 6 Press or repeatedly until the submenu item you want or the setting you want appears. 7 Press . Press To 1 Start Color Start a color copy, scan, or photo print job, depending on which mode is selected. 2 Start Black Start a black-and-white copy...
... appears. 5 Press . 6 Press or repeatedly until the submenu item you want or the setting you want appears. 7 Press . Press To 1 Start Color Start a color copy, scan, or photo print job, depending on which mode is selected. 2 Start Black Start a black-and-white copy...

Getting Started
Page 30
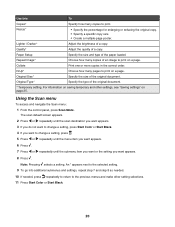
...one or more copies in the correct order. For information on a page. Note: Pressing selects a setting. Quality* Adjust the quality of the original document. * Temporary setting. Original Type* Specify the type of a copy. Paper Setup Specify the size and type of a copy. Using the Scan menu To access and navigate the Scan... a setting, press . 5 Press or repeatedly until the menu item you want appears. 6 Press . 7 Press or repeatedly until the scan destination you want appears. 3 If you do not want to change a setting, press Start Color or Start Black. 4 If you want...
...one or more copies in the correct order. For information on a page. Note: Pressing selects a setting. Quality* Adjust the quality of the original document. * Temporary setting. Original Type* Specify the type of a copy. Paper Setup Specify the size and type of a copy. Using the Scan menu To access and navigate the Scan... a setting, press . 5 Press or repeatedly until the menu item you want appears. 6 Press . 7 Press or repeatedly until the scan destination you want appears. 3 If you do not want to change a setting, press Start Color or Start Black. 4 If you want...

Getting Started
Page 31
... memory card or flash drive is removed. 2 Setting must be saved individually. Lighter/Darker Adjust brightness of a scan. Paper Setup1, 2 Specify the size and type of printed photos. 1 Setting will return to the selected setting. 6 To go into the printer. 2 Press or repeatedly until...borderless or bordered, center one photo on a page. Original Size* Specify the size of photos to the previous menus and make other settings, see "Saving Paper Size, Paper Type, and Photo Size settings" on page 35. Menu item Action Proof Sheet Print and then scan a proof sheet: &#...
... memory card or flash drive is removed. 2 Setting must be saved individually. Lighter/Darker Adjust brightness of a scan. Paper Setup1, 2 Specify the size and type of printed photos. 1 Setting will return to the selected setting. 6 To go into the printer. 2 Press or repeatedly until...borderless or bordered, center one photo on a page. Original Size* Specify the size of photos to the previous menus and make other settings, see "Saving Paper Size, Paper Type, and Photo Size settings" on page 35. Menu item Action Proof Sheet Print and then scan a proof sheet: &#...
Getting Started
Page 35
... Quality - f Press or g Press . An * appears next to the selected setting. Resize - N-Up - Quality - Resize Photo Card The following Photo Card settings will return to the default setting. Layout - b Press or repeatedly until Clear Settings Timeout appears. Saving settings In a ...inactivity or turning off . Temporary settings Copy Mode - Original Size - Original Size - Photo Effects - To change one or more temporary settings into new default settings: a Press Settings. Original Type Scan Mode - b Press or repeatedly until the setting you want appears. 2 Press :...
... Quality - f Press or g Press . An * appears next to the selected setting. Resize - N-Up - Quality - Resize Photo Card The following Photo Card settings will return to the default setting. Layout - b Press or repeatedly until Clear Settings Timeout appears. Saving settings In a ...inactivity or turning off . Temporary settings Copy Mode - Original Size - Original Size - Photo Effects - To change one or more temporary settings into new default settings: a Press Settings. Original Type Scan Mode - b Press or repeatedly until the setting you want appears. 2 Press :...
Getting Started
Page 37
...one of active Web pages. Create printer-friendly versions of these methods: Method 1 Method 2 From the desktop, double-click the Lexmark Imaging Studio icon. 1 Click Start Œ Programs or All Programs Œ Lexmark 3500-4500 Series. 2 Select Lexmark Imaging Studio. Using the Lexmark Imaging Studio To open the Lexmark..., scan, copy, print, or fax documents or photos. Click the Lexmark Imaging Studio icon for the document you are printing. Click To Scan Copy Details • Scan a photo or document. • Save, edit, or share your photo or document. • Copy a photo or...
...one of active Web pages. Create printer-friendly versions of these methods: Method 1 Method 2 From the desktop, double-click the Lexmark Imaging Studio icon. 1 Click Start Œ Programs or All Programs Œ Lexmark 3500-4500 Series. 2 Select Lexmark Imaging Studio. Using the Lexmark Imaging Studio To open the Lexmark..., scan, copy, print, or fax documents or photos. Click the Lexmark Imaging Studio icon for the document you are printing. Click To Scan Copy Details • Scan a photo or document. • Save, edit, or share your photo or document. • Copy a photo or...
Getting Started
Page 39
The Solution Center appears with the Maintenance tab open the Solution Center, use one of these methods: Method 1 1 From the desktop, double-click the Lexmark Imaging Studio icon. 2 Click Setup and diagnose printer. Print, scan, copy, and fax. - To open . The Solution Center consists of six tabs:... Information • Install a new print cartridge. Print projects such as photos, envelopes, cards, banners, iron-on the World Wide Web. • View ink levels and order new print cartridges. 39 Note: Wait until scanning is Busy Printing. • View paper type detected. • View...
The Solution Center appears with the Maintenance tab open the Solution Center, use one of these methods: Method 1 1 From the desktop, double-click the Lexmark Imaging Studio icon. 2 Click Setup and diagnose printer. Print, scan, copy, and fax. - To open . The Solution Center consists of six tabs:... Information • Install a new print cartridge. Print projects such as photos, envelopes, cards, banners, iron-on the World Wide Web. • View ink levels and order new print cartridges. 39 Note: Wait until scanning is Busy Printing. • View paper type detected. • View...
Getting Started
Page 44
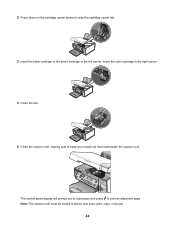
Note: The scanner unit must be closed to raise the cartridge carrier lids. 3 Insert the black cartridge or the photo cartridge in the right carrier. 4 Close the lids. 5 Close the scanner unit, making sure to print an alignment page. 2 Press down on the cartridge carrier levers to start a new scan, print, copy, or fax job. 44 Insert the color cartridge in the left carrier. The control panel display will prompt you to load paper and press to keep your hands out from underneath the scanner unit.
Note: The scanner unit must be closed to raise the cartridge carrier lids. 3 Insert the black cartridge or the photo cartridge in the right carrier. 4 Close the lids. 5 Close the scanner unit, making sure to print an alignment page. 2 Press down on the cartridge carrier levers to start a new scan, print, copy, or fax job. 44 Insert the color cartridge in the left carrier. The control panel display will prompt you to load paper and press to keep your hands out from underneath the scanner unit.
Getting Started
Page 45
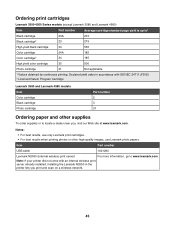
... Declared yield value in accordance with an internal wireless print server already installed, installing the Lexmark N2050 in the printer lets you , visit our Web site at www.lexmark.com. Notes: • For best results, use Lexmark photo papers. Note: If your printer did not ... Lexmark print cartridges. • For best results when printing photos or other supplies To order supplies or to www.lexmark.com. Item Part number USB cable 1021294 Lexmark N2050 (Internal wireless print server) For more information, go to locate a dealer near you print and scan on a wireless network...
... Declared yield value in accordance with an internal wireless print server already installed, installing the Lexmark N2050 in the printer lets you , visit our Web site at www.lexmark.com. Notes: • For best results, use Lexmark photo papers. Note: If your printer did not ... Lexmark print cartridges. • For best results when printing photos or other supplies To order supplies or to www.lexmark.com. Item Part number USB cable 1021294 Lexmark N2050 (Internal wireless print server) For more information, go to locate a dealer near you print and scan on a wireless network...
User's Guide
Page 3
...panel 13 Networking the printer 14 Installing the printer on a network...14 Installing an internal wireless print server 14 Finding your MAC address...15 Learning about the printer 16 Understanding the ...menus 17 Using the control panel...17 Using the Copy menu ...19 Using the Scan menu ...20 Using the Photo Card menu ...21 Using the PictBridge menu ...22 Using the Settings menu ...23 ...Saving settings ...25 Learning about the software 27 Using the printer software...27 Using the Lexmark Imaging ...
...panel 13 Networking the printer 14 Installing the printer on a network...14 Installing an internal wireless print server 14 Finding your MAC address...15 Learning about the printer 16 Understanding the ...menus 17 Using the control panel...17 Using the Copy menu ...19 Using the Scan menu ...20 Using the Photo Card menu ...21 Using the PictBridge menu ...22 Using the Settings menu ...23 ...Saving settings ...25 Learning about the software 27 Using the printer software...27 Using the Lexmark Imaging ...
User's Guide
Page 5
...using the computer 61 Copying a photo using the computer 62 Scanning...63 Scanning a document...63 Scanning to a computer over a network 63 Scanning a document using the computer 64 Scanning text for editing...64 Scanning images for editing...65 Scanning a photo to the Photo Library 65 Scanning multiple photos at one time using the computer 65 Scanning documents or images for e-mailing ... Cleaning the scanner glass...74 Ordering supplies...74 Ordering print cartridges...74 Ordering paper and other supplies ...75 Using genuine Lexmark print cartridges 75 Refilling a print cartridge...76 5
...using the computer 61 Copying a photo using the computer 62 Scanning...63 Scanning a document...63 Scanning to a computer over a network 63 Scanning a document using the computer 64 Scanning text for editing...64 Scanning images for editing...65 Scanning a photo to the Photo Library 65 Scanning multiple photos at one time using the computer 65 Scanning documents or images for e-mailing ... Cleaning the scanner glass...74 Ordering supplies...74 Ordering print cartridges...74 Ordering paper and other supplies ...75 Using genuine Lexmark print cartridges 75 Refilling a print cartridge...76 5
User's Guide
Page 6
...Lexmark products...76 Troubleshooting...77 Setup troubleshooting...77 Incorrect language appears on the display 77 Power button is not lit ...78 Software does not install ...78 Page does not print ...79 Cannot print from digital camera using PictBridge 80 Print troubleshooting...81 Partial 4 x 6 in. (10 x 15 cm) photo...87 Partial document or photo copies ...88 Scan troubleshooting...88 Scanner does not respond ...88 Scan was not successful ...89 Scanning takes too long or freezes the computer 89 Poor scanned image quality ...89 Partial document or photo scans ...90 Cannot scan to a computer ...
...Lexmark products...76 Troubleshooting...77 Setup troubleshooting...77 Incorrect language appears on the display 77 Power button is not lit ...78 Software does not install ...78 Page does not print ...79 Cannot print from digital camera using PictBridge 80 Print troubleshooting...81 Partial 4 x 6 in. (10 x 15 cm) photo...87 Partial document or photo copies ...88 Scan troubleshooting...88 Scanner does not respond ...88 Scan was not successful ...89 Scanning takes too long or freezes the computer 89 Poor scanned image quality ...89 Partial document or photo scans ...90 Cannot scan to a computer ...

User's Guide
Page 9
...to a network (if supported by your printer) • Maintaining the printer The installation screen appears. scanning, faxing, paper jams, and misfeeds 3 Click Yes. site at www.lexmark.com. User's Guide Description Where to find You can also find this document on the setting up ... icon. your printer) 2 Click View User's Guide (including Setup • Troubleshooting problems with photos If the link to find this document in the printer box or on the Lexmark Web 2 Double-click the printer Help icon. Getting Started booklet Description Where to the User's ...
...to a network (if supported by your printer) • Maintaining the printer The installation screen appears. scanning, faxing, paper jams, and misfeeds 3 Click Yes. site at www.lexmark.com. User's Guide Description Where to find You can also find this document on the setting up ... icon. your printer) 2 Click View User's Guide (including Setup • Troubleshooting problems with photos If the link to find this document in the printer box or on the Lexmark Web 2 Double-click the printer Help icon. Getting Started booklet Description Where to the User's ...
User's Guide
Page 17
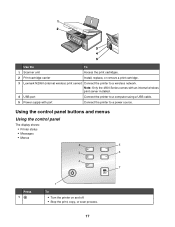
...installed. 4 USB port Connect the printer to a computer using a USB cable. 5 Power supply with port Connect the printer to a wireless network. Using the control panel buttons and menus Using the control panel The display shows: • Printer status • Messages •... 1 To • Turn the printer on and off. • Stop the print, copy, or scan process. 17 Use the To 1 Scanner unit Access the print cartridges. 2 Print cartridge carrier Install, replace, or remove a print cartridge. 3 Lexmark N2050 (internal wireless print server) Connect the printer to a power source.
...installed. 4 USB port Connect the printer to a computer using a USB cable. 5 Power supply with port Connect the printer to a wireless network. Using the control panel buttons and menus Using the control panel The display shows: • Printer status • Messages •... 1 To • Turn the printer on and off. • Stop the print, copy, or scan process. 17 Use the To 1 Scanner unit Access the print cartridges. 2 Print cartridge carrier Install, replace, or remove a print cartridge. 3 Lexmark N2050 (internal wireless print server) Connect the printer to a power source.
User's Guide
Page 18
...this button is selected. 6 Lighter / Darker Adjust the brightness of a copy or photo. 7 Display the Copy, Scan, or Photo Card menu, depending on which mode is on the display. 5 • Cancel a print, copy, or scan job in progress. • Exit a menu or submenu, and return to the ...default copy, scan, or photo card screen. • Clear current settings or error messages, and return to the previous screen. • Delete...
...this button is selected. 6 Lighter / Darker Adjust the brightness of a copy or photo. 7 Display the Copy, Scan, or Photo Card menu, depending on which mode is on the display. 5 • Cancel a print, copy, or scan job in progress. • Exit a menu or submenu, and return to the ...default copy, scan, or photo card screen. • Clear current settings or error messages, and return to the previous screen. • Delete...

User's Guide
Page 19
... Color or Start Black. 19 Note: Pressing selects a setting. Press To 1 Start Color Start a color copy, scan, or photo print job, depending on which mode is selected. 2 Start Black Start a black-and-white copy, scan or photo print job, depending on which mode is selected. An * appears next to the selected setting. 8 To go...
... Color or Start Black. 19 Note: Pressing selects a setting. Press To 1 Start Color Start a color copy, scan, or photo print job, depending on which mode is selected. 2 Start Black Start a black-and-white copy, scan or photo print job, depending on which mode is selected. An * appears next to the selected setting. 8 To go...
User's Guide
Page 20
...* Temporary setting. For information on saving temporary and other setting selections. 11 Press Start Color or Start Black. 20 The scan default screen appears. 2 Press or repeatedly until the scan destination you want appears. 3 If you do not want to change a setting, press . 5 Press or repeatedly until the... of the paper loaded. Quality* Adjust the quality of an image to print on page 25. Note: Pressing selects a setting. Collate Print one or more copies in the correct order. Use this To Copies* Specify how many copies to print on a page. N-Up* Choose how many...
...* Temporary setting. For information on saving temporary and other setting selections. 11 Press Start Color or Start Black. 20 The scan default screen appears. 2 Press or repeatedly until the scan destination you want appears. 3 If you do not want to change a setting, press . 5 Press or repeatedly until the... of the paper loaded. Quality* Adjust the quality of an image to print on page 25. Note: Pressing selects a setting. Collate Print one or more copies in the correct order. Use this To Copies* Specify how many copies to print on a page. N-Up* Choose how many...


