
X422 MFP Setup Guide
Page 5
... . . . . 1 Windows 2 Macintosh 3 UNIX/Linux 4 Step 2: Unpack the MFP 5 Unpacking 5 Placing the MFP 6 Step 3: Set up MFP and options 9 Installing options on your MFP 9 Setting up the optional 250-sheet or 500-sheet drawer . . . . .10 Attach the scanner automatic document feeder (ADF) tray . .11 Unlock... the scanner 12 Step 4: Install optional memory cards 13 Opening the side door 13 Removing the system board access shield 14 Installing an MFP memory card 15 Installing an optional flash memory or font card 15 Reattaching the system board access ...
... . . . . 1 Windows 2 Macintosh 3 UNIX/Linux 4 Step 2: Unpack the MFP 5 Unpacking 5 Placing the MFP 6 Step 3: Set up MFP and options 9 Installing options on your MFP 9 Setting up the optional 250-sheet or 500-sheet drawer . . . . .10 Attach the scanner automatic document feeder (ADF) tray . .11 Unlock... the scanner 12 Step 4: Install optional memory cards 13 Opening the side door 13 Removing the system board access shield 14 Installing an MFP memory card 15 Installing an optional flash memory or font card 15 Reattaching the system board access ...
X422 MFP Setup Guide
Page 6
Step 6: Install the print cartridge 21 Removing the packaging 21 Preparing the print cartridge 22 Step 7: Load media 25 Changing Paper Size and Paper Type settings 26 ...
Step 6: Install the print cartridge 21 Removing the packaging 21 Preparing the print cartridge 22 Step 7: Load media 25 Changing Paper Size and Paper Type settings 26 ...
X422 MFP Setup Guide
Page 7
Step 12: Install drivers for network printing 47 Windows 47 Macintosh 51 UNIX/Linux 53 NetWare 54 Step 13: Set default copy settings 55 Step 14: Set up to send and receive faxes 57 Configuring fax setup 57 Sending a fax from your MFP 58 Step 15: Set up your e-mail server 59 Other sources of information 63 Publications CD 63 Drivers CD 64 Lexmark Web site 64 Notices 65 Index 69 Contents v
Step 12: Install drivers for network printing 47 Windows 47 Macintosh 51 UNIX/Linux 53 NetWare 54 Step 13: Set default copy settings 55 Step 14: Set up to send and receive faxes 57 Configuring fax setup 57 Sending a fax from your MFP 58 Step 15: Set up your e-mail server 59 Other sources of information 63 Publications CD 63 Drivers CD 64 Lexmark Web site 64 Notices 65 Index 69 Contents v

X422 MFP Setup Guide
Page 9
..., Windows 98, and Windows Me Note: Windows 95 and Windows NT are not supported operating systems. Macintosh 3 UNIX/Linux 4 * For local installation, do not attach a USB cable while your MFP and computer are turned on your print and scan drivers. Launch the CD and follow the... instructions to page... If your MFP is an MFP attached to install drivers depends on page 5. Again, the procedure to your MFP. Install the drivers first. Operating system Go to install MFP software. A print driver is software that lets your computer communicate with your computer...
..., Windows 98, and Windows Me Note: Windows 95 and Windows NT are not supported operating systems. Macintosh 3 UNIX/Linux 4 * For local installation, do not attach a USB cable while your MFP and computer are turned on your print and scan drivers. Launch the CD and follow the... instructions to page... If your MFP is an MFP attached to install drivers depends on page 5. Again, the procedure to your MFP. Install the drivers first. Operating system Go to install MFP software. A print driver is software that lets your computer communicate with your computer...
X422 MFP Setup Guide
Page 10
... drivers on your computer. 1 Insert the drivers CD into your CD-ROM drive of your computer, you have installed the drivers on Lexmark's Web site at www.lexmark.com. Some Windows operating systems may contain less functionality than our enhanced custom driver. If the CD does not auto launch, click Start Æ Run...
... drivers on your computer. 1 Insert the drivers CD into your CD-ROM drive of your computer, you have installed the drivers on Lexmark's Web site at www.lexmark.com. Some Windows operating systems may contain less functionality than our enhanced custom driver. If the CD does not auto launch, click Start Æ Run...
X422 MFP Setup Guide
Page 11
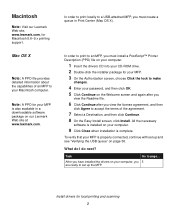
To verify that your computer, you 5 are ready to an MFP, you have installed the drivers on your MFP is installed on your password, and then click OK. 5 Click Continue on our Lexmark Web site at www.lexmark.com. What do I do next? After you must create a queue in a downloadable ... Welcome screen and again after you view the Readme file. 6 Click Continue after you must install a PostScript™ Printer Description (PPD) file on page 36. Macintosh Note: Visit our Lexmark Web site, www.lexmark.com, for local printing and scanning 3 In order to print to set up the MFP....
To verify that your computer, you 5 are ready to an MFP, you have installed the drivers on your MFP is installed on your password, and then click OK. 5 Click Continue on our Lexmark Web site at www.lexmark.com. What do I do next? After you must create a queue in a downloadable ... Welcome screen and again after you view the Readme file. 6 Click Continue after you must install a PostScript™ Printer Description (PPD) file on page 36. Macintosh Note: Visit our Lexmark Web site, www.lexmark.com, for local printing and scanning 3 In order to print to set up the MFP....
X422 MFP Setup Guide
Page 12
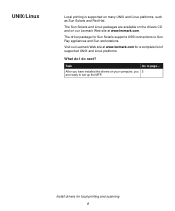
... UNIX and Linux platforms, such as Sun Solaris and Red Hat. Install drivers for a complete list of supported UNIX and Linux platforms. What do I do next? UNIX/Linux Local printing is supported on our Lexmark Web site at www.lexmark.com for local printing and scanning 4 Task Go to page... Visit... our Lexmark Web site at www.lexmark.com. The Sun Solaris and Linux packages are ready to Sun Ray appliances and Sun...
... UNIX and Linux platforms, such as Sun Solaris and Red Hat. Install drivers for a complete list of supported UNIX and Linux platforms. What do I do next? UNIX/Linux Local printing is supported on our Lexmark Web site at www.lexmark.com for local printing and scanning 4 Task Go to page... Visit... our Lexmark Web site at www.lexmark.com. The Sun Solaris and Linux packages are ready to Sun Ray appliances and Sun...

X422 MFP Setup Guide
Page 13
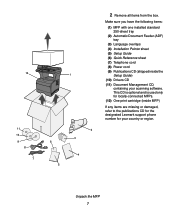
Ask someone to help you are ready to install it safely. It is also important to open the MFP trays, covers, doors, and options. Unpack the MFP 5 Leave the MFP in the box until you lift the MFP. 1 Select a location for your MFP. • Leave enough room to allow space around the MFP for proper ventilation. Step 2: Unpack the MFP Unpacking CAUTION: The MFP weighs 46 lbs. (21 kg) and requires at least two people to lift it .
Ask someone to help you are ready to install it safely. It is also important to open the MFP trays, covers, doors, and options. Unpack the MFP 5 Leave the MFP in the box until you lift the MFP. 1 Select a location for your MFP. • Leave enough room to allow space around the MFP for proper ventilation. Step 2: Unpack the MFP Unpacking CAUTION: The MFP weighs 46 lbs. (21 kg) and requires at least two people to lift it .
X422 MFP Setup Guide
Page 15
... CD (11) Document Management CD, containing your country or region. Make sure you have the following items: (1) MFP with one installed standard 250-sheet tray (2) Automatic Document Feeder (ADF) tray (3) Language overlays (4) Installation Pointer sheet (5) Setup Guide (6) Quick Reference sheet (7) Telephone cord (8) Power cord (9) Publications CD (shipped inside MFP) If any items...
... CD (11) Document Management CD, containing your country or region. Make sure you have the following items: (1) MFP with one installed standard 250-sheet tray (2) Automatic Document Feeder (ADF) tray (3) Language overlays (4) Installation Pointer sheet (5) Setup Guide (6) Quick Reference sheet (7) Telephone cord (8) Power cord (9) Publications CD (shipped inside MFP) If any items...

X422 MFP Setup Guide
Page 16
Save the carton and packing material in case you may have purchased. After you have unpacked the MFP, you are ready to set up 9 the MFP and install any options you need to page... What do I do next? Unpack the MFP 8 Task Go to repack the MFP.
Save the carton and packing material in case you may have purchased. After you have unpacked the MFP, you are ready to set up 9 the MFP and install any options you need to page... What do I do next? Unpack the MFP 8 Task Go to repack the MFP.
X422 MFP Setup Guide
Page 17
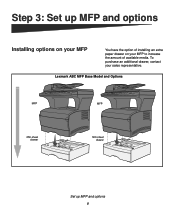
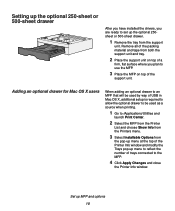
To purchase an additional drawer, contact your MFP to increase the amount of installing an extra paper drawer on your sales representative. Lexmark ABC MFP Base Model and Options MFP MFP 250-sheet drawer 500-sheet drawer Set up MFP and options Installing options on your MFP You have the option of available media. Step 3: Set up MFP and options 9
To purchase an additional drawer, contact your MFP to increase the amount of installing an extra paper drawer on your sales representative. Lexmark ABC MFP Base Model and Options MFP MFP 250-sheet drawer 500-sheet drawer Set up MFP and options Installing options on your MFP You have the option of available media. Step 3: Set up MFP and options 9
X422 MFP Setup Guide
Page 18
... printing. 1 Go to /Applications/Utilities and launch Print Center. 2 Select the MFP from the Printer List and choose Show Info from the Printers menu. 3 Select Installable Options from the pop-up menu at the top of the Printer Info window and modify the Trays pop-up menu to reflect the number... and tray. 2 Place the support unit on top of the support unit. Setting up the optional 250-sheet or 500-sheet drawer After you have installed the drivers, you plan to use the MFP. 3 Place the MFP on top of trays connected to the MFP. 4 Click Apply Changes and close the...
... printing. 1 Go to /Applications/Utilities and launch Print Center. 2 Select the MFP from the Printer List and choose Show Info from the Printers menu. 3 Select Installable Options from the pop-up menu at the top of the Printer Info window and modify the Trays pop-up menu to reflect the number... and tray. 2 Place the support unit on top of the support unit. Setting up the optional 250-sheet or 500-sheet drawer After you have installed the drivers, you plan to use the MFP. 3 Place the MFP on top of trays connected to the MFP. 4 Click Apply Changes and close the...
X422 MFP Setup Guide
Page 20
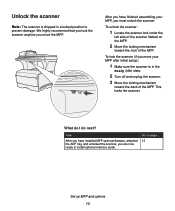
Task After you are now ready to page... 13 Set up MFP and options 12 This locks the scanner. Go to install optional memory cards. To unlock the scanner: 1 Locate the scanner lock under the left side of the scanner flatbed on the MFP. 2 Move the locking ...mechanism toward the back of the MFP. After you have installed MFP optional drawers, attached the ADF tray, and unlocked the scanner, you have finished assembling your MFP after initial setup): 1 Make sure the scanner is...
Task After you are now ready to page... 13 Set up MFP and options 12 This locks the scanner. Go to install optional memory cards. To unlock the scanner: 1 Locate the scanner lock under the left side of the scanner flatbed on the MFP. 2 Move the locking ...mechanism toward the back of the MFP. After you have installed MFP optional drawers, attached the ADF tray, and unlocked the scanner, you have finished assembling your MFP after initial setup): 1 Make sure the scanner is...

X422 MFP Setup Guide
Page 21
... to remove it out to free them from their slots. 3 Slide the side door off and unplug the power cord before continuing. Step 4: Install optional memory cards CAUTION: If you are installing memory cards sometime after setting up the MFP, turn the MFP off of the back of the MFP as you...
... to remove it out to free them from their slots. 3 Slide the side door off and unplug the power cord before continuing. Step 4: Install optional memory cards CAUTION: If you are installing memory cards sometime after setting up the MFP, turn the MFP off of the back of the MFP as you...

X422 MFP Setup Guide
Page 22
Do not remove them completely. 2 Slide the shield to remove the system board access shield. 1 Loosen the six screws. Install optional memory cards 14 Removing the system board access shield Note: You need a small Phillips screwdriver to the left until the screws fit into the keyholes on the shield. 3 Pull the shield straight out and set it aside.
Do not remove them completely. 2 Slide the shield to remove the system board access shield. 1 Loosen the six screws. Install optional memory cards 14 Removing the system board access shield Note: You need a small Phillips screwdriver to the left until the screws fit into the keyholes on the shield. 3 Pull the shield straight out and set it aside.
X422 MFP Setup Guide
Page 23
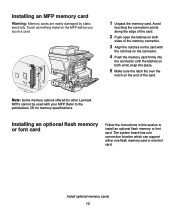
...2 Push open the latches on both sides of the card. Refer to install an optional flash memory or font card. Installing an optional flash memory or font card Follow the instructions in this section to the publications CD for other Lexmark MFPs cannot be used with the notches on the connector. 4 Push the... memory card firmly into the connector until the latches on both ends snap into place. 5 Make sure the latch fits over the notch on the MFP before you touch a card. 1 Unpack the memory card. Installing an ...
...2 Push open the latches on both sides of the card. Refer to install an optional flash memory or font card. Installing an optional flash memory or font card Follow the instructions in this section to the publications CD for other Lexmark MFPs cannot be used with the notches on the connector. 4 Push the... memory card firmly into the connector until the latches on both ends snap into place. 5 Make sure the latch fits over the notch on the MFP before you touch a card. 1 Unpack the memory card. Installing an ...

X422 MFP Setup Guide
Page 24
... flash memory or font card. Card Note: Do not pivot the card into the slot. Align the pins on the MFP before you touch a card. Install optional memory cards 16 Touch something metal on the card with the holes on the card must be fully inserted along its entire length. 3 Push...
... flash memory or font card. Card Note: Do not pivot the card into the slot. Align the pins on the MFP before you touch a card. Install optional memory cards 16 Touch something metal on the card with the holes on the card must be fully inserted along its entire length. 3 Push...

X422 MFP Setup Guide
Page 25
The top and front tabs snap into their corresponding slots. Make sure both sides. Install optional memory cards 17 Reattaching the system board access shield 1 Align the six keyholes on the shield with the corresponding slots on the MFP. 2 Guide ...
The top and front tabs snap into their corresponding slots. Make sure both sides. Install optional memory cards 17 Reattaching the system board access shield 1 Align the six keyholes on the shield with the corresponding slots on the MFP. 2 Guide ...

X422 MFP Setup Guide
Page 26
. Task After you have installed any optional memory cards, you are ready to page... 19 Install optional memory cards 18 Go to finish setting up your MFP. What do I do next?
. Task After you have installed any optional memory cards, you are ready to page... 19 Install optional memory cards 18 Go to finish setting up your MFP. What do I do next?
X422 MFP Setup Guide
Page 28
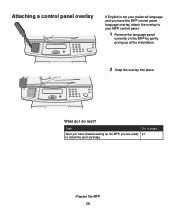
Attaching a control panel overlay If English is not your MFP control panel. 1 Remove the language panel currently on the MFP by gently prying up the MFP, you are ready 21 to install the print cartridge. What do I do next? After you have finished setting up at the indentation. 2 Snap the overlay into place. . Task Go to your preferred language and you have the MFP control panel language overlay, attach the overlay to page... Prepare the MFP 20
Attaching a control panel overlay If English is not your MFP control panel. 1 Remove the language panel currently on the MFP by gently prying up the MFP, you are ready 21 to install the print cartridge. What do I do next? After you have finished setting up at the indentation. 2 Snap the overlay into place. . Task Go to your preferred language and you have the MFP control panel language overlay, attach the overlay to page... Prepare the MFP 20


