Wireless Setup Guide
Page 13
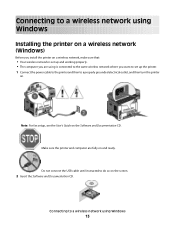
Connecting to do so on the screen. 2 Insert the Software and Documentation CD. Note: For fax setup, see the User's Guide on the Software and Documentation CD. Make sure the printer and computer are using is set up and working properly. &#...
Connecting to do so on the screen. 2 Insert the Software and Documentation CD. Note: For fax setup, see the User's Guide on the Software and Documentation CD. Make sure the printer and computer are using is set up and working properly. &#...

Wireless Setup Guide
Page 14
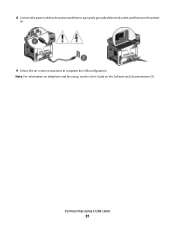
Note: Basic is configured, the software will instruct you to disconnect the temporary USB cable so you want to customize your printer has faxing capabilities, then connect the telephone cable. 9 Follow the on the wireless network to complete the software installation. Connecting to choose. Choose Advanced only if you ...
Note: Basic is configured, the software will instruct you to disconnect the temporary USB cable so you want to customize your printer has faxing capabilities, then connect the telephone cable. 9 Follow the on the wireless network to complete the software installation. Connecting to choose. Choose Advanced only if you ...

Wireless Setup Guide
Page 15
..., choose System Preferences. c Click AirPort. Write the last six digits of the MAC address in the space provided below: MAC address 2 If your printer has faxing capabilities, then connect the telephone cable. 3 Connect the power cable to the printer, and then to a wireless network using is connected to the same wireless...
..., choose System Preferences. c Click AirPort. Write the last six digits of the MAC address in the space provided below: MAC address 2 If your printer has faxing capabilities, then connect the telephone cable. 3 Connect the power cable to the printer, and then to a wireless network using is connected to the same wireless...

Wireless Setup Guide
Page 17
... is complete. 2 Add the printer: a For IP printing: In Mac OS X version 10.5 1 From the Apple menu, choose System Preferences. 2 Click Print & Fax. 3 Click +. 4 Select the printer from the list. 5 Click Add. In Mac OS X version 10.4 1 From the Go menu, choose Applications. 2 Double-... Select a Destination, and then click Continue. b For AppleTalk printing: In Mac OS X version 10.5 1 From the Apple menu, choose System Preferences. 2 Click Print & Fax. 3 Click +. 4 Click AppleTalk. 5 Select the printer from the list. 6 Click Add. In Mac OS X version 10.4 1 From the Go menu, choose Applications...
... is complete. 2 Add the printer: a For IP printing: In Mac OS X version 10.5 1 From the Apple menu, choose System Preferences. 2 Click Print & Fax. 3 Click +. 4 Select the printer from the list. 5 Click Add. In Mac OS X version 10.4 1 From the Go menu, choose Applications. 2 Double-... Select a Destination, and then click Continue. b For AppleTalk printing: In Mac OS X version 10.5 1 From the Apple menu, choose System Preferences. 2 Click Print & Fax. 3 Click +. 4 Click AppleTalk. 5 Select the printer from the list. 6 Click Add. In Mac OS X version 10.4 1 From the Go menu, choose Applications...
Wireless Setup Guide
Page 31
8 Connect the power cable to the printer and then to a properly grounded electrical outlet, and then turn the printer on. 9 Follow the on the Software and Documentation CD. Note: For information on telephone and fax setup, see the User's Guide on -screen instructions to complete the USB configuration. Connecting using a USB cable 31
8 Connect the power cable to the printer and then to a properly grounded electrical outlet, and then turn the printer on. 9 Follow the on the Software and Documentation CD. Note: For information on telephone and fax setup, see the User's Guide on -screen instructions to complete the USB configuration. Connecting using a USB cable 31
Wireless Setup Guide
Page 32
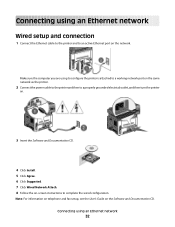
... CD. 4 Click Install. 5 Click Agree. 6 Click Suggested. 7 Click Wired Network Attach. 8 Follow the on the Software and Documentation CD. Note: For information on telephone and fax setup, see the User's Guide on -screen instructions to an active Ethernet port on the network. Connecting using an Ethernet network Wired setup and connection...
... CD. 4 Click Install. 5 Click Agree. 6 Click Suggested. 7 Click Wired Network Attach. 8 Follow the on the Software and Documentation CD. Note: For information on telephone and fax setup, see the User's Guide on -screen instructions to an active Ethernet port on the network. Connecting using an Ethernet network Wired setup and connection...
User's Guide
Page 3
......77 E-mailing 78 Getting ready to e-mail...78 Creating an e-mail shortcut using the Embedded Web Server 79 E-mailing a document...79 Canceling an e-mail...81 Faxing 82 Getting the printer ready to fax...82 Sending a fax...94 Creating shortcuts...97 Using shortcuts and the address book...98 Customizing...
......77 E-mailing 78 Getting ready to e-mail...78 Creating an e-mail shortcut using the Embedded Web Server 79 E-mailing a document...79 Canceling an e-mail...81 Faxing 82 Getting the printer ready to fax...82 Sending a fax...94 Creating shortcuts...97 Using shortcuts and the address book...98 Customizing...

User's Guide
Page 4
Improving fax quality...103 Scanning to a computer or flash drive 104 Scanning to a computer...104 Scanning to a flash drive...105 Understanding the Scan Center features...105 Understanding ...
Improving fax quality...103 Scanning to a computer or flash drive 104 Scanning to a computer...104 Scanning to a flash drive...105 Understanding the Scan Center features...105 Understanding ...
User's Guide
Page 5
... display is blank or displays only diamonds 176 Understanding printer messages...176 Solving printing problems...186 Solving copy problems...189 Solving scanner problems...192 Solving fax problems...194 Solving option problems...197 Solving paper feed problems...198 Solving print quality problems...199 Embedded Web Server does not open...208 Contacting Customer...
... display is blank or displays only diamonds 176 Understanding printer messages...176 Solving printing problems...186 Solving copy problems...189 Solving scanner problems...192 Solving fax problems...194 Solving option problems...197 Solving paper feed problems...198 Solving print quality problems...199 Embedded Web Server does not open...208 Contacting Customer...

User's Guide
Page 7
... the inside of lithium battery. Do not recharge, disassemble, or incinerate a lithium battery. CAUTION-SHOCK HAZARD: Do not use of specific Lexmark components. This product uses a printing process that heats the print media, and the heat may not always be hot. To reduce the ... replacement parts. CAUTION-SHOCK HAZARD: Make sure that all external connections (such as the fax feature, power cord, or telephone, during a lightning storm. Replace it only with the use the fax feature during a lightning storm. Refer service or repairs, other than those specified herein may...
... the inside of lithium battery. Do not recharge, disassemble, or incinerate a lithium battery. CAUTION-SHOCK HAZARD: Do not use of specific Lexmark components. This product uses a printing process that heats the print media, and the heat may not always be hot. To reduce the ... replacement parts. CAUTION-SHOCK HAZARD: Make sure that all external connections (such as the fax feature, power cord, or telephone, during a lightning storm. Replace it only with the use the fax feature during a lightning storm. Refer service or repairs, other than those specified herein may...

User's Guide
Page 9
...: • Selecting and storing paper and specialty media • Loading paper • Performing printing, copying, scanning, and faxing tasks, depending on your printer model • Configuring printer settings • Viewing and printing documents and photos • Setting..., read the User's Guide carefully, and make sure you check the latest updates on track fast. For updates, check our Web site at www.lexmark.com/publications/. Setup Instalación Instalação Asennus Instalacja Installation Installazione Installatie Installasjon 20 kg (44 lbs) 1 2 1 2 3 1...
...: • Selecting and storing paper and specialty media • Loading paper • Performing printing, copying, scanning, and faxing tasks, depending on your printer model • Configuring printer settings • Viewing and printing documents and photos • Setting..., read the User's Guide carefully, and make sure you check the latest updates on track fast. For updates, check our Web site at www.lexmark.com/publications/. Setup Instalación Instalação Asennus Instalacja Installation Installazione Installatie Installasjon 20 kg (44 lbs) 1 2 1 2 3 1...
User's Guide
Page 13
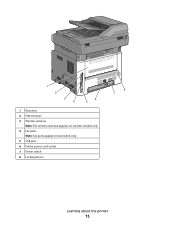
1 2 3 4 6 5 1 Rear door 2 Ethernet port 3 Wireless antenna Note: The wireless antenna appears on wireless models only. 4 Fax ports Note: Fax ports appear on fax models only. 5 USB port 6 Printer power cord socket 7 Power switch 8 Locking device 8 7 Learning about the printer 13
1 2 3 4 6 5 1 Rear door 2 Ethernet port 3 Wireless antenna Note: The wireless antenna appears on wireless models only. 4 Fax ports Note: Fax ports appear on fax models only. 5 USB port 6 Printer power cord socket 7 Power switch 8 Locking device 8 7 Learning about the printer 13

User's Guide
Page 14
... is available on the printer control panel to perform specific copy jobs. • Send a fax using the printer control panel. • Send a fax to multiple fax destinations at the same time. • Scan documents and send them to your computer, an e-mail address, or a flash drive. or 550-...sheet drawer (Tray 2) Basic functions of the scanner The scanner provides copy, fax, and scan capability. You can: • Make quick copies, or change the settings on selected printer models only. Learning about the printer 14 Configured...
... is available on the printer control panel to perform specific copy jobs. • Send a fax using the printer control panel. • Send a fax to multiple fax destinations at the same time. • Scan documents and send them to your computer, an e-mail address, or a flash drive. or 550-...sheet drawer (Tray 2) Basic functions of the scanner The scanner provides copy, fax, and scan capability. You can: • Make quick copies, or change the settings on selected printer models only. Learning about the printer 14 Configured...
User's Guide
Page 16
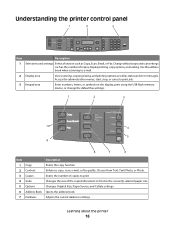
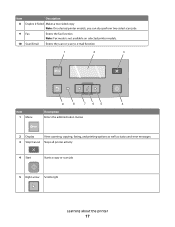
...or cancel a print job. 3 Keypad area Enter numbers, letters, or symbols on the display, print using the USB flash memory device, or change the default fax settings. 1 2 3 10 4 5 9 8 7 6 Item 1 Copy 2 Content 3 Copies 4 Scale 5 Options 6 Address Book 7 Darkness Description Enters the copy function Enhances copy... settings such as the number of the copied document to e-mail. 2 Display area View scanning, copying, faxing, and printing options as well as Copy, Scan, Email, or Fax. Use the address book when scanning to fit onto the currently selected paper size Changes Original Size, Paper ...
...or cancel a print job. 3 Keypad area Enter numbers, letters, or symbols on the display, print using the USB flash memory device, or change the default fax settings. 1 2 3 10 4 5 9 8 7 6 Item 1 Copy 2 Content 3 Copies 4 Scale 5 Options 6 Address Book 7 Darkness Description Enters the copy function Enhances copy... settings such as the number of the copied document to e-mail. 2 Display area View scanning, copying, faxing, and printing options as well as Copy, Scan, Email, or Fax. Use the address book when scanning to fit onto the currently selected paper size Changes Original Size, Paper ...
User's Guide
Page 17
...Description 8 Duplex 2-Sided Makes a two-sided copy Note: On selected printer models, you can also perform two-sided scan jobs. 9 Fax Enters the fax function Note: Fax mode is not available on selected printer models. 10 Scan/Email Enters the scan or scan to e-mail function 1 2 3 9 8... 765 4 Item 1 Menu Description Enters the administration menus 2 Display View scanning, copying, faxing, and printing options as well as status and error messages. 3 Stop/Cancel Stops all printer activity 4 Start Starts a copy or scan job 5 Right...
...Description 8 Duplex 2-Sided Makes a two-sided copy Note: On selected printer models, you can also perform two-sided scan jobs. 9 Fax Enters the fax function Note: Fax mode is not available on selected printer models. 10 Scan/Email Enters the scan or scan to e-mail function 1 2 3 9 8... 765 4 Item 1 Menu Description Enters the administration menus 2 Display View scanning, copying, faxing, and printing options as well as status and error messages. 3 Stop/Cancel Stops all printer activity 4 Start Starts a copy or scan job 5 Right...

User's Guide
Page 18
... USB menu is represented by a comma (,). • Press to cause a two- In the "Fax To" field, a Dial Pause is displayed. 2 1 7 6 Item 1 Redial/Pause 2 Keypad 3 5 4 Description • Press once to redial a fax number. or three-second dial pause in a fax number. Item 6 Select Description Accepts menu selections and settings 7 Left arrow Scrolls left 8 Indicator...
... USB menu is represented by a comma (,). • Press to cause a two- In the "Fax To" field, a Dial Pause is displayed. 2 1 7 6 Item 1 Redial/Pause 2 Keypad 3 5 4 Description • Press once to redial a fax number. or three-second dial pause in a fax number. Item 6 Select Description Accepts menu selections and settings 7 Left arrow Scrolls left 8 Indicator...

User's Guide
Page 21
Notes: • The entire length of the card. 3 Holding the card by its sides, align the card with the connector on the card must touch and be flush against the system board. • Be careful not to damage the connectors. • If your printer model does not fax, your system board will not have the fax card attached to the system board. 5 Close the system board door. Additional printer setup 21 Note: Avoid touching the connection points along the edge of the connector on the system board. 4 Push the card firmly into place. 2 Unpack the card.
Notes: • The entire length of the card. 3 Holding the card by its sides, align the card with the connector on the card must touch and be flush against the system board. • Be careful not to damage the connectors. • If your printer model does not fax, your system board will not have the fax card attached to the system board. 5 Close the system board door. Additional printer setup 21 Note: Avoid touching the connection points along the edge of the connector on the system board. 4 Push the card firmly into place. 2 Unpack the card.

User's Guide
Page 24
... all printer options are installed correctly. Additional printer setup 24 A list of installed options appears toward the bottom of the page. 1 4 2 3 1 Ethernet port 2 Fax ports Note: The fax ports are available on selected printer models only. 3 USB port 4 Printer power cord socket Verifying printer setup Once all hardware and software options are...
... all printer options are installed correctly. Additional printer setup 24 A list of installed options appears toward the bottom of the page. 1 4 2 3 1 Ethernet port 2 Fax ports Note: The fax ports are available on selected printer models only. 3 USB port 4 Printer power cord socket Verifying printer setup Once all hardware and software options are...
User's Guide
Page 26
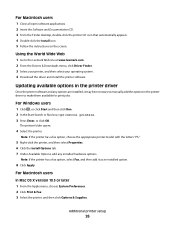
... click Run. 2 In the Start Search or Run box, type control printers. 3 Press Enter, or click OK. Note: If the printer has a fax option, select Fax, and then add it may be necessary to manually add the options in the printer driver Once the printer software and any installed hardware... options. The printer folder opens. 4 Select the printer. Updating available options in the printer driver to the Lexmark Web site at www.lexmark.com. 2 From ...
... click Run. 2 In the Start Search or Run box, type control printers. 3 Press Enter, or click OK. Note: If the printer has a fax option, select Fax, and then add it may be necessary to manually add the options in the printer driver Once the printer software and any installed hardware... options. The printer folder opens. 4 Select the printer. Updating available options in the printer driver to the Lexmark Web site at www.lexmark.com. 2 From ...

User's Guide
Page 28
... the Software and Documentation CD. 3 Click Install Printer and Software. 4 Click Agree to a properly grounded electrical outlet, and then turn the printer on. 1 2 Note: For fax setup, see the Networking Guide on a wireless network, make sure that: • Your wireless network is set up and working properly. • The computer you...
... the Software and Documentation CD. 3 Click Install Printer and Software. 4 Click Agree to a properly grounded electrical outlet, and then turn the printer on. 1 2 Note: For fax setup, see the Networking Guide on a wireless network, make sure that: • Your wireless network is set up and working properly. • The computer you...


