
Getting Started
Page 3
... the printer for wireless printing 15 Setting up the printer using a USB cable...17 Installing an optional internal wireless print server 17 Configuring the optional internal wireless print server 19 Installing the printer on additional network computers 19 Wireless networking...20 Networking overview...20 Learning about the printer 25 Understanding the parts of the printer 25 Using the control panel buttons and menus 26 Using the control panel...26 Using the Copy menu ...29 Using the Scan menu ...30 Using the Photo Card menu ...31 Using the PictBridge menu ...32 Using the Settings menu...
... the printer for wireless printing 15 Setting up the printer using a USB cable...17 Installing an optional internal wireless print server 17 Configuring the optional internal wireless print server 19 Installing the printer on additional network computers 19 Wireless networking...20 Networking overview...20 Learning about the printer 25 Understanding the parts of the printer 25 Using the control panel buttons and menus 26 Using the control panel...26 Using the Copy menu ...29 Using the Scan menu ...30 Using the Photo Card menu ...31 Using the PictBridge menu ...32 Using the Settings menu...
Getting Started
Page 5
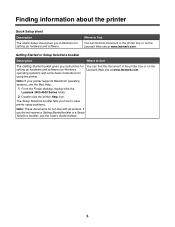
... the Lexmark Web site at www.lexmark.com. Finding information about the printer Quick Setup sheet Description The Quick Setup sheet gives you instructions for using the printer. Where to solve printer setup problems. Note: These documents do not ship with all printers. The Setup Solutions booklet tells you did not receive a Getting Started booklet or a Setup Solutions booklet, see the Mac Help: 1 From the Finder desktop, double-click the Lexmark 3500-4500 Series folder. 2 Double-click the printer Help icon...
... the Lexmark Web site at www.lexmark.com. Finding information about the printer Quick Setup sheet Description The Quick Setup sheet gives you instructions for using the printer. Where to solve printer setup problems. Note: These documents do not ship with all printers. The Setup Solutions booklet tells you did not receive a Getting Started booklet or a Setup Solutions booklet, see the Mac Help: 1 From the Finder desktop, double-click the Lexmark 3500-4500 Series folder. 2 Double-click the printer Help icon...
Getting Started
Page 6
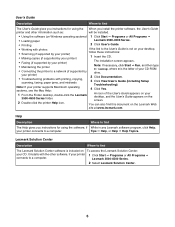
... When you instructions for using the software, if While in any Lexmark software program, click Help, your printer connects to a computer. Lexmark 3500-4500 Series. 2 Select Lexmark Solution Center. 6 Note: If your CD-ROM • Connecting the printer to find this document on your printer) 2 Click Documentation. • Troubleshooting problems with printing, copying, scanning, faxing, paper jams, and misfeeds 3 Click View User's Guide (including Setup Troubleshooting). You can also find The Help gives you install the printer software, the User's Guide printer and...
... When you instructions for using the software, if While in any Lexmark software program, click Help, your printer connects to a computer. Lexmark 3500-4500 Series. 2 Select Lexmark Solution Center. 6 Note: If your CD-ROM • Connecting the printer to find this document on your printer) 2 Click Documentation. • Troubleshooting problems with printing, copying, scanning, faxing, paper jams, and misfeeds 3 Click View User's Guide (including Setup Troubleshooting). You can also find The Help gives you install the printer software, the User's Guide printer and...
Getting Started
Page 16
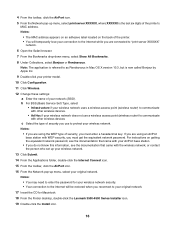
... set up your wireless network. 13 Click Submit. 14 From the Applications folder, double-click the Internet Connect icon. 15 From the toolbar, click the AirPort icon. 16 From the Network pop-up menu, select print server XXXXXX, where XXXXXX is now called Bonjour by Apple Inc. 9 Double-click your printer model. 10 Click Configuration. 11 Click Wireless. 12 Change these settings: a Enter the name of the printer's MAC address. For instructions...
... set up your wireless network. 13 Click Submit. 14 From the Applications folder, double-click the Internet Connect icon. 15 From the toolbar, click the AirPort icon. 16 From the Network pop-up menu, select print server XXXXXX, where XXXXXX is now called Bonjour by Apple Inc. 9 Double-click your printer model. 10 Click Configuration. 11 Click Wireless. 12 Change these settings: a Enter the name of the printer's MAC address. For instructions...
Getting Started
Page 34
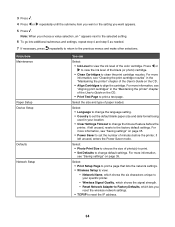
... to view the ink level of paper loaded. For more information, see "Aligning print cartridges" in your specific printer. - Select: • Print Setup Page to print a page that lists the network settings. • Wireless Setup to reset the IP address. 34 For more information, see "Cleaning the print cartridge nozzles" in the "Maintaining the printer" chapter of the User's Guide on page 35. • Power Saver to set the default blank paper size and date format being used in the "Maintaining the printer" chapter of minutes...
... to view the ink level of paper loaded. For more information, see "Aligning print cartridges" in your specific printer. - Select: • Print Setup Page to print a page that lists the network settings. • Wireless Setup to reset the IP address. 34 For more information, see "Cleaning the print cartridge nozzles" in the "Maintaining the printer" chapter of the User's Guide on page 35. • Power Saver to set the default blank paper size and date format being used in the "Maintaining the printer" chapter of minutes...
Getting Started
Page 37
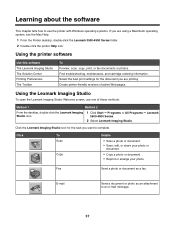
... troubleshooting, maintenance, and cartridge ordering information. Fax Send a photo or document as an attachment to an e-mail message. 37 Select the best print settings for the task you are using a Macintosh operating system, see the Mac Help: 1 From the Finder desktop, double-click the Lexmark 3500-4500 Series folder. 2 Double-click the printer Help icon. Click the Lexmark Imaging Studio icon for the document you want to use one of active Web pages. Click To Scan Copy Details • Scan a photo or document...
... troubleshooting, maintenance, and cartridge ordering information. Fax Send a photo or document as an attachment to an e-mail message. 37 Select the best print settings for the task you are using a Macintosh operating system, see the Mac Help: 1 From the Finder desktop, double-click the Lexmark 3500-4500 Series folder. 2 Double-click the printer Help icon. Click the Lexmark Imaging Studio icon for the document you want to use one of active Web pages. Click To Scan Copy Details • Scan a photo or document...
Getting Started
Page 57
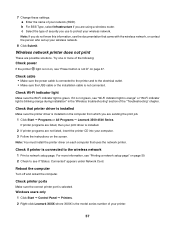
... printer ports Make sure the correct printer port is green. Windows users only 1 Click Start Œ Control Panel Œ Printers. 2 Right-click Lexmark XXXX where XXXX is blinking orange during installation" in the "Wireless troubleshooting" section of the "Troubleshooting" chapter. Note: If you are possible solutions. Check cable • Make sure the power cable is installed on the screen. Check that printer driver is installed Make sure the printer driver is connected to the printer and to the wireless network 1 Print a network setup page. 7 Change these settings: a Enter...
... printer ports Make sure the correct printer port is green. Windows users only 1 Click Start Œ Control Panel Œ Printers. 2 Right-click Lexmark XXXX where XXXX is blinking orange during installation" in the "Wireless troubleshooting" section of the "Troubleshooting" chapter. Note: If you are possible solutions. Check cable • Make sure the power cable is installed on the screen. Check that printer driver is installed Make sure the printer driver is connected to the printer and to the wireless network 1 Print a network setup page. 7 Change these settings: a Enter...
Getting Started
Page 65
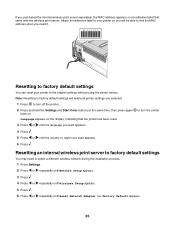
... region you want appears. 4 Press . 5 Press or until Reset Network Adapter to factory default settings You can reset your printer so you will delete all printer settings you want appears. 6 Press . Language appears on the display, indicating that came with the wireless print server. to turn off the printer. 2 Press and hold the Settings and Start Color buttons at the same time, then press again back on an adhesive label that...
... region you want appears. 4 Press . 5 Press or until Reset Network Adapter to factory default settings You can reset your printer so you will delete all printer settings you want appears. 6 Press . Language appears on the display, indicating that came with the wireless print server. to turn off the printer. 2 Press and hold the Settings and Start Color buttons at the same time, then press again back on an adhesive label that...
User's Guide
Page 3
... the printer on a network...14 Installing an internal wireless print server 14 Finding your MAC address...15 Learning about the printer 16 Understanding the parts of the printer 16 Using the control panel buttons and menus 17 Using the control panel...17 Using the Copy menu ...19 Using the Scan menu ...20 Using the Photo Card menu ...21 Using the PictBridge menu ...22 Using the Settings menu ...23 Saving settings ...25 Learning about the software 27 Using the printer software...27 Using the Lexmark Imaging Studio...27 Using the Solution Center...28 Using Printing Preferences...30 Opening...
... the printer on a network...14 Installing an internal wireless print server 14 Finding your MAC address...15 Learning about the printer 16 Understanding the parts of the printer 16 Using the control panel buttons and menus 17 Using the control panel...17 Using the Copy menu ...19 Using the Scan menu ...20 Using the Photo Card menu ...21 Using the PictBridge menu ...22 Using the Settings menu ...23 Saving settings ...25 Learning about the software 27 Using the printer software...27 Using the Lexmark Imaging Studio...27 Using the Solution Center...28 Using Printing Preferences...30 Opening...

User's Guide
Page 9
... instructions: • Making copies (if supported by your printer) • Maintaining the printer The installation screen appears. User's Guide Description Where to find this document in the printer box or on the Lexmark Web site at www.lexmark.com. 9 your printer) 2 Click View User's Guide (including Setup • Troubleshooting problems with photos If the link to a network (if supported by your printer) 1 Insert the CD. • Faxing (if supported by drive. Note: If your printer supports Macintosh operating systems, see the Mac Help...
... instructions: • Making copies (if supported by your printer) • Maintaining the printer The installation screen appears. User's Guide Description Where to find this document in the printer box or on the Lexmark Web site at www.lexmark.com. 9 your printer) 2 Click View User's Guide (including Setup • Troubleshooting problems with photos If the link to a network (if supported by your printer) 1 Insert the CD. • Faxing (if supported by drive. Note: If your printer supports Macintosh operating systems, see the Mac Help...
User's Guide
Page 14
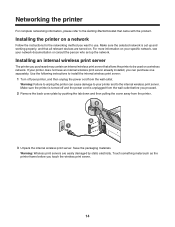
Installing an internal wireless print server The printer you touch the wireless print server. 14 Warning: Failure to unplug the printer can purchase one separately. Make sure the printer is turned off your printer, and then unplug the power cord from the wall outlet. Warning: Wireless print servers are turned on. Use the following instructions to install the internal wireless print server: 1 Turn off and the power cord is set up and working properly, and that all relevant devices are easily...
Installing an internal wireless print server The printer you touch the wireless print server. 14 Warning: Failure to unplug the printer can purchase one separately. Make sure the printer is turned off your printer, and then unplug the power cord from the wall outlet. Warning: Wireless print servers are turned on. Use the following instructions to install the internal wireless print server: 1 Turn off and the power cord is set up and working properly, and that all relevant devices are easily...
User's Guide
Page 24
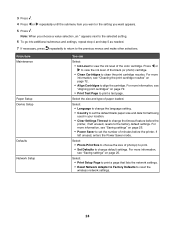
...; Print Test Page to reset the wireless network settings. 24 For more information, see "Saving settings" on page 25. • Power Saver to the factory default settings. From here Maintenance Paper Setup Device Setup Defaults Network Setup You can Select: • Ink Level to view the ink level of photo(s) to print. • Set Defaults to choose the size of the color cartridge. For more information, see "Aligning print cartridges" on page 72. • Align Cartridges to the previous menus and make other selections. Select: • Photo Print Size to change the...
...; Print Test Page to reset the wireless network settings. 24 For more information, see "Saving settings" on page 25. • Power Saver to the factory default settings. From here Maintenance Paper Setup Device Setup Defaults Network Setup You can Select: • Ink Level to view the ink level of photo(s) to print. • Set Defaults to choose the size of the color cartridge. For more information, see "Aligning print cartridges" on page 72. • Align Cartridges to the previous menus and make other selections. Select: • Photo Print Size to change the...

User's Guide
Page 27
... Lexmark 3500-4500 Series folder. 2 Double-click the printer Help icon. E-mail Send a document or photo as a fax. Fax Send a photo or document as an attachment to an e-mail message. 27 Find troubleshooting, maintenance, and cartridge ordering information. Using the Lexmark Imaging Studio To open the Lexmark Imaging Studio Welcome screen, use the printer with Windows operating systems. If you want to complete. Learning about the software This chapter tells how to use one of active Web pages. Click To Scan Copy Details • Scan a photo or document. • Save...
... Lexmark 3500-4500 Series folder. 2 Double-click the printer Help icon. E-mail Send a document or photo as a fax. Fax Send a photo or document as an attachment to an e-mail message. 27 Find troubleshooting, maintenance, and cartridge ordering information. Using the Lexmark Imaging Studio To open the Lexmark Imaging Studio Welcome screen, use the printer with Windows operating systems. If you want to complete. Learning about the software This chapter tells how to use one of active Web pages. Click To Scan Copy Details • Scan a photo or document. • Save...
User's Guide
Page 77
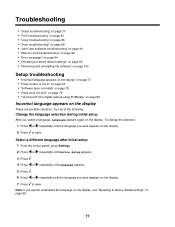
... change the selection: 1 Press or repeatedly until the language you select a language, Language appears again on the display. Troubleshooting • "Setup troubleshooting" on page 77 • "Print troubleshooting" on page 81 • "Copy troubleshooting" on page 86 • "Scan troubleshooting" on page 88 • "Jams and misfeeds troubleshooting" on page 90 • "Memory card troubleshooting" on page 92 • "Error messages" on page 94 • "Resetting to save . Note: If you want appears on the display. 7 Press to factory default settings...
... change the selection: 1 Press or repeatedly until the language you select a language, Language appears again on the display. Troubleshooting • "Setup troubleshooting" on page 77 • "Print troubleshooting" on page 81 • "Copy troubleshooting" on page 86 • "Scan troubleshooting" on page 88 • "Jams and misfeeds troubleshooting" on page 90 • "Memory card troubleshooting" on page 92 • "Error messages" on page 94 • "Resetting to save . Note: If you want appears on the display. 7 Press to factory default settings...
User's Guide
Page 81
... may have left the printer control panel Photo Size menu item setting at the edges of 4 x 6 in . You need to clear the error message. 81 to make sure your camera has a print size of the page" on page 84 • "Print speed is a PictBridge-enabled digital camera 1 Disconnect the camera. 2 Connect a PictBridge-enabled digital camera to the PictBridge port. Remove memory cards Remove any memory cards from your camera does not allow you are set . Make sure the camera...
... may have left the printer control panel Photo Size menu item setting at the edges of 4 x 6 in . You need to clear the error message. 81 to make sure your camera has a print size of the page" on page 84 • "Print speed is a PictBridge-enabled digital camera 1 Disconnect the camera. 2 Connect a PictBridge-enabled digital camera to the PictBridge port. Remove memory cards Remove any memory cards from your camera does not allow you are set . Make sure the camera...
User's Guide
Page 86
... document or photo copies" on page 86 • "Scanner unit does not close 1 Lift the scanner unit. 2 Remove any obstruction keeping the scanner unit open. 3 Lower the scanner unit. 86 they represent the ink level at a lower Quality/Speed setting. Are you print photos or graphics. The ink levels displayed in the Printing Status window when you are possible solutions. Try one or more ink than text documents, ink usage increases when you printing with a large number of the following : Check messages...
... document or photo copies" on page 86 • "Scanner unit does not close 1 Lift the scanner unit. 2 Remove any obstruction keeping the scanner unit open. 3 Lower the scanner unit. 86 they represent the ink level at a lower Quality/Speed setting. Are you print photos or graphics. The ink levels displayed in the Printing Status window when you are possible solutions. Try one or more ink than text documents, ink usage increases when you printing with a large number of the following : Check messages...
User's Guide
Page 88
... scan to print. Check Original Size setting Make sure that you are copying. Check power If the light is not on, see "Error messages" on page 78. Try one or more of the following : Check messages If an error message is displayed, see "Power button is loaded facedown on page 90 Scanner does not respond These are possible solutions. Check printer default and pause settings 1 Click: • In Windows XP (default Start menu): Start Œ Printers and Faxes. • In Windows XP (Classic Start menu): Start Œ Settings Œ Printers and Faxes...
... scan to print. Check Original Size setting Make sure that you are copying. Check power If the light is not on, see "Error messages" on page 78. Try one or more of the following : Check messages If an error message is displayed, see "Power button is loaded facedown on page 90 Scanner does not respond These are possible solutions. Check printer default and pause settings 1 Click: • In Windows XP (default Start menu): Start Œ Printers and Faxes. • In Windows XP (Classic Start menu): Start Œ Settings Œ Printers and Faxes...
User's Guide
Page 105
... Menu 18 Photo Card 18 Power 17 Right arrow 18 Scan Mode 18 Select 18 Settings 18 Start Black 19 Start Color 19 buttons, Lexmark Imaging Studio Copy 27 E-mail 27 Fax 27 Photo Greeting Cards 27 Photo Packages 27 Poster 27 Scan 27 Slideshow 27 Transfer Photos 27 using 27 View / Print Photo Library 27 C cannot print from digital camera using PictBridge 80 cannot scan to computer over network 90 cards loading 36 memory 44 printing 42 carrier jam error 95 cartridge error 94 cartridges, print aligning 72 cleaning...
... Menu 18 Photo Card 18 Power 17 Right arrow 18 Scan Mode 18 Select 18 Settings 18 Start Black 19 Start Color 19 buttons, Lexmark Imaging Studio Copy 27 E-mail 27 Fax 27 Photo Greeting Cards 27 Photo Packages 27 Poster 27 Scan 27 Slideshow 27 Transfer Photos 27 using 27 View / Print Photo Library 27 C cannot print from digital camera using PictBridge 80 cannot scan to computer over network 90 cards loading 36 memory 44 printing 42 carrier jam error 95 cartridge error 94 cartridges, print aligning 72 cleaning...
User's Guide
Page 107
...or photo copies 88 partial document or photo prints 85 partial document or photo scans 90 parts control panel 16 memory card slots 16 paper exit tray 16 paper feed guard 16 paper guide 16 paper support 16 PictBridge port 16 power supply port 17 print cartridge carrier 17 scanner glass 16 scanner unit 17 top cover 16 USB port 17 Wi-Fi indicator 16 Photo Card menu 21 photo cards, loading 36 Photo Greeting Cards button 27 photo ink low 94 Photo Library printing photos 53 scanning a photo to 65 viewing photos 53 Photo Packages 54 Photo Packages button 27 photo paper, loading 34 photo size error 99...
...or photo copies 88 partial document or photo prints 85 partial document or photo scans 90 parts control panel 16 memory card slots 16 paper exit tray 16 paper feed guard 16 paper guide 16 paper support 16 PictBridge port 16 power supply port 17 print cartridge carrier 17 scanner glass 16 scanner unit 17 top cover 16 USB port 17 Wi-Fi indicator 16 Photo Card menu 21 photo cards, loading 36 Photo Greeting Cards button 27 photo ink low 94 Photo Library printing photos 53 scanning a photo to 65 viewing photos 53 Photo Packages 54 Photo Packages button 27 photo paper, loading 34 photo size error 99...
User's Guide
Page 108
... feed paper, envelopes, or specialty media 91 printer software reinstalling 100 removing 100 using 27 printer software settings resetting to defaults 32 Printer Status dialog 29 printing all photos 50 cards 42 collated copies 41 document 39 envelopes 41 files from memory card or flash drive 43 greeting cards 42 high-quality graphics 39 index cards 42 last page first 41 multiple pages on one sheet 42 Photo Packages 54 photos by date range 51 photos by number 50 photos from digital camera using DPOF 52 photos from media device using...
... feed paper, envelopes, or specialty media 91 printer software reinstalling 100 removing 100 using 27 printer software settings resetting to defaults 32 Printer Status dialog 29 printing all photos 50 cards 42 collated copies 41 document 39 envelopes 41 files from memory card or flash drive 43 greeting cards 42 high-quality graphics 39 index cards 42 last page first 41 multiple pages on one sheet 42 Photo Packages 54 photos by date range 51 photos by number 50 photos from digital camera using DPOF 52 photos from media device using...


