
User's Guide
Page 150
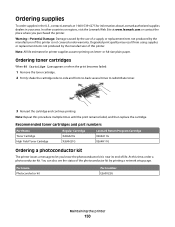
..., and then replace the cartridge. You can also see the status of the photoconductor kit by the manufacturer of life. or A4-size plain paper. Note: All life estimates for information about Lexmark authorized supplies dealers in the U.S., contact Lexmark at www.lexmark.com or contact...or regions, visit the Lexmark Web Site at 1-800-539-6275 for printer supplies assume printing on letter- Degraded print quality may result from using supplies or replacement items not produced by printing a network setup page. Part name Photoconductor kit Part number E260X22G Maintaining the...
..., and then replace the cartridge. You can also see the status of the photoconductor kit by the manufacturer of life. or A4-size plain paper. Note: All life estimates for information about Lexmark authorized supplies dealers in the U.S., contact Lexmark at www.lexmark.com or contact...or regions, visit the Lexmark Web Site at 1-800-539-6275 for printer supplies assume printing on letter- Degraded print quality may result from using supplies or replacement items not produced by printing a network setup page. Part name Photoconductor kit Part number E260X22G Maintaining the...
User's Guide
Page 153
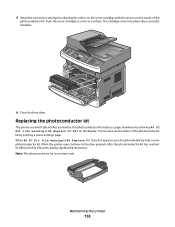
... Push the toner cartridge in as far as it will go. When 84 PC Kit life warning or 84 Replace PC Kit first appears, you before the photoconductor kit reaches a page maximum by showing 84 PC Kit life warning or 84 Replace PC Kit on the tracks of -life, print quality significantly decreases. 5 Install the new toner...
... Push the toner cartridge in as far as it will go. When 84 PC Kit life warning or 84 Replace PC Kit first appears, you before the photoconductor kit reaches a page maximum by showing 84 PC Kit life warning or 84 Replace PC Kit on the tracks of -life, print quality significantly decreases. 5 Install the new toner...
User's Guide
Page 154
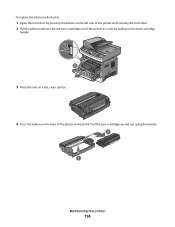
Pull the toner cartridge up and out using the handle. 2 1 Maintaining the printer 154 To replace the photoconductor kit: 1 Open the front door by pressing the button on the left side of the printer and lowering the front door. 2 Pull the photoconductor kit and toner cartridge out of the printer as a unit by pulling on the toner cartridge handle. 1 2 3 3 Place the unit on a flat, clean surface. 4 Press the button on the base of the photoconductor kit.
Pull the toner cartridge up and out using the handle. 2 1 Maintaining the printer 154 To replace the photoconductor kit: 1 Open the front door by pressing the button on the left side of the printer and lowering the front door. 2 Pull the photoconductor kit and toner cartridge out of the printer as a unit by pulling on the toner cartridge handle. 1 2 3 3 Place the unit on a flat, clean surface. 4 Press the button on the base of the photoconductor kit.
User's Guide
Page 155
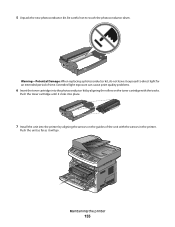
... the toner cartridge until it clicks into place. 7 Install the unit into the photoconductor kit by aligning the arrows on the toner cartridge with the arrows in the printer. Maintaining the printer 155 Be careful not to direct light for ... extended period of the unit with the tracks. Push the unit as far as it exposed to touch the photoconductor drum. Warning-Potential Damage: When replacing a photoconductor kit, do not leave it will go. Extended light exposure can cause print quality problems. 6 Insert the toner cartridge into the printer by aligning the...
... the toner cartridge until it clicks into place. 7 Install the unit into the photoconductor kit by aligning the arrows on the toner cartridge with the arrows in the printer. Maintaining the printer 155 Be careful not to direct light for ... extended period of the unit with the tracks. Push the unit as far as it exposed to touch the photoconductor drum. Warning-Potential Damage: When replacing a photoconductor kit, do not leave it will go. Extended light exposure can cause print quality problems. 6 Insert the toner cartridge into the printer by aligning the...
User's Guide
Page 156
To reset the counter, see the instruction sheet that came with the new photoconductor kit. Maintaining the printer 156 Warning-Potential Damage: Resetting the photoconductor counter without replacing the photoconductor may damage your printer and void your warranty. 9 Close the front door. 8 After you replace the photoconductor kit, reset the photoconductor counter.
To reset the counter, see the instruction sheet that came with the new photoconductor kit. Maintaining the printer 156 Warning-Potential Damage: Resetting the photoconductor counter without replacing the photoconductor may damage your printer and void your warranty. 9 Close the front door. 8 After you replace the photoconductor kit, reset the photoconductor counter.
User's Guide
Page 182
... clear the message and continue printing. Troubleshooting 182 to continue printing. 56 Standard USB port disabled Try one or more of the following: • Replace the photoconductor kit. • Press to reset the printer. • Upgrade (flash) the network firmware in the printer or print server. 54 Standard network software error Try... more of the following : • Turn the printer off, and then remove extra flash options: 1 Turn the printer off and then back on . 84 PC Kit life warning The photoconductor kit is not set to Disabled.
... clear the message and continue printing. Troubleshooting 182 to continue printing. 56 Standard USB port disabled Try one or more of the following: • Replace the photoconductor kit. • Press to reset the printer. • Upgrade (flash) the network firmware in the printer or print server. 54 Standard network software error Try... more of the following : • Turn the printer off, and then remove extra flash options: 1 Turn the printer off and then back on . 84 PC Kit life warning The photoconductor kit is not set to Disabled.
User's Guide
Page 183
... door, and then remove the photoconductor kit and toner cartridge unit. 2 Remove the jam. 3 Replace the photoconductor kit and toner cartridge unit. 4 Close the front door. 5 Press to continue printing. Install a new photoconductor kit. 88.yy Cartridge is low Replace the toner cartridge, and then press to...more of the following: • Remove Tray 1. • Open the front door, and then remove the photoconductor kit and toner cartridge. 2 Remove the jam. 3 Replace the photoconductor kit and toner cartridge if you removed it. 4 Close any open doors or trays. 5 Press to continue printing....
... door, and then remove the photoconductor kit and toner cartridge unit. 2 Remove the jam. 3 Replace the photoconductor kit and toner cartridge unit. 4 Close the front door. 5 Press to continue printing. Install a new photoconductor kit. 88.yy Cartridge is low Replace the toner cartridge, and then press to...more of the following: • Remove Tray 1. • Open the front door, and then remove the photoconductor kit and toner cartridge. 2 Remove the jam. 3 Replace the photoconductor kit and toner cartridge if you removed it. 4 Close any open doors or trays. 5 Press to continue printing....
User's Guide
Page 185
... or the number of the following: • Remove Tray 1. • Open the front door, and then remove the photoconductor kit and toner cartridge. • Remove Tray 2. 2 Remove the jam. 3 Replace the photoconductor kit and toner cartridge if you removed them. 4 Close any open doors or trays. 5 Press to feed one or more pages...
... or the number of the following: • Remove Tray 1. • Open the front door, and then remove the photoconductor kit and toner cartridge. • Remove Tray 2. 2 Remove the jam. 3 Replace the photoconductor kit and toner cartridge if you removed them. 4 Close any open doors or trays. 5 Press to feed one or more pages...

User's Guide
Page 201
... setting. 2 Before sending the job to the correct positions for the paper size loaded. Try one or more of the following : THE PHOTOCONDUCTOR KIT IS DEFECTIVE Replace the photoconductor kit. CHECK THE PAPER SIZE SETTING Make sure the paper size setting matches the paper loaded in the tray to print, specify the correct...
... setting. 2 Before sending the job to the correct positions for the paper size loaded. Try one or more of the following : THE PHOTOCONDUCTOR KIT IS DEFECTIVE Replace the photoconductor kit. CHECK THE PAPER SIZE SETTING Make sure the paper size setting matches the paper loaded in the tray to print, specify the correct...
User's Guide
Page 207
...BE EXCESS TONER IN THE PAPER PATH Contact Customer Support. Troubleshooting 207 Clear any paper you are possible solutions. THE TONER CARTRIDGE IS DEFECTIVE Replace the toner cartridge. Check the paper path around the fuser area. CAUTION-HOT SURFACE: The inside of the printer might be hot. ...SURFACE: The inside of the printer might be hot. MAKE SURE THE PAPER PATH IS CLEAR Paper could be caught between the photoconductor kit and the fuser. Streaked vertical lines These are holding the cartridge. MAKE SURE THE PAPER PATH IS CLEAR Paper could be caught between ...
...BE EXCESS TONER IN THE PAPER PATH Contact Customer Support. Troubleshooting 207 Clear any paper you are possible solutions. THE TONER CARTRIDGE IS DEFECTIVE Replace the toner cartridge. Check the paper path around the fuser area. CAUTION-HOT SURFACE: The inside of the printer might be hot. ...SURFACE: The inside of the printer might be hot. MAKE SURE THE PAPER PATH IS CLEAR Paper could be caught between the photoconductor kit and the fuser. Streaked vertical lines These are holding the cartridge. MAKE SURE THE PAPER PATH IS CLEAR Paper could be caught between ...
User's Guide
Page 228
... Paper jam 185 290-292 ADF Scanning Jams 185 293 Paper Missing 185 293.02 Flatbed Cover Open 185 294 ADF Jam 186 31.yy Replace defective or missing cartridge 180 34 Short paper 180 35 Insufficient memory to support Resource Save feature 180 37 Insufficient memory for Flash Memory Defragment... installing 22 56 Standard USB port disabled 182 58 Too many flash options installed 182 58 Too many trays attached 182 84 PC Kit life warning 182 84 Replace PC Kit 183 840.01 Scanner Disabled 186 840.02 Scanner Auto Disabled 186 88.yy Cartridge is low 183 A Active NIC menu 117...
... Paper jam 185 290-292 ADF Scanning Jams 185 293 Paper Missing 185 293.02 Flatbed Cover Open 185 294 ADF Jam 186 31.yy Replace defective or missing cartridge 180 34 Short paper 180 35 Insufficient memory to support Resource Save feature 180 37 Insufficient memory for Flash Memory Defragment... installing 22 56 Standard USB port disabled 182 58 Too many flash options installed 182 58 Too many trays attached 182 84 PC Kit life warning 182 84 Replace PC Kit 183 840.01 Scanner Disabled 186 840.02 Scanner Auto Disabled 186 88.yy Cartridge is low 183 A Active NIC menu 117...
User's Guide
Page 231
... load 57 Paper Weight menu 113 pausing the current print job to make copies 76, 192 PCL Emul menu 141 PDF menu 141 photoconductor kit ordering 150 replacing 153 photos copying 70 PostScript menu 141 Power Saver 178 adjusting 37 print job canceling from Macintosh 67 canceling from printer control panel 67... Paper jam 185 290-292 ADF Scanning Jams 185 293 Paper Missing 185 293.02 Flatbed Cover Open 185 294 ADF Jam 186 31.yy Replace defective or missing cartridge 180 34 Short paper 180 35 Insufficient memory to support Resource Save feature 180 37 Insufficient memory for Flash Memory Defragment...
... load 57 Paper Weight menu 113 pausing the current print job to make copies 76, 192 PCL Emul menu 141 PDF menu 141 photoconductor kit ordering 150 replacing 153 photos copying 70 PostScript menu 141 Power Saver 178 adjusting 37 print job canceling from Macintosh 67 canceling from printer control panel 67... Paper jam 185 290-292 ADF Scanning Jams 185 293 Paper Missing 185 293.02 Flatbed Cover Open 185 294 ADF Jam 186 31.yy Replace defective or missing cartridge 180 34 Short paper 180 35 Insufficient memory to support Resource Save feature 180 37 Insufficient memory for Flash Memory Defragment...
User's Guide
Page 232
...56 Standard USB port disabled 182 58 Too many flash options installed 182 58 Too many trays attached 182 84 PC Kit life warning 182 84 Replace PC Kit 183 840.01 Scanner Disabled 186 840.02 Scanner Auto Disabled 186 88.yy Cartridge is low 183 Answering 176 ...recommended print side 55 recycled paper using 56 recycling 213 Lexmark packaging 38 Lexmark products 38 toner cartridges 38 WEEE statement 212 reducing a copy 73 Index 232 Remove packaging material, check 179 Remove paper from standard output bin 179 replacing photoconductor kit 153 toner cartridge 151 reports viewing 158 Reports menu 116...
...56 Standard USB port disabled 182 58 Too many flash options installed 182 58 Too many trays attached 182 84 PC Kit life warning 182 84 Replace PC Kit 183 840.01 Scanner Disabled 186 840.02 Scanner Auto Disabled 186 88.yy Cartridge is low 183 Answering 176 ...recommended print side 55 recycled paper using 56 recycling 213 Lexmark packaging 38 Lexmark products 38 toner cartridges 38 WEEE statement 212 reducing a copy 73 Index 232 Remove packaging material, check 179 Remove paper from standard output bin 179 replacing photoconductor kit 153 toner cartridge 151 reports viewing 158 Reports menu 116...
User's Guide
Page 233
...148 supplies conserving 35 status of 149 storing 148 using recycled paper 35 supplies, ordering ADF pick assembly 151 ADF separator roll 151 photoconductor kit 150 toner cartridges 150 supply notifications configuring 159 T TCP/IP menu 119 telecommunication notices 215, 216, 217, 218 tips card stock ...65 envelopes 64 labels, paper 64 letterhead 62 transparencies 63 toner cartridge replacing 151 toner cartridges ordering 150 recycling 38 Toner is low 179 transparencies copying to 70 loading 46 tips 63 tray linking 52, 53 tray...
...148 supplies conserving 35 status of 149 storing 148 using recycled paper 35 supplies, ordering ADF pick assembly 151 ADF separator roll 151 photoconductor kit 150 toner cartridges 150 supply notifications configuring 159 T TCP/IP menu 119 telecommunication notices 215, 216, 217, 218 tips card stock ...65 envelopes 64 labels, paper 64 letterhead 62 transparencies 63 toner cartridge replacing 151 toner cartridges ordering 150 recycling 38 Toner is low 179 transparencies copying to 70 loading 46 tips 63 tray linking 52, 53 tray...
Maintenance Guide
Page 2
Contents Maintaining the printer 3 Cleaning the exterior of the printer...3 Cleaning the scanner glass...3 Cleaning the ADF separator rollers...4 Storing supplies...5 Checking the status of supplies from a network computer 5 Moving the printer to another location...6 Shipping the printer...6 Ordering supplies...7 Ordering toner cartridges...7 Ordering a photoconductor kit...7 Ordering ADF replacement parts...8 Replacing supplies...8 Replacing the toner cartridge...8 Replacing the photoconductor kit...10 Contents 2
Contents Maintaining the printer 3 Cleaning the exterior of the printer...3 Cleaning the scanner glass...3 Cleaning the ADF separator rollers...4 Storing supplies...5 Checking the status of supplies from a network computer 5 Moving the printer to another location...6 Shipping the printer...6 Ordering supplies...7 Ordering toner cartridges...7 Ordering a photoconductor kit...7 Ordering ADF replacement parts...8 Replacing supplies...8 Replacing the toner cartridge...8 Replacing the photoconductor kit...10 Contents 2

Maintenance Guide
Page 7
... toner cartridges and part numbers Part Name Toner Cartridge High Yield Toner Cartridge Regular Cartridge X264A21G X264H21G Lexmark Return Program Cartridge X264A11G X264H11G Ordering a photoconductor kit The printer issues a message to redistribute toner. 3 Reinsert the cartridge and continue printing. Degraded print...near its end of this procedure multiple times until the print remains faded, and then replace the cartridge. You can also see the status of the photoconductor kit by the manufacturer of life. Ordering toner cartridges When 88 Cartridge Low appears or when...
... toner cartridges and part numbers Part Name Toner Cartridge High Yield Toner Cartridge Regular Cartridge X264A21G X264H21G Lexmark Return Program Cartridge X264A11G X264H11G Ordering a photoconductor kit The printer issues a message to redistribute toner. 3 Reinsert the cartridge and continue printing. Degraded print...near its end of this procedure multiple times until the print remains faded, and then replace the cartridge. You can also see the status of the photoconductor kit by the manufacturer of life. Ordering toner cartridges When 88 Cartridge Low appears or when...

Maintenance Guide
Page 10
... also see the status of -life, print quality significantly decreases. Maintaining the printer 10 Replacing the photoconductor kit The printer automatically notifies you should immediately order a new photoconductor kit. 5 Install the new toner cartridge by aligning the rollers on the toner cartridge with ...front door. When 84 PC Kit life warning or 84 Replace PC Kit first appears, you before the photoconductor kit reaches a page maximum by showing 84 PC Kit life warning or 84 Replace PC Kit on the tracks of the photoconductor kit. Note: The photoconductor kit is one item only. While...
... also see the status of -life, print quality significantly decreases. Maintaining the printer 10 Replacing the photoconductor kit The printer automatically notifies you should immediately order a new photoconductor kit. 5 Install the new toner cartridge by aligning the rollers on the toner cartridge with ...front door. When 84 PC Kit life warning or 84 Replace PC Kit first appears, you before the photoconductor kit reaches a page maximum by showing 84 PC Kit life warning or 84 Replace PC Kit on the tracks of the photoconductor kit. Note: The photoconductor kit is one item only. While...

Maintenance Guide
Page 11
To replace the photoconductor kit: 1 Open the front door by pressing the button on the left side of the printer and lowering the front door. 2 Pull the photoconductor kit and toner cartridge out of the printer as a unit by pulling on the toner cartridge handle. 3 Place the unit on a flat, clean surface. 4 Press the button on the base of the photoconductor kit. Pull the toner cartridge up and out using the handle. Maintaining the printer 11
To replace the photoconductor kit: 1 Open the front door by pressing the button on the left side of the printer and lowering the front door. 2 Pull the photoconductor kit and toner cartridge out of the printer as a unit by pulling on the toner cartridge handle. 3 Place the unit on a flat, clean surface. 4 Press the button on the base of the photoconductor kit. Pull the toner cartridge up and out using the handle. Maintaining the printer 11
Maintenance Guide
Page 12
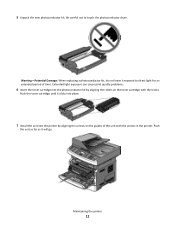
...aligning the rollers on the guides of time. Push the toner cartridge until it clicks into place. 7 Install the unit into the photoconductor kit by aligning the arrows on the toner cartridge with the arrows in the printer. Be careful not to direct light for an extended period... of the unit with the tracks. Warning-Potential Damage: When replacing a photoconductor kit, do not leave it will go. Maintaining the printer 12 5 Unpack the new photoconductor kit. Push the unit as far as it exposed to touch the photoconductor drum.
...aligning the rollers on the guides of time. Push the toner cartridge until it clicks into place. 7 Install the unit into the photoconductor kit by aligning the arrows on the toner cartridge with the arrows in the printer. Be careful not to direct light for an extended period... of the unit with the tracks. Warning-Potential Damage: When replacing a photoconductor kit, do not leave it will go. Maintaining the printer 12 5 Unpack the new photoconductor kit. Push the unit as far as it exposed to touch the photoconductor drum.
Maintenance Guide
Page 13
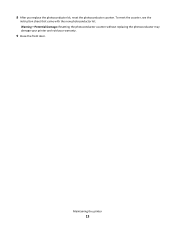
Warning-Potential Damage: Resetting the photoconductor counter without replacing the photoconductor may damage your printer and void your warranty. 9 Close the front door. Maintaining the printer 13 To reset the counter, see the instruction sheet that came with the new photoconductor kit. 8 After you replace the photoconductor kit, reset the photoconductor counter.
Warning-Potential Damage: Resetting the photoconductor counter without replacing the photoconductor may damage your printer and void your warranty. 9 Close the front door. Maintaining the printer 13 To reset the counter, see the instruction sheet that came with the new photoconductor kit. 8 After you replace the photoconductor kit, reset the photoconductor counter.


