Technical Reference
Page 57
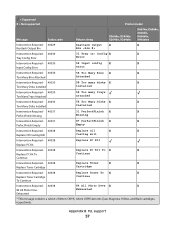
... PC Kit Replace PC Kit Intervention Required - 40038 Replace PC Kit To X X Replace PC Kit To Continue Continue Intervention Required - 40038 Replace Toner X X Replace Toner Cartridge Cartridge Intervention Required - 40038 Replace Toner To X X Replace Toner Cartridge Continue To Continue Intervention Required - 40038 84 All Photo Devs X X 84 All Photo Devs Exhausted Exhausted * This message contains a subset of...
... PC Kit Replace PC Kit Intervention Required - 40038 Replace PC Kit To X X Replace PC Kit To Continue Continue Intervention Required - 40038 Replace Toner X X Replace Toner Cartridge Cartridge Intervention Required - 40038 Replace Toner To X X Replace Toner Cartridge Continue To Continue Intervention Required - 40038 84 All Photo Devs X X 84 All Photo Devs Exhausted Exhausted * This message contains a subset of...
Technical Reference
Page 66
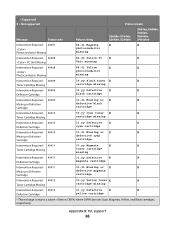
... Intervention Required - 40409 30.yy Black toner X X Toner Cartridge Missing cartridge missing Intervention Required - 40409 31.yy Defective X X Defective Cartridge black cartridge Intervention Required - 40409 31.41 Missing or X X Missing or Defective Cartridge defective black cartridge Intervention Required - 40410 30.yy Cyan toner X X Toner Cartridge Missing cartridge missing Intervention Required - 40410 31.yy Defective X X Defective Cartridge cyan cartridge Intervention Required - 40410 31.41 Missing...
... Intervention Required - 40409 30.yy Black toner X X Toner Cartridge Missing cartridge missing Intervention Required - 40409 31.yy Defective X X Defective Cartridge black cartridge Intervention Required - 40409 31.41 Missing or X X Missing or Defective Cartridge defective black cartridge Intervention Required - 40410 30.yy Cyan toner X X Toner Cartridge Missing cartridge missing Intervention Required - 40410 31.yy Defective X X Defective Cartridge cyan cartridge Intervention Required - 40410 31.41 Missing...

Card Stock & Label Guide
Page 11
...fuse grade. The auto compensator has two rollers that could cause nesting and tenting should fall outside of Lexmark specifications • use of non-Lexmark supplies (such as toner cartridges and/or inkjet cartridges) • use micro-perfs to embossments results in .) on both sides of a product. This ... embossing materials. Printing too close to avoid nesting problems. For more reliably than the corner buckler system used by any unauthorized (non-Lexmark) servicer • operation of a product beyond the limit of its duty cycle • failure to nesting and double-sheet feeds,...
...fuse grade. The auto compensator has two rollers that could cause nesting and tenting should fall outside of Lexmark specifications • use of non-Lexmark supplies (such as toner cartridges and/or inkjet cartridges) • use micro-perfs to embossments results in .) on both sides of a product. This ... embossing materials. Printing too close to avoid nesting problems. For more reliably than the corner buckler system used by any unauthorized (non-Lexmark) servicer • operation of a product beyond the limit of its duty cycle • failure to nesting and double-sheet feeds,...
Card Stock & Label Guide
Page 130
... the fuser cleaner shipped with the 4039 print cartridges. 3 Print 5 more sheets of paper dust, debris, and chaff. Using third party, non-Lexmark cartridges and fuser cleaners can result in toner build-up in your Optra and Optra plus laser printers that come with Diamond FineTM toner cartridges (P/N 1382100 or 1382150) when duplexing. • Note that...
... the fuser cleaner shipped with the 4039 print cartridges. 3 Print 5 more sheets of paper dust, debris, and chaff. Using third party, non-Lexmark cartridges and fuser cleaners can result in toner build-up in your Optra and Optra plus laser printers that come with Diamond FineTM toner cartridges (P/N 1382100 or 1382150) when duplexing. • Note that...
Maintenance Guide
Page 2
Contents Maintaining the printer 3 Cleaning the exterior of the printer...3 Cleaning the scanner glass...3 Cleaning the ADF separator rollers...4 Storing supplies...5 Checking the status of supplies from a network computer 5 Moving the printer to another location...6 Shipping the printer...6 Ordering supplies...7 Ordering toner cartridges...7 Ordering a photoconductor kit...7 Ordering ADF replacement parts...8 Replacing supplies...8 Replacing the toner cartridge...8 Replacing the photoconductor kit...10 Contents 2
Contents Maintaining the printer 3 Cleaning the exterior of the printer...3 Cleaning the scanner glass...3 Cleaning the ADF separator rollers...4 Storing supplies...5 Checking the status of supplies from a network computer 5 Moving the printer to another location...6 Shipping the printer...6 Ordering supplies...7 Ordering toner cartridges...7 Ordering a photoconductor kit...7 Ordering ADF replacement parts...8 Replacing supplies...8 Replacing the toner cartridge...8 Replacing the photoconductor kit...10 Contents 2

Maintenance Guide
Page 7
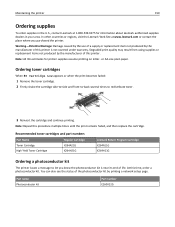
Recommended toner cartridges and part numbers Part Name Toner Cartridge High Yield Toner Cartridge Regular Cartridge X264A21G X264H21G Lexmark Return Program Cartridge X264A11G X264H11G Ordering a photoconductor kit The printer issues a message to redistribute toner. 3 Reinsert the cartridge and continue printing. Degraded print quality may result from using supplies or replacement items not produced by the manufacturer of this printer is near its...
Recommended toner cartridges and part numbers Part Name Toner Cartridge High Yield Toner Cartridge Regular Cartridge X264A21G X264H21G Lexmark Return Program Cartridge X264A11G X264H11G Ordering a photoconductor kit The printer issues a message to redistribute toner. 3 Reinsert the cartridge and continue printing. Degraded print quality may result from using supplies or replacement items not produced by the manufacturer of this printer is near its...

Maintenance Guide
Page 8
...experience problems with paper double-feeding or failing to redistribute the toner, and then reinsert it and continue printing. To replace the toner cartridge: 1 Open the front door by pressing the button on the left in your cartridge by printing a menu settings page. Part name ADF input ...tray ADF separator pad ADF separator roll Part number 40X5470 40X5472 40X5471 Replacing supplies Replacing the toner cartridge When 88 Cartridge is left side of the printer and lowering...
...experience problems with paper double-feeding or failing to redistribute the toner, and then reinsert it and continue printing. To replace the toner cartridge: 1 Open the front door by pressing the button on the left in your cartridge by printing a menu settings page. Part name ADF input ...tray ADF separator pad ADF separator roll Part number 40X5470 40X5472 40X5471 Replacing supplies Replacing the toner cartridge When 88 Cartridge is left side of the printer and lowering...

Maintenance Guide
Page 9
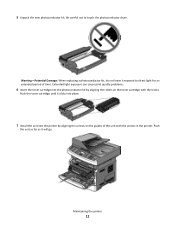
Maintaining the printer 9 2 Press the button on the base of the photoconductor kit, and then pull the toner cartridge out using the handle. 3 Unpack the new toner cartridge. 4 Shake the cartridge in all directions to distribute the toner.
Maintaining the printer 9 2 Press the button on the base of the photoconductor kit, and then pull the toner cartridge out using the handle. 3 Unpack the new toner cartridge. 4 Shake the cartridge in all directions to distribute the toner.

Maintenance Guide
Page 10
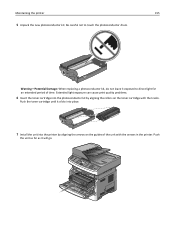
... should immediately order a new photoconductor kit. Note: The photoconductor kit is one item only. Maintaining the printer 10 The cartridge clicks into place when correctly installed. 6 Close the front door. Push the toner cartridge in as far as it will go. You can also see the status of the photoconductor kit by showing... life warning or 84 Replace PC Kit first appears, you before the photoconductor kit reaches a page maximum by printing a menu settings page. 5 Install the new toner cartridge by aligning the rollers on the toner cartridge with the arrows on the display.
... should immediately order a new photoconductor kit. Note: The photoconductor kit is one item only. Maintaining the printer 10 The cartridge clicks into place when correctly installed. 6 Close the front door. Push the toner cartridge in as far as it will go. You can also see the status of the photoconductor kit by showing... life warning or 84 Replace PC Kit first appears, you before the photoconductor kit reaches a page maximum by printing a menu settings page. 5 Install the new toner cartridge by aligning the rollers on the toner cartridge with the arrows on the display.

Maintenance Guide
Page 11
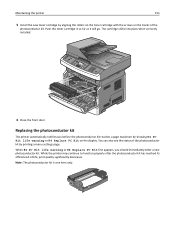
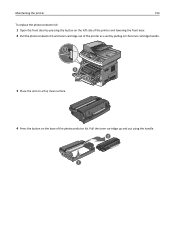
Pull the toner cartridge up and out using the handle. To replace the photoconductor kit: 1 Open the front door by pressing the button on the left side of the printer and lowering the front door. 2 Pull the photoconductor kit and toner cartridge out of the printer as a unit by pulling on the toner cartridge handle. 3 Place the unit on a flat, clean surface. 4 Press the button on the base of the photoconductor kit. Maintaining the printer 11
Pull the toner cartridge up and out using the handle. To replace the photoconductor kit: 1 Open the front door by pressing the button on the left side of the printer and lowering the front door. 2 Pull the photoconductor kit and toner cartridge out of the printer as a unit by pulling on the toner cartridge handle. 3 Place the unit on a flat, clean surface. 4 Press the button on the base of the photoconductor kit. Maintaining the printer 11
Maintenance Guide
Page 12
... it clicks into place. 7 Install the unit into the photoconductor kit by aligning the arrows on the toner cartridge with the arrows in the printer. Extended light exposure can cause print quality problems. 6 Insert the toner cartridge into the printer by aligning the rollers on the guides of time. Push the unit as far...
... it clicks into place. 7 Install the unit into the photoconductor kit by aligning the arrows on the toner cartridge with the arrows in the printer. Extended light exposure can cause print quality problems. 6 Insert the toner cartridge into the printer by aligning the rollers on the guides of time. Push the unit as far...

User's Guide
Page 37
... Recycling Lexmark products To return Lexmark products to Lexmark for recycling: 1 Visit our Web site at www.lexmark.com/recycle. 2 From the Toner Cartridges section, select your country from the list. 3 Follow the instructions on the computer screen. Expanded polystyrene (EPS) foam used cartridges to return the cartridges are 100% recyclable where corrugated recycling facilities exist. Returning Lexmark cartridges for...
... Recycling Lexmark products To return Lexmark products to Lexmark for recycling: 1 Visit our Web site at www.lexmark.com/recycle. 2 From the Toner Cartridges section, select your country from the list. 3 Follow the instructions on the computer screen. Expanded polystyrene (EPS) foam used cartridges to return the cartridges are 100% recyclable where corrugated recycling facilities exist. Returning Lexmark cartridges for...
User's Guide
Page 150
... kit is not covered under warranty. Degraded print quality may result from using supplies or replacement items not produced by printing a network setup page. Recommended toner cartridges and part numbers Part Name Regular Cartridge Toner Cartridge High Yield Toner Cartridge X264A21G X264H21G Lexmark Return Program Cartridge X264A11G X264H11G Ordering a photoconductor kit The printer issues a message to redistribute...
... kit is not covered under warranty. Degraded print quality may result from using supplies or replacement items not produced by printing a network setup page. Recommended toner cartridges and part numbers Part Name Regular Cartridge Toner Cartridge High Yield Toner Cartridge X264A21G X264H21G Lexmark Return Program Cartridge X264A11G X264H11G Ordering a photoconductor kit The printer issues a message to redistribute...

User's Guide
Page 151
... the printer 151 Ordering ADF replacement parts Order ADF replacement parts if you experience faded print, remove the toner cartridge. When shaking the cartridge no longer improves the print quality, replace the toner cartridge. To replace the toner cartridge: 1 Open the front door by printing a menu settings page. Note: You can check to see approximately how much...
... the printer 151 Ordering ADF replacement parts Order ADF replacement parts if you experience faded print, remove the toner cartridge. When shaking the cartridge no longer improves the print quality, replace the toner cartridge. To replace the toner cartridge: 1 Open the front door by printing a menu settings page. Note: You can check to see approximately how much...

User's Guide
Page 152
Maintaining the printer 152 2 Press the button on the base of the photoconductor kit, and then pull the toner cartridge out using the handle. 1 2 3 Unpack the new toner cartridge. 4 Shake the cartridge in all directions to distribute the toner.
Maintaining the printer 152 2 Press the button on the base of the photoconductor kit, and then pull the toner cartridge out using the handle. 1 2 3 Unpack the new toner cartridge. 4 Shake the cartridge in all directions to distribute the toner.
User's Guide
Page 153
Push the toner cartridge in as far as it will go. Replacing the photoconductor kit The printer automatically notifies you should immediately order a new photoconductor kit. The cartridge clicks into place when correctly installed. 6 Close the front door. When 84 PC Kit life warning or 84 Replace PC Kit first appears, you before ... Kit life warning or 84 Replace PC Kit on the tracks of ‑life, print quality significantly decreases. Maintaining the printer 153 5 Install the new toner cartridge by aligning the rollers on the toner cartridge with the arrows on the display.
Push the toner cartridge in as far as it will go. Replacing the photoconductor kit The printer automatically notifies you should immediately order a new photoconductor kit. The cartridge clicks into place when correctly installed. 6 Close the front door. When 84 PC Kit life warning or 84 Replace PC Kit first appears, you before ... Kit life warning or 84 Replace PC Kit on the tracks of ‑life, print quality significantly decreases. Maintaining the printer 153 5 Install the new toner cartridge by aligning the rollers on the toner cartridge with the arrows on the display.
User's Guide
Page 154
Maintaining the printer 154 To replace the photoconductor kit: 1 Open the front door by pressing the button on the left side of the printer and lowering the front door. 2 Pull the photoconductor kit and toner cartridge out of the printer as a unit by pulling on the toner cartridge handle. 1 2 3 3 Place the unit on a flat, clean surface. 4 Press the button on the base of the photoconductor kit. Pull the toner cartridge up and out using the handle. 2 1
Maintaining the printer 154 To replace the photoconductor kit: 1 Open the front door by pressing the button on the left side of the printer and lowering the front door. 2 Pull the photoconductor kit and toner cartridge out of the printer as a unit by pulling on the toner cartridge handle. 1 2 3 3 Place the unit on a flat, clean surface. 4 Press the button on the base of the photoconductor kit. Pull the toner cartridge up and out using the handle. 2 1
User's Guide
Page 155
...: When replacing a photoconductor kit, do not leave it exposed to touch the photoconductor drum. Push the toner cartridge until it will go. Extended light exposure can cause print quality problems. 6 Insert the toner cartridge into the printer by aligning the rollers on the guides of time. Push the unit as far as... it clicks into place. 7 Install the unit into the photoconductor kit by aligning the arrows on the toner cartridge with the arrows in the printer. Be careful not to direct light for an extended period of the unit with the tracks.
...: When replacing a photoconductor kit, do not leave it exposed to touch the photoconductor drum. Push the toner cartridge until it will go. Extended light exposure can cause print quality problems. 6 Insert the toner cartridge into the printer by aligning the rollers on the guides of time. Push the unit as far as... it clicks into place. 7 Install the unit into the photoconductor kit by aligning the arrows on the toner cartridge with the arrows in the printer. Be careful not to direct light for an extended period of the unit with the tracks.

User's Guide
Page 158
... Settings. 3 Under Other Settings, click Security. 4 Click Web Page Password Protect. Determine which password will be prompted to see tray settings, the level of toner in the toner cartridge, the percentage of life remaining in the photoconductor kit, and capacity measurements of the printer, then print a network setup page and locate the IP...
... Settings. 3 Under Other Settings, click Security. 4 Click Web Page Password Protect. Determine which password will be prompted to see tray settings, the level of toner in the toner cartridge, the percentage of life remaining in the photoconductor kit, and capacity measurements of the printer, then print a network setup page and locate the IP...

User's Guide
Page 161
... then press . If Jam Recovery is set to access jam locations. See "Jam message numbers and how to open the front door. Inside are the toner cartridge and photoconductor kit. 2 Standard exit bin 3 Front door 4 Multipurpose or manual feeder door Note: Some printer models have a multipurpose feeder and some have a manual feeder...
... then press . If Jam Recovery is set to access jam locations. See "Jam message numbers and how to open the front door. Inside are the toner cartridge and photoconductor kit. 2 Standard exit bin 3 Front door 4 Multipurpose or manual feeder door Note: Some printer models have a multipurpose feeder and some have a manual feeder...


