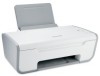
User's Guide
Page 3
Contents Safety information 7 Introduction 8 Finding information about the printer...8 Setting up the printer 10 Bypassing security warnings during software installation 10 Setting up the printer as a copier only...10 Understanding the parts of the printer...15 Using the printer control panel...17 Understanding the printer software 19 Installing printer software...19 Installing the optional XPS driver (Windows Vista users only 19...
Contents Safety information 7 Introduction 8 Finding information about the printer...8 Setting up the printer 10 Bypassing security warnings during software installation 10 Setting up the printer as a copier only...10 Understanding the parts of the printer...15 Using the printer control panel...17 Understanding the printer software 19 Installing printer software...19 Installing the optional XPS driver (Windows Vista users only 19...
User's Guide
Page 4
... Canceling scan jobs...41 Faxing 42 Sending a fax...42 Receiving a fax automatically...42 Maintaining the printer 44 Maintaining print cartridges...44 Installing print cartridges...44 Removing used print cartridges...45 Refilling print cartridges...46 Using genuine Lexmark print cartridges...46 Wiping the print cartridge nozzles and contacts ...46 Preserving the print cartridges ...47...
... Canceling scan jobs...41 Faxing 42 Sending a fax...42 Receiving a fax automatically...42 Maintaining the printer 44 Maintaining print cartridges...44 Installing print cartridges...44 Removing used print cartridges...45 Refilling print cartridges...46 Using genuine Lexmark print cartridges...46 Wiping the print cartridge nozzles and contacts ...46 Preserving the print cartridges ...47...
User's Guide
Page 8
... instructions for using the printer. The electronic version installs automatically with printed publications. Support in English: Monday-Friday (8:00 AM-11:00 PM EST), Saturday (Noon-6:00 PM EST) Telephone numbers and support hours vary by country or region. Introduction Finding information about contacting Lexmark, see the printed warranty statement that came with...
... instructions for using the printer. The electronic version installs automatically with printed publications. Support in English: Monday-Friday (8:00 AM-11:00 PM EST), Saturday (Noon-6:00 PM EST) Telephone numbers and support hours vary by country or region. Introduction Finding information about contacting Lexmark, see the printed warranty statement that came with...
User's Guide
Page 10
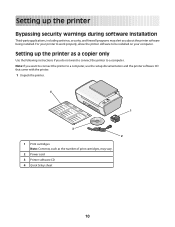
... Setup sheet 10 Note: If you do not want to connect the printer to be installed on your printer to work properly, allow the printer software to a computer, use the setup documentation and the printer software CD that came with the printer. 1 Unpack the printer. 4 1 2 1 3 3 2 1 Print cartridges Note: Contents, such as a copier only Use the following instructions...
... Setup sheet 10 Note: If you do not want to connect the printer to be installed on your printer to work properly, allow the printer software to a computer, use the setup documentation and the printer software CD that came with the printer. 1 Unpack the printer. 4 1 2 1 3 3 2 1 Print cartridges Note: Contents, such as a copier only Use the following instructions...
User's Guide
Page 16
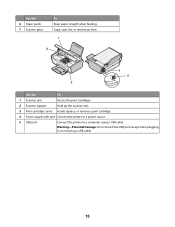
Copy, scan, fax, or remove an item. 1 2 4 5 3 Use the To 1 Scanner unit Access the print cartridges. 2 Scanner support Hold up the scanner unit. 3 Print cartridge carrier Install, replace, or remove a print cartridge. 4 Power supply with port Connect the printer to a power source. 5 USB port Connect the printer to a computer using a USB cable. Warning-Potential Damage: Do not touch the USB port except when plugging in or removing a USB cable. 16 Use the 6 Paper guide 7 Scanner glass To Keep paper straight when feeding.
Copy, scan, fax, or remove an item. 1 2 4 5 3 Use the To 1 Scanner unit Access the print cartridges. 2 Scanner support Hold up the scanner unit. 3 Print cartridge carrier Install, replace, or remove a print cartridge. 4 Power supply with port Connect the printer to a power source. 5 USB port Connect the printer to a computer using a USB cable. Warning-Potential Damage: Do not touch the USB port except when plugging in or removing a USB cable. 16 Use the 6 Paper guide 7 Scanner glass To Keep paper straight when feeding.

User's Guide
Page 19
...Lexmark Web site at www.lexmark.com. 2 From the home page, navigate through the menu selection, and then click Drivers & Downloads. 3 Choose the printer and the printer driver for Windows Vista users. To use of the advanced XPS color and graphics features that automatically appears. 4 Double-click the Install...Computer. 19 Understanding the printer software Installing printer software Using Windows 1 Close all open software programs. 2 Insert the printer software CD. 3 From the main installation screen, click Install. 4 Follow the instructions on the computer. To install the patch, you ...
...Lexmark Web site at www.lexmark.com. 2 From the home page, navigate through the menu selection, and then click Drivers & Downloads. 3 Choose the printer and the printer driver for Windows Vista users. To use of the advanced XPS color and graphics features that automatically appears. 4 Double-click the Install...Computer. 19 Understanding the printer software Installing printer software Using Windows 1 Close all open software programs. 2 Insert the printer software CD. 3 From the main installation screen, click Install. 4 Follow the instructions on the computer. To install the patch, you ...
User's Guide
Page 20
Follow the instructions on all printers. Note: Not all the necessary software was installed. Use the LexmarkTM Productivity Studio or Lexmark FastPics Lexmark Fax Solutions Software To • Scan, copy, fax, e-mail, or print a photo or document. • Transfer photos. • Make ...Disk dialog appears. 6 Click Browse, and then navigate to your printer model number, and then double-click Drivers. d Double-click xps, and then click Open. Use the Lexmark Fax Setup Utility to finish installing the patch. e From the Install From Disk dialog, click OK. 7 Click Next on your computer...
Follow the instructions on all printers. Note: Not all the necessary software was installed. Use the LexmarkTM Productivity Studio or Lexmark FastPics Lexmark Fax Solutions Software To • Scan, copy, fax, e-mail, or print a photo or document. • Transfer photos. • Make ...Disk dialog appears. 6 Click Browse, and then navigate to your printer model number, and then double-click Drivers. d Double-click xps, and then click Open. Use the Lexmark Fax Setup Utility to finish installing the patch. e From the Install From Disk dialog, click OK. 7 Click Next on your computer...
User's Guide
Page 21
...; Add a watermark. • Enhance images. • Save settings. • Set up the wireless printer on the computer. Use the Printing Preferences Lexmark Wireless Setup Utility To When you select File Œ Print with the printer software during installation. These applications are also installed with a document open, a Printing Preferences dialog appears. Applications are saved in the...
...; Add a watermark. • Enhance images. • Save settings. • Set up the wireless printer on the computer. Use the Printing Preferences Lexmark Wireless Setup Utility To When you select File Œ Print with the printer software during installation. These applications are also installed with a document open, a Printing Preferences dialog appears. Applications are saved in the...
User's Guide
Page 22
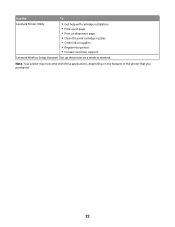
Note: Your printer may not come with cartridge installation. • Print a test page. • Print an alignment page. • Clean the print cartridge nozzles. • Order ink or supplies. • Register the printer. • Contact customer support. Lexmark Wireless Setup Assistant Set up the printer on the features of the printer that you purchased. 22 Use the To Lexmark Printer Utility • Get help with these applications, depending on a wireless network.
Note: Your printer may not come with cartridge installation. • Print a test page. • Print an alignment page. • Clean the print cartridge nozzles. • Order ink or supplies. • Register the printer. • Contact customer support. Lexmark Wireless Setup Assistant Set up the printer on the features of the printer that you purchased. 22 Use the To Lexmark Printer Utility • Get help with these applications, depending on a wireless network.
User's Guide
Page 28
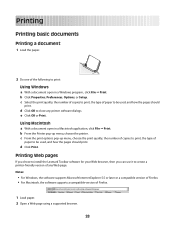
... program , click File ΠPrint. b Click Properties, Preferences, Options, or Setup. d Click Print. Printing Web pages If you chose to install the Lexmark Toolbar software for your Web browser, then you can use it to be used , and how the pages should print. Using Macintosh a With a ... a Macintosh application, click File ΠPrint. c From the print options pop-up menu, choose the printer. c Select the print quality, the number of copies to print, the type of paper to create a printer-friendly version of Firefox. 1 Load paper. 2 Open a Web page using a supported browser. 28 b ...
... program , click File ΠPrint. b Click Properties, Preferences, Options, or Setup. d Click Print. Printing Web pages If you chose to install the Lexmark Toolbar software for your Web browser, then you can use it to be used , and how the pages should print. Using Macintosh a With a ... a Macintosh application, click File ΠPrint. c From the print options pop-up menu, choose the printer. c Select the print quality, the number of copies to print, the type of paper to create a printer-friendly version of Firefox. 1 Load paper. 2 Open a Web page using a supported browser. 28 b ...
User's Guide
Page 33
... or printable side facing you. (If you are fade- Using the taskbar in Windows 1 Double-click the printer icon in the taskbar. 2 Do one of the following : Using Windows • If you installed Lexmark FastPics or Lexmark Productivity Studio, then the one of the following : • If you want to cancel a particular print job...
... or printable side facing you. (If you are fade- Using the taskbar in Windows 1 Double-click the printer icon in the taskbar. 2 Do one of the following : Using Windows • If you installed Lexmark FastPics or Lexmark Productivity Studio, then the one of the following : • If you want to cancel a particular print job...

User's Guide
Page 37
...Lexmark, and then select your setting, and then assign a name. Select the setting that you want to use. If the printer folder is the year that the printer was released. 2 Double-click the application that you want to delete, and then click Delete. 37 For information about printing these documents, see the Help installed...print settings Using Windows 1 With a document open software dialogs. Printing other specialty documents When you installed the printer driver, some printer software was installed that you want to use. • To delete a setting, click Profiles Œ Delete ...
...Lexmark, and then select your setting, and then assign a name. Select the setting that you want to use. If the printer folder is the year that the printer was released. 2 Double-click the application that you want to delete, and then click Delete. 37 For information about printing these documents, see the Help installed...print settings Using Windows 1 With a document open software dialogs. Printing other specialty documents When you installed the printer driver, some printer software was installed that you want to use. • To delete a setting, click Profiles Œ Delete ...
User's Guide
Page 42
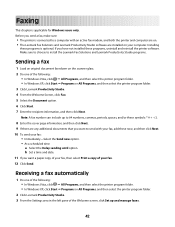
...; Programs or All Programs, and then select the printer program folder. 3 Click Lexmark Productivity Studio. 4 From the Welcome Screen, click Fax. 5 Select the Document option. 6 Click Start. 7 Enter the recipient information, and then click Next. Make sure to choose to install the Lexmark Fax Solutions and Lexmark Productivity Studio programs. Sending a fax 1 Load an original...
...; Programs or All Programs, and then select the printer program folder. 3 Click Lexmark Productivity Studio. 4 From the Welcome Screen, click Fax. 5 Select the Document option. 6 Click Start. 7 Enter the recipient information, and then click Next. Make sure to choose to install the Lexmark Fax Solutions and Lexmark Productivity Studio programs. Sending a fax 1 Load an original...
User's Guide
Page 44
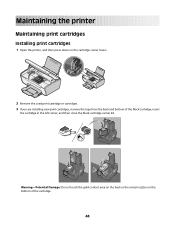
Maintaining the printer Maintaining print cartridges Installing print cartridges 1 Open the printer, and then press down on the bottom of the black cartridge, insert the cartridge in the left carrier, and then close the black cartridge carrier lid. Warning-Potential Damage: Do not touch the gold contact area on the back or the metal nozzles on the cartridge carrier levers. 2 Remove the used print cartridge or cartridges. 3 If you are installing new print cartridges, remove the tape from the back and bottom of the cartridge. 44
Maintaining the printer Maintaining print cartridges Installing print cartridges 1 Open the printer, and then press down on the bottom of the black cartridge, insert the cartridge in the left carrier, and then close the black cartridge carrier lid. Warning-Potential Damage: Do not touch the gold contact area on the back or the metal nozzles on the cartridge carrier levers. 2 Remove the used print cartridge or cartridges. 3 If you are installing new print cartridges, remove the tape from the back and bottom of the cartridge. 44
User's Guide
Page 47
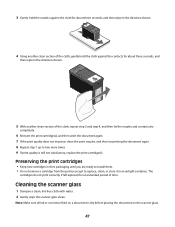
... printing the document again. 8 Repeat step 7 up to replace, clean, or store it in their packaging until you are ready to install them. • Do not remove a cartridge from the printer except to two more times. 9 If print quality is dry before placing the document on a document is still not satisfactory, replace...
... printing the document again. 8 Repeat step 7 up to replace, clean, or store it in their packaging until you are ready to install them. • Do not remove a cartridge from the printer except to two more times. 9 If print quality is dry before placing the document on a document is still not satisfactory, replace...
User's Guide
Page 51
Software did not install If you encountered problems while installing, or if your printer does not appear in the list in the Printers folder or as a printer option when sending a print job, you can try uninstalling and reinstalling the software. RECONNECT THE POWER SUPPLY 1 Press to turn the printer off. 2...security programs. 3 Do one or more of the following operating systems are some other electrical devices have been using. 7 Press to turn the printer on . Try one of the following: MAKE SURE YOUR OPERATING SYSTEM IS SUPPORTED The following : • In Windows Vista, click . &#...
Software did not install If you encountered problems while installing, or if your printer does not appear in the list in the Printers folder or as a printer option when sending a print job, you can try uninstalling and reinstalling the software. RECONNECT THE POWER SUPPLY 1 Press to turn the printer off. 2...security programs. 3 Do one or more of the following operating systems are some other electrical devices have been using. 7 Press to turn the printer on . Try one of the following: MAKE SURE YOUR OPERATING SYSTEM IS SUPPORTED The following : • In Windows Vista, click . &#...
User's Guide
Page 52
..., then resolve the error before trying to print again. CHECK POWER If the light is not on the computer screen to install the software. 8 When the installation is properly connected to the printer and plugged into a known working electrical outlet that the power cord is completed, enable the security software again. Page does...
..., then resolve the error before trying to print again. CHECK POWER If the light is not on the computer screen to install the software. 8 When the installation is properly connected to the printer and plugged into a known working electrical outlet that the power cord is completed, enable the security software again. Page does...
User's Guide
Page 54
.... 3 Select Uninstall. 4 Follow the instructions on the computer screen to remove the printer software. 5 Restart the computer before reinstalling the printer software. 6 Click Cancel on all New Hardware Found screens. 7 Insert the installation CD, and then follow the instructions on the printer. If the install screen does not appear automatically after you encountered problems while...
.... 3 Select Uninstall. 4 Follow the instructions on the computer screen to remove the printer software. 5 Restart the computer before reinstalling the printer software. 6 Click Cancel on all New Hardware Found screens. 7 Insert the installation CD, and then follow the instructions on the printer. If the install screen does not appear automatically after you encountered problems while...
User's Guide
Page 55
...: 1 Do one of your operating system. 6 Select the file that you want to remove the printer software. 5 Restart the computer before reinstalling the printer software. 6 Insert the installation CD, and then follow the directions on the computer screen. b Click Control Panel ΠPerformance and... Click System and Maintenance ΠSystem. c From the Hardware tab, click Device Manager. If the software still does not install correctly, visit our Web site at www.lexmark.com to reinstall the software. In Windows XP a Click Start. b Click Settings ΠControl Panel ΠSystem. ...
...: 1 Do one of your operating system. 6 Select the file that you want to remove the printer software. 5 Restart the computer before reinstalling the printer software. 6 Insert the installation CD, and then follow the directions on the computer screen. b Click Control Panel ΠPerformance and... Click System and Maintenance ΠSystem. c From the Hardware tab, click Device Manager. If the software still does not install correctly, visit our Web site at www.lexmark.com to reinstall the software. In Windows XP a Click Start. b Click Settings ΠControl Panel ΠSystem. ...

User's Guide
Page 59
...the Industry Canada technical specifications were met. Industry Canada notice The following notices are applicable if your printer has a wireless network card installed. The installer of this device is applicable if your printer has a wireless network card installed. L'utilisation de toute autre antenne est strictement interdite par la réglementation d'Industry Canada. 59...and (2) this device may cause undesired operation of the Canadian Interference-Causing Equipment Standard ICES-003. Equipment (or its transmit antenna) that is installed outdoors is subject to licensing.
...the Industry Canada technical specifications were met. Industry Canada notice The following notices are applicable if your printer has a wireless network card installed. The installer of this device is applicable if your printer has a wireless network card installed. L'utilisation de toute autre antenne est strictement interdite par la réglementation d'Industry Canada. 59...and (2) this device may cause undesired operation of the Canadian Interference-Causing Equipment Standard ICES-003. Equipment (or its transmit antenna) that is installed outdoors is subject to licensing.


