
Setup Sheet
Page 1
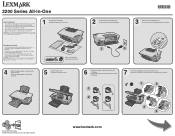
... support papier et tirez le bac de sortie. 5 Lift the scanner unit. CAUTION: Do not use the fax feature during a lightning storm. 1 Unpack your All-In-One. May not be included. www.lexmark.com Connectez le cordon d'alimentation. *21T0077* 3 Make sure the power light is near the product and easily accessible. • Refer service or repairs, other than those described in the user documentation...
... support papier et tirez le bac de sortie. 5 Lift the scanner unit. CAUTION: Do not use the fax feature during a lightning storm. 1 Unpack your All-In-One. May not be included. www.lexmark.com Connectez le cordon d'alimentation. *21T0077* 3 Make sure the power light is near the product and easily accessible. • Refer service or repairs, other than those described in the user documentation...

Setup Solutions
Page 1
2200 Series All-In-One Setup Solutions January 2004 www.lexmark.com Lexmark and Lexmark with diamond design are trademarks of Lexmark International, Inc., registered in the United States and/or other countries. © 2003 Lexmark International, Inc. All rights reserved. 740 West New Circle Road Lexington, Kentucky 40550
2200 Series All-In-One Setup Solutions January 2004 www.lexmark.com Lexmark and Lexmark with diamond design are trademarks of Lexmark International, Inc., registered in the United States and/or other countries. © 2003 Lexmark International, Inc. All rights reserved. 740 West New Circle Road Lexington, Kentucky 40550
Setup Solutions
Page 2
... and easily accessible. •Refer service or repairs, other than those expressly designated by calling 1-800-553-9727. All rights reserved. CAUTION: Do not use or distribute any of the information you supply in any way it operates. Changes are commercial computer software and documentation developed exclusively at any time. Comments about this statement may be addressed to Lexmark International, Inc...
... and easily accessible. •Refer service or repairs, other than those expressly designated by calling 1-800-553-9727. All rights reserved. CAUTION: Do not use or distribute any of the information you supply in any way it operates. Changes are commercial computer software and documentation developed exclusively at any time. Comments about this statement may be addressed to Lexmark International, Inc...
Setup Solutions
Page 3
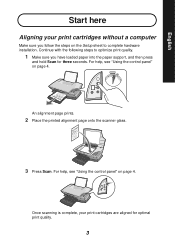
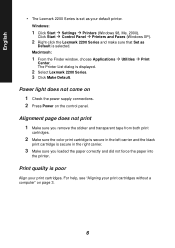
... the printed alignment page onto the scanner glass. 3 Press Scan. For help , see "Using the control panel" on page 4. For help , see "Using the control panel" on the Setup sheet to optimize print quality. 1 Make sure you follow the steps on page 4. English Start here Aligning your print cartridges are aligned for three seconds. Continue with the following steps to complete hardware installation. Once scanning is complete, your print cartridges without a computer Make sure you have loaded paper into the paper support...
... the printed alignment page onto the scanner glass. 3 Press Scan. For help , see "Using the control panel" on page 4. For help , see "Using the control panel" on the Setup sheet to optimize print quality. 1 Make sure you follow the steps on page 4. English Start here Aligning your print cartridges are aligned for three seconds. Continue with the following steps to complete hardware installation. Once scanning is complete, your print cartridges without a computer Make sure you have loaded paper into the paper support...
Setup Solutions
Page 4
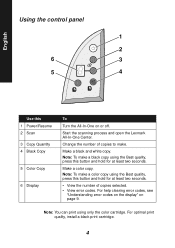
... button and hold for at least two seconds. • View the number of copies to make a color copy using only the color cartridge. Make a color copy. For help clearing error codes, see "Understanding error codes on the display" on or off. Note: You can print using the Best quality, press this button and hold for at least two seconds. Note: To make . English Using the control panel 1 2 6 3 5 4 Use this 1 Power/Resume 2 Scan 3 Copy Quantity 4 Black Copy 5 Color Copy 6 Display To Turn the All-In-One on page...
... button and hold for at least two seconds. • View the number of copies to make a color copy using only the color cartridge. Make a color copy. For help clearing error codes, see "Understanding error codes on the display" on or off. Note: You can print using the Best quality, press this button and hold for at least two seconds. Note: To make . English Using the control panel 1 2 6 3 5 4 Use this 1 Power/Resume 2 Scan 3 Copy Quantity 4 Black Copy 5 Color Copy 6 Display To Turn the All-In-One on page...
Setup Solutions
Page 5
... a Lexmark 2200 Series folder. The color print cartridge is secure in the left carrier and the black print cartridge is securely attached to your computer and to see "Understanding error codes on the display" on page 9. • You installed the software. Note: Do not force paper into the printer. • There are no flashing error codes on if you are using one of the following supported operating systems: • Windows 98 • Windows XP...
... a Lexmark 2200 Series folder. The color print cartridge is secure in the left carrier and the black print cartridge is securely attached to your computer and to see "Understanding error codes on the display" on page 9. • You installed the software. Note: Do not force paper into the printer. • There are no flashing error codes on if you are using one of the following supported operating systems: • Windows 98 • Windows XP...
Setup Solutions
Page 6
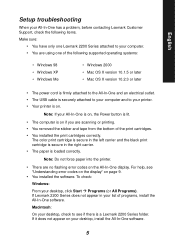
... you remove the sticker and transparent tape from both print cartridges. 2 Make sure the color print cartridge is secure in the right carrier. 3 Make sure you loaded the paper correctly and did not force the paper into the printer. Click Start Æ Control Panel Æ Printers and Faxes (Windows XP). 2 Right-click the Lexmark 2200 Series and make sure that Set as your default printer. Power light does not come on 1 Check the power supply connections. 2 Press Power on page 3. 6 Print...
... you remove the sticker and transparent tape from both print cartridges. 2 Make sure the color print cartridge is secure in the right carrier. 3 Make sure you loaded the paper correctly and did not force the paper into the printer. Click Start Æ Control Panel Æ Printers and Faxes (Windows XP). 2 Right-click the Lexmark 2200 Series and make sure that Set as your default printer. Power light does not come on 1 Check the power supply connections. 2 Press Power on page 3. 6 Print...
Setup Solutions
Page 7
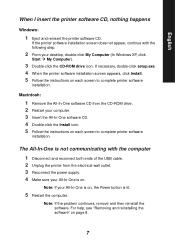
.... 3 Reconnect the power supply. 4 Make sure your All-In-One is on, the Power button is on each screen to complete printer software installation. For help, see "Removing and reinstalling the software" on each screen to complete printer software installation. If necessary, double-click setup.exe. 4 When the printer software installation screen appears, click Install. 5 Follow the instructions on . Note: If the problem continues, remove and then reinstall the software. The All-In...
.... 3 Reconnect the power supply. 4 Make sure your All-In-One is on, the Power button is on each screen to complete printer software installation. For help, see "Removing and reinstalling the software" on each screen to complete printer software installation. If necessary, double-click setup.exe. 4 When the printer software installation screen appears, click Install. 5 Follow the instructions on . Note: If the problem continues, remove and then reinstall the software. The All-In...
Setup Solutions
Page 8
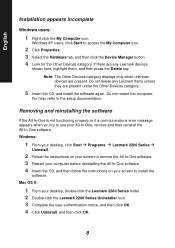
... instructions on your screen to the setup documentation. English Installation appears incomplete Windows users: 1 Right-click the My Computer icon. Removing and reinstalling the software If the All-In-One is not functioning properly or if a communications error message appears when you try to access the My Computer icon. 2 Click Properties. 3 Select the Hardware tab, and then click the Device Manager button...
... instructions on your screen to the setup documentation. English Installation appears incomplete Windows users: 1 Right-click the My Computer icon. Removing and reinstalling the software If the All-In-One is not functioning properly or if a communications error message appears when you try to access the My Computer icon. 2 Click Properties. 3 Select the Hardware tab, and then click the Device Manager button...
Setup Solutions
Page 9
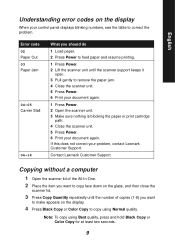
... the display When your control panel displays blinking numbers, see the table to correct the problem. Copying without a computer 1 Open the scanner lid of copies (1-9) you should do 1 Load paper. 2 Press Power to feed paper and resume printing. 1 Press Power. 2 Lift the scanner unit until the number of the All-In-One. 2 Place the item you want to make appears on the display. 4 Press Black Copy or Color Copy to copy using Best quality, press and hold Black Copy or Color Copy for...
... the display When your control panel displays blinking numbers, see the table to correct the problem. Copying without a computer 1 Open the scanner lid of copies (1-9) you should do 1 Load paper. 2 Press Power to feed paper and resume printing. 1 Press Power. 2 Lift the scanner unit until the number of the All-In-One. 2 Place the item you want to make appears on the display. 4 Press Black Copy or Color Copy to copy using Best quality, press and hold Black Copy or Color Copy for...
Setup Solutions
Page 10
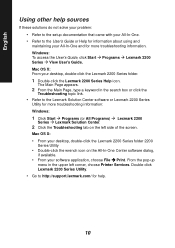
..., choose Printer Services. The Main Page appears. 2 From the Main Page, type a keyword in the upper left side of the screen. English Using other help . 10 From the pop-up menu in the search box or click the Troubleshooting topic link. • Refer to http://support.lexmark.com/ for help sources If these solutions do not solve your problem: • Refer to the setup documentation that...
..., choose Printer Services. The Main Page appears. 2 From the Main Page, type a keyword in the upper left side of the screen. English Using other help . 10 From the pop-up menu in the search box or click the Troubleshooting topic link. • Refer to http://support.lexmark.com/ for help sources If these solutions do not solve your problem: • Refer to the setup documentation that...


