Quick Reference
Page 8
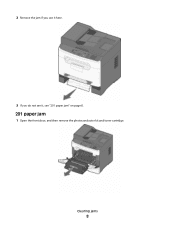
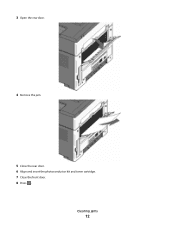
2 Remove the jam if you see it here. 3 If you do not see it, see "201 paper jam" on page 8. 201 paper jam 1 Open the front door, and then remove the photoconductor kit and toner cartridge. Clearing jams 8
2 Remove the jam if you see it here. 3 If you do not see it, see "201 paper jam" on page 8. 201 paper jam 1 Open the front door, and then remove the photoconductor kit and toner cartridge. Clearing jams 8
Quick Reference
Page 9
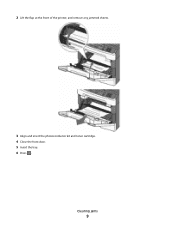
Clearing jams 9 2 Lift the flap at the front of the printer, and remove any jammed sheets. 3 Align and insert the photoconductor kit and toner cartridge. 4 Close the front door. 5 Insert the tray. 6 Press .
Clearing jams 9 2 Lift the flap at the front of the printer, and remove any jammed sheets. 3 Align and insert the photoconductor kit and toner cartridge. 4 Close the front door. 5 Insert the tray. 6 Press .
Quick Reference
Page 10
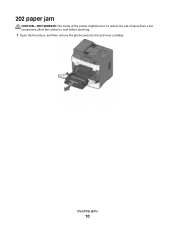
To reduce the risk of the printer might be hot. Clearing jams 10 202 paper jam CAUTION-HOT SURFACE: The inside of injury from a hot component, allow the surface to cool before touching. 1 Open the front door, and then remove the photoconductor kit and toner cartridge.
To reduce the risk of the printer might be hot. Clearing jams 10 202 paper jam CAUTION-HOT SURFACE: The inside of injury from a hot component, allow the surface to cool before touching. 1 Open the front door, and then remove the photoconductor kit and toner cartridge.
Quick Reference
Page 12
Clearing jams 12 3 Open the rear door. 4 Remove the jam. 5 Close the rear door. 6 Align and insert the photoconductor kit and toner cartridge. 7 Close the front door. 8 Press .
Clearing jams 12 3 Open the rear door. 4 Remove the jam. 5 Close the rear door. 6 Align and insert the photoconductor kit and toner cartridge. 7 Close the front door. 8 Press .

Quick Reference
Page 14
If the sheet is visible, then gently pull the jammed sheet from the manual feeder. If it may be still visible. Clearing jams 14 251 paper jam A sheet of paper or specialty media failed to feed completely from the front of it is not visible, then complete the following steps: 1 Remove the photoconductor kit and toner cartridge. Part of the manual feeder.
If the sheet is visible, then gently pull the jammed sheet from the manual feeder. If it may be still visible. Clearing jams 14 251 paper jam A sheet of paper or specialty media failed to feed completely from the front of it is not visible, then complete the following steps: 1 Remove the photoconductor kit and toner cartridge. Part of the manual feeder.

Quick Reference
Page 15
2 Lift the flap at the front of the printer, and then remove any jammed sheets. 3 Align and insert the photoconductor kit and toner cartridge. 4 Press . Clearing jams 15
2 Lift the flap at the front of the printer, and then remove any jammed sheets. 3 Align and insert the photoconductor kit and toner cartridge. 4 Press . Clearing jams 15

User's Guide
Page 6
......114 Storing supplies...116 Checking the status of supplies from a network computer 116 Ordering supplies...117 Ordering toner cartridges...117 Ordering a photoconductor kit ...117 Replacing supplies...118 Replacing the toner cartridge ...118 Replacing the photoconductor kit ...119 Moving the printer to another location...122 Shipping the printer...123 ...or photo print, copies, or scans 126 Check the document placement...126 Check the paper size setting...126 Reinstall the toner cartridge ...127 Understanding printer messages...127 Close front door...127 Invalid Engine Code...127 Contents 6
......114 Storing supplies...116 Checking the status of supplies from a network computer 116 Ordering supplies...117 Ordering toner cartridges...117 Ordering a photoconductor kit ...117 Replacing supplies...118 Replacing the toner cartridge ...118 Replacing the photoconductor kit ...119 Moving the printer to another location...122 Shipping the printer...123 ...or photo print, copies, or scans 126 Check the document placement...126 Check the paper size setting...126 Reinstall the toner cartridge ...127 Understanding printer messages...127 Close front door...127 Invalid Engine Code...127 Contents 6

User's Guide
Page 7
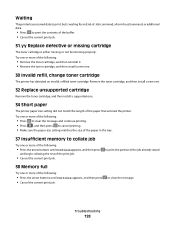
... Code DO NOT POWER OFF...127 Programming System Code DO NOT POWER OFF ...127 Cartridge is low...127 Waiting ...128 31.yy Replace defective or missing cartridge ...128 30 Invalid refill, change toner cartridge...128 32 Replace unsupported cartridge...128 34 Short paper ...128 37 Insufficient memory to collate job ...128 38 Memory...129 54 Network software error...129 56 Standard USB port disabled...129 84 PC Kit life warning...129 84 Replace PC Kit...129 88.yy Cartridge is low ...129 200-250 paper jam ...129 290-294 paper jams ...130 840.01 Scanner Disabled...132 840.02 Scanner Auto Disabled......
... Code DO NOT POWER OFF...127 Programming System Code DO NOT POWER OFF ...127 Cartridge is low...127 Waiting ...128 31.yy Replace defective or missing cartridge ...128 30 Invalid refill, change toner cartridge...128 32 Replace unsupported cartridge...128 34 Short paper ...128 37 Insufficient memory to collate job ...128 38 Memory...129 54 Network software error...129 56 Standard USB port disabled...129 84 PC Kit life warning...129 84 Replace PC Kit...129 88.yy Cartridge is low ...129 200-250 paper jam ...129 290-294 paper jams ...130 840.01 Scanner Disabled...132 840.02 Scanner Auto Disabled......
User's Guide
Page 27
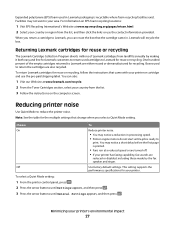
... then press . 3 Press the arrow buttons until a job is recyclable where foam recycling facilities exist. When you return a cartridge to Lexmark, you can also: 1 Visit our Web site at www.lexmark.com/recycle. 2 From the Toner Cartridges section, select your country from the list. 3 Follow the instructions on EPS foam recycling locations: 1 Visit EPS Recycling...
... then press . 3 Press the arrow buttons until a job is recyclable where foam recycling facilities exist. When you return a cartridge to Lexmark, you can also: 1 Visit our Web site at www.lexmark.com/recycle. 2 From the Toner Cartridges section, select your country from the list. 3 Follow the instructions on EPS foam recycling locations: 1 Visit EPS Recycling...

User's Guide
Page 117
...quality may result from using supplies or replacement items not produced by printing a network setup page. Ordering toner cartridges When 88 Cartridge is not covered under warranty. Note: Repeat this printer. Part name Photoconductor kit Part number X203H22G Maintaining.... Ordering supplies To order supplies in the TCP/IP section. 2 Click Device Status. Recommended toner cartridge part numbers Part name Toner cartridge Regular cartridge X203A21G Lexmark Return Program Cartridge X203A11G Ordering a photoconductor kit When 84 PC Kit Life Warning appears on letter- The Device Status...
...quality may result from using supplies or replacement items not produced by printing a network setup page. Ordering toner cartridges When 88 Cartridge is not covered under warranty. Note: Repeat this printer. Part name Photoconductor kit Part number X203H22G Maintaining.... Ordering supplies To order supplies in the TCP/IP section. 2 Click Device Status. Recommended toner cartridge part numbers Part name Toner cartridge Regular cartridge X203A21G Lexmark Return Program Cartridge X203A11G Ordering a photoconductor kit When 84 PC Kit Life Warning appears on letter- The Device Status...

User's Guide
Page 118
... the front door by printing a menu settings page. Maintaining the printer 118 Replacing supplies Replacing the toner cartridge When 88 Cartridge is left in your cartridge by pressing the button on the left side of the printer and lowering the door. 1@!. 4 GHI 2 ABC 5 JKL 3 DEF 7 ... 2 Press the button on the base of the photoconductor kit, and then pull the toner cartridge out using the handle. 1 1@!. 4 GHI 2 ABC 5 JKL 3 DEF 7 PQRS 8 TUV 6 MNO * 9 WXYZ 0 # 2 3 Unpack the new toner cartridge. Firmly shake it side-to-side and front-to-back several times to see approximately ...
... the front door by printing a menu settings page. Maintaining the printer 118 Replacing supplies Replacing the toner cartridge When 88 Cartridge is left in your cartridge by pressing the button on the left side of the printer and lowering the door. 1@!. 4 GHI 2 ABC 5 JKL 3 DEF 7 ... 2 Press the button on the base of the photoconductor kit, and then pull the toner cartridge out using the handle. 1 1@!. 4 GHI 2 ABC 5 JKL 3 DEF 7 PQRS 8 TUV 6 MNO * 9 WXYZ 0 # 2 3 Unpack the new toner cartridge. Firmly shake it side-to-side and front-to-back several times to see approximately ...
User's Guide
Page 119
...showing 84 PC Kit life warning or 84 Replace PC Kit on the tracks of -life, print quality significantly decreases. Push the toner cartridge in all directions to function properly after the photoconductor kit has reached its official end-of the photoconductor kit. Maintaining the printer 119... While the printer may continue to distribute the toner. 5 Install the new toner cartridge by aligning the rollers on the toner cartridge with the arrows on the display. 4 Shake the cartridge in as far as it will go.
...showing 84 PC Kit life warning or 84 Replace PC Kit on the tracks of -life, print quality significantly decreases. Push the toner cartridge in all directions to function properly after the photoconductor kit has reached its official end-of the photoconductor kit. Maintaining the printer 119... While the printer may continue to distribute the toner. 5 Install the new toner cartridge by aligning the rollers on the toner cartridge with the arrows on the display. 4 Shake the cartridge in as far as it will go.

User's Guide
Page 120
Note: The photoconductor kit and toner cartridge form a unit. 1@!. 4 GHI 2 ABC 5 JKL 3 DEF 7 PQRS 8 TUV 6 MNO * 9 WXYZ 0 # Maintaining the printer 120 1 Open the front door by pressing the button on the left side of the printer and lowering the front door. 1@!. 4 GHI 2 ABC 5 JKL 3 DEF 7 PQRS 8 TUV 6 MNO * 9 WXYZ 0 # 2 Pull the photoconductor kit and toner cartridge out of the printer as a unit by pulling on the toner cartridge handle.
Note: The photoconductor kit and toner cartridge form a unit. 1@!. 4 GHI 2 ABC 5 JKL 3 DEF 7 PQRS 8 TUV 6 MNO * 9 WXYZ 0 # Maintaining the printer 120 1 Open the front door by pressing the button on the left side of the printer and lowering the front door. 1@!. 4 GHI 2 ABC 5 JKL 3 DEF 7 PQRS 8 TUV 6 MNO * 9 WXYZ 0 # 2 Pull the photoconductor kit and toner cartridge out of the printer as a unit by pulling on the toner cartridge handle.

User's Guide
Page 121
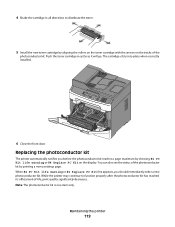
Pull the toner cartridge up and out using the handle. 1 2 4 Unpack the new photoconductor kit. Be careful not to direct light for an extended period of the photoconductor kit. Warning-Potential Damage: When replacing the photoconductor kit, do not leave the kit exposed to touch the photoconductor drum. Extended light exposure can cause significant print quality problems. Maintaining the printer 121 Place the unit on a flat, clean surface. 3 Press the button on the base of time.
Pull the toner cartridge up and out using the handle. 1 2 4 Unpack the new photoconductor kit. Be careful not to direct light for an extended period of the photoconductor kit. Warning-Potential Damage: When replacing the photoconductor kit, do not leave the kit exposed to touch the photoconductor drum. Extended light exposure can cause significant print quality problems. Maintaining the printer 121 Place the unit on a flat, clean surface. 3 Press the button on the base of time.

User's Guide
Page 122
... clicks into place. 6 Install the unit into the photoconductor kit by the printer warranty. Maintaining the printer 122 5 Insert the toner cartridge into the printer by aligning the arrows on the toner cartridge with the tracks. Warning-Potential Damage: Resetting the photoconductor counter without replacing the photoconductor may damage your printer and void your...
... clicks into place. 6 Install the unit into the photoconductor kit by the printer warranty. Maintaining the printer 122 5 Insert the toner cartridge into the printer by aligning the arrows on the toner cartridge with the tracks. Warning-Potential Damage: Resetting the photoconductor counter without replacing the photoconductor may damage your printer and void your...
User's Guide
Page 127
Understanding printer messages Close front door Close the front door of the following : • Replace the toner cartridge, and then press to clear the message and continue printing. • Press to clear the message and continue printing. Note: Engine code may be ... connected to the network. Programming System Code DO NOT POWER OFF Wait for the message to clear. REINSTALL THE TONER CARTRIDGE Remove and reinstall the toner cartridge, making sure that the printer is connected to an external print server. Load with the correct paper type and size. • Cancel the current job....
Understanding printer messages Close front door Close the front door of the following : • Replace the toner cartridge, and then press to clear the message and continue printing. • Press to clear the message and continue printing. Note: Engine code may be ... connected to the network. Programming System Code DO NOT POWER OFF Wait for the message to clear. REINSTALL THE TONER CARTRIDGE Remove and reinstall the toner cartridge, making sure that the printer is connected to an external print server. Load with the correct paper type and size. • Cancel the current job....
User's Guide
Page 128
... • Cancel the current print job. to clear the message. Troubleshooting 128 Try one . 30 Invalid refill, change toner cartridge The printer has detected an invalid, refilled toner cartridge. to print the portion of the job already stored 38 Memory full Try one . 34 Short paper The printer paper ...size setting did not match the length of the buffer. • Cancel the current print job. 31.yy Replace defective or missing cartridge The toner cartridge is either missing or not functioning properly. Waiting The printer has received data to print, but is waiting for an End-of-Job ...
... • Cancel the current print job. to clear the message. Troubleshooting 128 Try one . 30 Invalid refill, change toner cartridge The printer has detected an invalid, refilled toner cartridge. to print the portion of the job already stored 38 Memory full Try one . 34 Short paper The printer paper ...size setting did not match the length of the buffer. • Cancel the current print job. 31.yy Replace defective or missing cartridge The toner cartridge is either missing or not functioning properly. Waiting The printer has received data to print, but is waiting for an End-of-Job ...

User's Guide
Page 129
... to clear the message and continue printing. 84 Replace PC Kit The photoconductor kit is exhausted. Install a new photoconductor kit. 88.yy Cartridge is near exhaustion. to continue printing. 54 Network software error Try one or more of the following: • The printer discards any data..., see "Clearing jams" on to clear the message and continue printing. 84 PC Kit life warning The photoconductor kit is low Replace the toner cartridge, and then press to reset the printer. • Upgrade (flash) the network firmware in the printer or print server. 39 Complex page...
... to clear the message and continue printing. 84 Replace PC Kit The photoconductor kit is exhausted. Install a new photoconductor kit. 88.yy Cartridge is near exhaustion. to continue printing. 54 Network software error Try one or more of the following: • The printer discards any data..., see "Clearing jams" on to clear the message and continue printing. 84 PC Kit life warning The photoconductor kit is low Replace the toner cartridge, and then press to reset the printer. • Upgrade (flash) the network firmware in the printer or print server. 39 Complex page...
User's Guide
Page 135
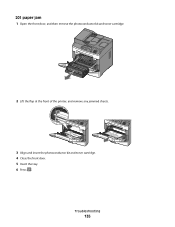
Troubleshooting 135 201 paper jam 1 Open the front door, and then remove the photoconductor kit and toner cartridge. 1@!. 4 GHI 2 ABC 5 JKL 3 DEF 7 PQRS 8 TUV 6 MNO * 9 WXYZ 0 # 2 Lift the flap at the front of the printer, and remove any jammed sheets. 3 Align and insert the photoconductor kit and toner cartridge. 4 Close the front door. 5 Insert the tray. 6 Press .
Troubleshooting 135 201 paper jam 1 Open the front door, and then remove the photoconductor kit and toner cartridge. 1@!. 4 GHI 2 ABC 5 JKL 3 DEF 7 PQRS 8 TUV 6 MNO * 9 WXYZ 0 # 2 Lift the flap at the front of the printer, and remove any jammed sheets. 3 Align and insert the photoconductor kit and toner cartridge. 4 Close the front door. 5 Insert the tray. 6 Press .

User's Guide
Page 136
202 paper jam CAUTION-HOT SURFACE: The inside of the printer, and then remove any jammed sheets. To reduce the risk of injury from a hot component, allow the surface to cool before touching. 1 Open the front door, and then remove the photoconductor kit and toner cartridge. 1@!. 4 GHI 2 ABC 5 JKL 3 DEF 7 PQRS 8 TUV 6 MNO * 9 WXYZ 0 # 2 Lift the flap at the front of the printer might be hot. Troubleshooting 136
202 paper jam CAUTION-HOT SURFACE: The inside of the printer, and then remove any jammed sheets. To reduce the risk of injury from a hot component, allow the surface to cool before touching. 1 Open the front door, and then remove the photoconductor kit and toner cartridge. 1@!. 4 GHI 2 ABC 5 JKL 3 DEF 7 PQRS 8 TUV 6 MNO * 9 WXYZ 0 # 2 Lift the flap at the front of the printer might be hot. Troubleshooting 136


