
Embedded Web Server Administrator's Guide
Page 14
... are encouraged to securely end each device can be used as needed. 5 To sync to an NTP server rather than manage date and time settings manually, click the Enable NTP check box, and then type the IP address or hostname of the NTP Server. 6 If the NTP server requires authentication, click... by the Kerberos server. 1 From the Embedded Web Server Home screen, browse to Settings ª Security ª Set Date and Time. 2 To manage the settings manually, type the correct date and time in a non-standard time zone or an area that observes an alternate DST calendar, adjust the Custom Time Zone...
... are encouraged to securely end each device can be used as needed. 5 To sync to an NTP server rather than manage date and time settings manually, click the Enable NTP check box, and then type the IP address or hostname of the NTP Server. 6 If the NTP server requires authentication, click... by the Kerberos server. 1 From the Embedded Web Server Home screen, browse to Settings ª Security ª Set Date and Time. 2 To manage the settings manually, type the correct date and time in a non-standard time zone or an area that observes an alternate DST calendar, adjust the Custom Time Zone...

Embedded Web Server Administrator's Guide
Page 23
...the Wiping Mode list, select Off (for no wiping), Auto (for automatic wiping), or Manual (for either scheduled or ad-hoc wiping). Disk wiping On certain devices, administrators can be performed manually, automatically, or on the hard drive that an unprinted confidential print job will be affected ... devices is not supported on certain days or during certain hours. Notes: • The Scheduled Disk Wiping option will not appear until Manual mode has been selected and submitted. • Clicking Submit after choosing a Wiping Mode will return you to the main Security menu, where...
...the Wiping Mode list, select Off (for no wiping), Auto (for automatic wiping), or Manual (for either scheduled or ad-hoc wiping). Disk wiping On certain devices, administrators can be performed manually, automatically, or on the hard drive that an unprinted confidential print job will be affected ... devices is not supported on certain days or during certain hours. Notes: • The Scheduled Disk Wiping option will not appear until Manual mode has been selected and submitted. • Clicking Submit after choosing a Wiping Mode will return you to the main Security menu, where...

Embedded Web Server Administrator's Guide
Page 24
... Disable to the Enable/Disable screen. 8 To finish, press Back, and then Exit Configuration (or Exit Config Menu). 3 If you have enabled Manual mode and wish to set up , the printer touch screen should occur, and then click Add. This takes approximately one minute. Warning-Potential Damage:... disk encryption will erase the contents of the hard disk. 7 A message will appear in the lower right corner of disk wiping (Automatic, Manual, and Scheduled). 6 Click Submit to finalize changes. Using security features in the event your printer-or its hard disk-is in Configuration mode by...
... Disable to the Enable/Disable screen. 8 To finish, press Back, and then Exit Configuration (or Exit Config Menu). 3 If you have enabled Manual mode and wish to set up , the printer touch screen should occur, and then click Add. This takes approximately one minute. Warning-Potential Damage:... disk encryption will erase the contents of the hard disk. 7 A message will appear in the lower right corner of disk wiping (Automatic, Manual, and Scheduled). 6 Click Submit to finalize changes. Using security features in the event your printer-or its hard disk-is in Configuration mode by...

Quick Reference
Page 14
If the sheet is visible, then gently pull the jammed sheet from the front of paper or specialty media failed to feed completely from the manual feeder. Part of it is not visible, then complete the following steps: 1 Remove the photoconductor kit and toner cartridge. If it may be still visible. Clearing jams 14 251 paper jam A sheet of the manual feeder.
If the sheet is visible, then gently pull the jammed sheet from the front of paper or specialty media failed to feed completely from the manual feeder. Part of it is not visible, then complete the following steps: 1 Remove the photoconductor kit and toner cartridge. If it may be still visible. Clearing jams 14 251 paper jam A sheet of the manual feeder.

User's Guide
Page 2
......24 Using recycled paper...24 Conserving supplies...24 Saving energy...25 Using Eco-Mode ...25 Adjusting Power Saver...26 Recycling...26 Recycling Lexmark products...26 Recycling Lexmark packaging...26 Returning Lexmark cartridges for reuse or recycling...27 Reducing printer noise...27 Loading paper and specialty media 29 Setting the Paper Size and Paper...
......24 Using recycled paper...24 Conserving supplies...24 Saving energy...25 Using Eco-Mode ...25 Adjusting Power Saver...26 Recycling...26 Recycling Lexmark products...26 Recycling Lexmark packaging...26 Returning Lexmark cartridges for reuse or recycling...27 Reducing printer noise...27 Loading paper and specialty media 29 Setting the Paper Size and Paper...
User's Guide
Page 13
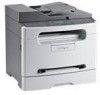
7 6 1@!. 4 GHI 2 ABC 5 JKL 3 DEF 7 PQRS 8 TUV 6 MNO * 9 WXYZ 0 # 1 2 5 1 Printer control panel 2 Standard exit bin 3 Paper stop 4 Manual feeder 5 Paper tray (250 sheets) 6 Front door 7 Front door release button Configured model The following illustration shows the fully configured printer: 3 4 Learning about the printer 13
7 6 1@!. 4 GHI 2 ABC 5 JKL 3 DEF 7 PQRS 8 TUV 6 MNO * 9 WXYZ 0 # 1 2 5 1 Printer control panel 2 Standard exit bin 3 Paper stop 4 Manual feeder 5 Paper tray (250 sheets) 6 Front door 7 Front door release button Configured model The following illustration shows the fully configured printer: 3 4 Learning about the printer 13

User's Guide
Page 14
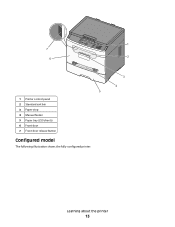
Learning about the printer 14 1 8 7 1@!. 4 GHI 2 ABC 5 JKL 3 DEF 7 PQRS 8 TUV 6 MNO * 9 WXYZ 0 # 2 3 1 Automatic Document Feeder (ADF) 2 Printer control panel 3 Standard exit bin 4 Paper stop 5 Manual feeder 6 Paper tray (250 sheets) 7 Front door 8 Front door release button 4 5 6 Basic functions of the scanner The scanner provides copy, fax, and scan-to your ...
Learning about the printer 14 1 8 7 1@!. 4 GHI 2 ABC 5 JKL 3 DEF 7 PQRS 8 TUV 6 MNO * 9 WXYZ 0 # 2 3 1 Automatic Document Feeder (ADF) 2 Printer control panel 3 Standard exit bin 4 Paper stop 5 Manual feeder 6 Paper tray (250 sheets) 7 Front door 8 Front door release button 4 5 6 Basic functions of the scanner The scanner provides copy, fax, and scan-to your ...

User's Guide
Page 22
If the CD does not launch after a minute, then launch the CD manually: a Click , or click Start and then click Run. For information on printing a network setup page, see "Printing a network setup page" on the network setup page, ...
If the CD does not launch after a minute, then launch the CD manually: a Click , or click Start and then click Run. For information on printing a network setup page, see "Printing a network setup page" on the network setup page, ...
User's Guide
Page 29
... use , and then press . Set the Paper Size for your paper: • Units of the following Universal size settings for the Manual Feeder to load the 250-sheet tray and the manual feeder. Select Source appears. 5 Press the arrow buttons until the paper source you want appears, and then press . 6 To change...
... use , and then press . Set the Paper Size for your paper: • Units of the following Universal size settings for the Manual Feeder to load the 250-sheet tray and the manual feeder. Select Source appears. 5 Press the arrow buttons until the paper source you want appears, and then press . 6 To change...
User's Guide
Page 34
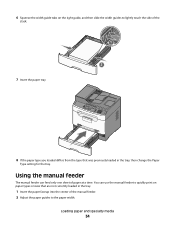
6 Squeeze the width guide tabs on the right guide, and then slide the width guides to lightly touch the side of the manual feeder. 2 Adjust the paper guides to quickly print on paper types or sizes that are not currently loaded in the tray. 1 Insert the paper faceup ... loaded in the tray, then change the Paper Type setting for the tray. You can feed only one sheet of paper at a time. Using the manual feeder The manual feeder can use the manual feeder to the paper width. Loading paper and specialty media 34
6 Squeeze the width guide tabs on the right guide, and then slide the width guides to lightly touch the side of the manual feeder. 2 Adjust the paper guides to quickly print on paper types or sizes that are not currently loaded in the tray. 1 Insert the paper faceup ... loaded in the tray, then change the Paper Type setting for the tray. You can feed only one sheet of paper at a time. Using the manual feeder The manual feeder can use the manual feeder to the paper width. Loading paper and specialty media 34
User's Guide
Page 35
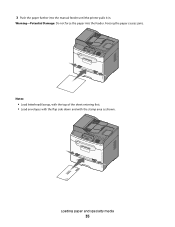
3 Push the paper further into the feeder. Forcing the paper causes jams. 1@!. 4 GHI 2 ABC 5 JKL 3 DEF 7 PQRS 8 TUV 6 MNO * 9 WXYZ 0 # Notes: • Load letterhead faceup, with the top of the sheet entering first. • Load envelopes with the flap side down and with the stamp area as shown. 1@!. 4 GHI 2 ABC 5 JKL 3 DEF 7 PQRS 8 TUV 6 MNO * 9 WXYZ 0 # Loading paper and specialty media 35 Warning-Potential Damage: Do not force the paper into the manual feeder until the printer pulls it in.
3 Push the paper further into the feeder. Forcing the paper causes jams. 1@!. 4 GHI 2 ABC 5 JKL 3 DEF 7 PQRS 8 TUV 6 MNO * 9 WXYZ 0 # Notes: • Load letterhead faceup, with the top of the sheet entering first. • Load envelopes with the flap side down and with the stamp area as shown. 1@!. 4 GHI 2 ABC 5 JKL 3 DEF 7 PQRS 8 TUV 6 MNO * 9 WXYZ 0 # Loading paper and specialty media 35 Warning-Potential Damage: Do not force the paper into the manual feeder until the printer pulls it in.
User's Guide
Page 36
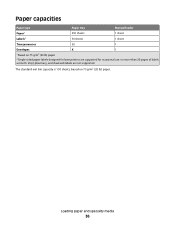
The standard exit bin capacity is 150 sheets, based on 75 g/m2 (20 lb) paper 2 Single-sided paper labels designed for occasional use: no more than 20 pages of labels a month. Loading paper and specialty media 36 Paper capacities Paper type Paper1 Labels2 Paper tray 250 sheets 50 sheets Manual feeder 1 sheet 1 sheet Transparencies 50 1 Envelopes X 1 1 Based on 75 g/m2 (20 lb) paper. Vinyl, pharmacy, and dual-web labels are supported for laser printers are not supported.
The standard exit bin capacity is 150 sheets, based on 75 g/m2 (20 lb) paper 2 Single-sided paper labels designed for occasional use: no more than 20 pages of labels a month. Loading paper and specialty media 36 Paper capacities Paper type Paper1 Labels2 Paper tray 250 sheets 50 sheets Manual feeder 1 sheet 1 sheet Transparencies 50 1 Envelopes X 1 1 Based on 75 g/m2 (20 lb) paper. Vinyl, pharmacy, and dual-web labels are supported for laser printers are not supported.
User's Guide
Page 37
The manual feeder can occur after the paper passes through the printer, where it is exposed to high temperatures. Curl Curl is the tendency for paper to ...
The manual feeder can occur after the paper passes through the printer, where it is exposed to high temperatures. Curl Curl is the tendency for paper to ...
User's Guide
Page 40
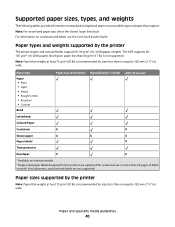
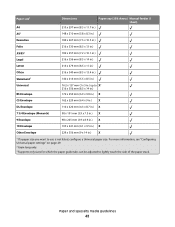
...75 g/m2 (20 lb) is not supported. Paper and specialty media guidelines 40 Vinyl, pharmacy, and dual-web labels are supported for laser printers are not supported. Paper type Paper • Plain • Light • Heavy • Rough/Cotton • Recycled &#...8226; Custom Bond Paper tray (250 sheets) Manual feeder (1 sheet) ADF (30 sheets)1 Letterhead Colored Paper Card stock X X Glossy paper X X X Paper labels2 X Transparencies Envelopes X X 1 Available on ...
...75 g/m2 (20 lb) is not supported. Paper and specialty media guidelines 40 Vinyl, pharmacy, and dual-web labels are supported for laser printers are not supported. Paper type Paper • Plain • Light • Heavy • Rough/Cotton • Recycled &#...8226; Custom Bond Paper tray (250 sheets) Manual feeder (1 sheet) ADF (30 sheets)1 Letterhead Colored Paper Card stock X X Glossy paper X X X Paper labels2 X Transparencies Envelopes X X 1 Available on ...
User's Guide
Page 41
Paper size1 A4 Dimensions Paper tray (250 sheets) Manual feeder (1 sheet) 210 x 297 mm (8.3 x 11.7 in.) A52 148 x 210 mm (5.8 x 8.3 in.) Executive 184 x 267 mm (7.3 x 10.5 in.) Folio 216 x 330 mm (8.5 x 13 in.) JIS ...
Paper size1 A4 Dimensions Paper tray (250 sheets) Manual feeder (1 sheet) 210 x 297 mm (8.3 x 11.7 in.) A52 148 x 210 mm (5.8 x 8.3 in.) Executive 184 x 267 mm (7.3 x 10.5 in.) Folio 216 x 330 mm (8.5 x 13 in.) JIS ...

User's Guide
Page 43
...When printing on letterhead. Note: Transparencies can withstand that temperature, select those settings using letterhead • Use letterhead designed specifically for laser printers. • Print samples on the letterhead being considered for use before buying large quantities. "Loading the paper tray" on ...(374°F) without melting, discoloring, offsetting, or releasing hazardous emissions. Printing 43 For information on page 31 - "Using the manual feeder" on page 34 Tips on using can be printed at a temperature up to Rough. If the transparencies you are able ...
...When printing on letterhead. Note: Transparencies can withstand that temperature, select those settings using letterhead • Use letterhead designed specifically for laser printers. • Print samples on the letterhead being considered for use before buying large quantities. "Loading the paper tray" on ...(374°F) without melting, discoloring, offsetting, or releasing hazardous emissions. Printing 43 For information on page 31 - "Using the manual feeder" on page 34 Tips on using can be printed at a temperature up to Rough. If the transparencies you are able ...

User's Guide
Page 44
Use up to prevent sheets from the manual feeder. • Use envelopes designed specifically for use envelopes...an interlocking design - Have bent corners - Tips on using envelopes Print samples on the envelopes being considered for laser printers. For detailed information on label printing, characteristics, and design, see the Card Stock & Label Guide available...pharmacy, and dual-sided labels are not supported. Printing 44 When printing on the Lexmark Web site at www.lexmark.com/publications. Check with the manufacturer or vendor to ensure the envelopes can withstand ...
Use up to prevent sheets from the manual feeder. • Use envelopes designed specifically for use envelopes...an interlocking design - Have bent corners - Tips on using envelopes Print samples on the envelopes being considered for laser printers. For detailed information on label printing, characteristics, and design, see the Card Stock & Label Guide available...pharmacy, and dual-sided labels are not supported. Printing 44 When printing on the Lexmark Web site at www.lexmark.com/publications. Check with the manufacturer or vendor to ensure the envelopes can withstand ...
User's Guide
Page 45
...mm (0.04 in .) strip on the leading and driver edge, and use before buying large quantities. Print samples on the card stock being considered for laser printers. When printing on card stock: • Make sure the Paper Type is Card Stock. • Select the appropriate Paper Texture setting. •... zone coating of the label. • Be sure adhesive backing does not reach to peel off during printing, resulting in the paper tray or manual feeder. Check with slick backing material. • Use full label sheets. The labels can withstand temperatures up to 210°C (410°F) ...
...mm (0.04 in .) strip on the leading and driver edge, and use before buying large quantities. Print samples on the card stock being considered for laser printers. When printing on card stock: • Make sure the Paper Type is Card Stock. • Select the appropriate Paper Texture setting. •... zone coating of the label. • Be sure adhesive backing does not reach to peel off during printing, resulting in the paper tray or manual feeder. Check with slick backing material. • Use full label sheets. The labels can withstand temperatures up to 210°C (410°F) ...

User's Guide
Page 58
... of the printer, then print a network setup page and locate the IP address in the address book, then Manual Entry appears. 5 Press to search the address book, or press the arrow buttons until Manual appears, and then press to select another number. Search appears. E-mailing a document Sending an e-mail using the Embedded...
... of the printer, then print a network setup page and locate the IP address in the address book, then Manual Entry appears. 5 Press to search the address book, or press the arrow buttons until Manual appears, and then press to select another number. Search appears. E-mailing a document Sending an e-mail using the Embedded...

User's Guide
Page 59
...Load an original document faceup, short edge first into the ADF. c Press 1 to search for that button appears. Search appears. Manually entering an e-mail address After selecting Manual on the printer control panel, To appears on the first line, and a cursor appears on the second line. The first time you... are no entries in the address book, then Manual Entry appears. 5 Press # , and then enter the recipient's shortcut number. 6 Press 1 to enter another address, or press 2 to that button appears...
...Load an original document faceup, short edge first into the ADF. c Press 1 to search for that button appears. Search appears. Manually entering an e-mail address After selecting Manual on the printer control panel, To appears on the first line, and a cursor appears on the second line. The first time you... are no entries in the address book, then Manual Entry appears. 5 Press # , and then enter the recipient's shortcut number. 6 Press 1 to enter another address, or press 2 to that button appears...


