Clearing Jams Guide
Page 1
...feeder, and adjust the guide. 27x Paper Jam Open the output bin rear doors and Check Bin x then remove the jam. 28x Paper Jam Open the finisher top cover and Check Finisher then remove the jam. Lexmark™ T64x Clearing Jams Guide Avoiding jams The following hints can help you are not ...top front cover. Warning: Do not touch the photoconductor drum on the printer, Open Rear and remove the jam. Make sure the guides are holding the cartridge. 4 Place the print cartridge aside. Door 23x Paper Jam Check Duplex Remove the duplex tray from the multipurpose feeder, flex and stack...
...feeder, and adjust the guide. 27x Paper Jam Open the output bin rear doors and Check Bin x then remove the jam. 28x Paper Jam Open the finisher top cover and Check Finisher then remove the jam. Lexmark™ T64x Clearing Jams Guide Avoiding jams The following hints can help you are not ...top front cover. Warning: Do not touch the photoconductor drum on the printer, Open Rear and remove the jam. Make sure the guides are holding the cartridge. 4 Place the print cartridge aside. Door 23x Paper Jam Check Duplex Remove the duplex tray from the multipurpose feeder, flex and stack...
Clearing Jams Guide
Page 2
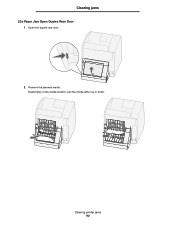
... toward you. 202 Paper Jam Open Rear Door 1 If the paper is exiting the printer, pull the media straight out, and press . CAUTION: The inside of the printer may be hot. Make sure it snaps into place. 4 Press . Otherwise, continue with step 2. 2 Open the printer rear door. 23x Paper Jam Open Duplex Rear Door 1 Open the duplex rear door. 6 Align and reinstall the...
... toward you. 202 Paper Jam Open Rear Door 1 If the paper is exiting the printer, pull the media straight out, and press . CAUTION: The inside of the printer may be hot. Make sure it snaps into place. 4 Press . Otherwise, continue with step 2. 2 Open the printer rear door. 23x Paper Jam Open Duplex Rear Door 1 Open the duplex rear door. 6 Align and reinstall the...
Clearing Jams Guide
Page 4
... the output bin rear door latches in the finisher: 2 Remove the jammed media. 3 Close the rear door, and make sure the door is exiting into the bin or finisher, pull the media straight out, and press . The rear door will open and drop down . 1 Push the finisher rear door latches in this group...have been divided into 27x and 28x groups. If you may only have one rear door. 3 Remove the jammed media. 4 Close the output bin rear doors, and make sure all doors are secure. 5 Press . 28x Paper Jam Check Finisher To clear a jam in toward the center. 6 Lower the envelope weight. 1 2 1 If ...
... the output bin rear door latches in the finisher: 2 Remove the jammed media. 3 Close the rear door, and make sure the door is exiting into the bin or finisher, pull the media straight out, and press . The rear door will open and drop down . 1 Push the finisher rear door latches in this group...have been divided into 27x and 28x groups. If you may only have one rear door. 3 Remove the jammed media. 4 Close the output bin rear doors, and make sure all doors are secure. 5 Press . 28x Paper Jam Check Finisher To clear a jam in toward the center. 6 Lower the envelope weight. 1 2 1 If ...
User's Guide
Page 80
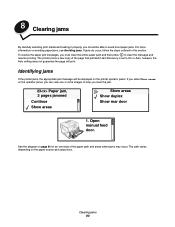
... path varies depending on avoiding paper jams, see Avoiding jams. If jams do occur, follow the steps outlined in this section. The printer prints a new copy of the paper path and areas where jams may occur. Open manual feed door. To resolve the paper jam messages, you must clear the entire...jammed if Jam Recovery is set to clear the message and resume printing. however, the Auto setting does not guarantee the page will be able to avoid most paper jams. For more images to help you clear the jam. 23 Paper jam, 3 pages jammed Continue Show areas Show areas Show duplex Show rear door...
... path varies depending on avoiding paper jams, see Avoiding jams. If jams do occur, follow the steps outlined in this section. The printer prints a new copy of the paper path and areas where jams may occur. Open manual feed door. To resolve the paper jam messages, you must clear the entire...jammed if Jam Recovery is set to clear the message and resume printing. however, the Auto setting does not guarantee the page will be able to avoid most paper jams. For more images to help you clear the jam. 23 Paper jam, 3 pages jammed Continue Show areas Show areas Show duplex Show rear door...
User's Guide
Page 82
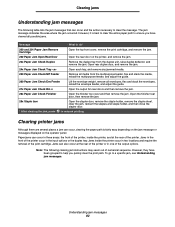
... the jam occurred. Jams inside the printer, and at the rear of the printer or in one of the output options. However, they have cleared all envelopes, flex and stack the envelopes, reload the envelope feeder, and adjust the guide. 27x Paper Jam Check Bin x Open the output bin rear doors and then remove the jam. 28x Paper Jam Check...
... the jam occurred. Jams inside the printer, and at the rear of the printer or in one of the output options. However, they have cleared all envelopes, flex and stack the envelopes, reload the envelope feeder, and adjust the guide. 27x Paper Jam Check Bin x Open the output bin rear doors and then remove the jam. 28x Paper Jam Check...

User's Guide
Page 88
This could cause personal injury or damage to remove the paper. Clearing printer jams 88 CAUTION: Do not use any pointed objects to the printer. Warning: If the print media does not move immediately when you . Clearing jams 5 Pull the print media up and toward you pull, stop pulling. You need to access the print media from the printer rear door. 6 Align and reinstall the toner cartridge. 7 Close the top front cover. 8 Close the multipurpose feeder. 9 Press .
This could cause personal injury or damage to remove the paper. Clearing printer jams 88 CAUTION: Do not use any pointed objects to the printer. Warning: If the print media does not move immediately when you . Clearing jams 5 Pull the print media up and toward you pull, stop pulling. You need to access the print media from the printer rear door. 6 Align and reinstall the toner cartridge. 7 Close the top front cover. 8 Close the multipurpose feeder. 9 Press .
User's Guide
Page 89
CAUTION: The inside of the printer may be hot. CAUTION: Do not use any internal components. This could cause personal injury or damage to remove the paper. Clearing jams 202 Paper Jam Open Rear Door 1 If the paper is exiting the printer, pull the media straight out, and press 2 Open the printer rear door. . Allow the printer to cool before touching any pointed objects to the printer. 3 Remove the jammed media. 4 Close the rear door. 5 Press . Clearing printer jams 89 Otherwise, continue with step 2.
CAUTION: The inside of the printer may be hot. CAUTION: Do not use any internal components. This could cause personal injury or damage to remove the paper. Clearing jams 202 Paper Jam Open Rear Door 1 If the paper is exiting the printer, pull the media straight out, and press 2 Open the printer rear door. . Allow the printer to cool before touching any pointed objects to the printer. 3 Remove the jammed media. 4 Close the rear door. 5 Press . Clearing printer jams 89 Otherwise, continue with step 2.
User's Guide
Page 90
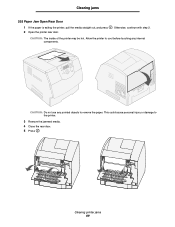
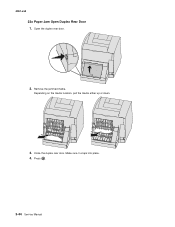
Depending on the media location, pull the media either up or down. Clearing jams 23x Paper Jam Open Duplex Rear Door 1 Open the duplex rear door. 2 Remove the jammed media. Clearing printer jams 90
Depending on the media location, pull the media either up or down. Clearing jams 23x Paper Jam Open Duplex Rear Door 1 Open the duplex rear door. 2 Remove the jammed media. Clearing printer jams 90
User's Guide
Page 91
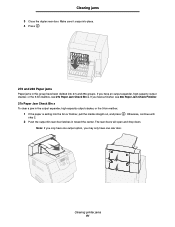
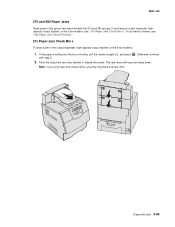
...high-capacity output stacker, or the 5-bin mailbox: 1 If the paper is exiting into place. 4 Press . 270 and 280 Paper jams Paper jams in toward the center. The rear doors will open and drop down. Note: If you only have one output option, you have been divided into 27x and 28x groups.... Clearing jams 3 Close the duplex rear door. If you have one rear door. Make sure it snaps into the bin or finisher, pull the media straight out, and press . Clearing printer jams 91 If you may only have a finisher, see 27x Paper...
...high-capacity output stacker, or the 5-bin mailbox: 1 If the paper is exiting into place. 4 Press . 270 and 280 Paper jams Paper jams in toward the center. The rear doors will open and drop down. Note: If you only have one output option, you have been divided into 27x and 28x groups.... Clearing jams 3 Close the duplex rear door. If you have one rear door. Make sure it snaps into the bin or finisher, pull the media straight out, and press . Clearing printer jams 91 If you may only have a finisher, see 27x Paper...
User's Guide
Page 92
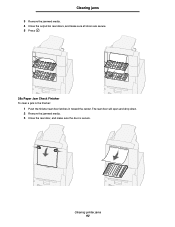
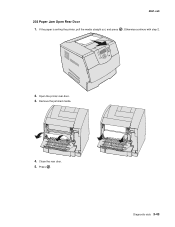
Clearing jams 3 Remove the jammed media. 4 Close the output bin rear doors, and make sure the door is secure. The rear door will open and drop down. 2 Remove the jammed media. 3 Close the rear door, and make sure all doors are secure. 5 Press . 28x Paper Jam Check Finisher To clear a jam in the finisher: 1 Push the finisher rear door latches in toward the center. Clearing printer jams 92
Clearing jams 3 Remove the jammed media. 4 Close the output bin rear doors, and make sure the door is secure. The rear door will open and drop down. 2 Remove the jammed media. 3 Close the rear door, and make sure all doors are secure. 5 Press . 28x Paper Jam Check Finisher To clear a jam in the finisher: 1 Push the finisher rear door latches in toward the center. Clearing printer jams 92
Service Manual
Page 7
4061-xx0 23x and 24x jams 3-40 200 and 201 Paper Jam Remove Cartridge 3-41 202 Paper Jam Open Rear Door 3-43 23x Paper Jam Open Duplex Rear Door 3-44 270 and 280 Paper Jams 3-45 27x Paper Jam Check Bin x 3-45 28x Paper Jam Check Finisher 3-46 Clearing staple jams 3-48 Repair information 4-1 Handling ...cover handle holder removal 4-16 Right cover handle holder removal 4-16 Left and right frame extensions 4-17 Pass thru plate 4-18 Laser cover removal 4-19 Bevel gear removal 4-21 Cartridge duct removal 4-23 Developer drive assembly removal 4-24 Developer drive coupler kit removal...
4061-xx0 23x and 24x jams 3-40 200 and 201 Paper Jam Remove Cartridge 3-41 202 Paper Jam Open Rear Door 3-43 23x Paper Jam Open Duplex Rear Door 3-44 270 and 280 Paper Jams 3-45 27x Paper Jam Check Bin x 3-45 28x Paper Jam Check Finisher 3-46 Clearing staple jams 3-48 Repair information 4-1 Handling ...cover handle holder removal 4-16 Right cover handle holder removal 4-16 Left and right frame extensions 4-17 Pass thru plate 4-18 Laser cover removal 4-19 Bevel gear removal 4-21 Cartridge duct removal 4-23 Developer drive assembly removal 4-24 Developer drive coupler kit removal...
Service Manual
Page 83
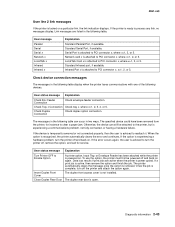
... link, the link indication displays. User status message Explanation Turn Printer OFF to Enable Option Insert Duplex Front Cover Close Duplex Rear Door A printer option, Input Tray, or Envelope Feeder has been attached while the printer is advised to process any link, no messages display. The ... could have been removed from the printer, for service. Data loss results if print jobs are listed in the following table can still be powered off , remove the option, and call for instance to turn off and back on again. The duplex rear door is advised to clear a paper jam.
... link, the link indication displays. User status message Explanation Turn Printer OFF to Enable Option Insert Duplex Front Cover Close Duplex Rear Door A printer option, Input Tray, or Envelope Feeder has been attached while the printer is advised to process any link, no messages display. The ... could have been removed from the printer, for service. Data loss results if print jobs are listed in the following table can still be powered off , remove the option, and call for instance to turn off and back on again. The duplex rear door is advised to clear a paper jam.
Service Manual
Page 84
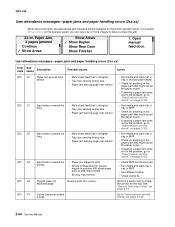
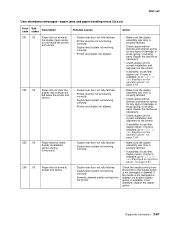
If you select Show Areas on the operator panel, you clear the jam. 23 Paper Jam, 3 pages jammed Continue Show Areas Show Areas Show Duplex Show Rear Door Show Finisher 1. User attendance messages-paper jams and paper handling errors (2xx.xx) Error code Sub codes Description Possible causes Action ... • Check for the tray. 4061-xx0 User attendance messages-paper jams and paper handling errors (2xx.xx) When the printer jams, the appropriate jam message will be displayed on page 3-13. Open manual feed door. Input sensor covered too quickly • Paper pre-staged in path...
If you select Show Areas on the operator panel, you clear the jam. 23 Paper Jam, 3 pages jammed Continue Show Areas Show Areas Show Duplex Show Rear Door Show Finisher 1. User attendance messages-paper jams and paper handling errors (2xx.xx) Error code Sub codes Description Possible causes Action ... • Check for the tray. 4061-xx0 User attendance messages-paper jams and paper handling errors (2xx.xx) When the printer jams, the appropriate jam message will be displayed on page 3-13. Open manual feed door. Input sensor covered too quickly • Paper pre-staged in path...
Service Manual
Page 107
... not functioning correctly. • Duplex feed system not working correctly. • Printer and duplex not aligned. • Make sure the duplex assembly rear door is available, go to "233.xx Jam displayed on operator panel" on page 2-83. • Duplex rear door not fully latched. • Duplex feed system not working correctly. • Severely skewed media...
... not functioning correctly. • Duplex feed system not working correctly. • Printer and duplex not aligned. • Make sure the duplex assembly rear door is available, go to "233.xx Jam displayed on operator panel" on page 2-83. • Duplex rear door not fully latched. • Duplex feed system not working correctly. • Severely skewed media...
Service Manual
Page 141
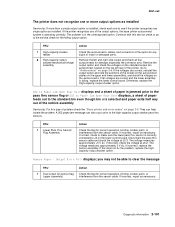
...on page 5-6. Otherwise, replace the High-capacity output stacker option. 202.xx Paper Jam Open Rear Door displays and a sheet of paper is jammed prior to the pass thru sensor flag or 202.xx Paper Jam Open Rear Door displays, a sheet of paper feeds out to the high-capacity output stacker pass thru... sensors. A 202 paper jam message can help isolate the problem. you may not be able to see if the printer recognizes any single option as installed....
...on page 5-6. Otherwise, replace the High-capacity output stacker option. 202.xx Paper Jam Open Rear Door displays and a sheet of paper is jammed prior to the pass thru sensor flag or 202.xx Paper Jam Open Rear Door displays, a sheet of paper feeds out to the high-capacity output stacker pass thru... sensors. A 202 paper jam message can help isolate the problem. you may not be able to see if the printer recognizes any single option as installed....
Service Manual
Page 150
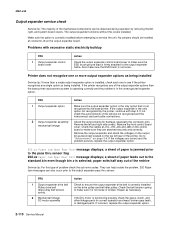
... the pass thru sensor flag 202.xx Paper Jam Open Rear Door message displays; Check the cables at connector J6 on the control board to see if the printer recognizes any of the printer. Also make sure it is not loose. Printer does not recognize one to make sure the ...make sure they are correct and the problem persists, replace the output expander option. 202.xx Paper Jam Open Rear Door message displays; If the DC motor is not recognized by the printer, continue with excessive static electricity buildup FRU 1 Output expander control board cover Action Check the output ...
... the pass thru sensor flag 202.xx Paper Jam Open Rear Door message displays; Check the cables at connector J6 on the control board to see if the printer recognizes any of the printer. Also make sure it is not loose. Printer does not recognize one to make sure the ...make sure they are correct and the problem persists, replace the output expander option. 202.xx Paper Jam Open Rear Door message displays; If the DC motor is not recognized by the printer, continue with excessive static electricity buildup FRU 1 Output expander control board cover Action Check the output ...
Service Manual
Page 211
Press . Open the printer rear door. 3. Diagnostic aids 3-43 Remove the jammed media. 4. Close the rear door. 5. If the paper is exiting the printer, pull the media straight out, and press . 4061-xx0 202 Paper Jam Open Rear Door 1. Otherwise continue with step 2. 2.
Press . Open the printer rear door. 3. Diagnostic aids 3-43 Remove the jammed media. 4. Close the rear door. 5. If the paper is exiting the printer, pull the media straight out, and press . 4061-xx0 202 Paper Jam Open Rear Door 1. Otherwise continue with step 2. 2.
Service Manual
Page 212
Open the duplex rear door. 2. Close the duplex rear door. Remove the jammed media. Make sure it snaps into place. 4. Press . 3-44 Service Manual Depending on the media location, pull the media either up or down. 3. 4061-xx0 23x Paper Jam Open Duplex Rear Door 1.
Open the duplex rear door. 2. Close the duplex rear door. Remove the jammed media. Make sure it snaps into place. 4. Press . 3-44 Service Manual Depending on the media location, pull the media either up or down. 3. 4061-xx0 23x Paper Jam Open Duplex Rear Door 1.
Service Manual
Page 213
...5-bin mailbox, see "28x Paper Jam Check Finisher". 27x Paper Jam Check Bin x To clear a jam in the output expander, high-capacity output stacker, or the 5-bin mailbox: 1. If the paper is exiting into 27x and 28x groups. Note: If you only have one rear door. Otherwise continue with step 2. 2.... Push the output bin rear door latches in this group have one output option, you have a finisher, see "27x Paper Jam Check Bin x". Diagnostic aids 3-45 If you may only have been...
...5-bin mailbox, see "28x Paper Jam Check Finisher". 27x Paper Jam Check Bin x To clear a jam in the output expander, high-capacity output stacker, or the 5-bin mailbox: 1. If the paper is exiting into 27x and 28x groups. Note: If you only have one rear door. Otherwise continue with step 2. 2.... Push the output bin rear door latches in this group have one output option, you have a finisher, see "27x Paper Jam Check Bin x". Diagnostic aids 3-45 If you may only have been...
Service Manual
Page 214
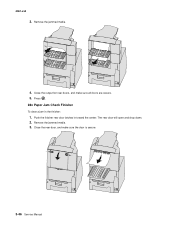
Push the finisher rear door latches in the finisher: 1. The rear door will open and drop down. 2. Close the rear door, and make sure all doors are secure. 5. Remove the jammed media. 4. Close the output bin rear doors, and make sure the door is secure. 3-46 Service Manual Remove the jammed media. 3. 4061-xx0 3. Press . 28x Paper Jam Check Finisher To clear a jam in toward the center.
Push the finisher rear door latches in the finisher: 1. The rear door will open and drop down. 2. Close the rear door, and make sure all doors are secure. 5. Remove the jammed media. 4. Close the output bin rear doors, and make sure the door is secure. 3-46 Service Manual Remove the jammed media. 3. 4061-xx0 3. Press . 28x Paper Jam Check Finisher To clear a jam in toward the center.


