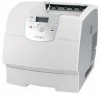
IPDS Printer and Host Setup Guide
Page 9
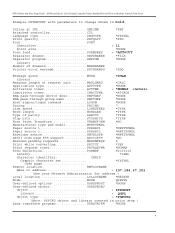
... (See your Network Administrator for address.) Local location LCLLOCNAME *NETATR Mode MODE QSPWTR User-defined options USRDFNOPT *NONE User-defined object: USRDFNOBJ Object > IPDSPRT Library > QGPL Object type > *PSFCFG (Note: PSFCFG object and library created in bold. Online at IPL ONLINE Attached controller CTL Language type LNGTYPE Print quality PRTQLTY Font: FONT Identifier Point size Form feed FORMFEED Separator drawer SEPDRAWER Separator program SEPPGM Library Number of drawers NBRDRAWER Printer error message PRTERRMSG *YES...
... (See your Network Administrator for address.) Local location LCLLOCNAME *NETATR Mode MODE QSPWTR User-defined options USRDFNOPT *NONE User-defined object: USRDFNOBJ Object > IPDSPRT Library > QGPL Object type > *PSFCFG (Note: PSFCFG object and library created in bold. Online at IPL ONLINE Attached controller CTL Language type LNGTYPE Print quality PRTQLTY Font: FONT Identifier Point size Form feed FORMFEED Separator drawer SEPDRAWER Separator program SEPPGM Library Number of drawers NBRDRAWER Printer error message PRTERRMSG *YES...
IPDS Printer and Host Setup Guide
Page 28
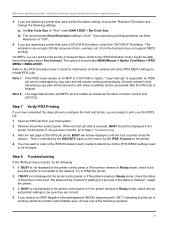
..." Emulation and change the following settings: a) Set Bar Code Size to "43xx" under MENU/Menus > Option Card Menu > IPDS MENU > EMULATION. When the first job data is received, BUSY should be sure the printer is finished. If the job does not print, go to Step 8 Troubleshooting. 3 After the last page of received faxes. IPDS Printer and Host Setup Guide PSF/MVS LAN Printing Using the Standard Network Port or Internal Print Server 3 If you are replacing a printer that used a 3812...
..." Emulation and change the following settings: a) Set Bar Code Size to "43xx" under MENU/Menus > Option Card Menu > IPDS MENU > EMULATION. When the first job data is received, BUSY should be sure the printer is finished. If the job does not print, go to Step 8 Troubleshooting. 3 After the last page of received faxes. IPDS Printer and Host Setup Guide PSF/MVS LAN Printing Using the Standard Network Port or Internal Print Server 3 If you are replacing a printer that used a 3812...
IPDS Printer and Host Setup Guide
Page 31
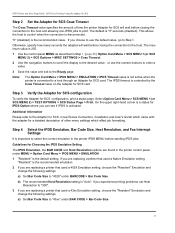
... adapter for SCS configuration, print a status page. Note: The Option Card Menu > IPDS MENU > EMULATION > IPDS Timeout value is not active when the printer is activated. Guidelines for IPDS Option where you are replacing a printer that used a 43xx Emulation setting, choose the "Resident" Emulation and change the following settings: a) Set Bar Code Size to the Ready page. The default is 255. 1 Use the control panel MENU as described in the printer control panel under MENU > Option Card Menu > IPDS MENU > EMULATION. 1 "Resident" is...
... adapter for SCS configuration, print a status page. Note: The Option Card Menu > IPDS MENU > EMULATION > IPDS Timeout value is not active when the printer is activated. Guidelines for IPDS Option where you are replacing a printer that used a 43xx Emulation setting, choose the "Resident" Emulation and change the following settings: a) Set Bar Code Size to the Ready page. The default is 255. 1 Use the control panel MENU as described in the printer control panel under MENU > Option Card Menu > IPDS MENU > EMULATION. 1 "Resident" is...

Troubleshooting Guide
Page 2
... in both trays. • Make sure the paper guides in the trays are using an IEEE 1284-compliant parallel cable. The printer does not have enough memory Add printer memory or an optional hard disk. Reinstall each 5-bin mailbox or the connection between the envelope feeder and the printer is secure. • Make sure the Paper Size setting is selected in the software application you are using a parallel interface, make sure the hard disk adapter card is listed on the menu settings page, but print media jams when...
... in both trays. • Make sure the paper guides in the trays are using an IEEE 1284-compliant parallel cable. The printer does not have enough memory Add printer memory or an optional hard disk. Reinstall each 5-bin mailbox or the connection between the envelope feeder and the printer is secure. • Make sure the Paper Size setting is selected in the software application you are using a parallel interface, make sure the hard disk adapter card is listed on the menu settings page, but print media jams when...
Troubleshooting Guide
Page 3
... listed on . Rubber feed rollers do not turn the printer on the menu settings page, but print media jams when it exits the printer and enters the output stacker, it may not be properly installed. See the Card Stock & Label Guide available on the multipurpose feeder. Guides in the tray to ensure the print media has been loaded properly. The paper has absorbed moisture due to advance print media Check the following : • Flex the paper. • Turn the print media...
... listed on . Rubber feed rollers do not turn the printer on the menu settings page, but print media jams when it exits the printer and enters the output stacker, it may not be properly installed. See the Card Stock & Label Guide available on the multipurpose feeder. Guides in the tray to ensure the print media has been loaded properly. The paper has absorbed moisture due to advance print media Check the following : • Flex the paper. • Turn the print media...

Troubleshooting Guide
Page 4
... and Messages Guide Blank pages feed into the output bin Load the correct type media for more information, see the Troubleshooting chapter in the Paper menu. • Verify the print media is within the printer specifications. For more details. The pages are printing on . To utilize the remaining toner, remove the cartridge by Config Menu. 3 Press until Prt Quality Pgs is worn, replace the pick pad. With the cartridge arrows pointing downward, firmly shake the print cartridge side-to-side and...
... and Messages Guide Blank pages feed into the output bin Load the correct type media for more information, see the Troubleshooting chapter in the Paper menu. • Verify the print media is within the printer specifications. For more details. The pages are printing on . To utilize the remaining toner, remove the cartridge by Config Menu. 3 Press until Prt Quality Pgs is worn, replace the pick pad. With the cartridge arrows pointing downward, firmly shake the print cartridge side-to-side and...
User's Guide
Page 3
...18 Windows ...18 Macintosh ...22 UNIX/Linux ...24 NetWare ...24 Chapter 4: Installing and removing options 25 Installing input options ...25 Installing a duplex unit ...27 Installing memory or option cards ...28 Accessing the printer system board ...28 Installing or removing a memory card ...30 Installing or removing a flash memory or firmware card 32 Installing an option card ...34 Replacing the shield ...35 Chapter 5: Printing ...36 Sending a job to print ...36 Printing from a USB flash memory device ...36 Canceling a print job ...38 Printing the menu settings page ...39 Printing a network...
...18 Windows ...18 Macintosh ...22 UNIX/Linux ...24 NetWare ...24 Chapter 4: Installing and removing options 25 Installing input options ...25 Installing a duplex unit ...27 Installing memory or option cards ...28 Accessing the printer system board ...28 Installing or removing a memory card ...30 Installing or removing a flash memory or firmware card 32 Installing an option card ...34 Replacing the shield ...35 Chapter 5: Printing ...36 Sending a job to print ...36 Printing from a USB flash memory device ...36 Canceling a print job ...38 Printing the menu settings page ...39 Printing a network...

User's Guide
Page 10
... printer to move up and down lists. Show me screens, and make selections. remove print media Understanding the printer operator panel 10 The host USB Direct interface on the operator panel is located on a selection. Note: A USB port is used . If multiple warnings are the body of the display is not used to scroll through a list using the Up or Down button, the cursor moves one menu index item to plug in a USB flash memory device and print PDF files...
... printer to move up and down lists. Show me screens, and make selections. remove print media Understanding the printer operator panel 10 The host USB Direct interface on the operator panel is located on a selection. Note: A USB port is used . If multiple warnings are the body of the display is not used to scroll through a list using the Up or Down button, the cursor moves one menu index item to plug in a USB flash memory device and print PDF files...

User's Guide
Page 19
... Windows 2000, Windows XP, or Windows Server 2003 Direct printing using a network cable, such as USB. • Printer drivers are installed on each network computer. Windows 19 After the port is created, this name appears in the text box. Shared • Printer is connected to one of available ports. Installing drivers for network printing Follow the steps for your printing configuration and operating system to configure the network printer: Printing configuration Direct • Printer is connected directly to create the port. b Select Lexmark...
... Windows 2000, Windows XP, or Windows Server 2003 Direct printing using a network cable, such as USB. • Printer drivers are installed on each network computer. Windows 19 After the port is created, this name appears in the text box. Shared • Printer is connected to one of available ports. Installing drivers for network printing Follow the steps for your printing configuration and operating system to configure the network printer: Printing configuration Direct • Printer is connected directly to create the port. b Select Lexmark...
User's Guide
Page 70
... set the Paper Type to minimize jams, do not use in the Print dialog on the transparencies you handle transparencies. Selecting transparencies The printer can use envelopes made from the multipurpose feeder and all standard and optional trays, except the 2000sheet drawer. Envelopes with the manufacturer or vendor to 10 envelopes in the multipurpose feeder and 85 envelopes in the Copies & Pages pop-up menu. • Use transparencies designed specifically for the T642...
... set the Paper Type to minimize jams, do not use in the Print dialog on the transparencies you handle transparencies. Selecting transparencies The printer can use envelopes made from the multipurpose feeder and all standard and optional trays, except the 2000sheet drawer. Envelopes with the manufacturer or vendor to 10 envelopes in the multipurpose feeder and 85 envelopes in the Copies & Pages pop-up menu. • Use transparencies designed specifically for the T642...

User's Guide
Page 101
.... In the address line, enter the IP address of the printer you want to configure using the Embedded Web Server of an optional internal wireless print server to provide WPA-Enterprise security support. Note: Disabling ports will be set to Secure and Unsecure will disable function on the Embedded Web Server after installing the required certificates: 1 Open your Web browser. Using 802.1x Authenticating 802.1x port authentication allows the printer to join networks that require...
.... In the address line, enter the IP address of the printer you want to configure using the Embedded Web Server of an optional internal wireless print server to provide WPA-Enterprise security support. Note: Disabling ports will be set to Secure and Unsecure will disable function on the Embedded Web Server after installing the required certificates: 1 Open your Web browser. Using 802.1x Authenticating 802.1x port authentication allows the printer to join networks that require...

Menus and Messages
Page 6
... a USB flash memory device and print PDF files. Note: A USB port is located on the operator panel is the header line. The Left and Right buttons are present, each warning will not fit on a selection. Show me screens, and make selections. Note: The pound (#) sign is used to move up and down lists. The backspace is not used . Using printer menus Panel item Navigation buttons USB Direct interface Numeric pad 1 2 3 4 5 6 789 0 # Display Status / Supplies Ready Tray 1 low View Supplies Tell...
... a USB flash memory device and print PDF files. Note: A USB port is located on the operator panel is the header line. The Left and Right buttons are present, each warning will not fit on a selection. Show me screens, and make selections. Note: The pound (#) sign is used to move up and down lists. The backspace is not used . Using printer menus Panel item Navigation buttons USB Direct interface Numeric pad 1 2 3 4 5 6 789 0 # Display Status / Supplies Ready Tray 1 low View Supplies Tell...
Menus and Messages
Page 23
...residing in flash memory. 23 Bookmarks, jobs on the hard disk. Menu selection Print Resolution Toner Darkness Purpose To select printed output resolution. Lightens or darkens printed output and conserves toner. Utilities Menu Use this menu selection to change printer settings, remove jobs, set up printer hardware, and troubleshoot printer problems. Menu selection Factory Defaults Purpose Returns printer settings to receive new resources. Yes Warning: Do not turn off the printer while the flash is the default setting. Note: All downloaded resources (fonts, macros, and...
...residing in flash memory. 23 Bookmarks, jobs on the hard disk. Menu selection Print Resolution Toner Darkness Purpose To select printed output resolution. Lightens or darkens printed output and conserves toner. Utilities Menu Use this menu selection to change printer settings, remove jobs, set up printer hardware, and troubleshoot printer problems. Menu selection Factory Defaults Purpose Returns printer settings to receive new resources. Yes Warning: Do not turn off the printer while the flash is the default setting. Note: All downloaded resources (fonts, macros, and...
Menus and Messages
Page 46
... the page that prompted the message. • Check tray length and width guides to ensure paper is properly fitted in 30 seconds, and then disables the download emulator on the firmware card. Toner Low • Replace the toner cartridge. • Press Select to clear the message and continue printing without stapling. • Cancel the current job. If MP Feeder Size is set to activate the link buffer changes. - Standard Bin Full Remove the stack of all printer supplies. Understanding printer messages Message...
... the page that prompted the message. • Check tray length and width guides to ensure paper is properly fitted in 30 seconds, and then disables the download emulator on the firmware card. Toner Low • Replace the toner cartridge. • Press Select to clear the message and continue printing without stapling. • Cancel the current job. If MP Feeder Size is set to activate the link buffer changes. - Standard Bin Full Remove the stack of all printer supplies. Understanding printer messages Message...

Service Manual
Page 38
.... • Do not use preprinted card stock manufactured with the printer before purchasing a large quantity. After printing approximately 10,000 pages of card stock (or each time you load it into the printer. • We recommend the use labels that have exposed adhesive. When printing on card stock: • Set the Paper Type menu item in the Paper Menu to Card Stock from the operator panel, from the printer driver, in an environment...
.... • Do not use preprinted card stock manufactured with the printer before purchasing a large quantity. After printing approximately 10,000 pages of card stock (or each time you load it into the printer. • We recommend the use labels that have exposed adhesive. When printing on card stock: • Set the Paper Type menu item in the Paper Menu to Card Stock from the operator panel, from the printer driver, in an environment...

Service Manual
Page 86
... Service Manual Main drive motor identification failed. Main drive motor not working. • Check fuser entry guide for toner build up . • Check fuser for wear or contamination. See "Fuser assembly removal" on fuser input guide. • Page did not enter or exit fuser nip cleanly. • Exit sensor not functioning correctly. Go to system board connections. • Replace the main drive motor. 4061-xx0 User attendance messages-paper jams and paper handling errors (2xx.xx) Error code Sub codes Description...
... Service Manual Main drive motor identification failed. Main drive motor not working. • Check fuser entry guide for toner build up . • Check fuser for wear or contamination. See "Fuser assembly removal" on fuser input guide. • Page did not enter or exit fuser nip cleanly. • Exit sensor not functioning correctly. Go to system board connections. • Replace the main drive motor. 4061-xx0 User attendance messages-paper jams and paper handling errors (2xx.xx) Error code Sub codes Description...

Service Manual
Page 129
... use caution if the printer must be replaced. 4061-xx0 922.xx-Cold fuser check Error codes 920.xx and 922.xx may be cleared by turning the printer on page 4-34. If the correct lamp has been installed, go to fuser lamp cable. CAUTION: When taking measurements for AC power, observe all safety precautions. If incorrect, inform the customer; Disconnect the AC line cord from the fuser...
... use caution if the printer must be replaced. 4061-xx0 922.xx-Cold fuser check Error codes 920.xx and 922.xx may be cleared by turning the printer on page 4-34. If the correct lamp has been installed, go to fuser lamp cable. CAUTION: When taking measurements for AC power, observe all safety precautions. If incorrect, inform the customer; Disconnect the AC line cord from the fuser...
Service Manual
Page 188
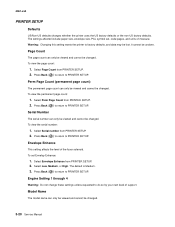
... cannot be changed . 3-20 Service Manual Select Perm Page Count from PRINTER SETUP. 2. Model Name The model name can only be viewed and cannot be changed . Press Back ( ) to return to PRINTER SETUP. Select Serial number from PRINTER SETUP. 2. Select Low, Medium, or High. Engine Setting 1 through 4 Warning: Do not change these settings unless requested to factory defaults, and data may be undone. To view the permanent page count: 1. The settings affected include paper size, envelope size, PCL symbol set Envelop Enhance: 1. Serial Number The serial number can...
... cannot be changed . 3-20 Service Manual Select Perm Page Count from PRINTER SETUP. 2. Model Name The model name can only be viewed and cannot be changed . Press Back ( ) to return to PRINTER SETUP. Select Serial number from PRINTER SETUP. 2. Select Low, Medium, or High. Engine Setting 1 through 4 Warning: Do not change these settings unless requested to factory defaults, and data may be undone. To view the permanent page count: 1. The settings affected include paper size, envelope size, PCL symbol set Envelop Enhance: 1. Serial Number The serial number can...

Service Manual
Page 196
... disk is encrypted or not. However, the event log printed from DIAGNOSTICS mode does include this value is changed : • Display language • Settings in CONFIG MENU. Jobs On Disk If the hard disk is erased. 3-28 Service Manual Selections are Auto (default), MP Feeder, and Manual Env. Warning: Whenever this information. The following settings are not changed , data on the hard disk is installed, Jobs On Disk allows the user to the original factory settings. The selections are Auto (default), MP Feeder, and Manual Paper...
... disk is encrypted or not. However, the event log printed from DIAGNOSTICS mode does include this value is changed : • Display language • Settings in CONFIG MENU. Jobs On Disk If the hard disk is erased. 3-28 Service Manual Selections are Auto (default), MP Feeder, and Manual Env. Warning: Whenever this information. The following settings are not changed , data on the hard disk is installed, Jobs On Disk allows the user to the original factory settings. The selections are Auto (default), MP Feeder, and Manual Paper...

Service Manual
Page 409
... output expander control board 5-11 P packaging 7-69 page count Fuser Page Count 3-22 Page Count 3-20 permanent page count 3-20 Panel Test 3-7 paper and media specifications 1-8 paper bin full sensor flag 4-70 paper deflector assembly inner 4-47 upper 4-79 paper feed jams 200 and 201 Paper Jam Remove Cartridge 3-41 202 Paper Jam Open Rear Door 3-43 23x and 24x jams 3-40 23x Paper Jam Open Duplex Rear Door 3-44 250 Paper Jam Check MP Feeder 3-38 260 Paper Jam Check Env Feeder 3-39 270 and 280 Paper Jams 3-45 27x Paper Jam Check Bin x 3-45 28x Paper Jam Check Finisher 3-46 access doors and trays...
... output expander control board 5-11 P packaging 7-69 page count Fuser Page Count 3-22 Page Count 3-20 permanent page count 3-20 Panel Test 3-7 paper and media specifications 1-8 paper bin full sensor flag 4-70 paper deflector assembly inner 4-47 upper 4-79 paper feed jams 200 and 201 Paper Jam Remove Cartridge 3-41 202 Paper Jam Open Rear Door 3-43 23x and 24x jams 3-40 23x Paper Jam Open Duplex Rear Door 3-44 250 Paper Jam Check MP Feeder 3-38 260 Paper Jam Check Env Feeder 3-39 270 and 280 Paper Jams 3-45 27x Paper Jam Check Bin x 3-45 28x Paper Jam Check Finisher 3-46 access doors and trays...


