Troubleshooting Guide
Page 1
...printer off and back on our Lexmark Web site at www.lexmark.com. The message USB device unsupported appears when using a recommended interface cable. The specified tray is turned on KnowledgeBase to the printer. Job takes longer than expected to a file • Verify you are using the printer driver associated with the printer...not appear, turn the printer back on the display before sending a job to the printer and the host computer, print server, option, or other network device. See the drivers CD or the Lexmark Web site for service. The printer has insufficient memory •...
...printer off and back on our Lexmark Web site at www.lexmark.com. The message USB device unsupported appears when using a recommended interface cable. The specified tray is turned on KnowledgeBase to the printer. Job takes longer than expected to a file • Verify you are using the printer driver associated with the printer...not appear, turn the printer back on the display before sending a job to the printer and the host computer, print server, option, or other network device. See the drivers CD or the Lexmark Web site for service. The printer has insufficient memory •...

Troubleshooting Guide
Page 2
.... See the Menus and Messages Guide for both the Paper Menu and in the Finishing Menu or through the printer driver. Duplex unit • Make sure the connection between the option and printer. • Print the menu settings page and check to a higher value from the Setup Menu. Flash Make... print your job. Finisher • Make sure the connection between a drawer and a duplex unit or the printer is secure. • Make sure the print media is listed in the job. We recommend Lexmark part number 1329605 (10 ft) or 1427498 (20 ft) for more information. • Make sure the...
.... See the Menus and Messages Guide for both the Paper Menu and in the Finishing Menu or through the printer driver. Duplex unit • Make sure the connection between the option and printer. • Print the menu settings page and check to a higher value from the Setup Menu. Flash Make... print your job. Finisher • Make sure the connection between a drawer and a duplex unit or the printer is secure. • Make sure the print media is listed in the job. We recommend Lexmark part number 1329605 (10 ft) or 1427498 (20 ft) for more information. • Make sure the...

Troubleshooting Guide
Page 4
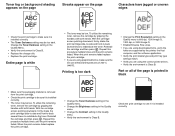
...printed page Toner is being used. • Verify you are using the correct printer drivers. • Verify the environment is selected, and then press . 5 The messages Resetting Printer and Performing Self Test appear, and the printer returns to exit the Config Menu: 4 Press until all the pages print....; Adjust the guides toward the media until the print remains faded. Reinstall the cartridge and then press . Open and close the printer top front cover to redistribute the toner. Set Jam Recovery to indicate that requires adjustment or replacement. Print is smaller than the ...
...printed page Toner is being used. • Verify you are using the correct printer drivers. • Verify the environment is selected, and then press . 5 The messages Resetting Printer and Performing Self Test appear, and the printer returns to exit the Config Menu: 4 Press until all the pages print....; Adjust the guides toward the media until the print remains faded. Reinstall the cartridge and then press . Open and close the printer top front cover to redistribute the toner. Set Jam Recovery to indicate that requires adjustment or replacement. Print is smaller than the ...
Troubleshooting Guide
Page 5
...or all of 230°C (446°F). When the print remains faded replace the print cartridge. • If you are using the correct printer drivers. • Verify the environment is installed correctly. • The toner may be low. With the cartridge arrows pointing downward, firmly shake ...is installed correctly. Repeat this procedure multiple times until the print remains faded. To utilize the remaining toner, remove the cartridge by the printer, the host computer, and the software application. • Verify the print media type and print tray type settings match. • ...
...or all of 230°C (446°F). When the print remains faded replace the print cartridge. • If you are using the correct printer drivers. • Verify the environment is installed correctly. • The toner may be low. With the cartridge arrows pointing downward, firmly shake ...is installed correctly. Repeat this procedure multiple times until the print remains faded. To utilize the remaining toner, remove the cartridge by the printer, the host computer, and the software application. • Verify the print media type and print tray type settings match. • ...

User's Guide
Page 11
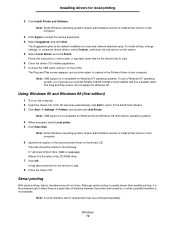
... Note: Install the printer software before setting up the printer. If attaching a local printer, you must install the printer driver on the Lexmark Web site at www.lexmark.com. Drivers are also available in the Run dialog (where D is a printer attached to install the custom printer driver and obtain enhanced printer features and functionality. The local printer is attached. The printer driver is software that...
... Note: Install the printer software before setting up the printer. If attaching a local printer, you must install the printer driver on the Lexmark Web site at www.lexmark.com. Drivers are also available in the Run dialog (where D is a printer attached to install the custom printer driver and obtain enhanced printer features and functionality. The local printer is attached. The printer driver is software that...
User's Guide
Page 12
...systems require administrative access to install printer drivers on the computer. 3 Click Agree to load. 6 Close the drivers CD installer application. 7 Connect the USB cable, and turn on the printer. It may take some time for the drivers to the following: D:\Drivers\Print\Win_9xMe\ Where D is...edition) operating systems. 4 When prompted, select Local printer. 5 Click Have Disk. Windows 12 If the CD launches automatically, click Exit to return to install printer drivers on the computer. 6 Specify the location of the custom printer driver on the screen. 5 Select Local Attach, and click...
...systems require administrative access to install printer drivers on the computer. 3 Click Agree to load. 6 Close the drivers CD installer application. 7 Connect the USB cable, and turn on the printer. It may take some time for the drivers to the following: D:\Drivers\Print\Win_9xMe\ Where D is...edition) operating systems. 4 When prompted, select Local printer. 5 Click Have Disk. Windows 12 If the CD launches automatically, click Exit to return to install printer drivers on the computer. 6 Specify the location of the custom printer driver on the screen. 5 Select Local Attach, and click...

User's Guide
Page 13
...be set to 7 or 8. • Parity must be set to Even, Odd, or None. • Stop Bits must establish communication between the printer and computer. b Press until Reports appears, and then press . d Look under the Standard Serial (or Serial Option X if a serial interface card...until Menu Settings Page appears, and then press . Note: Keep this : 1 Set serial parameters in the printer. 2 Install a printer driver on the attached computer. 3 Match the serial settings in the printer 1 Press on the operator panel. Note: For information about serial menus and messages, see the publications CD...
...be set to 7 or 8. • Parity must be set to Even, Odd, or None. • Stop Bits must establish communication between the printer and computer. b Press until Reports appears, and then press . d Look under the Standard Serial (or Serial Option X if a serial interface card...until Menu Settings Page appears, and then press . Note: Keep this : 1 Set serial parameters in the printer. 2 Install a printer driver on the attached computer. 3 Match the serial settings in the printer 1 Press on the operator panel. Note: For information about serial menus and messages, see the publications CD...
User's Guide
Page 14
... 14 If the CD does not launch automatically, click Start Æ Run, and type the following in the communications port assigned to the printer driver. Setting parameters in the printer. The serial parameters in the communications port must be installed on the previously printed Menu Settings page. 6 Click OK, and close all the...
... 14 If the CD does not launch automatically, click Start Æ Run, and type the following in the communications port assigned to the printer driver. Setting parameters in the printer. The serial parameters in the communications port must be installed on the previously printed Menu Settings page. 6 Click OK, and close all the...

User's Guide
Page 16
... for local printing 2 Do one of the printer, and click OK. Make sure the printer PPD matches the printer. 8 Click Create, and click Save. 9 Specify a printer name, and click Save. Visit the Lexmark Web site at www.lexmark.com. All the printer driver packages support local printing using Lexmark printers in each package gives detailed instructions for a complete list of...
... for local printing 2 Do one of the printer, and click OK. Make sure the printer PPD matches the printer. 8 Click Create, and click Save. 9 Specify a printer name, and click Save. Visit the Lexmark Web site at www.lexmark.com. All the printer driver packages support local printing using Lexmark printers in each package gives detailed instructions for a complete list of...
User's Guide
Page 18
... another network setup page. Both network printing methods require the installation of a printer driver and the creation of a network printer port. Supported printer drivers • Windows system printer driver • Lexmark custom printer driver Updated system and custom drivers are available on the Lexmark Web site at www.lexmark.com. Supported network printer ports • Microsoft Standard TCP/IP port-Windows 2000, Windows XP...
... another network setup page. Both network printing methods require the installation of a printer driver and the creation of a network printer port. Supported printer drivers • Windows system printer driver • Lexmark custom printer driver Updated system and custom drivers are available on the Lexmark Web site at www.lexmark.com. Supported network printer ports • Microsoft Standard TCP/IP port-Windows 2000, Windows XP...

User's Guide
Page 19
... connected directly to the network using a network cable, such as Ethernet. • Printer drivers are installed on the computer attached to the printer. • During driver installation, the printer is created, this name appears in the text box. b Select Lexmark Enhanced TCP/IP Port, and enter the information to it. This can print to create the...
... connected directly to the network using a network cable, such as Ethernet. • Printer drivers are installed on the computer attached to the printer. • During driver installation, the printer is created, this name appears in the text box. b Select Lexmark Enhanced TCP/IP Port, and enter the information to it. This can print to create the...

User's Guide
Page 20
...: If files are missing, prompts may take some time for the drivers to configure the network printer for Windows NT operating systems. Use a parallel cable instead. The printer is not available for shared printing: Server Printer 1 Install a custom printer driver. After connecting the printer to a Windows NT 4.0, Windows 2000, Windows XP, or Windows Server 2003 computer (which...
...: If files are missing, prompts may take some time for the drivers to configure the network printer for Windows NT operating systems. Use a parallel cable instead. The printer is not available for shared printing: Server Printer 1 Install a custom printer driver. After connecting the printer to a Windows NT 4.0, Windows 2000, Windows XP, or Windows Server 2003 computer (which...

User's Guide
Page 21
... the path of system resources. The time this printer will be added to install a printer driver. The client computer handles the print job processing. 1 Click Start Æ Settings Æ Printers. 2 Click Add Printer to launch the Add Printer wizard. 3 Click Next. 4 Click Network Printer, and click Next. 5 Enter the printer name or URL (if on network traffic and...
... the path of system resources. The time this printer will be added to install a printer driver. The client computer handles the print job processing. 1 Click Start Æ Settings Æ Printers. 2 Click Add Printer to launch the Add Printer wizard. 3 Click Next. 4 Click Network Printer, and click Next. 5 Enter the printer name or URL (if on network traffic and...
User's Guide
Page 24
..., and click View Documentation. The required driver package is complete. Step 2: Create a desktop printer 1 In the Chooser, select the LaserWriter 8 driver. 2 For a routed network, select the default zone from the Lexmark Web site. Lexmark provides a printer driver package for each package gives detailed instructions for installing and using Lexmark printers in the PostScript Printer Description (PPD) file portion of supported...
..., and click View Documentation. The required driver package is complete. Step 2: Create a desktop printer 1 In the Chooser, select the LaserWriter 8 driver. 2 For a routed network, select the default zone from the Lexmark Web site. Lexmark provides a printer driver package for each package gives detailed instructions for installing and using Lexmark printers in the PostScript Printer Description (PPD) file portion of supported...
User's Guide
Page 36
...Printing a document from the initial Print dialog to see our Lexmark Web site at http:// support.lexmark.com, and click KnowledgeBase to print. 2 From the File menu, select Print. 3 Select the correct printer in the printer driver window, open the online Help for Direct USB printing. Sending... the file you can change. Devices formatted with the USB 2.0 standard. • Hi-Speed USB devices must use the Lexmark custom printer drivers supplied with the printer. To print a job from a USB flash memory device A USB Direct interface is software that were not available on the...
...Printing a document from the initial Print dialog to see our Lexmark Web site at http:// support.lexmark.com, and click KnowledgeBase to print. 2 From the File menu, select Print. 3 Select the correct printer in the printer driver window, open the online Help for Direct USB printing. Sending... the file you can change. Devices formatted with the USB 2.0 standard. • Hi-Speed USB devices must use the Lexmark custom printer drivers supplied with the printer. To print a job from a USB flash memory device A USB Direct interface is software that were not available on the...
User's Guide
Page 43
... sometimes referred to the type of the specialty media from the Format for help . 2 From the printer operator panel, set the paper type, size, and source according to view the printer driver settings. Select the size of the media. Select the size of print job and action you want... to the Paper Source pop-up menu. Print All Print A Job Print Copies Delete All Delete A Job If you have difficulty, click Help, and then follow the driver instructions. ...
... sometimes referred to the type of the specialty media from the Format for help . 2 From the printer operator panel, set the paper type, size, and source according to view the printer driver settings. Select the size of the media. Select the size of print job and action you want... to the Paper Source pop-up menu. Print All Print A Job Print Copies Delete All Delete A Job If you have difficulty, click Help, and then follow the driver instructions. ...
User's Guide
Page 70
... (250-sheet tray for the T640 or 500-sheet tray for the T642 and T644), optional 250- Be careful when you are considering using with... the operator panel, the printer driver, the Local Printer Setup Utility, or from sticking together. See Identifying and linking output bins for instructions on the Lexmark Web site at www.lexmark.com. Use metal clasps...heat transparencies to 10 envelopes in the multipurpose feeder and 85 envelopes in laser printers. Fingerprints on transparencies designed for laser printers. Envelopes You can print directly on the surface of any way. -...
... (250-sheet tray for the T640 or 500-sheet tray for the T642 and T644), optional 250- Be careful when you are considering using with... the operator panel, the printer driver, the Local Printer Setup Utility, or from sticking together. See Identifying and linking output bins for instructions on the Lexmark Web site at www.lexmark.com. Use metal clasps...heat transparencies to 10 envelopes in the multipurpose feeder and 85 envelopes in laser printers. Fingerprints on transparencies designed for laser printers. Envelopes You can print directly on the surface of any way. -...
User's Guide
Page 71
... Paper Size/Type from the printer operator panel, the printer driver, the Local Printer Setup Utility, or from MarkVision. • Feed vinyl labels from peeling inside the printer. • Portrait orientation is not possible, a 1.6 mm (0.1 in.) strip should be removed on the Lexmark Web site at least 1 mm... labels are one size of envelope at a time in the envelope feeder. • A combination of the most difficult print media for laser printers. Note: Labels are supplied in the Paper menu. After printing approximately 10,000 pages of labels (or each time you are considering using...
... Paper Size/Type from the printer operator panel, the printer driver, the Local Printer Setup Utility, or from MarkVision. • Feed vinyl labels from peeling inside the printer. • Portrait orientation is not possible, a 1.6 mm (0.1 in.) strip should be removed on the Lexmark Web site at least 1 mm... labels are one size of envelope at a time in the envelope feeder. • A combination of the most difficult print media for laser printers. Note: Labels are supplied in the Paper menu. After printing approximately 10,000 pages of labels (or each time you are considering using...

User's Guide
Page 72
... Try a sample of print media. When printing on card stock: • Set the Paper Type menu item in the Paper menu to maintain printer feeding reliability: 1 Print five sheets of paper. 2 Wait approximately five seconds. 3 Print five more sheets of grain short card stock. Storing ...place anything on the preferred weight and for information on top of paper packages. • Store paper in the Local Printer Setup Utility, or from the printer driver, in its original wrapper until you are considering using card stock that may release hazardous emissions when heated. • ...
... Try a sample of print media. When printing on card stock: • Set the Paper Type menu item in the Paper menu to maintain printer feeding reliability: 1 Print five sheets of paper. 2 Wait approximately five seconds. 3 Print five more sheets of grain short card stock. Storing ...place anything on the preferred weight and for information on top of paper packages. • Store paper in the Local Printer Setup Utility, or from the printer driver, in its original wrapper until you are considering using card stock that may release hazardous emissions when heated. • ...

User's Guide
Page 75
... Settings Æ Quality Menu Multipage Print in the Settings Æ Finishing Menu Duplex in the Settings Æ Finishing Menu Use your print cartridge. Causes the printer to redistribute any trays are 2 Up, 3 Up, 4 Up, 6 Up, 9 Up, 12 Up, and 16 Up. Tray 1 Low, Tray 2 Low... Duplex printing is low, ... or gray area at the top of the display will open the View Supplies screen to view the current status of your software application or printer driver to be sure it is unsatisfactory, you can also view the status of paper (16 images on the front and 16 on one side...
... Settings Æ Quality Menu Multipage Print in the Settings Æ Finishing Menu Duplex in the Settings Æ Finishing Menu Use your print cartridge. Causes the printer to redistribute any trays are 2 Up, 3 Up, 4 Up, 6 Up, 9 Up, 12 Up, and 16 Up. Tray 1 Low, Tray 2 Low... Duplex printing is low, ... or gray area at the top of the display will open the View Supplies screen to view the current status of your software application or printer driver to be sure it is unsatisfactory, you can also view the status of paper (16 images on the front and 16 on one side...


