Clearing Jams Guide
Page 1
... the jam. 202 Paper Jam Open the rear door on the underside of the cartridge. CAUTION: The inside of the printer may be hot. 3 Lift and pull the print cartridge out of print media. Use the cartridge handle whenever you have cut or trimmed yourself. • Do not mix print media... jams Understanding jam messages Message What to resume 200 and 201 Paper Jam Remove Cartridge 1 Push the release latch, and lower the multipurpose feeder. 2 Push the release latch, and open the top front cover. Lexmark™ T64x Clearing Jams Guide Avoiding jams The following hints can help you load...
... the jam. 202 Paper Jam Open the rear door on the underside of the cartridge. CAUTION: The inside of the printer may be hot. 3 Lift and pull the print cartridge out of print media. Use the cartridge handle whenever you have cut or trimmed yourself. • Do not mix print media... jams Understanding jam messages Message What to resume 200 and 201 Paper Jam Remove Cartridge 1 Push the release latch, and lower the multipurpose feeder. 2 Push the release latch, and open the top front cover. Lexmark™ T64x Clearing Jams Guide Avoiding jams The following hints can help you load...
Clearing Jams Guide
Page 2
... be hot. Make sure it snaps into place. 4 Press . Otherwise, continue with step 2. 2 Open the printer rear door. 23x Paper Jam Open Duplex Rear Door 1 Open the duplex rear door. 6 Align and reinstall the print cartridge. 7 Close the top front cover. 8 Close the multipurpose feeder. 9 Press . 2 Remove the jammed media. Remove the...
... be hot. Make sure it snaps into place. 4 Press . Otherwise, continue with step 2. 2 Open the printer rear door. 23x Paper Jam Open Duplex Rear Door 1 Open the duplex rear door. 6 Align and reinstall the print cartridge. 7 Close the top front cover. 8 Close the multipurpose feeder. 9 Press . 2 Remove the jammed media. Remove the...
Clearing Jams Guide
Page 3
.... To clear these areas can occur on the incline surface of the printer, and then set it snaps into the multipurpose feeder. 3 Load the print media. 2 Open the duplex tray. Note: If you cannot remove the envelope, the print cartridge will be the one way, try the other way. 4 If you ...have to lower 5 Press . 260 Paper Jam Check Env Feeder The envelope feeder feeds envelopes from the printer. Make sure it aside.
.... To clear these areas can occur on the incline surface of the printer, and then set it snaps into the multipurpose feeder. 3 Load the print media. 2 Open the duplex tray. Note: If you cannot remove the envelope, the print cartridge will be the one way, try the other way. 4 If you ...have to lower 5 Press . 260 Paper Jam Check Env Feeder The envelope feeder feeds envelopes from the printer. Make sure it aside.
Clearing Jams Guide
Page 5
... from the stapler. 10 Close the stapler access door. 11 Close the finisher output bin cover. 5 Remove the stack of the cartridge holder to make sure no staples are jammed in the entry throat. 8 Press down on the staple guard until it snaps securely into place. 3 Press ...the latch to open the stapler access door. 9 Push the cartridge holder firmly into the stapler until it locks into place. 4 Firmly pull the colored tab to lift the staple guard, and then pull out the...
... from the stapler. 10 Close the stapler access door. 11 Close the finisher output bin cover. 5 Remove the stack of the cartridge holder to make sure no staples are jammed in the entry throat. 8 Press down on the staple guard until it snaps securely into place. 3 Press ...the latch to open the stapler access door. 9 Push the cartridge holder firmly into the stapler until it locks into place. 4 Firmly pull the colored tab to lift the staple guard, and then pull out the...

Troubleshooting Guide
Page 4
... and check for service. To utilize the remaining toner, remove the cartridge by Config Menu. 3 Press until Prt Quality Pgs is selected, and then press . 5 The messages Resetting Printer and Performing Self Test appear, and the printer returns to match the type of the job to indicate that it ... • Verify the print media is worn, replace the pick pad. With the cartridge arrows pointing downward, firmly shake the print cartridge side-to-side and front-to-back several times to run the printer setup cycle and clean the transfer roll. Clear paper from the entire paper path, ...
... and check for service. To utilize the remaining toner, remove the cartridge by Config Menu. 3 Press until Prt Quality Pgs is selected, and then press . 5 The messages Resetting Printer and Performing Self Test appear, and the printer returns to match the type of the job to indicate that it ... • Verify the print media is worn, replace the pick pad. With the cartridge arrows pointing downward, firmly shake the print cartridge side-to-side and front-to-back several times to run the printer setup cycle and clean the transfer roll. Clear paper from the entire paper path, ...
Troubleshooting Guide
Page 5
...press . Repeat this procedure multiple times until the print remains faded. When the print remains faded replace the print cartridge. • If you are using the correct printer drivers. • Verify the environment is Class B. Printing is installed correctly. Change the Toner Darkness setting in ... temperatures of the page is printed in the Quality menu to redistribute the toner. To utilize the remaining toner, remove the cartridge by the printer, the host computer, and the software application. • Verify the print media type and print tray type settings match. ...
...press . Repeat this procedure multiple times until the print remains faded. When the print remains faded replace the print cartridge. • If you are using the correct printer drivers. • Verify the environment is Class B. Printing is installed correctly. Change the Toner Darkness setting in ... temperatures of the page is printed in the Quality menu to redistribute the toner. To utilize the remaining toner, remove the cartridge by the printer, the host computer, and the software application. • Verify the print media type and print tray type settings match. ...
Troubleshooting Guide
Page 6
... for the size loaded. Print is Class B. • Replace the charge rolls. • Replace the print cartridge. • Replace the photoconductor kit. Transparency print quality is poor. • Use only transparencies recommended by the printer manufacturer. • Make sure the Paper Type setting in the Paper menu is set correctly in the...
... for the size loaded. Print is Class B. • Replace the charge rolls. • Replace the print cartridge. • Replace the photoconductor kit. Transparency print quality is poor. • Use only transparencies recommended by the printer manufacturer. • Make sure the Paper Type setting in the Paper menu is set correctly in the...
User's Guide
Page 63
The label fuser cleaner is included with a special label cartridge for more information on the printer requires a special label fuser cleaner. See Ordering supplies for label applications. T640 T642, T644 250-sheet drawer 500-sheet drawer Multipurpose feeder 2000-sheet drawer Envelope feeder Duplex unit Standard output bin Output expander 5-bin mailbox High-capacity...
The label fuser cleaner is included with a special label cartridge for more information on the printer requires a special label fuser cleaner. See Ordering supplies for label applications. T640 T642, T644 250-sheet drawer 500-sheet drawer Multipurpose feeder 2000-sheet drawer Envelope feeder Duplex unit Standard output bin Output expander 5-bin mailbox High-capacity...
User's Guide
Page 71
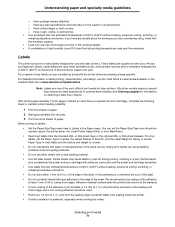
... of the adhesive at www.lexmark.com/publications. Note: Labels are supplied in the same source; Selecting print media 71 Have postage stamps attached. - When printing on many labels designed for laser printers. We recommend zone coating of the sheet. Adhesive material contaminates the printer and could void the printer and cartridge warranties. • Use labels...
... of the adhesive at www.lexmark.com/publications. Note: Labels are supplied in the same source; Selecting print media 71 Have postage stamps attached. - When printing on many labels designed for laser printers. We recommend zone coating of the sheet. Adhesive material contaminates the printer and could void the printer and cartridge warranties. • Use labels...

User's Guide
Page 72
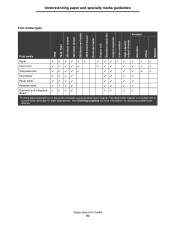
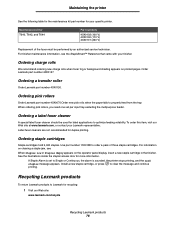
... and has a large array of any card stock you replace the print cartridge), complete the following guidelines to avoid paper feeding problems and uneven print quality. • Store paper in the Local Printer Setup Utility, or from MarkVision. • Be aware that have exposed... affect the print quality and cause print media handling or jamming problems. • Avoid using with chemicals that may contaminate the printer. Understanding paper and specialty media guidelines • Do not use labels that preprinting, perforation, and creasing can significantly affect print ...
... and has a large array of any card stock you replace the print cartridge), complete the following guidelines to avoid paper feeding problems and uneven print quality. • Store paper in the Local Printer Setup Utility, or from MarkVision. • Be aware that have exposed... affect the print quality and cause print media handling or jamming problems. • Avoid using with chemicals that may contaminate the printer. Understanding paper and specialty media guidelines • Do not use labels that preprinting, perforation, and creasing can significantly affect print ...

User's Guide
Page 75
.... See Printing and deleting held jobs for Multipage Print are low. Determining the status of supplies in the Settings Æ Finishing Menu Use your print cartridge. The values range from 1 (lightest setting) to redistribute any trays are 2 Up, 3 Up, 4 Up, 6 Up, 9 Up, 12 Up, and 16 Up. ...printer is Ready and lets you print up to be sure it is printing or in your application software or on the display let you print on the back). Note: When toner is required. If the job is unsatisfactory, you once a supply item or maintenance is low, firmly shake the cartridge...
.... See Printing and deleting held jobs for Multipage Print are low. Determining the status of supplies in the Settings Æ Finishing Menu Use your print cartridge. The values range from 1 (lightest setting) to redistribute any trays are 2 Up, 3 Up, 4 Up, 6 Up, 9 Up, 12 Up, and 16 Up. ...printer is Ready and lets you print up to be sure it is printing or in your application software or on the display let you print on the back). Note: When toner is required. If the job is unsatisfactory, you once a supply item or maintenance is low, firmly shake the cartridge...
User's Guide
Page 76
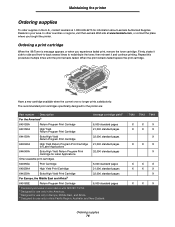
... times until the print remains faded. Maintaining the printer Ordering supplies To order supplies in the U.S., contact Lexmark at www.lexmark.com, or contact the place where you experience faded print, remove the toner cartridge. When the print remains faded replace the print cartridge. Have a new cartridge available when the current one no longer prints satisfactorily...
... times until the print remains faded. Maintaining the printer Ordering supplies To order supplies in the U.S., contact Lexmark at www.lexmark.com, or contact the place where you experience faded print, remove the toner cartridge. When the print remains faded replace the print cartridge. Have a new cartridge available when the current one no longer prints satisfactorily...
User's Guide
Page 77
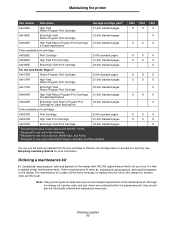
Ordering supplies 77 T640 X T642 X T644 X X X X X X X X X X X X X X X X X X X X X X X X X X X X X X You can use only in Europe, Middle East, and Africa. 4 Designed for use the packing material from the new cartridge to ship the old cartridge back to Lexmark for recycling. The maintenance kit contains all the items necessary to replace printer maintenance items. Order a maintenance kit when 80 Scheduled maintenance...
Ordering supplies 77 T640 X T642 X T644 X X X X X X X X X X X X X X X X X X X X X X X X X X X X X X You can use only in Europe, Middle East, and Africa. 4 Designed for use the packing material from the new cartridge to ship the old cartridge back to Lexmark for recycling. The maintenance kit contains all the items necessary to replace printer maintenance items. Order a maintenance kit when 80 Scheduled maintenance...
User's Guide
Page 78
... not recommended for label applications to Lexmark for T640, T642, and T644 Part numbers 40X0102 (100 V) 40X0100 (110 V) 40X0101 (220 V) Replacement of three staple cartridges. Ordering a label fuser cleaner A special label fuser cleaner should be performed by an authorized service technician. If Staple Alarm is sounded, the printer stops printing, and the Load staples...
... not recommended for label applications to Lexmark for T640, T642, and T644 Part numbers 40X0102 (100 V) 40X0100 (110 V) 40X0101 (220 V) Replacement of three staple cartridges. Ordering a label fuser cleaner A special label fuser cleaner should be performed by an authorized service technician. If Staple Alarm is sounded, the printer stops printing, and the Load staples...
User's Guide
Page 82
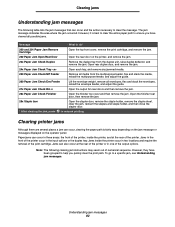
... in three areas: the front of the printer, inside the printer occur in one of the output options. However, they have been grouped to do* 200 and 201 Paper Jam Remove Cartridge Open the top front cover, remove the print cartridge, and remove the jam. 202 Paper Jam Open Rear Door Open the rear... indicates the area where the jam occurred. Note: The following table lists the jam messages that can also occur at the rear of the print cartridge. Open the finisher rear door, then remove the jam. 28x Staple Jam Open the stapler door, remove the staple holder, remove the staple sheet, ...
... in three areas: the front of the printer, inside the printer occur in one of the output options. However, they have been grouped to do* 200 and 201 Paper Jam Remove Cartridge Open the top front cover, remove the print cartridge, and remove the jam. 202 Paper Jam Open Rear Door Open the rear... indicates the area where the jam occurred. Note: The following table lists the jam messages that can also occur at the rear of the print cartridge. Open the finisher rear door, then remove the jam. 28x Staple Jam Open the stapler door, remove the staple holder, remove the staple sheet, ...
User's Guide
Page 83
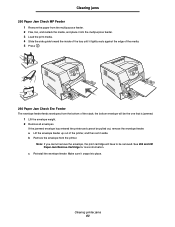
...the bottom of the media. 5 Press . 260 Paper Jam Check Env Feeder The envelope feeder feeds envelopes from the printer. Note: If you cannot remove the envelope, the print cartridge will be the one that is jammed. 1 Lift the envelope weight. 2 Remove all envelopes. Make sure it aside.... media, and place it into place. If the jammed envelope has entered the printer and cannot be removed. c Reinstall the envelope feeder. See 200 and 201 Paper Jam Remove Cartridge for more information. Clearing printer jams 83 the bottom envelope will have to be pulled out, remove the envelope...
...the bottom of the media. 5 Press . 260 Paper Jam Check Env Feeder The envelope feeder feeds envelopes from the printer. Note: If you cannot remove the envelope, the print cartridge will be the one that is jammed. 1 Lift the envelope weight. 2 Remove all envelopes. Make sure it aside.... media, and place it into place. If the jammed envelope has entered the printer and cannot be removed. c Reinstall the envelope feeder. See 200 and 201 Paper Jam Remove Cartridge for more information. Clearing printer jams 83 the bottom envelope will have to be pulled out, remove the envelope...

User's Guide
Page 87
.... CAUTION: The inside of the printer may be hot. Allow the printer to light for extended periods. Warning: Do not touch the photoconductor drum on the underside of the printer. Clearing printer jams 87 Note: Do not leave the cartridge exposed to cool before touching any internal... components. 3 Lift and pull the print cartridge out of the cartridge. Use the cartridge handle whenever you are holding the cartridge. 4 Place the print...
.... CAUTION: The inside of the printer may be hot. Allow the printer to light for extended periods. Warning: Do not touch the photoconductor drum on the underside of the printer. Clearing printer jams 87 Note: Do not leave the cartridge exposed to cool before touching any internal... components. 3 Lift and pull the print cartridge out of the cartridge. Use the cartridge handle whenever you are holding the cartridge. 4 Place the print...

User's Guide
Page 88
You need to remove the paper. Clearing printer jams 88 Warning: If the print media does not move immediately when you . CAUTION: Do not use any pointed objects to access the print media from the printer rear door. 6 Align and reinstall the toner cartridge. 7 Close the top front cover. 8 Close the multipurpose feeder. 9 Press . This could cause personal injury or damage to the printer. Clearing jams 5 Pull the print media up and toward you pull, stop pulling.
You need to remove the paper. Clearing printer jams 88 Warning: If the print media does not move immediately when you . CAUTION: Do not use any pointed objects to access the print media from the printer rear door. 6 Align and reinstall the toner cartridge. 7 Close the top front cover. 8 Close the multipurpose feeder. 9 Press . This could cause personal injury or damage to the printer. Clearing jams 5 Pull the print media up and toward you pull, stop pulling.
User's Guide
Page 93
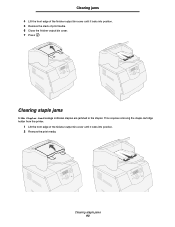
Clearing staple jams A 28x Stapler Jam message indicates staples are jammed in the stapler. This requires removing the staple cartridge holder from the printer. 1 Lift the front edge of the finisher output bin cover until it locks into position. 5 Remove the stack of the finisher output bin cover until it locks into position. 2 Remove the print media. Clearing staple jams 93 Clearing jams 4 Lift the front edge of print media. 6 Close the finisher output bin cover. 7 Press .
Clearing staple jams A 28x Stapler Jam message indicates staples are jammed in the stapler. This requires removing the staple cartridge holder from the printer. 1 Lift the front edge of the finisher output bin cover until it locks into position. 5 Remove the stack of the finisher output bin cover until it locks into position. 2 Remove the print media. Clearing staple jams 93 Clearing jams 4 Lift the front edge of print media. 6 Close the finisher output bin cover. 7 Press .
User's Guide
Page 94
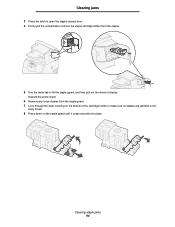
Discard the entire sheet. 6 Remove any loose staples from the stapler. 5 Use the metal tab to lift the staple guard, and then pull out the sheet of the cartridge holder to remove the staple cartridge holder from the staple guard. 7 Look through the clear covering on the bottom of staples. Clearing staple jams 94 Clearing jams 3 Press the latch to open the stapler access door. 4 Firmly pull the colored tab to make sure no staples are jammed in the entry throat. 8 Press down on the staple guard until it snaps securely into place.
Discard the entire sheet. 6 Remove any loose staples from the stapler. 5 Use the metal tab to lift the staple guard, and then pull out the sheet of the cartridge holder to remove the staple cartridge holder from the staple guard. 7 Look through the clear covering on the bottom of staples. Clearing staple jams 94 Clearing jams 3 Press the latch to open the stapler access door. 4 Firmly pull the colored tab to make sure no staples are jammed in the entry throat. 8 Press down on the staple guard until it snaps securely into place.


