
Quick Reference
Page 2
... provided below, and (2) pass this license/agreement to Lexmark for returning empty Lexmark cartridges to request postage-paid return bag, and then seal the bag. Visit www.lexmark.com/recycle to Lexmark's recycling partner. This patented printer is licensed for proper recycling. Mail the bag to learn...SHOCK HAZARD: Do not use only the telecommunications (RJ‑11) cord provided with this product or make any of the patented printer. Lexmark-branded cartridges are properly handled with all new parts, though components may be refilled by you, or a third party, as furniture...
... provided below, and (2) pass this license/agreement to Lexmark for returning empty Lexmark cartridges to request postage-paid return bag, and then seal the bag. Visit www.lexmark.com/recycle to Lexmark's recycling partner. This patented printer is licensed for proper recycling. Mail the bag to learn...SHOCK HAZARD: Do not use only the telecommunications (RJ‑11) cord provided with this product or make any of the patented printer. Lexmark-branded cartridges are properly handled with all new parts, though components may be refilled by you, or a third party, as furniture...

Quick Reference
Page 3
... ink cartridges 18 Using shortcuts 20 What are shortcuts?...20 Getting started...20 Using the printer software 22 Minimum system requirements 22 Installing the printer software 22 Using the Windows printer software 22 Using the Macintosh printer software 23 Printing 25 Printing a document...25 Printing on both sides of the paper ...the telephone line 32 Step 2: Check the dial tone 39 Step 3: Set your fax name and fax number 39 Step 4: Set the printer to receive faxes automatically or manually 39 Step 5: Set the number of rings 40 Step 6: Create a contact list 40 Faxing 41 Sending ...
... ink cartridges 18 Using shortcuts 20 What are shortcuts?...20 Getting started...20 Using the printer software 22 Minimum system requirements 22 Installing the printer software 22 Using the Windows printer software 22 Using the Macintosh printer software 23 Printing 25 Printing a document...25 Printing on both sides of the paper ...the telephone line 32 Step 2: Check the dial tone 39 Step 3: Set your fax name and fax number 39 Step 4: Set the printer to receive faxes automatically or manually 39 Step 5: Set the number of rings 40 Step 6: Create a contact list 40 Faxing 41 Sending ...

Quick Reference
Page 5
...telephone support 1 Available on the installation software CD. 2 Available on the installation software CD and on the Lexmark Support Web site at http://support.lexmark.com. 5 Minimizing your printer's environmental impact We are committed to protecting the environment and are mostly text. • Use font types...ink than one page image on one sheet. Most programs or applications let you to www.lexmark.com/recycle. Wireless/network printers allow you can access the User's Guide from the printer program folder: 1 Click or Start. 2 Click All Programs or Programs, and then select ...
...telephone support 1 Available on the installation software CD. 2 Available on the installation software CD and on the Lexmark Support Web site at http://support.lexmark.com. 5 Minimizing your printer's environmental impact We are committed to protecting the environment and are mostly text. • Use font types...ink than one page image on one sheet. Most programs or applications let you to www.lexmark.com/recycle. Wireless/network printers allow you can access the User's Guide from the printer program folder: 1 Click or Start. 2 Click All Programs or Programs, and then select ...
Quick Reference
Page 6
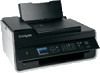
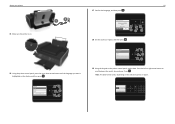
... the computer during setup. If you are setting up the printer 1 Unpack the printer. About your printer works for the following printer models: • Lexmark S515 • Lexmark S519 Printer features Depending on the printer instead of going through the usual process of the printer that you to all the printer menus. When you want to your digital camera or memory...
... the computer during setup. If you are setting up the printer 1 Unpack the printer. About your printer works for the following printer models: • Lexmark S515 • Lexmark S519 Printer features Depending on the printer instead of going through the usual process of the printer that you to all the printer menus. When you want to your digital camera or memory...
Quick Reference
Page 7
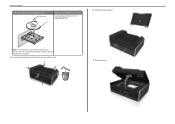
Note: If the installation screen does not appear after a minute, then see "Installation screen did not appear during installation" on page 45. 3 Remove tape and packing material from www.lexmark.com. 4 Attach the paper support. About your printer 7 With a CD or DVD drive (Windows/Macintosh) Without a CD or DVD drive or for Linux Download the printer driver from all areas of the printer. 5 Open the printer.
Note: If the installation screen does not appear after a minute, then see "Installation screen did not appear during installation" on page 45. 3 Remove tape and packing material from www.lexmark.com. 4 Attach the paper support. About your printer 7 With a CD or DVD drive (Windows/Macintosh) Without a CD or DVD drive or for Linux Download the printer driver from all areas of the printer. 5 Open the printer.

Quick Reference
Page 8
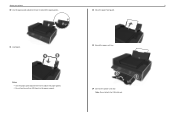
a Remove the preinstalled language sheet from the printer control panel. 7 Raise the printer control panel until it clicks into place. 1 2 xxxx xx xxxxxxxx xxxx xx xxxxx xxxxxxxx xxxx xx xxxxxxxx xxxx xx xxxxx xxxxxxxx b Insert the preferred language ...sheet into the language sheet holder, and then attach the language sheet holder to the printer control panel. Note: The language sheets are in the documentation folder that came with your...
a Remove the preinstalled language sheet from the printer control panel. 7 Raise the printer control panel until it clicks into place. 1 2 xxxx xx xxxxxxxx xxxx xx xxxxx xxxxxxxx xxxx xx xxxxxxxx xxxx xx xxxxx xxxxxxxx b Insert the preferred language ...sheet into the language sheet holder, and then attach the language sheet holder to the printer control panel. Note: The language sheets are in the documentation folder that came with your...
Quick Reference
Page 9
Notes: • Use the paper guide adjustment lever to extend the paper guides. 12 Close the paper feed guard. 11 Load paper. 13 Extend the paper exit tray. About your printer 9 10 Use the paper guide adjustment lever to adjust the paper guides. • Do not load more than 100 sheets in the paper support. 14 Connect the power cord only. Note: Do not attach the USB cable yet.
Notes: • Use the paper guide adjustment lever to extend the paper guides. 12 Close the paper feed guard. 11 Load paper. 13 Extend the paper exit tray. About your printer 9 10 Use the paper guide adjustment lever to adjust the paper guides. • Do not load more than 100 sheets in the paper support. 14 Connect the power cord only. Note: Do not attach the USB cable yet.
Quick Reference
Page 10
...the keypad on the selected country or region. Press . Language Selection You have chosen English as the language for your printer 15 Make sure the printer is on. 16 Using the printer control panel, press the up or down arrow button until the language you sure? Press the left or right arrow ... 18 / 01 / 2011 Press OK when complete. Note: The date format varies, depending on the printer control panel, set the date. Yes No 18 Set the country or region, and then press . About your Printer Are you want is highlighted on the display, and then press . 10 17 Confirm the language...
...the keypad on the selected country or region. Press . Language Selection You have chosen English as the language for your printer 15 Make sure the printer is on. 16 Using the printer control panel, press the up or down arrow button until the language you sure? Press the left or right arrow ... 18 / 01 / 2011 Press OK when complete. Note: The date format varies, depending on the printer control panel, set the date. Yes No 18 Set the country or region, and then press . About your Printer Are you want is highlighted on the display, and then press . 10 17 Confirm the language...

Quick Reference
Page 11
...right arrow button until Now is highlighted, and then press . Get my printer ready to scan directly to my computer Configure Lexmark SmartSolutions and standalone email Get my printer ready to access all your fax number for the printer, and then press . Time Zone (UTC-05:00) Eastern Time (...USA/Ca... (UTC-06:00) Central Time (USA/Ca... (UTC-07:00) Mountain Time (USA/C... Otherwise, go to set up fax now? Lexmark Pro490100SSeerireies sInInstsatalllalatitoionn Configure Advanced Features You can...
...right arrow button until Now is highlighted, and then press . Get my printer ready to scan directly to my computer Configure Lexmark SmartSolutions and standalone email Get my printer ready to access all your fax number for the printer, and then press . Time Zone (UTC-05:00) Eastern Time (...USA/Ca... (UTC-06:00) Central Time (USA/Ca... (UTC-07:00) Mountain Time (USA/C... Otherwise, go to set up fax now? Lexmark Pro490100SSeerireies sInInstsatalllalatitoionn Configure Advanced Features You can...
Quick Reference
Page 12
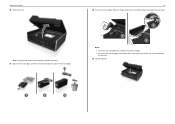
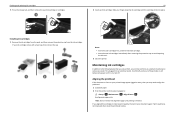
About your finger along the ink cartridge until the cartridge clicks into place. 3 1 2 Notes: • Insert the color cartridges first, and then the black cartridge. • Insert the new ink cartridges immediately after removing the protective cap to avoid exposing the ink to the cartridge installation position. 27 Unpack the ink cartridges, and then remove the protective caps from the cartridges. 12 28 Insert each ink cartridge. Slide your printer 26 Open the printer. Note: The printhead moves to air. 29 Close the printer. 1 2 3
About your finger along the ink cartridge until the cartridge clicks into place. 3 1 2 Notes: • Insert the color cartridges first, and then the black cartridge. • Insert the new ink cartridges immediately after removing the protective cap to avoid exposing the ink to the cartridge installation position. 27 Unpack the ink cartridges, and then remove the protective caps from the cartridges. 12 28 Insert each ink cartridge. Slide your printer 26 Open the printer. Note: The printhead moves to air. 29 Close the printer. 1 2 3

Quick Reference
Page 13
... to print and will move in and out during the process. • Streaks on the alignment page are normal and not an indication of the printer 3 Notes: • The alignment page prints. • Do not remove the page until printing is finished. Prevent items from the ADF. The alignment page may...
... to print and will move in and out during the process. • Streaks on the alignment page are normal and not an indication of the printer 3 Notes: • The alignment page prints. • Do not remove the page until printing is finished. Prevent items from the ADF. The alignment page may...
Quick Reference
Page 14
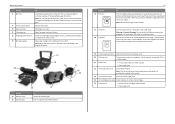
...devices (telephone or answering machine) to access the port. Warning-Potential Damage: Do not touch the USB port except when plugging in the printer. 23 Jam clearance cover Access and clear paper jams. 24 Ink cartridge access area Install, replace, or remove ink cartridges. 25 Scanner ...access area Install the printhead. Keep the paper in your country or region. Note: Adjust the paper guide on the scanner glass. Connect the printer to the printer. Connect a PictBridge-enabled digital camera, a USB Bluetooth adapter, or a flash drive to a computer using a USB cable. Use this port...
...devices (telephone or answering machine) to access the port. Warning-Potential Damage: Do not touch the USB port except when plugging in the printer. 23 Jam clearance cover Access and clear paper jams. 24 Ink cartridge access area Install, replace, or remove ink cartridges. 25 Scanner ...access area Install the printhead. Keep the paper in your country or region. Note: Adjust the paper guide on the scanner glass. Connect the printer to the printer. Connect a PictBridge-enabled digital camera, a USB Bluetooth adapter, or a flash drive to a computer using a USB cable. Use this port...
Quick Reference
Page 15
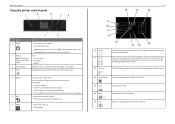
.... 15 12 13 14 11 10 9 8 8 Redial 9 Pause 18 15 17 16 Display the last number dialed. Insert a three-second pause in Sleep mode. • Printer status • Messages • Menus 3 Arrow buttons Navigate to menu or submenu items that appear on , press to switch to wait for an outside line... or get through an automated answering system. Note: When the printer is turned off . • Switch to make. Enter a pause only when you want to Sleep mode. In Fax mode: • Enter fax numbers. • ...
.... 15 12 13 14 11 10 9 8 8 Redial 9 Pause 18 15 17 16 Display the last number dialed. Insert a three-second pause in Sleep mode. • Printer status • Messages • Menus 3 Arrow buttons Navigate to menu or submenu items that appear on , press to switch to wait for an outside line... or get through an automated answering system. Note: When the printer is turned off . • Switch to make. Enter a pause only when you want to Sleep mode. In Fax mode: • Enter fax numbers. • ...

Quick Reference
Page 16
... 17 Wi‑Fi indicator Check the wireless connection of data can occur. 2 Follow the instructions or select from the memory device. About your printer 15 Cancel • Cancel a print, copy, scan, or fax job in the areas shown while actively printing, reading, or writing from available... types • .jpg, .jpeg, .jpe (Joint Photographic Experts Group) • .tiff, .tif (Tagged Image File Format) Using a flash drive with the printer Make sure the flash drive contains files that is left idle for a PictBridge camera cable. • An adapter may be necessary if your flash drive...
... 17 Wi‑Fi indicator Check the wireless connection of data can occur. 2 Follow the instructions or select from the memory device. About your printer 15 Cancel • Cancel a print, copy, scan, or fax job in the areas shown while actively printing, reading, or writing from available... types • .jpg, .jpeg, .jpe (Joint Photographic Experts Group) • .tiff, .tif (Tagged Image File Format) Using a flash drive with the printer Make sure the flash drive contains files that is left idle for a PictBridge camera cable. • An adapter may be necessary if your flash drive...
Quick Reference
Page 17
...get more ink, order high‑yield ink cartridges. • Depending on your needs. • For page yield information, visit www.lexmark.com/yields. • The cartridges used for printing documents can order a mix of standard ink cartridges and high‑yield ink cartridges..., depending on your printer. 2 Open the printer. After use, return this cartridge to the cartridge installation position. You must install new cartridges immediately after removing the old ones...
...get more ink, order high‑yield ink cartridges. • Depending on your needs. • For page yield information, visit www.lexmark.com/yields. • The cartridges used for printing documents can order a mix of standard ink cartridges and high‑yield ink cartridges..., depending on your printer. 2 Open the printer. After use, return this cartridge to the cartridge installation position. You must install new cartridges immediately after removing the old ones...
Quick Reference
Page 18
...out of Sleep mode or will temporarily power on your printed image appear jagged or wavy, then you aligned the cartridges to air. 3 Close the printer. Aligning the printhead If the characters or lines on if it is plugged into place. 3 1 2 Notes: • Insert the color cartridges...alignment page until the cartridge clicks into an electrical outlet. If you may need to align the printhead. 1 Load plain paper. 2 From the printer control panel, navigate to the following tasks that you can perform, your document again. Ordering and replacing ink cartridges 3 Press the release tab,...
...out of Sleep mode or will temporarily power on your printed image appear jagged or wavy, then you aligned the cartridges to air. 3 Close the printer. Aligning the printhead If the characters or lines on if it is plugged into place. 3 1 2 Notes: • Insert the color cartridges...alignment page until the cartridge clicks into an electrical outlet. If you may need to align the printhead. 1 Load plain paper. 2 From the printer control panel, navigate to the following tasks that you can perform, your document again. Ordering and replacing ink cartridges 3 Press the release tab,...

Quick Reference
Page 19
...levels are too low, you must replace the ink cartridges before you may need to clean the printhead nozzles to improve the quality of your printer plugged to a properly grounded, working electrical outlet to allow it to Clean Printhead or Deep Clean Printhead, and then press . Keep your... prints. Ordering and replacing ink cartridges 19 Cleaning the printhead nozzles If you have not been using the printer for a long period, then you can clean the printhead nozzles. 1 Load paper. 2 From the printer control panel, navigate to: > Setup > > Maintenance > 3 Press the up or down arrow button ...
...levels are too low, you must replace the ink cartridges before you may need to clean the printhead nozzles to improve the quality of your printer plugged to a properly grounded, working electrical outlet to allow it to Clean Printhead or Deep Clean Printhead, and then press . Keep your... prints. Ordering and replacing ink cartridges 19 Cleaning the printhead nozzles If you have not been using the printer for a long period, then you can clean the printhead nozzles. 1 Load paper. 2 From the printer control panel, navigate to: > Setup > > Maintenance > 3 Press the up or down arrow button ...
Quick Reference
Page 20
... wants to the selected settings. Instead of an ID card onto a single page. Getting started During installation, a link will appear on your printer software. Creating a shortcut 1 Launch the shortcuts page, and then navigate to the computer, either locally (USB) or through an Ethernet or... each connected to quickly accomplish printing, copying, scanning, e‑mailing, or faxing tasks with the printer. Eco‑Copy Copy a document or photo using the printer software Before you may create the shortcuts through an Ethernet or wireless connection. Scan to create your ...
... wants to the selected settings. Instead of an ID card onto a single page. Getting started During installation, a link will appear on your printer software. Creating a shortcut 1 Launch the shortcuts page, and then navigate to the computer, either locally (USB) or through an Ethernet or... each connected to quickly accomplish printing, copying, scanning, e‑mailing, or faxing tasks with the printer. Eco‑Copy Copy a document or photo using the printer software Before you may create the shortcuts through an Ethernet or wireless connection. Scan to create your ...

Quick Reference
Page 21
From the printer control panel, navigate to: > Shortcuts > > select a shortcut > Using shortcuts on the printer Make sure you have created a shortcut. Using shortcuts 21 Modifying or deleting a shortcut 1 Launch the shortcuts page, and then select a shortcut. 2 Do either of the following: • Make the necessary changes, and then click Save Changes. • Click Delete.
From the printer control panel, navigate to: > Shortcuts > > select a shortcut > Using shortcuts on the printer Make sure you have created a shortcut. Using shortcuts 21 Modifying or deleting a shortcut 1 Launch the shortcuts page, and then select a shortcut. 2 Do either of the following: • Make the necessary changes, and then click Save Changes. • Click Delete.
Quick Reference
Page 22
... available only at http://support.lexmark.com. 2 Navigate to reinstall the software, then uninstall the current software first. For Macintosh users Note: To take advantage of the full features of your operating system 3 Download the driver, and then install the printer software. If the installation dialog...software programs and what they can help you set up to the Lexmark Web site at http://support.lexmark.com. 22 Installing the printer software Note: If you did not install these additional programs during printer installation When you do. You may have chosen to install some ...
... available only at http://support.lexmark.com. 2 Navigate to reinstall the software, then uninstall the current software first. For Macintosh users Note: To take advantage of the full features of your operating system 3 Download the driver, and then install the printer software. If the installation dialog...software programs and what they can help you set up to the Lexmark Web site at http://support.lexmark.com. 22 Installing the printer software Note: If you did not install these additional programs during printer installation When you do. You may have chosen to install some ...


