Setup Sheet
Page 1
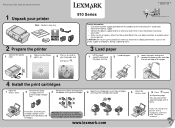
... supply. • Connect the power supply cord to an electrical outlet that is on the bottom. 1 2 3 www.lexmark.com If you are using your printer 910 Series ??? Reminder: Save the print cartridge storage unit to print an alignment page. Safety information • Use only ...the power supply provided with "Install the software"... http://support.lexmark.com/ Note: Contents may discard the alignment ...
... supply. • Connect the power supply cord to an electrical outlet that is on the bottom. 1 2 3 www.lexmark.com If you are using your printer 910 Series ??? Reminder: Save the print cartridge storage unit to print an alignment page. Safety information • Use only ...the power supply provided with "Install the software"... http://support.lexmark.com/ Note: Contents may discard the alignment ...
Setup Sheet
Page 2
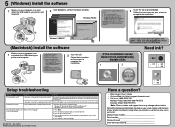
... 2004 Lexmark International, Inc. For help , refer to : 1 Close all New Hardware windows. Follow the instructions on your screen to complete the installation. 2 1 Windows 2000/XP (Macintosh) Install the software 1 Make sure your computer is on and attach the USB cable to your printer and ...install Diagnosis Is the power cord pushed all open programs. 2 Temporarily disable any antivirus software. Follow the instructions on the printer, and then into the printer? If the installation screen does not run automatically, double-click: 1 2 • 31 • 32 • ...
... 2004 Lexmark International, Inc. For help , refer to : 1 Close all New Hardware windows. Follow the instructions on your screen to complete the installation. 2 1 Windows 2000/XP (Macintosh) Install the software 1 Make sure your computer is on and attach the USB cable to your printer and ...install Diagnosis Is the power cord pushed all open programs. 2 Temporarily disable any antivirus software. Follow the instructions on the printer, and then into the printer? If the installation screen does not run automatically, double-click: 1 2 • 31 • 32 • ...
Setup Solutions Booklet
Page 5
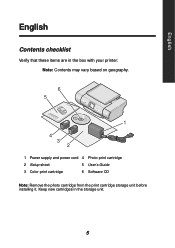
English English Contents checklist Verify that these items are in the storage unit. 5 Keep new cartridges in the box with your printer: Note: Contents may vary based on geography. 6 5 1 4 3 2 1 Power supply and power cord 4 Photo print cartridge 2 Setup sheet 5 User's Guide 3 Color print cartridge 6 Software CD Note: Remove the photo cartridge from the print cartridge storage unit before installing it.
English English Contents checklist Verify that these items are in the storage unit. 5 Keep new cartridges in the box with your printer: Note: Contents may vary based on geography. 6 5 1 4 3 2 1 Power supply and power cord 4 Photo print cartridge 2 Setup sheet 5 User's Guide 3 Color print cartridge 6 Software CD Note: Remove the photo cartridge from the print cartridge storage unit before installing it.
Setup Solutions Booklet
Page 6
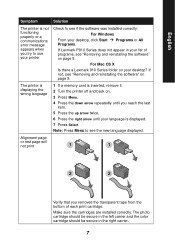
...• Refer service or repairs, other devices have a problem, this section helps you find the solution. Setup troubleshooting Should your printer have been using a working electrical outlet. Symptom Solution The Power light does not come on when the Power button is pressed •...than those described in the user documentation, to a professional service person. English Safety information • Use only the power supply provided with the printer, which supports these operating systems: • Windows 98 • Windows Me • Windows 2000 • Windows XP • Mac OS ...
...• Refer service or repairs, other devices have a problem, this section helps you find the solution. Setup troubleshooting Should your printer have been using a working electrical outlet. Symptom Solution The Power light does not come on when the Power button is pressed •...than those described in the user documentation, to a professional service person. English Safety information • Use only the power supply provided with the printer, which supports these operating systems: • Windows 98 • Windows Me • Windows 2000 • Windows XP • Mac OS ...
Setup Solutions Booklet
Page 7
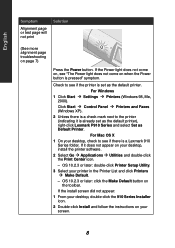
... the bottom of programs, see if the software was installed correctly: For Windows From your language is inserted, remove it. 2 Turn the printer off and back on page 9. The photo cartridge should be secure in the left carrier and the color cartridge should be secure in your...software" on . 3 Press Menu. 4 Press the down arrow repeatedly until your desktop, click Start Æ Programs or All Programs. If Lexmark P910 Series does not appear in the right carrier. 7 The printer is displaying the wrong language 1 If a memory card is displayed. 7 Press Select. For Mac OS X Is there...
... the bottom of programs, see if the software was installed correctly: For Windows From your language is inserted, remove it. 2 Turn the printer off and back on page 9. The photo cartridge should be secure in the left carrier and the color cartridge should be secure in your...software" on . 3 Press Menu. 4 Press the down arrow repeatedly until your desktop, click Start Æ Programs or All Programs. If Lexmark P910 Series does not appear in the right carrier. 7 The printer is displaying the wrong language 1 If a memory card is displayed. 7 Press Select. For Mac OS X Is there...
Setup Solutions Booklet
Page 8
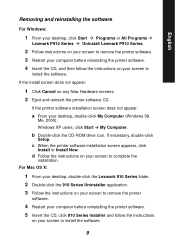
... alignment page troubleshooting on the toolbar. Click Start Æ Control Panel Æ Printers and Faxes (Windows XP). 2 Unless there is a check mark next to the printer (indicating it does not appear on when the Power button is a Lexmark 910 Series folder. For Mac OS X 1 On your desktop, install the... button on page 7) Press the Power button. Check to see if the printer is already set as Default Printer. If it is set as the default printer), right-click Lexmark P910 Series and select Set as the default printer. If the Power light does not come on, see "The Power light...
... alignment page troubleshooting on the toolbar. Click Start Æ Control Panel Æ Printers and Faxes (Windows XP). 2 Unless there is a check mark next to the printer (indicating it does not appear on when the Power button is a Lexmark 910 Series folder. For Mac OS X 1 On your desktop, install the... button on page 7) Press the Power button. Check to see if the printer is already set as Default Printer. If it is set as the default printer), right-click Lexmark P910 Series and select Set as the default printer. If the Power light does not come on, see "The Power light...
Setup Solutions Booklet
Page 9
...desktop, click Start Æ Programs or All Programs Æ Lexmark P910 Series Æ Uninstall Lexmark P910 Series. 2 Follow instructions on your screen to remove the printer software. 3 Restart your computer before reinstalling the printer software. 5 Insert the CD, click 910 Series Installer and follow...X: 1 From your desktop, double-click the Lexmark 910 Series folder. 2 Double-click the 910 Series Uninstaller application. 3 Follow the instructions on your screen to remove the printer software. 4 Restart your computer before reinstalling the printer software. 4 Insert the CD, and then ...
...desktop, click Start Æ Programs or All Programs Æ Lexmark P910 Series Æ Uninstall Lexmark P910 Series. 2 Follow instructions on your screen to remove the printer software. 3 Restart your computer before reinstalling the printer software. 5 Insert the CD, click 910 Series Installer and follow...X: 1 From your desktop, double-click the Lexmark 910 Series folder. 2 Double-click the 910 Series Uninstaller application. 3 Follow the instructions on your screen to remove the printer software. 4 Restart your computer before reinstalling the printer software. 4 Insert the CD, and then ...
Setup Solutions Booklet
Page 10
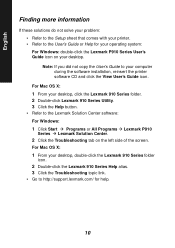
.... 2 Click the Troubleshooting tab on your computer during the software installation, reinsert the printer software CD and click the View User's Guide icon. For Mac OS X: 1 From your desktop, double-click the Lexmark 910 Series folder icon. 2 Double-click the Lexmark 910 Series Help alias. 3 Click the Troubleshooting topic link. • Go to...
.... 2 Click the Troubleshooting tab on your computer during the software installation, reinsert the printer software CD and click the View User's Guide icon. For Mac OS X: 1 From your desktop, double-click the Lexmark 910 Series folder icon. 2 Double-click the Lexmark 910 Series Help alias. 3 Click the Troubleshooting topic link. • Go to...


