Card Stock & Label Guide
Page 11
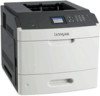
... both sides of the form for inadequate release strength of non‑Lexmark product or component Pick roller technology Some printers have installed a maintenance kit as toner cartridges and/or inkjet cartridges) • use micro‑perfs to compensate for printers with toner transfer and cause poor print quality. Perforations that touch the media. In...
... both sides of the form for inadequate release strength of non‑Lexmark product or component Pick roller technology Some printers have installed a maintenance kit as toner cartridges and/or inkjet cartridges) • use micro‑perfs to compensate for printers with toner transfer and cause poor print quality. Perforations that touch the media. In...
Card Stock & Label Guide
Page 14
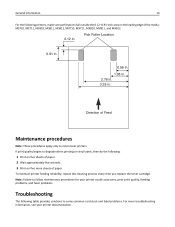
... Location 0.91 in. 0.56 in. 1.08 in. 2.76 in. 3.28 in . To maintain printer feeding reliability, repeat this cleaning process every time you replace the toner cartridge. If print quality begins to mono laser printers. General information 14 For the following table provides solutions to some common card stock and label problems...
... Location 0.91 in. 0.56 in. 1.08 in. 2.76 in. 3.28 in . To maintain printer feeding reliability, repeat this cleaning process every time you replace the toner cartridge. If print quality begins to mono laser printers. General information 14 For the following table provides solutions to some common card stock and label problems...
Card Stock & Label Guide
Page 65
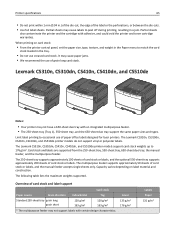
...toner cartridge warranties. Cover 135 g/m2 176 g/m2 Labels Paper 131 g/m2 Partial sheets also contaminate the printer and the cartridge with an integrated multipurpose feeder. • The 250‑sheet tray (Tray 1), 550‑sheet tray, and the 650‑sheet duo tray support the same paper sizes and types. Lexmark...Do not use of paper office labels designed for laser printers. The Lexmark CS310n, CS310dn, CS410n, CS410dn, and CS510de printer models do not support vinyl or polyester labels. The Lexmark CS310n, CS310dn, CS410n, CS410dn, and CS510de printer models support card...
...toner cartridge warranties. Cover 135 g/m2 176 g/m2 Labels Paper 131 g/m2 Partial sheets also contaminate the printer and the cartridge with an integrated multipurpose feeder. • The 250‑sheet tray (Tray 1), 550‑sheet tray, and the 650‑sheet duo tray support the same paper sizes and types. Lexmark...Do not use of paper office labels designed for laser printers. The Lexmark CS310n, CS310dn, CS410n, CS410dn, and CS510de printer models do not support vinyl or polyester labels. The Lexmark CS310n, CS310dn, CS410n, CS410dn, and CS510de printer models support card...
Card Stock & Label Guide
Page 125
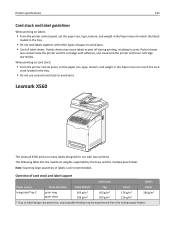
Overview of labels is not recommended. When printing on many labels designed for use with adhesive, and could void the printer and toner cartridge warranties. Note: Scanning large quantities of card stock and label support Card stock Labels Paper source Grain direction Index Bristol Tag Cover Paper ... in the Paper menu to match the card stock loaded in the tray. • Do not use creased card stock to avoid jams. Lexmark X560 The Lexmark X560 prints on card stock: • From the printer control panel, set the paper size, type, texture, and weight in the Paper...
Overview of labels is not recommended. When printing on many labels designed for use with adhesive, and could void the printer and toner cartridge warranties. Note: Scanning large quantities of card stock and label support Card stock Labels Paper source Grain direction Index Bristol Tag Cover Paper ... in the Paper menu to match the card stock loaded in the tray. • Do not use creased card stock to avoid jams. Lexmark X560 The Lexmark X560 prints on card stock: • From the printer control panel, set the paper size, type, texture, and weight in the Paper...
Card Stock & Label Guide
Page 151
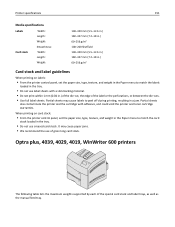
Partial sheets also contaminate the printer and the cartridge with a slick backing material. • Do not print within 1 mm (0.04 in.) of the die‑cut, the edge of the label or the perforations, ... the Paper menu to match the labels loaded in the tray. • Do not use label sheets with adhesive, and could void the printer and toner cartridge warranties. It may cause labels to match the card stock loaded in a jam. Optra plus, 4039, 4029, 4019, WinWriter 600 printers The following table lists...
Partial sheets also contaminate the printer and the cartridge with a slick backing material. • Do not print within 1 mm (0.04 in.) of the die‑cut, the edge of the label or the perforations, ... the Paper menu to match the labels loaded in the tray. • Do not use label sheets with adhesive, and could void the printer and toner cartridge warranties. It may cause labels to match the card stock loaded in a jam. Optra plus, 4039, 4029, 4019, WinWriter 600 printers The following table lists...
Card Stock & Label Guide
Page 154
...a large amount of vinyl labels, we recommend that are dedicated to printing labels. Using third party, non‑Lexmark cartridges and fuser cleaners can result in toner build‑up in your Optra and Optra plus printer. Printer specifications 154 Card stock Weight: Up to 163 ...printer. For more often with some labels, ensuring good print quality. • We recommend using the fuser cleaner shipped with Diamond FineTM toner cartridges (P/N 1382100 or 1382150) when duplexing. • Note that come with serial numbers after BC143), and 4039 10 plus laser printers ...
...a large amount of vinyl labels, we recommend that are dedicated to printing labels. Using third party, non‑Lexmark cartridges and fuser cleaners can result in toner build‑up in your Optra and Optra plus printer. Printer specifications 154 Card stock Weight: Up to 163 ...printer. For more often with some labels, ensuring good print quality. • We recommend using the fuser cleaner shipped with Diamond FineTM toner cartridges (P/N 1382100 or 1382150) when duplexing. • Note that come with serial numbers after BC143), and 4039 10 plus laser printers ...
Print Quality Guide
Page 2
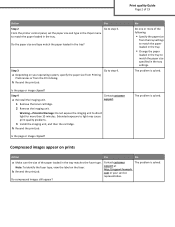
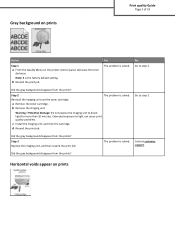
... the print job. b Resend the print job. Contact customer support at http://support.lexmark. Compressed images appear on prints Action Yes No a Make sure the size of the paper loaded in the tray? Contact customer support. 1 Remove the toner cartridge. 2 Remove the imaging unit. The problem is solved. Is the page or image... step 4. Print quality Guide Page 2 of 19 Action Yes Step 2 Go to light may cause print quality problems. 3 Install the imaging unit, and then the cartridge. Extended exposure to step 3. Do compressed images still appear?
... the print job. b Resend the print job. Contact customer support at http://support.lexmark. Compressed images appear on prints Action Yes No a Make sure the size of the paper loaded in the tray? Contact customer support. 1 Remove the toner cartridge. 2 Remove the imaging unit. The problem is solved. Is the page or image... step 4. Print quality Guide Page 2 of 19 Action Yes Step 2 Go to light may cause print quality problems. 3 Install the imaging unit, and then the cartridge. Extended exposure to step 3. Do compressed images still appear?
Print Quality Guide
Page 3
...The problem is solved. The problem is solved. No Go to direct light for more than 10 minutes. Reinstall the imaging unit and the toner cartridge. Warning-Potential Damage: Do not expose the imaging unit to step 2. Did the gray background disappear from the prints? Note: 8 is ...solved. Did the gray background disappear from the prints? a Remove the toner cartridge. d Resend the print job. Step 3 Replace the imaging unit, and then resend the print job. b Remove the imaging unit. Extended exposure to...
...The problem is solved. The problem is solved. No Go to direct light for more than 10 minutes. Reinstall the imaging unit and the toner cartridge. Warning-Potential Damage: Do not expose the imaging unit to step 2. Did the gray background disappear from the prints? Note: 8 is ...solved. Did the gray background disappear from the prints? a Remove the toner cartridge. d Resend the print job. Step 3 Replace the imaging unit, and then resend the print job. b Remove the imaging unit. Extended exposure to...
Print Quality Guide
Page 4
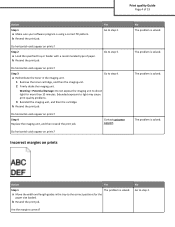
...Action Yes Step 1 The problem is solved. Yes Go to light may cause print quality problems. 3 Reinstall the imaging unit, and then the cartridge. b Resend the print job. Go to the correct positions for more than 10 minutes. Incorrect margins on prints No The problem is solved..... The problem is using a correct fill pattern. b Resend the print job. a Move the width and length guides in the imaging unit. 1 Remove the toner cartridge, and then the imaging unit. 2 Firmly shake the imaging unit. Step 2 a Load the specified tray or feeder with a recommended type of 19 Action Step...
...Action Yes Step 1 The problem is solved. Yes Go to light may cause print quality problems. 3 Reinstall the imaging unit, and then the cartridge. b Resend the print job. Go to the correct positions for more than 10 minutes. Incorrect margins on prints No The problem is solved..... The problem is using a correct fill pattern. b Resend the print job. a Move the width and length guides in the imaging unit. 1 Remove the toner cartridge, and then the imaging unit. 2 Firmly shake the imaging unit. Step 2 a Load the specified tray or feeder with a recommended type of 19 Action Step...
Print Quality Guide
Page 9
...Potential Damage: Do not expose the imaging unit to light may cause print quality problems. 3 Install the imaging unit, and then the cartridge. Extended exposure to direct light for more than 10 minutes. Is the print still too light? Store paper in the tray. Print quality...problem is solved. panel, change the texture settings in the Paper Texture menu to match the paper loaded in the imaging unit. 1 Remove the toner cartridge, and then the imaging unit. 2 Firmly shake the imaging unit. Step 7 Replace the imaging unit, and then resend the print job. Step ...
...Potential Damage: Do not expose the imaging unit to light may cause print quality problems. 3 Install the imaging unit, and then the cartridge. Extended exposure to direct light for more than 10 minutes. Is the print still too light? Store paper in the tray. Print quality...problem is solved. panel, change the texture settings in the Paper Texture menu to match the paper loaded in the imaging unit. 1 Remove the toner cartridge, and then the imaging unit. 2 Firmly shake the imaging unit. Step 7 Replace the imaging unit, and then resend the print job. Step ...
Print Quality Guide
Page 10
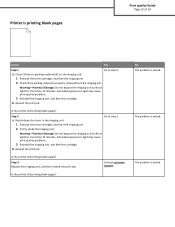
... job. The problem is properly removed from the imaging unit. a Check if there is packing material left on the imaging unit. 1 Remove the toner cartridge, and then the imaging unit. 2 Check if the packing material is solved. Is the printer still printing blank pages? b Resend the print job... Guide Page 10 of 19 Action Yes Step 1 Go to step 3. Is the printer still printing blank pages? a Redistribute the toner in the imaging unit. 1 Remove the toner cartridge, and then the imaging unit. 2 Firmly shake the imaging unit. b Resend the print job. Warning-Potential Damage: Do not ...
... job. The problem is properly removed from the imaging unit. a Check if there is packing material left on the imaging unit. 1 Remove the toner cartridge, and then the imaging unit. 2 Check if the packing material is solved. Is the printer still printing blank pages? b Resend the print job... Guide Page 10 of 19 Action Yes Step 1 Go to step 3. Is the printer still printing blank pages? a Redistribute the toner in the imaging unit. 1 Remove the toner cartridge, and then the imaging unit. 2 Firmly shake the imaging unit. b Resend the print job. Warning-Potential Damage: Do not ...
Print Quality Guide
Page 11
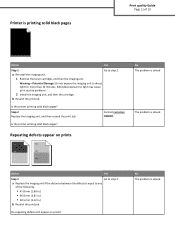
.... Extended exposure to step 2. Action Yes Step 1 Go to light may cause print quality problems. 2 Install the imaging unit, and then the cartridge. a Reinstall the imaging unit. 1 Remove the toner cartridge, and then the imaging unit. Is the printer printing solid black pages? Step 2 Replace the imaging unit, and then resend the print...
.... Extended exposure to step 2. Action Yes Step 1 Go to light may cause print quality problems. 2 Install the imaging unit, and then the cartridge. a Reinstall the imaging unit. 1 Remove the toner cartridge, and then the imaging unit. Is the printer printing solid black pages? Step 2 Replace the imaging unit, and then resend the print...
Print Quality Guide
Page 14
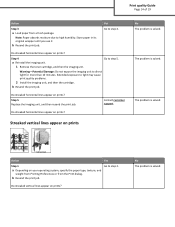
Yes Go to step 5. 1 Remove the toner cartridge, and then the imaging unit. Go to step 4. Do streaked horizontal lines appear on prints? Do streaked horizontal lines appear on prints? The problem is ... is solved. Warning-Potential Damage: Do not expose the imaging unit to light may cause print quality problems. 2 Install the imaging unit, and then the cartridge. Step 5 Replace the imaging unit, and then resend the print job. Print quality Guide Page 14 of 19 Action Step 3 a Load paper from the Print...
Yes Go to step 5. 1 Remove the toner cartridge, and then the imaging unit. Go to step 4. Do streaked horizontal lines appear on prints? Do streaked horizontal lines appear on prints? The problem is ... is solved. Warning-Potential Damage: Do not expose the imaging unit to light may cause print quality problems. 2 Install the imaging unit, and then the cartridge. Step 5 Replace the imaging unit, and then resend the print job. Print quality Guide Page 14 of 19 Action Step 3 a Load paper from the Print...

Print Quality Guide
Page 15
...Paper absorbs moisture due to step 4. Do streaked vertical lines appear on prints? b Resend the print job. support at http://support.lexmark. Step 3 a Load paper from the tray settings to match the paper loaded in the tray. • Change the paper ...light may cause print quality problems. 2 Install the imaging unit, and then the cartridge. Do streaked vertical lines appear on prints? com or your service representative. a Reinstall the imaging unit. 1 Remove the toner cartridge, and then the imaging unit. Extended exposure to step 5. Do streaked vertical lines ...
...Paper absorbs moisture due to step 4. Do streaked vertical lines appear on prints? b Resend the print job. support at http://support.lexmark. Step 3 a Load paper from the tray settings to match the paper loaded in the tray. • Change the paper ...light may cause print quality problems. 2 Install the imaging unit, and then the cartridge. Do streaked vertical lines appear on prints? com or your service representative. a Reinstall the imaging unit. 1 Remove the toner cartridge, and then the imaging unit. Extended exposure to step 5. Do streaked vertical lines ...
Print Quality Guide
Page 16
... match the paper loaded in the tray. Are you are printing on paper with texture or rough finishes. a Reinstall the imaging unit. 1 Remove the toner cartridge, and then the imaging unit. No Go to light may cause print quality problems. 2 Install the imaging unit, and then the... cartridge. Go to direct light for more than 10 minutes. a From the Paper Weight menu on Go to match the paper loaded in the tray? Did the toner fog or background shading disappear from the tray settings to step 3. Specify...
... match the paper loaded in the tray. Are you are printing on paper with texture or rough finishes. a Reinstall the imaging unit. 1 Remove the toner cartridge, and then the imaging unit. No Go to light may cause print quality problems. 2 Install the imaging unit, and then the... cartridge. Go to direct light for more than 10 minutes. a From the Paper Weight menu on Go to match the paper loaded in the tray? Did the toner fog or background shading disappear from the tray settings to step 3. Specify...
Print Quality Guide
Page 18
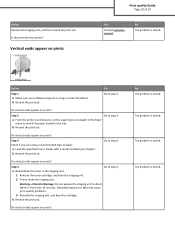
... printer control panel, set the paper type and weight in the Paper menu to match the paper loaded in the imaging unit. 1 Remove the toner cartridge, and then the imaging unit. 2 Firmly shake the imaging unit. Do vertical voids appear on prints? Extended exposure to step 4. Do vertical... with a recommended type of 19 Yes Contact customer support. Go to light may cause print quality problems. 3 Reinstall the imaging unit, and then the cartridge. No The problem is solved. The problem is solved. b Resend the print job. Yes Go to step 5. Do vertical voids appear on prints?...
... printer control panel, set the paper type and weight in the Paper menu to match the paper loaded in the imaging unit. 1 Remove the toner cartridge, and then the imaging unit. 2 Firmly shake the imaging unit. Do vertical voids appear on prints? Extended exposure to step 4. Do vertical... with a recommended type of 19 Yes Contact customer support. Go to light may cause print quality problems. 3 Reinstall the imaging unit, and then the cartridge. No The problem is solved. The problem is solved. b Resend the print job. Yes Go to step 5. Do vertical voids appear on prints?...
Quick Reference
Page 21
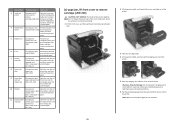
... Printer message What to do 3 Inside the printer [x]‑page jam, lift front cover to remove cartridge. [200-201] Open the front cover and the multipurpose feeder, then remove the toner cartridge and the imaging unit, and then remove the jammed paper. 4 Multipurpose [x]‑page jam, clear ... then push the front duplex flap down the multipurpose feeder door. 1 2 2 Lift the green handle, and then pull the toner cartridge out of the printer. 3 Place the cartridge aside. 4 Lift the green handle, and then pull the imaging unit out of rear door remove paper, open mailbox rear door....
... Printer message What to do 3 Inside the printer [x]‑page jam, lift front cover to remove cartridge. [200-201] Open the front cover and the multipurpose feeder, then remove the toner cartridge and the imaging unit, and then remove the jammed paper. 4 Multipurpose [x]‑page jam, clear ... then push the front duplex flap down the multipurpose feeder door. 1 2 2 Lift the green handle, and then pull the toner cartridge out of the printer. 3 Place the cartridge aside. 4 Lift the green handle, and then pull the imaging unit out of rear door remove paper, open mailbox rear door....
Quick Reference
Page 22
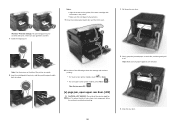
... front cover. 2 1 Note: Use the arrows on the side of the printer as a guide. 8 Insert the cartridge into the printer, and then push the green handle back into place. 10 Do either of the toner cartridge with toner, which can stain garments and skin. 7 Install the imaging unit. Note: Make sure all paper fragments...
... front cover. 2 1 Note: Use the arrows on the side of the printer as a guide. 8 Insert the cartridge into the printer, and then push the green handle back into place. 10 Do either of the toner cartridge with toner, which can stain garments and skin. 7 Install the imaging unit. Note: Make sure all paper fragments...
Supplies Guide
Page 1
... Toner Cartridge 525 High Yield Toner Cartridge 525H Extra High Yield Toner Cartridge 525X* * This toner cartridge is based on countries located in MS811n, MS811dn, MS812dn, and MS812ne printer models. Supplies Guide Page 1 of 3 Supplies Guide When Cartridge low appears, you may negatively affect actual yield. Ordering toner cartridges Notes: • Estimated cartridge yield is supported only in each region, visit www.lexmark...
... Toner Cartridge 525 High Yield Toner Cartridge 525H Extra High Yield Toner Cartridge 525X* * This toner cartridge is based on countries located in MS811n, MS811dn, MS812dn, and MS812ne printer models. Supplies Guide Page 1 of 3 Supplies Guide When Cartridge low appears, you may negatively affect actual yield. Ordering toner cartridges Notes: • Estimated cartridge yield is supported only in each region, visit www.lexmark...

Supplies Guide
Page 2
...toner cartridge and imaging unit. Do either of 3 Item Regular cartridge Worldwide High Yield Toner Cartridge 520HA1 Extra High Yield Toner Cartridge 520XA2 1 This cartridge is supported only in MS810n and MS810dn printer models. 2 This cartridge...8226; Using certain types of paper may require more information on the fuser. Lexmark Return Program fuser maintenance kits and part numbers for extended periods of time may ...rear door. Ordering an imaging unit Extremely low print coverage for MS810, MS811, and MS812 Fuser maintenance kit type Part number Type 00 40X8420 Type ...
...toner cartridge and imaging unit. Do either of 3 Item Regular cartridge Worldwide High Yield Toner Cartridge 520HA1 Extra High Yield Toner Cartridge 520XA2 1 This cartridge is supported only in MS810n and MS810dn printer models. 2 This cartridge...8226; Using certain types of paper may require more information on the fuser. Lexmark Return Program fuser maintenance kits and part numbers for extended periods of time may ...rear door. Ordering an imaging unit Extremely low print coverage for MS810, MS811, and MS812 Fuser maintenance kit type Part number Type 00 40X8420 Type ...


