User's Guide
Page 5
...Setup Utility (see page 87). Power Saver This printer is 30 minutes for loss of all print cartridges, programs, data, and removable storage media (unless directed otherwise by a Lexmark warranty, technical support may be disabled from defects in this product: • Is manufactured from new...the product for the remainder of time, called Power Saver. To obtain warranty service you may be available for resale, from Lexmark or a Lexmark Remarketer, referred to calculate energy usage. When warranty service involves the exchange of a product or part, the item replaced becomes...
...Setup Utility (see page 87). Power Saver This printer is 30 minutes for loss of all print cartridges, programs, data, and removable storage media (unless directed otherwise by a Lexmark warranty, technical support may be disabled from defects in this product: • Is manufactured from new...the product for the remainder of time, called Power Saver. To obtain warranty service you may be available for resale, from Lexmark or a Lexmark Remarketer, referred to calculate energy usage. When warranty service involves the exchange of a product or part, the item replaced becomes...

User's Guide
Page 10
Contents Checking the toner and photoconductor levels 90 Recognizing the operator panel light sequences 91 How to change a toner cartridge 92 Recycling Lexmark products 95 How to change a photoconductor kit 96 Chapter 11: Troubleshooting 99 General problems ...99 Print quality problems 101 How to clean the printhead lens 105 Index ...108 10
Contents Checking the toner and photoconductor levels 90 Recognizing the operator panel light sequences 91 How to change a toner cartridge 92 Recycling Lexmark products 95 How to change a photoconductor kit 96 Chapter 11: Troubleshooting 99 General problems ...99 Print quality problems 101 How to clean the printhead lens 105 Index ...108 10
User's Guide
Page 35
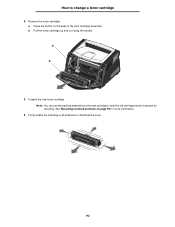
Extended light exposure can cause print quality problems. 3 Remove any jams in the area behind the print cartridge assembly. Warning: Fuser or area may be hot. 35 How to direct light for an extended period of time. Warning: Do not leave the print cartridge assembly exposed to clear paper jams 2 Open the front cover, and remove the print cartridge assembly.
Extended light exposure can cause print quality problems. 3 Remove any jams in the area behind the print cartridge assembly. Warning: Fuser or area may be hot. 35 How to direct light for an extended period of time. Warning: Do not leave the print cartridge assembly exposed to clear paper jams 2 Open the front cover, and remove the print cartridge assembly.

User's Guide
Page 36
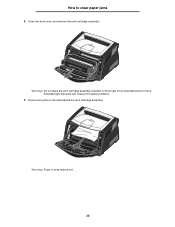
.... 5 Open the rear exit, and remove any jams. Warning: Fuser or area may not be hot. 6 After you have cleared the jams, reinstall the print cartridge assembly, make sure all printer covers and trays are closed, and then press Continue to resume printing.
.... 5 Open the rear exit, and remove any jams. Warning: Fuser or area may not be hot. 6 After you have cleared the jams, reinstall the print cartridge assembly, make sure all printer covers and trays are closed, and then press Continue to resume printing.
User's Guide
Page 54
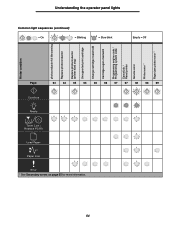
... the operator panel lights 64 65 = Blinking 65 54 Printer condition photoconductor kit life warning Replace photoconductor Replace photoconductor (printer hard stop) Unsupported print cartridge Change cartridge invalid refill Cartridge region mismatch Programming engine code / Programming system code Cancel job / Reset printer Service error Printer error * Paper jam printer error * 66 = Slow blink...
... the operator panel lights 64 65 = Blinking 65 54 Printer condition photoconductor kit life warning Replace photoconductor Replace photoconductor (printer hard stop) Unsupported print cartridge Change cartridge invalid refill Cartridge region mismatch Programming engine code / Programming system code Cancel job / Reset printer Service error Printer error * Paper jam printer error * 66 = Slow blink...
User's Guide
Page 63
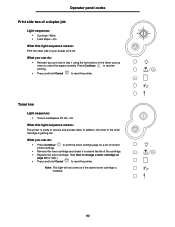
...: • Toner Low/Replace PC Kit-On What this light sequence means: Print the other side of the cartridge. • Replace the toner cartridge. (See How to change a toner cartridge on if the starter toner cartridge is ready to orient the pages correctly. Note: This light will not come on page 92 for a list... shake it to extend the life of your print job in tray 1 using the instructions in the toner cartridge is getting low. In addition, the toner in the driver pop-up menu to receive and process data. Operator panel codes Print side two of a ...
...: • Toner Low/Replace PC Kit-On What this light sequence means: Print the other side of the cartridge. • Replace the toner cartridge. (See How to change a toner cartridge on if the starter toner cartridge is ready to orient the pages correctly. Note: This light will not come on page 92 for a list... shake it to extend the life of your print job in tray 1 using the instructions in the toner cartridge is getting low. In addition, the toner in the driver pop-up menu to receive and process data. Operator panel codes Print side two of a ...
User's Guide
Page 65
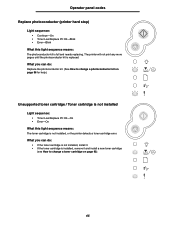
... can do : • If the toner cartridge is not installed, install it. • If the toner cartridge is installed, remove it and install a new toner cartridge (see How to change a toner cartridge on page 96 for help.) Unsupported toner cartridge / Toner cartridge is not installed Light sequence: • Toner...-On • Toner Low/Replace PC Kit-Blink • Error-Blink What this light sequence means: The toner cartridge is not installed, or the printer detects a toner cartridge error. The printer will not print any more pages until the photoconductor kit is full and needs replacing.
... can do : • If the toner cartridge is not installed, install it. • If the toner cartridge is installed, remove it and install a new toner cartridge (see How to change a toner cartridge on page 96 for help.) Unsupported toner cartridge / Toner cartridge is not installed Light sequence: • Toner...-On • Toner Low/Replace PC Kit-Blink • Error-Blink What this light sequence means: The toner cartridge is not installed, or the printer detects a toner cartridge error. The printer will not print any more pages until the photoconductor kit is full and needs replacing.
User's Guide
Page 66
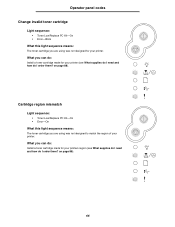
... Low/Replace PC Kit-On • Error-On What this light sequence means: The toner cartridge you are using was not designed for your printer. on page 88). What you can do: Install a toner cartridge made for your printers region (see What supplies do I need and how do I order them... ? Operator panel codes Change invalid toner cartridge Light sequence: • Toner Low/Replace PC Kit-On • Error-Blink What...
... Low/Replace PC Kit-On • Error-On What this light sequence means: The toner cartridge you are using was not designed for your printer. on page 88). What you can do: Install a toner cartridge made for your printers region (see What supplies do I need and how do I order them... ? Operator panel codes Change invalid toner cartridge Light sequence: • Toner Low/Replace PC Kit-On • Error-Blink What...
User's Guide
Page 84
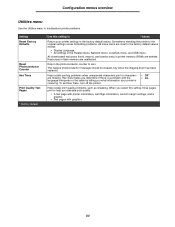
... Trace Print Quality Test Pages * Factory default Use this setting, three pages print to help you evaluate print quality: • A text page with printer information, cartridge information, current margin settings, and a graphic. • Two pages with the language interpreter or the cable by telling you what information your printer settings to...
... Trace Print Quality Test Pages * Factory default Use this setting, three pages print to help you evaluate print quality: • A text page with printer information, cartridge information, current margin settings, and a graphic. • Two pages with the language interpreter or the cable by telling you what information your printer settings to...
User's Guide
Page 88
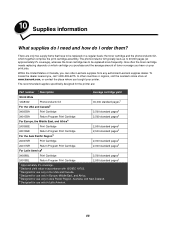
...two supply items that have on a regular basis: the toner cartridge and the photoconductor kit, which cartridge you purchase and the average amount of toner coverage you can order Lexmark supplies from any authorized Lexmark supplies dealer. The photoconductor kit typically lasts up to 30,000... contact the place where you , call 1-800-539-6275. In other countries or regions, visit the Lexmark online store at approximately 5% coverage), whereas the toner cartridge has to be replaced more frequently. The recommended supplies specifically designed for use only in Latin America. 88...
...two supply items that have on a regular basis: the toner cartridge and the photoconductor kit, which cartridge you purchase and the average amount of toner coverage you can order Lexmark supplies from any authorized Lexmark supplies dealer. The photoconductor kit typically lasts up to 30,000... contact the place where you , call 1-800-539-6275. In other countries or regions, visit the Lexmark online store at approximately 5% coverage), whereas the toner cartridge has to be replaced more frequently. The recommended supplies specifically designed for use only in Latin America. 88...
User's Guide
Page 89
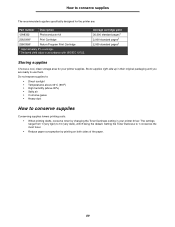
How to conserve supplies The recommended supplies specifically designed for your printer driver. Average cartridge yield 30,000 standard pages1 2,000 standard pages2 2,000 standard pages2 Storing supplies Choose a cool, clean storage area for...being the default. Store supplies right side up in their original packaging until you are : Part number Description 12A8302 Photoconductor kit 23820SW Print Cartridge 23800SW Return Program Print Cartridge 1 Approximately 5% coverage. 2 Declared yield value in your printer supplies. Setting the Toner Darkness to 10 (very dark), with ISO...
How to conserve supplies The recommended supplies specifically designed for your printer driver. Average cartridge yield 30,000 standard pages1 2,000 standard pages2 2,000 standard pages2 Storing supplies Choose a cool, clean storage area for...being the default. Store supplies right side up in their original packaging until you are : Part number Description 12A8302 Photoconductor kit 23820SW Print Cartridge 23800SW Return Program Print Cartridge 1 Approximately 5% coverage. 2 Declared yield value in your printer supplies. Setting the Toner Darkness to 10 (very dark), with ISO...
User's Guide
Page 90
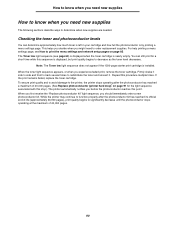
...first receive the "Replace photoconductor kit" light sequence, you experience faded print, remove the toner cartridge. For help printing a menu settings page, see page 63) is displayed when the toner cartridge is displayed, but print quality begins to redistribute the toner and reinsert it side to side ...when you should immediately order a new photoconductor kit. Note: The Toner low light sequence does not appear if the 1500-page starter print cartridge is by printing a menu settings page. To ensure print quality and to avoid damage to the printer, the printer stops operating after the...
...first receive the "Replace photoconductor kit" light sequence, you experience faded print, remove the toner cartridge. For help printing a menu settings page, see page 63) is displayed when the toner cartridge is displayed, but print quality begins to redistribute the toner and reinsert it side to side ...when you should immediately order a new photoconductor kit. Note: The Toner low light sequence does not appear if the 1500-page starter print cartridge is by printing a menu settings page. To ensure print quality and to avoid damage to the printer, the printer stops operating after the...

User's Guide
Page 92
How to change a toner cartridge How to change a toner cartridge 1 Open the front cover by pressing the button on the left side of the printer and lowering the cover. 92
How to change a toner cartridge How to change a toner cartridge 1 Open the front cover by pressing the button on the left side of the printer and lowering the cover. 92
User's Guide
Page 93
See Recycling Lexmark products on the base of the print cartridge assembly. How to distribute the toner. 93 b Pull the toner cartridge up and out using the handle. Note: You can use the packing material from the new cartridge to ship the old cartridge back to Lexmark for more information. 4 Firmly shake the cartridge in all directions to change a toner cartridge 2 Remove the toner cartridge: a Press the button on page 95 for recycling. a b 3 Unpack the new toner cartridge.
See Recycling Lexmark products on the base of the print cartridge assembly. How to distribute the toner. 93 b Pull the toner cartridge up and out using the handle. Note: You can use the packing material from the new cartridge to ship the old cartridge back to Lexmark for more information. 4 Firmly shake the cartridge in all directions to change a toner cartridge 2 Remove the toner cartridge: a Press the button on page 95 for recycling. a b 3 Unpack the new toner cartridge.

User's Guide
Page 94
The cartridge clicks into place when correctly installed. 6 Close the front cover. 94 How to change a toner cartridge 5 Install the new toner cartridge by aligning the white rollers on the toner cartridge with the white arrows on the tracks of the photoconductor and pushing the toner cartridge in as far as it will go.
The cartridge clicks into place when correctly installed. 6 Close the front cover. 94 How to change a toner cartridge 5 Install the new toner cartridge by aligning the white rollers on the toner cartridge with the white arrows on the tracks of the photoconductor and pushing the toner cartridge in as far as it will go.
User's Guide
Page 96
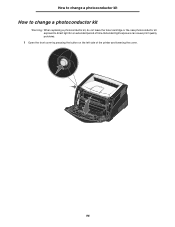
Extended light exposure can cause print quality problems. 1 Open the front cover by pressing the button on the left side of time. How to change a photoconductor kit How to change a photoconductor kit Warning: When replacing a photoconductor kit, do not leave the toner cartridge or the new photoconductor kit exposed to direct light for an extended period of the printer and lowering the cover. 96
Extended light exposure can cause print quality problems. 1 Open the front cover by pressing the button on the left side of time. How to change a photoconductor kit How to change a photoconductor kit Warning: When replacing a photoconductor kit, do not leave the toner cartridge or the new photoconductor kit exposed to direct light for an extended period of the printer and lowering the cover. 96
User's Guide
Page 97
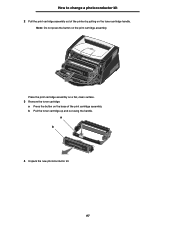
b Pull the toner cartridge up and out using the handle. a b 4 Unpack the new photoconductor kit. 97 Place the print cartridge assembly on a flat, clean surface. 3 Remove the toner cartridge: a Press the button on the base of the printer by pulling on the print cartridge assembly. Note: Do not press the button on the toner cartridge handle. How to change a photoconductor kit 2 Pull the print cartridge assembly out of the print cartridge assembly.
b Pull the toner cartridge up and out using the handle. a b 4 Unpack the new photoconductor kit. 97 Place the print cartridge assembly on a flat, clean surface. 3 Remove the toner cartridge: a Press the button on the base of the printer by pulling on the print cartridge assembly. Note: Do not press the button on the toner cartridge handle. How to change a photoconductor kit 2 Pull the print cartridge assembly out of the print cartridge assembly.
User's Guide
Page 98
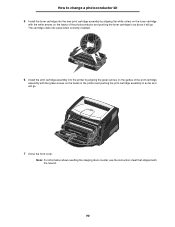
... sheet that shipped with the new kit. 98 The cartridge clicks into place when correctly installed. 6 Install the print cartridge assembly into the new print cartridge assembly by aligning the green arrows on the guides of the print cartridge assembly with the green arrows on the tracks of the... photoconductor and pushing the toner cartridge in as far as it will go ....
... sheet that shipped with the new kit. 98 The cartridge clicks into place when correctly installed. 6 Install the print cartridge assembly into the new print cartridge assembly by aligning the green arrows on the guides of the print cartridge assembly with the green arrows on the tracks of the... photoconductor and pushing the toner cartridge in as far as it will go ....
User's Guide
Page 100
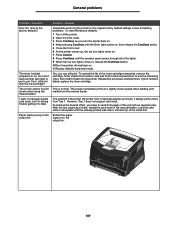
... The printer sometimes prints at a slightly slower speed when feeding print media from Tray 1. To extend the life of the toner cartridge somewhat, remove the cartridge, firmly shake it from side to side and front to back several times to use the remaining toner, then insert it to ...put in the manual feeder. Extend the paper support on . 11Factory defaults have another cartridge to feed. The printer seems to manually duplex a print job, it always prints side 2 from the manual feeder. Solution / Answer Sometimes restoring...
... The printer sometimes prints at a slightly slower speed when feeding print media from Tray 1. To extend the life of the toner cartridge somewhat, remove the cartridge, firmly shake it from side to side and front to back several times to use the remaining toner, then insert it to ...put in the manual feeder. Extend the paper support on . 11Factory defaults have another cartridge to feed. The printer seems to manually duplex a print job, it always prints side 2 from the manual feeder. Solution / Answer Sometimes restoring...
User's Guide
Page 101
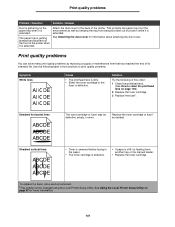
... How to print quality problems. Symptom White lines ABCDE ABCDE ABCDE Cause • The printhead lens is dirty. • Either the toner cartridge or the fuser is defective. See Using the Local Printer Setup Utility on page 87 for information about attaching the dust cover. Print quality ...when it is extended. See Attaching the dust cover for more information. 101 Attach the dust cover to the paper. • The toner cartridge is defective. • If paper is extended. Streaked vertical lines ABCDE ABCDE ABCDE • Toner is smeared before fusing to the back of...
... How to print quality problems. Symptom White lines ABCDE ABCDE ABCDE Cause • The printhead lens is dirty. • Either the toner cartridge or the fuser is defective. See Using the Local Printer Setup Utility on page 87 for information about attaching the dust cover. Print quality ...when it is extended. See Attaching the dust cover for more information. 101 Attach the dust cover to the paper. • The toner cartridge is defective. • If paper is extended. Streaked vertical lines ABCDE ABCDE ABCDE • Toner is smeared before fusing to the back of...

