
User Guide
Page 4
...(Windows only)...55 Cleaning printer parts...56 Ordering parts and supplies...57 Replacing parts and supplies...59 Moving the printer...85 Saving energy and paper...86 Recycling...86 Clearing jams 88 Avoiding jams...88 Identifying jam locations...89 Paper jam in trays...90 Paper jam behind door E...91 Paper jam in the multipurpose feeder...91 Paper jam in the standard bin...92 Paper jam in door A...93 Troubleshooting 98 Network connection problems...98 Hardware options problems...100 Paper feed problems...102 Printing problems...105 Color quality problems...123 Faxing problems...126 Scanning...
...(Windows only)...55 Cleaning printer parts...56 Ordering parts and supplies...57 Replacing parts and supplies...59 Moving the printer...85 Saving energy and paper...86 Recycling...86 Clearing jams 88 Avoiding jams...88 Identifying jam locations...89 Paper jam in trays...90 Paper jam behind door E...91 Paper jam in the multipurpose feeder...91 Paper jam in the standard bin...92 Paper jam in door A...93 Troubleshooting 98 Network connection problems...98 Hardware options problems...100 Paper feed problems...102 Printing problems...105 Color quality problems...123 Faxing problems...126 Scanning...

User Guide
Page 9
Information Center-Authoritative online resource for Microsoft® Windows® or Macintosh operating systems-Open a printer software program or application, and then click Help. ? Help Menu Pages-The guides may be available on the operating system. Click to http://infoserve.lexmark.com/ids/ and select your printer Help using the printer software • Configuring the printer on a network • Caring for ? Lexmark Accessibility Guide-The guide is available at http://support.lexmark.com. Go to view context...
Information Center-Authoritative online resource for Microsoft® Windows® or Macintosh operating systems-Open a printer software program or application, and then click Help. ? Help Menu Pages-The guides may be available on the operating system. Click to http://infoserve.lexmark.com/ids/ and select your printer Help using the printer software • Configuring the printer on a network • Caring for ? Lexmark Accessibility Guide-The guide is available at http://support.lexmark.com. Go to view context...

User Guide
Page 16
.... Scan and save documents directly to clear it. Organize all the current print jobs. Lock Device Prevent users from accessing any printer functions from a flash drive. Printing a menu settings page From the home screen, touch Settings > Reports > Menu Settings Page. Note: You can also access this setting by touching the top section of the home screen. Learning about the printer 16 Touch 8 Status/Supplies 9 Address Book 10 Scan Profiles 11 FTP 12 Bookmarks 13 Held Jobs 14 USB Drive 15 Job...
.... Scan and save documents directly to clear it. Organize all the current print jobs. Lock Device Prevent users from accessing any printer functions from a flash drive. Printing a menu settings page From the home screen, touch Settings > Reports > Menu Settings Page. Note: You can also access this setting by touching the top section of the home screen. Learning about the printer 16 Touch 8 Status/Supplies 9 Address Book 10 Scan Profiles 11 FTP 12 Bookmarks 13 Held Jobs 14 USB Drive 15 Job...

User Guide
Page 20
... black and white. • You need a printer hard disk to validate and adjust the settings until no errors occur. • Only destinations created from the Embedded Web Server are configured. 4 Apply the changes. Setting up and using a proxy server, then temporarily disable it to load the Web page correctly. 2 Click Apps > Card Copy > Configure. 3 Configure the output options and scan settings. The IP address appears as four sets of numbers...
... black and white. • You need a printer hard disk to validate and adjust the settings until no errors occur. • Only destinations created from the Embedded Web Server are configured. 4 Apply the changes. Setting up and using a proxy server, then temporarily disable it to load the Web page correctly. 2 Click Apps > Card Copy > Configure. 3 Configure the output options and scan settings. The IP address appears as four sets of numbers...

User Guide
Page 26
... display, touch the document that you want to : Forms and Favorites > select form > Print 2 If necessary, configure the print settings. 3 Send the print job. Printing 26 Printing Printing from a flash drive 1 Insert a flash drive into the USB port. Printing from a computer Note: For specialty media such as labels, card stock, and envelopes, set the paper size and type in the printer before sending the print job. 1 With a document open, click File > Print. 2 If necessary, adjust the settings. 3 Send the print job...
... display, touch the document that you want to : Forms and Favorites > select form > Print 2 If necessary, configure the print settings. 3 Send the print job. Printing 26 Printing Printing from a flash drive 1 Insert a flash drive into the USB port. Printing from a computer Note: For specialty media such as labels, card stock, and envelopes, set the paper size and type in the printer before sending the print job. 1 With a document open, click File > Print. 2 If necessary, adjust the settings. 3 Send the print job...

User Guide
Page 28
... held jobs are deleted from the printer memory. Note: Verify jobs print one copy to check if it is reached, the print jobs for that user name are deleted without being printed. Printing held jobs are stored in the printer until you log in and release or delete them manually. Repeat Job Expiration Set the amount of time before repeat jobs are automatically deleted from the printer memory. Note: Reserve held jobs 1 With a document open, select File > Print. 2 Select the printer...
... held jobs are deleted from the printer memory. Note: Verify jobs print one copy to check if it is reached, the print jobs for that user name are deleted without being printed. Printing held jobs are stored in the printer until you log in and release or delete them manually. Repeat Job Expiration Set the amount of time before repeat jobs are automatically deleted from the printer memory. Note: Reserve held jobs 1 With a document open, select File > Print. 2 Select the printer...

User Guide
Page 47
... fax job. Setting the fax date and time 1 From the home screen, touch Settings > Device > Preferences > Date and Time > Configure. 2 Configure the settings. For Macintosh users 1 With a document open , click File > Print. 2 Select the printer, and then click Properties, Preferences, Options, or Setup. 3 Click Fax > Enable fax, and then enter the recipient number. 4 If necessary, configure other fax settings. 4 Send the fax job. Faxing 47 3 Apply the changes. Sending a fax Using the control panel 1 Load the original document into the ADF tray or on the scanner...
... fax job. Setting the fax date and time 1 From the home screen, touch Settings > Device > Preferences > Date and Time > Configure. 2 Configure the settings. For Macintosh users 1 With a document open , click File > Print. 2 Select the printer, and then click Properties, Preferences, Options, or Setup. 3 Click Fax > Enable fax, and then enter the recipient number. 4 If necessary, configure other fax settings. 4 Send the fax job. Faxing 47 3 Apply the changes. Sending a fax Using the control panel 1 Load the original document into the ADF tray or on the scanner...

User Guide
Page 86
... number of minutes the printer stays idle before printing it enters Sleep mode. Adjusting the brightness of time before sending a print job. • The Embedded Web Server is disabled when the printer is the default setting in hibernate mode. Hibernate mode 1 From the home screen, touch Settings > Device > Power Management > Timeouts > Hibernate Timeout. 2 Select the amount of printer display 1 From the homes screen, touch Settings > Preferences > Screen Brightness. 2 Adjust the setting. Conserving supplies • Print on both sides of the document to check...
... number of minutes the printer stays idle before printing it enters Sleep mode. Adjusting the brightness of time before sending a print job. • The Embedded Web Server is disabled when the printer is the default setting in hibernate mode. Hibernate mode 1 From the home screen, touch Settings > Device > Power Management > Timeouts > Hibernate Timeout. 2 Select the amount of printer display 1 From the homes screen, touch Settings > Preferences > Screen Brightness. 2 Adjust the setting. Conserving supplies • Print on both sides of the document to check...

User Guide
Page 99
... the Embedded Web Server open? Step 2 Check if the flash drive is Access the Embedded Web Server again by typing the correct IP solved. Enabling the USB port From the home screen, touch Settings > Network/Ports > USB > Enable USB Port. Unable to step 7. For more information, see "Supported flash drives and file types" on page 99. Step 7 The problem is supported. The problem is solved. Are the Web proxy servers disabled? For more information, see support. Does the error message still...
... the Embedded Web Server open? Step 2 Check if the flash drive is Access the Embedded Web Server again by typing the correct IP solved. Enabling the USB port From the home screen, touch Settings > Network/Ports > USB > Enable USB Port. Unable to step 7. For more information, see "Supported flash drives and file types" on page 99. Step 7 The problem is supported. The problem is solved. Are the Web proxy servers disabled? For more information, see support. Does the error message still...
User Guide
Page 100
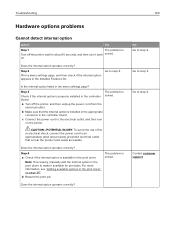
... Turn off the printer, and then unplug the power cord from the electrical outlet. Troubleshooting 100 Hardware options problems Cannot detect internal option Action Yes Step 1 The problem is installed in the appropriate connector in the controller board. b Resend the print job. on page 147. Print a menu settings page, and then check if the internal option appears in the menu settings page? No Go to step 4. Contact customer support. Step 2 Go to step 3. b Make...
... Turn off the printer, and then unplug the power cord from the electrical outlet. Troubleshooting 100 Hardware options problems Cannot detect internal option Action Yes Step 1 The problem is installed in the appropriate connector in the controller board. b Resend the print job. on page 147. Print a menu settings page, and then check if the internal option appears in the menu settings page? No Go to step 4. Contact customer support. Step 2 Go to step 3. b Make...

User Guide
Page 106
... print job. Are the documents printed? b Resend the print job. b Resend the print job. a Make sure that the setting matches the paper loaded in Eco‑Mode and Quiet Mode. Step 3 a Reduce the number of pages to step 3. Step 4 a Remove held jobs to step 5. Go to step 5. No The problem is solved. The problem is solved. b Resend the print job. Is the printer still printing slow? Contact customer support. Are the documents printed? Step 5 a Add printer memory. a Depending on the printer control panel...
... print job. Are the documents printed? b Resend the print job. b Resend the print job. a Make sure that the setting matches the paper loaded in Eco‑Mode and Quiet Mode. Step 3 a Reduce the number of pages to step 3. Step 4 a Remove held jobs to step 5. Go to step 5. No The problem is solved. The problem is solved. b Resend the print job. Is the printer still printing slow? Contact customer support. Are the documents printed? Step 5 a Add printer memory. a Depending on the printer control panel...

User Guide
Page 111
... control panel, select Color Adjust. Notes: • Make sure that the settings match the paper loaded in the tray. • You can also change the settings on prints? solved. Do ghost images still appear on the printer control panel. Yes Go to step 2. b Resend the print job. b Resend the print job. Contact customer The problem is solved. b Resend the print job. The problem is support. Yes Go to step 2. b Resend the print job. Step 3 a From the Quality menu...
... control panel, select Color Adjust. Notes: • Make sure that the settings match the paper loaded in the tray. • You can also change the settings on prints? solved. Do ghost images still appear on the printer control panel. Yes Go to step 2. b Resend the print job. b Resend the print job. Contact customer The problem is solved. b Resend the print job. The problem is support. Yes Go to step 2. b Resend the print job. Step 3 a From the Quality menu...

User Guide
Page 125
... for a particular color‑matching problem depends on the box can then be used to Auto generates preferred colors for modifying the color of Color Samples sets are not useful. Selecting which Color Samples set generates multiple‑page prints consisting of hundreds of cyan, magenta, yellow, and black toner used for the documents. Additionally, some software programs adjust the RGB or CMYK combinations specified in printed output" on the table...
... for a particular color‑matching problem depends on the box can then be used to Auto generates preferred colors for modifying the color of Color Samples sets are not useful. Selecting which Color Samples set generates multiple‑page prints consisting of hundreds of cyan, magenta, yellow, and black toner used for the documents. Additionally, some software programs adjust the RGB or CMYK combinations specified in printed output" on the table...

User Guide
Page 132
..., visit http://support.lexmark.com. Telephone support is solved. b Resolve any error messages that is also listed on the printer display, and the troubleshooting steps you with a service representative. Yes The problem is also available. Is the scanner responding? Contact customer support. Contacting customer support When you contact customer support, you will respond and provide you have already taken to solve your printer model type and serial number. You need...
..., visit http://support.lexmark.com. Telephone support is solved. b Resolve any error messages that is also listed on the printer display, and the troubleshooting steps you with a service representative. Yes The problem is also available. Is the scanner responding? Contact customer support. Contacting customer support When you contact customer support, you will respond and provide you have already taken to solve your printer model type and serial number. You need...

User Guide
Page 147
... the settings to load the Web page correctly. 2 Export or import a configuration file for one or multiple applications. Adding available options in the Network/Ports menu. Upgrading and migrating 147 Software Installing the printer software 1 Obtain a copy of the software installer package. 2 Run the installer, and then follow the instructions on the printer home screen. Note: Obtain the printer IP address from the TCP/IP section in the print driver For Windows users 1 Open the printers folder...
... the settings to load the Web page correctly. 2 Export or import a configuration file for one or multiple applications. Adding available options in the Network/Ports menu. Upgrading and migrating 147 Software Installing the printer software 1 Obtain a copy of the software installer package. 2 Run the installer, and then follow the instructions on the printer home screen. Note: Obtain the printer IP address from the TCP/IP section in the print driver For Windows users 1 Open the printers folder...

User Guide
Page 153
... options print driver 147 ADF input tray replacing 76 ADF scan pad replacing 77 ADF separator roller replacing 79 adjusting brightness of printer display 86 adjusting toner darkness 123 answering machine setting up 35 available internal options 133 avoiding paper jams 88 B blank pages 108 blocking junk faxes 49 brightness of printer display adjusting 86 C canceling a print job from the computer 29 from the printer control panel 29 cannot open Embedded Web Server 98 Card Copy setting up 20 card stock loading 23 changing port settings internal solutions port 55 checking the printer connectivity...
... options print driver 147 ADF input tray replacing 76 ADF scan pad replacing 77 ADF separator roller replacing 79 adjusting brightness of printer display 86 adjusting toner darkness 123 answering machine setting up 35 available internal options 133 avoiding paper jams 88 B blank pages 108 blocking junk faxes 49 brightness of printer display adjusting 86 C canceling a print job from the computer 29 from the printer control panel 29 cannot open Embedded Web Server 98 Card Copy setting up 20 card stock loading 23 changing port settings internal solutions port 55 checking the printer connectivity...

User Guide
Page 154
... options printer hard disk 142 installing printer 147 internal options 133 installing 140 memory card 133 internal options, adding print driver 147 internal solutions port installing 135 troubleshooting 101 J jam, clearing behind door E 91 multipurpose feeder 91 trays 90 jams avoiding 88 locating jam areas 89 locations 89 jams, clearing in the duplex unit 93 in the fuser 93 L letterhead copying on 30 light print 115 line filter 39 linking trays 24 loading card stock 23 envelopes 23 multipurpose feeder 23 loading trays 21 M maintenance counter resetting 85 making copies 30 manual Color...
... options printer hard disk 142 installing printer 147 internal options 133 installing 140 memory card 133 internal options, adding print driver 147 internal solutions port installing 135 troubleshooting 101 J jam, clearing behind door E 91 multipurpose feeder 91 trays 90 jams avoiding 88 locating jam areas 89 locations 89 jams, clearing in the duplex unit 93 in the fuser 93 L letterhead copying on 30 light print 115 line filter 39 linking trays 24 loading card stock 23 envelopes 23 multipurpose feeder 23 loading trays 21 M maintenance counter resetting 85 making copies 30 manual Color...
User Guide
Page 155
... 92 paper jam in trays 90 paper jam, clearing automatic document feeder 91 multipurpose feeder 91 trays 90 paper jams avoiding 88 paper jams, clearing in the duplex unit 93 in the fuser 93 paper size setting 21 paper type setting 21 parallel interface card troubleshooting 101 parts status checking 57 personal identification number method 54 phone splitter 40 photos copying 30 pick roller replacing 71 placing separator sheets between copies copying 31 port settings configuring 55 power button light printer status 15 print driver hardware options, adding 147 print job canceling from...
... 92 paper jam in trays 90 paper jam, clearing automatic document feeder 91 multipurpose feeder 91 trays 90 paper jams avoiding 88 paper jams, clearing in the duplex unit 93 in the fuser 93 paper size setting 21 paper type setting 21 parallel interface card troubleshooting 101 parts status checking 57 personal identification number method 54 phone splitter 40 photos copying 30 pick roller replacing 71 placing separator sheets between copies copying 31 port settings configuring 55 power button light printer status 15 print driver hardware options, adding 147 print job canceling from...
User Guide
Page 156
... scanner glass cleaning 56 scanning to an FTP server 50 scanning to a computer 51 scanning to a flash drive 50 scanning to an FTP server using the control panel 50 scheduling a fax 48 selecting a location for the printer 10 sending a fax scheduled 48 using the computer 47 using the control panel 47 sending an e‑mail 32 separator bracket replacing 74 serial interface card troubleshooting 101 serial printing setting up 55 setting hibernate mode 86 setting sleep mode 86 setting the paper size 21 setting the paper type 21 setting...
... scanner glass cleaning 56 scanning to an FTP server 50 scanning to a computer 51 scanning to a flash drive 50 scanning to an FTP server using the control panel 50 scheduling a fax 48 selecting a location for the printer 10 sending a fax scheduled 48 using the computer 47 using the control panel 47 sending an e‑mail 32 separator bracket replacing 74 serial interface card troubleshooting 101 serial printing setting up 55 setting hibernate mode 86 setting sleep mode 86 setting the paper size 21 setting the paper type 21 setting...
User Guide
Page 157
...;ash drive troubleshooting, print 99 understanding the status of the power button and indicator light 15 uneven print density 120 Universal paper size setting 21 unlinking trays 24 updating firmware flash file 148 USB port enabling 99 using genuine Lexmark parts 57 genuine Lexmark supplies 57 using the ADF copying 30 using the control panel 14 using the home screen 15 using the scanner glass copying 30 V verify print jobs 28 printing from a Macintosh computer 28 printing from Windows 28 vertical dark lines or...
...;ash drive troubleshooting, print 99 understanding the status of the power button and indicator light 15 uneven print density 120 Universal paper size setting 21 unlinking trays 24 updating firmware flash file 148 USB port enabling 99 using genuine Lexmark parts 57 genuine Lexmark supplies 57 using the ADF copying 30 using the control panel 14 using the home screen 15 using the scanner glass copying 30 V verify print jobs 28 printing from a Macintosh computer 28 printing from Windows 28 vertical dark lines or...

