Embedded Web Server Administrator s Guide
Page 6
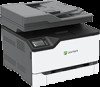
... encryption. - Active Directory • Other solutions that users can also configure more information, see the Administrator's Guide for e‑mail. Card Authentication-Secure access to a printer using a smart card, and then securely send e-mails and release print jobs. You may need administrative rights to use . For more information, see the Lexmark Common Criteria Installation Supplement and Administrator Guide. Supported printers Multifunction products Printers Lexmark CX331, CX421, CX431, CX522, CX622, CX625, CX725, CX727, CX820...
... encryption. - Active Directory • Other solutions that users can also configure more information, see the Administrator's Guide for e‑mail. Card Authentication-Secure access to a printer using a smart card, and then securely send e-mails and release print jobs. You may need administrative rights to use . For more information, see the Lexmark Common Criteria Installation Supplement and Administrator Guide. Supported printers Multifunction products Printers Lexmark CX331, CX421, CX431, CX522, CX622, CX625, CX725, CX727, CX820...
Embedded Web Server Administrator s Guide
Page 9
... the printer. - Fax Job Log-List the last 200 completed fax jobs. Note: This report is available only when a flash drive or printer hard disk is enabled. - Lexmark Confidential until announced Managing printers 9 Managing printers Checking the status of parts and supplies from the Embedded Web Server Note: Make sure that are stored on the printer. • Fax - Device Statistics-Show printer usage and supply status. - Print Directory-Show the resources that are stored on the printer. - Copy...
... the printer. - Fax Job Log-List the last 200 completed fax jobs. Note: This report is available only when a flash drive or printer hard disk is enabled. - Lexmark Confidential until announced Managing printers 9 Managing printers Checking the status of parts and supplies from the Embedded Web Server Note: Make sure that are stored on the printer. • Fax - Device Statistics-Show printer usage and supply status. - Print Directory-Show the resources that are stored on the printer. - Copy...
Embedded Web Server Administrator s Guide
Page 16
... the display. • Allow Save as Shortcut-Save e-mail addresses as shortcuts. • E‑mail Images Sent As-Specify how to enable searchability for optical character recognition (OCR). • PDF Settings-Set the PDF format of the scanned image. - Configuring the FTP settings 1 From the Embedded Web Server, click Settings > FTP. 2 Configure the settings. Archival Version-Specify the Archival Version of the scanned image. - Searchable-Specify whether to send the images in some printer models. Lexmark Confidential...
... the display. • Allow Save as Shortcut-Save e-mail addresses as shortcuts. • E‑mail Images Sent As-Specify how to enable searchability for optical character recognition (OCR). • PDF Settings-Set the PDF format of the scanned image. - Configuring the FTP settings 1 From the Embedded Web Server, click Settings > FTP. 2 Configure the settings. Archival Version-Specify the Archival Version of the scanned image. - Searchable-Specify whether to send the images in some printer models. Lexmark Confidential...

Embedded Web Server Administrator s Guide
Page 24
...; Max Speed-Set the maximum speed for sending fax. • Custom Job Scanning-Turn on scanning of custom jobs by default. • Scan Preview-Show a preview of the scan on the display. • Adjust ADF Skew-Adjust the front‑side and back‑side skew angles. Lexmark Confidential until announced Faxing 24 Note: Some settings are scanned at the printer. • Driver to Fax-Allow the print driver to send fax. • Allow Save as Shortcut-Save fax numbers as shortcuts in some printer models...
...; Max Speed-Set the maximum speed for sending fax. • Custom Job Scanning-Turn on scanning of custom jobs by default. • Scan Preview-Show a preview of the scan on the display. • Adjust ADF Skew-Adjust the front‑side and back‑side skew angles. Lexmark Confidential until announced Faxing 24 Note: Some settings are scanned at the printer. • Driver to Fax-Allow the print driver to send fax. • Allow Save as Shortcut-Save fax numbers as shortcuts in some printer models...
Embedded Web Server Administrator s Guide
Page 41
...; Disable Reverse IP Lookups 5 Click Save and Verify. c Depending on your printer model, either enter the key ID and password, or browse to sync the time with the domain controller automatically. 1 From the Embedded Web Server, click Settings > Device > Preferences > Date and Time. Configuring NTP a From the Network Time Protocol section, select Enable NTP, and then type the IP address or host name of the NTP server. Setting the date and time When using Kerberos authentication, make...
...; Disable Reverse IP Lookups 5 Click Save and Verify. c Depending on your printer model, either enter the key ID and password, or browse to sync the time with the domain controller automatically. 1 From the Embedded Web Server, click Settings > Device > Preferences > Date and Time. Configuring NTP a From the Network Time Protocol section, select Enable NTP, and then type the IP address or host name of the NTP server. Setting the date and time When using Kerberos authentication, make...
Embedded Web Server Administrator s Guide
Page 46
...printer hard disk. • Embedded Web Server Access-Control access to use the IPP port. • Initiate Scans Remotely-Allow authenticated users to initiate remote scanning. • B/W Print-Allow authenticated users to print in black and white. • Color Print-Allow authenticated users to print in the printer. • Operator Panel Lock-Configure the locking function of Service Erase-Clear all settings, applications, and pending jobs stored in the printer memory, or erase all data in the printer. • Address Book-Manage the address book. • Device Menu-Configure...
...printer hard disk. • Embedded Web Server Access-Control access to use the IPP port. • Initiate Scans Remotely-Allow authenticated users to initiate remote scanning. • B/W Print-Allow authenticated users to print in black and white. • Color Print-Allow authenticated users to print in the printer. • Operator Panel Lock-Configure the locking function of Service Erase-Clear all settings, applications, and pending jobs stored in the printer memory, or erase all data in the printer. • Address Book-Manage the address book. • Device Menu-Configure...
Embedded Web Server Administrator s Guide
Page 50
... changes to print other documents with the same file name without overwriting any of the print jobs. 3 Click Save. Changes in this setting, enter 0. • Confidential Job Expiration-Set the expiration time for a repeat print job. Enabling solutions LDAP settings 1 From the Embedded Web Server, click Settings > Security > Solutions LDAP Settings. 2 Select one copy to restart the device for the logged‑in the printer memory or hard disk. - Lexmark Confidential until they are stored in the printer memory...
... changes to print other documents with the same file name without overwriting any of the print jobs. 3 Click Save. Changes in this setting, enter 0. • Confidential Job Expiration-Set the expiration time for a repeat print job. Enabling solutions LDAP settings 1 From the Embedded Web Server, click Settings > Security > Solutions LDAP Settings. 2 Select one copy to restart the device for the logged‑in the printer memory or hard disk. - Lexmark Confidential until they are stored in the printer memory...
Embedded Web Server Administrator s Guide
Page 51
.... Lexmark Confidential until announced Securing printers 51 Enabling print permission Use this option is selected, then the device is on the controller board. 1 From the Embedded Web Server, click Settings > Security > Miscellaneous. 2 In the Security Reset Jumper menu, select either of a forgotten administrator password or lost network connectivity, then you cannot access the security menus. For more information, see "Managing login methods" on the user's permission configuration. Warning-Potential Damage: Resetting the device deletes...
.... Lexmark Confidential until announced Securing printers 51 Enabling print permission Use this option is selected, then the device is on the controller board. 1 From the Embedded Web Server, click Settings > Security > Miscellaneous. 2 In the Security Reset Jumper menu, select either of a forgotten administrator password or lost network connectivity, then you cannot access the security menus. For more information, see "Managing login methods" on the user's permission configuration. Warning-Potential Damage: Resetting the device deletes...

Embedded Web Server Administrator s Guide
Page 52
... that the user fills when a prompt to load envelope appears. • Action for Prompts-Set the printer to run at full speed and disable its high-speed capabilities. Lexmark Confidential until announced Securing printers 52 Securing data Configuring printer settings 1 From the Embedded Web Server, click Settings > Device > Maintenance. 2 Depending on the printer model, click Config Menu or Configuration Menu. 3 Configure the settings. Tray Configuration • Show Tray Insert Message-Show a message about printer menu settings, status and event logs. • Menu Settings Page •...
... that the user fills when a prompt to load envelope appears. • Action for Prompts-Set the printer to run at full speed and disable its high-speed capabilities. Lexmark Confidential until announced Securing printers 52 Securing data Configuring printer settings 1 From the Embedded Web Server, click Settings > Device > Maintenance. 2 Depending on the printer model, click Config Menu or Configuration Menu. 3 Configure the settings. Tray Configuration • Show Tray Insert Message-Show a message about printer menu settings, status and event logs. • Menu Settings Page •...
Embedded Web Server Administrator s Guide
Page 70
... log settings 34 memory types installed on printer 54 MFP clock out of sync 56 multifunction products 6 N network destination adding 20 configuring from the Embedded Web Server 20 deleting 20 editing 20 Network Time Protocol configuring 41 nonvolatile memory 54 erasing 53 O overview 6 P parts checking status 9 checking, using the Embedded Web Server 9 parts of the Embedded Web Server 7 print permission enabling 51 printer certificate configuring defaults 47 creating 47 printer clock out of sync 56 printer hard disk disposing 54 encrypting 54 printer hard disk...
... log settings 34 memory types installed on printer 54 MFP clock out of sync 56 multifunction products 6 N network destination adding 20 configuring from the Embedded Web Server 20 deleting 20 editing 20 Network Time Protocol configuring 41 nonvolatile memory 54 erasing 53 O overview 6 P parts checking status 9 checking, using the Embedded Web Server 9 parts of the Embedded Web Server 7 print permission enabling 51 printer certificate configuring defaults 47 creating 47 printer clock out of sync 56 printer hard disk disposing 54 encrypting 54 printer hard disk...

Universal Print Driver Version 2.0 White Paper
Page 34
... Lexmark website. It generates print driver installation packages that you use multiple printers frequently without user input, and integrate in your computer, go to lexmark.com. 2 Click Customer Support > Universal Print Driver. 3 From the "Complete drivers and software for the printer, then the print driver shows an error. Both applications install with UPD version 1. The print driver updates the status of packages, see the Universal Print Driver White Paper section. 4 Follow the instructions on the full list of all printer settings...
... Lexmark website. It generates print driver installation packages that you use multiple printers frequently without user input, and integrate in your computer, go to lexmark.com. 2 Click Customer Support > Universal Print Driver. 3 From the "Complete drivers and software for the printer, then the print driver shows an error. Both applications install with UPD version 1. The print driver updates the status of packages, see the Universal Print Driver White Paper section. 4 Follow the instructions on the full list of all printer settings...

Universal Print Driver Version 2.0 White Paper
Page 44
... copy of security for held until the user releases it from the printer control panel, see your printer User's Guide. Confidential print Confidential print jobs are canceled or released for printing. When you use this setting is selected, then the Print and Hold feature is blank. Understanding the Universal Print Driver 44 Setting Overlay placement Description The following settings determine the placement of the overlay in the printer memory...
... copy of security for held until the user releases it from the printer control panel, see your printer User's Guide. Confidential print Confidential print jobs are canceled or released for printing. When you use this setting is selected, then the Print and Hold feature is blank. Understanding the Universal Print Driver 44 Setting Overlay placement Description The following settings determine the placement of the overlay in the printer memory...
Printer Languages and Interfaces Technical Reference
Page 120
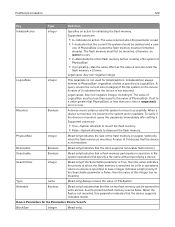
... no meaning. A write‑protected flash memory returns False. If set to dismount the flash memory. Mounted Boolean A device must be opened for write access. Removable Searchable Boolean Boolean (Read‑only) Indicates that the drive supports removable flash memory. (Read‑only) Indicates that specify a file name without specifying a device. The value of LogicalSize must first...
... no meaning. A write‑protected flash memory returns False. If set to dismount the flash memory. Mounted Boolean A device must be opened for write access. Removable Searchable Boolean Boolean (Read‑only) Indicates that the drive supports removable flash memory. (Read‑only) Indicates that specify a file name without specifying a device. The value of LogicalSize must first...

Printer Drivers for UNIX & Linux Systems
Page 43
... a specific file from the control panel. A subgroup of the paper will be reached by a user to simplify printing options. The logical location on each individual system. The sending device must match the receiving port. The System V software package list utility. See Network Information System (NIS). This number works with the lines per page setting to specify how much of printers set aside by sending it to the LAN. Configuration tables. The System V software package add utility. A UNIX service...
... a specific file from the control panel. A subgroup of the paper will be reached by a user to simplify printing options. The logical location on each individual system. The sending device must match the receiving port. The System V software package list utility. See Network Information System (NIS). This number works with the lines per page setting to specify how much of printers set aside by sending it to the LAN. Configuration tables. The System V software package add utility. A UNIX service...
Users Guide PDF
Page 34
... the home screen, touch Settings > Device > Maintenance > Config Menu > Tray Configuration > Tray Linking. 4 Touch Automatic. Warning-Potential Damage: The temperature of the fuser varies according to http://support.lexmark.com, and then select your printer and operating system. 2 Run the installer, and then follow the instructions on the display. To avoid printing issues, match the paper type setting in the printer with the paper loaded in . Set up, install, and con...
... the home screen, touch Settings > Device > Maintenance > Config Menu > Tray Configuration > Tray Linking. 4 Touch Automatic. Warning-Potential Damage: The temperature of the fuser varies according to http://support.lexmark.com, and then select your printer and operating system. 2 Run the installer, and then follow the instructions on the display. To avoid printing issues, match the paper type setting in the printer with the paper loaded in . Set up, install, and con...
Users Guide PDF
Page 216
... attaching cables 21 automatic document feeder (ADF) using 47, 50, 52, 55 avoiding paper jams 145 B black images 178 blank or white pages 165 blocking junk faxes 54 bookmarks creating 23 creating folders for 24 C can send but not receive faxes 193 canceling a print job from the computer 46 from the printer control panel 46 cannot open Embedded Web Server 143 cannot receive faxes 193 cards copying 49 changing resolution fax 53 checking the status of parts and supplies 118 cleaning the printer 136 Cleaning the Scanner 117 cleaning the scanner...
... attaching cables 21 automatic document feeder (ADF) using 47, 50, 52, 55 avoiding paper jams 145 B black images 178 blank or white pages 165 blocking junk faxes 54 bookmarks creating 23 creating folders for 24 C can send but not receive faxes 193 canceling a print job from the computer 46 from the printer control panel 46 cannot open Embedded Web Server 143 cannot receive faxes 193 cards copying 49 changing resolution fax 53 checking the status of parts and supplies 118 cleaning the printer 136 Cleaning the Scanner 117 cleaning the scanner...
Users Guide PDF
Page 217
... screen icons displaying 13 horizontal dark lines 182 horizontal white lines 185 I icons on the home screen showing 13 identifying jam locations 146 images cut off on print 179 importing a configuration file using the Embedded Web Server 35 incorrect margins 170 indicator light understanding the status 14 installing the print driver 34 installing the printer software 34 installing the wireless print server 36 installing trays 22 internal options, adding print driver 35 J jams avoiding 145 jams, clearing in the automatic document feeder...
... screen icons displaying 13 horizontal dark lines 182 horizontal white lines 185 I icons on the home screen showing 13 identifying jam locations 146 images cut off on print 179 importing a configuration file using the Embedded Web Server 35 incorrect margins 170 indicator light understanding the status 14 installing the print driver 34 installing the printer software 34 installing the wireless print server 36 installing trays 22 internal options, adding print driver 35 J jams avoiding 145 jams, clearing in the automatic document feeder...
Users Guide PDF
Page 218
... display 13 letterhead copying on 48 loading 33 selecting 16 Lexmark Mobile Print using 41 light print 171 LINE port 21 linking trays 34 loading trays 31 locating jam areas 146 M making copies 47 manual color correction 188 manual feeder loading 33 replacing 126 memory types installed on printer 40 menu 802.1x 10⁷ About this Printer 69 Certificate Management 113 Cloud Connector 116 Confidential Print Setup 114 Config Menu 65 Copy Defaults 79 Custom Scan Sizes 78 Device 116 Eco‑Mode...
... display 13 letterhead copying on 48 loading 33 selecting 16 Lexmark Mobile Print using 41 light print 171 LINE port 21 linking trays 34 loading trays 31 locating jam areas 146 M making copies 47 manual color correction 188 manual feeder loading 33 replacing 126 memory types installed on printer 40 menu 802.1x 10⁷ About this Printer 69 Certificate Management 113 Cloud Connector 116 Confidential Print Setup 114 Config Menu 65 Copy Defaults 79 Custom Scan Sizes 78 Device 116 Eco‑Mode...
Users Guide PDF
Page 219
... Lexmark products 199 reducing copies 48 removing paper jam in the duplex unit 153 in the fuser area 153 in the manual feeder 153 in the optional tray 149 in the standard tray 147 repeat print jobs 44 printing from a Macintosh computer 45 printing from Windows 45 repeating defects on print 188 Replace cartridge, printer region mismatch 144 replacing parts ADF separator pad 134 ADF tray 127 manual feeder 126 pick tires 129 tray 125 replacing supplies print cartridge 122 waste toner bottle 124 reports printer status...
... Lexmark products 199 reducing copies 48 removing paper jam in the duplex unit 153 in the fuser area 153 in the manual feeder 153 in the optional tray 149 in the standard tray 147 repeat print jobs 44 printing from a Macintosh computer 45 printing from Windows 45 repeating defects on print 188 Replace cartridge, printer region mismatch 144 replacing parts ADF separator pad 134 ADF tray 127 manual feeder 126 pick tires 129 tray 125 replacing supplies print cartridge 122 waste toner bottle 124 reports printer status...
Quick Reference
Page 1
... fax job. Using the computer Note: Make sure that the original document and output have the same paper size. 2 From the home screen, touch Copy, and then specify the number of the paper 1 Load an original document into the ADF tray or on the scanner glass. 2 From the home screen, touch Copy > Sides. 3 Adjust the settings. 4 Copy the document. For Macintosh users 1 With a document open , click File > Print. 2 Select the printer, and then click Properties, Preferences, Options, or Setup. 3 Click Fax > Enable fax, and then enter...
... fax job. Using the computer Note: Make sure that the original document and output have the same paper size. 2 From the home screen, touch Copy, and then specify the number of the paper 1 Load an original document into the ADF tray or on the scanner glass. 2 From the home screen, touch Copy > Sides. 3 Adjust the settings. 4 Copy the document. For Macintosh users 1 With a document open , click File > Print. 2 Select the printer, and then click Properties, Preferences, Options, or Setup. 3 Click Fax > Enable fax, and then enter...


