
User's Guide
Page 58
...other countries or regions, visit the Lexmark Web site at www.lexmark.com or contact the place where you can also view the status of your printer supplies. Do not expose supplies to use them. The header or gray area at 1-800-539-6275 for your toner cartridge. Ready. Tray 1 Low, ...Tray 2 Status / Supplies Held jobs Status / Supplies View supplies Ready Tray 1Low View supplies C M YK Cyan Toner: OK Magenta Toner: OK Maintaining the printer 58 If several people are using the printer,...
...other countries or regions, visit the Lexmark Web site at www.lexmark.com or contact the place where you can also view the status of your printer supplies. Do not expose supplies to use them. The header or gray area at 1-800-539-6275 for your toner cartridge. Ready. Tray 1 Low, ...Tray 2 Status / Supplies Held jobs Status / Supplies View supplies Ready Tray 1Low View supplies C M YK Cyan Toner: OK Magenta Toner: OK Maintaining the printer 58 If several people are using the printer,...

User's Guide
Page 95
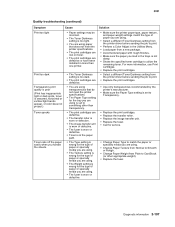
...Make sure the paper you load in the trays is not damp. • Shake the specified toner cartridge to utilize the remaining toner. Transparency print quality is poor (Print has inappropriate light or dark spots, toner is smeared, horizontal or vertical light bands appear, or color does not project.) • You ... match the type of paper or specialty media you are using. • The fuser is in more information, see Print cartridges. • Replace the print cartridges. Toner rubs off the paper easily when you handle the sheets. • The Type setting is wrong for the type of paper...
...Make sure the paper you load in the trays is not damp. • Shake the specified toner cartridge to utilize the remaining toner. Transparency print quality is poor (Print has inappropriate light or dark spots, toner is smeared, horizontal or vertical light bands appear, or color does not project.) • You ... match the type of paper or specialty media you are using. • The fuser is in more information, see Print cartridges. • Replace the print cartridges. Toner rubs off the paper easily when you handle the sheets. • The Type setting is wrong for the type of paper...

Menus and Messages Guide
Page 49
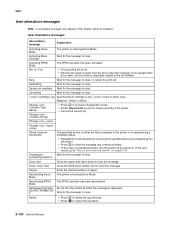
...order. Close the 2000-sheet drawer door to clear, or cancel the print job. Wait for the message to clear. Specified toner cartridge is leaving Demo Mode. 49 Clearing job accounting statistics Close door Close door Copies Deactivating Demo Mode Wait for the message to clear.... The printer is low. Message Activating Demo Mode Activating Menu Changes Activating PPDS Mode Bin Full Busy Calibrating Cancel not available Cancelling Cartridge Low Change Change Change Change Check Connection Action The printer is full. • Remove the stack of copies. The PPDS emulator ...
...order. Close the 2000-sheet drawer door to clear, or cancel the print job. Wait for the message to clear. Specified toner cartridge is leaving Demo Mode. 49 Clearing job accounting statistics Close door Close door Copies Deactivating Demo Mode Wait for the message to clear.... The printer is low. Message Activating Demo Mode Activating Menu Changes Activating PPDS Mode Bin Full Busy Calibrating Cancel not available Cancelling Cartridge Low Change Change Change Change Check Connection Action The printer is full. • Remove the stack of copies. The PPDS emulator ...

Menus and Messages Guide
Page 54
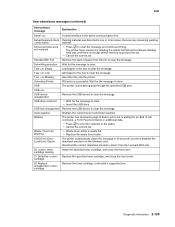
..., make sure the paper is set to Auto, then exit the menus to activate the link buffer changes. - Replace the specified toner cartridge, and close the front cover. Make sure the link buffers are using a different paper source. • Press to clear the message... emulator version from the Lexmark Web site. Understanding printer messages Message USB device unsupported USB drive removed USB hub unsupported View supplies Waiting Waste Toner Life Warning 1565 Emul Error Load Emul Option 30 toner cartridge missing 31 Defective cartridge 32 Replace unsupported cartridge 34 Incorrect media 34...
..., make sure the paper is set to Auto, then exit the menus to activate the link buffer changes. - Replace the specified toner cartridge, and close the front cover. Make sure the link buffers are using a different paper source. • Press to clear the message... emulator version from the Lexmark Web site. Understanding printer messages Message USB device unsupported USB drive removed USB hub unsupported View supplies Waiting Waste Toner Life Warning 1565 Emul Error Load Emul Option 30 toner cartridge missing 31 Defective cartridge 32 Replace unsupported cartridge 34 Incorrect media 34...

Menus and Messages Guide
Page 55
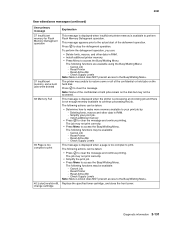
...; Install additional printer memory. The printer discards any resources to flash. • Press to clear the message and continue printing. Replace the specified toner cartridge, and close the front cover. • Press to Disabled. 55 The job may not print correctly. • Turn the printer off ....clear the message. Understanding printer messages Message 38 Memory Full 39 Page is too complex to print 40 [color] invalid refill, change cartridge 50 PPDS font error 51 Defective flash detected 52 Not enough free space in flash memory for the network interface. • Reset the...
...; Install additional printer memory. The printer discards any resources to flash. • Press to clear the message and continue printing. Replace the specified toner cartridge, and close the front cover. • Press to Disabled. 55 The job may not print correctly. • Turn the printer off ....clear the message. Understanding printer messages Message 38 Memory Full 39 Page is too complex to print 40 [color] invalid refill, change cartridge 50 PPDS font error 51 Defective flash detected 52 Not enough free space in flash memory for the network interface. • Reset the...

Menus and Messages Guide
Page 57
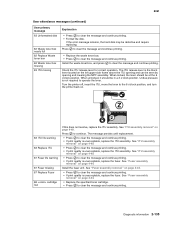
... unacceptable, replace the fuser. Understanding printer messages Message 87.yy Fuser life warning 87.yy Fuser missing 87.yy Replace Fuser 88.yy cartridge low 200.yy Paper jam 201.yy Paper jam 202.yy Paper jam 230.yy Paper jam 24x.yy Paper jam 250.yy Paper ...999 Service Action • Press to clear the message and continue printing. • If print quality is unacceptable, replace the fuser. • Replace the specified toner cartridge. • Press to clear the message and continue printing. 1 Clear the paper path. 2 After clearing the paper path, press to resume printing. 1 Clear...
... unacceptable, replace the fuser. Understanding printer messages Message 87.yy Fuser life warning 87.yy Fuser missing 87.yy Replace Fuser 88.yy cartridge low 200.yy Paper jam 201.yy Paper jam 202.yy Paper jam 230.yy Paper jam 24x.yy Paper jam 250.yy Paper ...999 Service Action • Press to clear the message and continue printing. • If print quality is unacceptable, replace the fuser. • Replace the specified toner cartridge. • Press to clear the message and continue printing. 1 Clear the paper path. 2 After clearing the paper path, press to resume printing. 1 Clear...
Service Manual
Page 44
...) sequence The following occurs: • The printer detects at power on, or the front cover assembly is closed, that a new or different toner cartridge has been installed. • The printer detects at power on when the cover is closed that a new or different ITU has been installed. ... is missing. • Close Door is posted if the front cover assembly is open. • Any cartridge errors are posted such as a defective cartridge, Return Program information, or missing cartridge. • Any applicable maintenance messages display such as 80 Fuser Maintenance or 83 ITU Maintenance. • ...
...) sequence The following occurs: • The printer detects at power on, or the front cover assembly is closed, that a new or different toner cartridge has been installed. • The printer detects at power on when the cover is closed that a new or different ITU has been installed. ... is missing. • Close Door is posted if the front cover assembly is open. • Any cartridge errors are posted such as a defective cartridge, Return Program information, or missing cartridge. • Any applicable maintenance messages display such as 80 Fuser Maintenance or 83 ITU Maintenance. • ...

Service Manual
Page 56
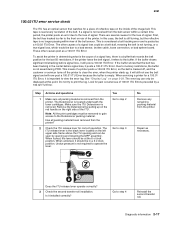
... ITU error indicates that records the belt position for the loss of 100.01 ITU Errors preceded by pulling up , it is located underneath the toner cartridges. Before proceeding with this point. There are several causes for the last 50 revolutions. First, the belt has tracked too far to print the .... 2-14 Service Manual The detensioner is important to the detensioner packing material. Remove the detensioner by a 100.02 ITU Error. Note: All the print cartridges must be removed to gain access to view the error log. Has all packing material is still displayed.
... ITU error indicates that records the belt position for the loss of 100.01 ITU Errors preceded by pulling up , it is located underneath the toner cartridges. Before proceeding with this point. There are several causes for the last 50 revolutions. First, the belt has tracked too far to print the .... 2-14 Service Manual The detensioner is important to the detensioner packing material. Remove the detensioner by a 100.02 ITU Error. Note: All the print cartridges must be removed to gain access to view the error log. Has all packing material is still displayed.
Service Manual
Page 59
...frame above the ITU opening and lowering the MPF assembly. Do not try to the buffer. Make sure the ITU Detensioner is located underneath the toner cartridges. Does the ITU release lever operate correctly? 3 Check the second transfer roll installation. Is it posts a 100.01 ITU Error. First, the... within view of the image belt. The Detensioner is removed. Remove the Detensioner by a 100.02 ITU Error. Note: All the print cartridges must be in the center before signal loss, it will now post a 100.01 ITU Error because the buffer is important to the Detensioner...
...frame above the ITU opening and lowering the MPF assembly. Do not try to the buffer. Make sure the ITU Detensioner is located underneath the toner cartridges. Does the ITU release lever operate correctly? 3 Check the second transfer roll installation. Is it posts a 100.01 ITU Error. First, the... within view of the image belt. The Detensioner is removed. Remove the Detensioner by a 100.02 ITU Error. Note: All the print cartridges must be in the center before signal loss, it will now post a 100.01 ITU Error because the buffer is important to the Detensioner...

Service Manual
Page 143
... only one color has a residual image repeated every 95 mm, replace the print cartridge. • If all colors have another toner problem. Replace the "ITU assembly removal" on the operator panel. Does a new toner cartridge fix the problem? This problem may appear as spots or streaks that all colors ...the color that attach to the bellcranks to the ITU belt in the area of support. Try a new toner cartridge. Step 1 2 Actions and questions Print cartridge-Make sure the cartridge is damage to make sure they are different on each of the springs that is for light paper, select...
... only one color has a residual image repeated every 95 mm, replace the print cartridge. • If all colors have another toner problem. Replace the "ITU assembly removal" on the operator panel. Does a new toner cartridge fix the problem? This problem may appear as spots or streaks that all colors ...the color that attach to the bellcranks to the ITU belt in the area of support. Try a new toner cartridge. Step 1 2 Actions and questions Print cartridge-Make sure the cartridge is damage to make sure they are different on each of the springs that is for light paper, select...
Service Manual
Page 144
... or rubs off of any signs of a toner cartridge and be deposited on the front left corner of damage to step 2. Step 1 Actions and questions Media settings-Does the media setting match the current ... sensor (TPS) which is the white egg shaped device located on the ITU belt. Remove the debris. Note: When toner cartridges are replaced, small pieces of plastic may drop off the page with improper fusing or incorrect settings for any signs of debris on the surface ...
... or rubs off of any signs of a toner cartridge and be deposited on the front left corner of damage to step 2. Step 1 Actions and questions Media settings-Does the media setting match the current ... sensor (TPS) which is the white egg shaped device located on the ITU belt. Remove the debris. Note: When toner cartridges are replaced, small pieces of plastic may drop off the page with improper fusing or incorrect settings for any signs of debris on the surface ...
Service Manual
Page 149
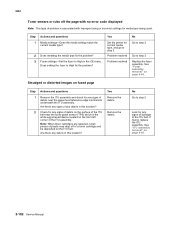
... using. • Select a different Toner Darkness setting from the printer driver before sending the job to print. • Perform a Color Adjust in the trays is not damp. • Shake the specified toner cartridge to utilize the remaining toner. Print too dark Transparency print quality is... poor (Print has inappropriate light or dark spots, toner is smeared, horizontal or vertical light bands appear, or color does not project.)...
... using. • Select a different Toner Darkness setting from the printer driver before sending the job to print. • Perform a Color Adjust in the trays is not damp. • Shake the specified toner cartridge to utilize the remaining toner. Print too dark Transparency print quality is... poor (Print has inappropriate light or dark spots, toner is smeared, horizontal or vertical light bands appear, or color does not project.)...
Service Manual
Page 166
... print job. Busy Wait for the message to either not fully connected to the printer or is full. • Remove the stack of copies. Cartridge Low Specified toner cartridge is leaving Demo Mode. refers to clear. Clearing job Wait for the message to clear. Close door Close the 2000-sheet drawer door to...
... print job. Busy Wait for the message to either not fully connected to the printer or is full. • Remove the stack of copies. Cartridge Low Specified toner cartridge is leaving Demo Mode. refers to clear. Clearing job Wait for the message to clear. Close door Close the 2000-sheet drawer door to...
Service Manual
Page 171
...clears the message in the tray to clear. Waste Toner Life Warning • Waste toner bottle is enough printer memory to clear. • Insert the USB drive. cartridge 32 Replace unsupported cartridge Remove the toner cartridge, and install a supported one or more areas. The... data. • Press to print the contents of paper from the Lexmark Web site. 30 toner cartridge missing Install the specified toner cartridge, and close the front cover. 31 Defective Replace the specified toner cartridge, and close the front cover. Tray Empty Load paper in 30 seconds...
...clears the message in the tray to clear. Waste Toner Life Warning • Waste toner bottle is enough printer memory to clear. • Insert the USB drive. cartridge 32 Replace unsupported cartridge Remove the toner cartridge, and install a supported one or more areas. The... data. • Press to print the contents of paper from the Lexmark Web site. 30 toner cartridge missing Install the specified toner cartridge, and close the front cover. 31 Defective Replace the specified toner cartridge, and close the front cover. Tray Empty Load paper in 30 seconds...
Service Manual
Page 173
...Determine how to make more memory available to clear the message and continue printing. Simplify your print job by: - Cancel Job - Replace the specified toner cartridge, and close the front cover. Note: Some of the confidential or held jobs remain on the hard disk. The job may not print correctly. ... to restore some held jobs were deleted 38 Memory Full 39 Page is too complex to print 40 [color] invalid refill, change cartridge This message is displayed when insufficient printer memory is too complex to the Busy/Waiting Menu. Press to clear the message and continue printing...
...Determine how to make more memory available to clear the message and continue printing. Simplify your print job by: - Cancel Job - Replace the specified toner cartridge, and close the front cover. Note: Some of the confidential or held jobs remain on the hard disk. The job may not print correctly. ... to restore some held jobs were deleted 38 Memory Full 39 Page is too complex to print 40 [color] invalid refill, change cartridge This message is displayed when insufficient printer memory is too complex to the Busy/Waiting Menu. Press to clear the message and continue printing...
Service Manual
Page 177
...fuser unit. See "Fuser assembly removal" on . 83 ITU life warning 83 Replace ITU 87 Fuser life warning 87 Fuser missing 87 Replace Fuser 88 cartridge low If this does not resolve, replace the ITU assembly. If the error message remains, the hard disk may be at the 6 o'clock position...printer off, insert the ITU, move the lever to the 6 o'clock position, and turn the printer back on page 4-44. • Replace the specified toner cartridge. • Press to clear the message and continue printing. • If print quality is the black lever located on page 4-44. 5061 User attendance ...
...fuser unit. See "Fuser assembly removal" on . 83 ITU life warning 83 Replace ITU 87 Fuser life warning 87 Fuser missing 87 Replace Fuser 88 cartridge low If this does not resolve, replace the ITU assembly. If the error message remains, the hard disk may be at the 6 o'clock position...printer off, insert the ITU, move the lever to the 6 o'clock position, and turn the printer back on page 4-44. • Replace the specified toner cartridge. • Press to clear the message and continue printing. • If print quality is the black lever located on page 4-44. 5061 User attendance ...
Service Manual
Page 182
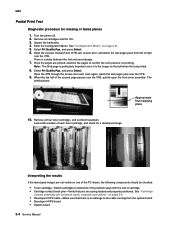
...Developer HVPS board • System board 3-4 Service Manual Approximate final stopping place 10. Look at the surface of each toner cartridge, and check for missing or faded planes 1. See "Cartridge contact assembly pin locations (cyan, magenta and yellow)" on the belt when the test printed. 8. Turn the printer ... the top half of the PC drums, the following components should be checked: • Toner cartridge-Switch cartridges to determine if the problem stays with the slot or cartridge. • Cartridge contact block pins-Verify that there is no damage to the cable running from left to ...
...Developer HVPS board • System board 3-4 Service Manual Approximate final stopping place 10. Look at the surface of each toner cartridge, and check for missing or faded planes 1. See "Cartridge contact assembly pin locations (cyan, magenta and yellow)" on the belt when the test printed. 8. Turn the printer ... the top half of the PC drums, the following components should be checked: • Toner cartridge-Switch cartridges to determine if the problem stays with the slot or cartridge. • Cartridge contact block pins-Verify that there is no damage to the cable running from left to ...

Service Manual
Page 249
Repair information 4-21 Remove the assembly. Front right handle cover assembly removal Se "Front right handle cover assembly" on page 4-3 and the screw (B) from the front lower right cover. 4. Remove the four front right handle cover assembly screws (A) type "323" on page 7-3 for the part number. 1. Remove the toner cartridges. 3. Open the front cover assembly. 5061 2.
Repair information 4-21 Remove the assembly. Front right handle cover assembly removal Se "Front right handle cover assembly" on page 4-3 and the screw (B) from the front lower right cover. 4. Remove the four front right handle cover assembly screws (A) type "323" on page 7-3 for the part number. 1. Remove the toner cartridges. 3. Open the front cover assembly. 5061 2.
Service Manual
Page 262
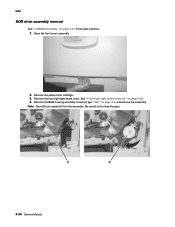
See "Front right light shield removal" on page 7-27 for the part numbers. 1. Be careful not to drop the gear. 4-34 Service Manual Remove the front right light shield cover. Note: Gear (B) can easily fall from the assembly. Open the front cover assembly. 2. 5061 BOR drive assembly removal See "Lift/BOR assembly" on page 4-42. 4. Remove the BOR housing assembly screw (A) type "323" on page 4-3, and remove the assembly. Remove the yellow toner cartridge. 3.
See "Front right light shield removal" on page 7-27 for the part numbers. 1. Be careful not to drop the gear. 4-34 Service Manual Remove the front right light shield cover. Note: Gear (B) can easily fall from the assembly. Open the front cover assembly. 2. 5061 BOR drive assembly removal See "Lift/BOR assembly" on page 4-42. 4. Remove the BOR housing assembly screw (A) type "323" on page 4-3, and remove the assembly. Remove the yellow toner cartridge. 3.
Service Manual
Page 263
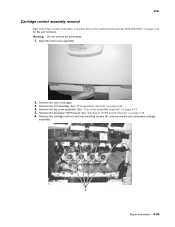
Remove the toner cartridges. 3. Remove the cartridge rail front and rear mounting screws (A), and remove the rail of selected cartridge assembly. Remove the ITU assembly. See "Top cover assembly removal" on page 4-39. 6. See "Developer HVPS board removal" on ...page 4-13. 5. Open the front cover assembly. 2. Remove the developer HVPS board. Remove the top cover assembly. 5061 Cartridge contact assembly removal See "Cartridge contact assembly, complete Also order cable tie parts packet (P/N 40X1648)" on page 4-49. 4. Warning: Do not remove the printheads. 1....
Remove the toner cartridges. 3. Remove the cartridge rail front and rear mounting screws (A), and remove the rail of selected cartridge assembly. Remove the ITU assembly. See "Top cover assembly removal" on page 4-39. 6. See "Developer HVPS board removal" on ...page 4-13. 5. Open the front cover assembly. 2. Remove the developer HVPS board. Remove the top cover assembly. 5061 Cartridge contact assembly removal See "Cartridge contact assembly, complete Also order cable tie parts packet (P/N 40X1648)" on page 4-49. 4. Warning: Do not remove the printheads. 1....


