User Guide
Page 33
Item Worldwide BSD Black 24B5998 Cyan 24B5995 Magenta 24B5996 Yellow 24B5997 BSD LAD Black 24B2126 Cyan 24B1198 Magenta 24B1249 Yellow 24B2074 Ordering a photoconductor unit Item Photoconductor unit (1 pack) Photoconductor unit (3 pack) Part number 72K0P00 72K0Q00 Ordering developer units Item Return Program developer units Black developer unit Color (CMY) developer kit Cyan developer unit Magenta...
Item Worldwide BSD Black 24B5998 Cyan 24B5995 Magenta 24B5996 Yellow 24B5997 BSD LAD Black 24B2126 Cyan 24B1198 Magenta 24B1249 Yellow 24B2074 Ordering a photoconductor unit Item Photoconductor unit (1 pack) Photoconductor unit (3 pack) Part number 72K0P00 72K0Q00 Ordering developer units Item Return Program developer units Black developer unit Color (CMY) developer kit Cyan developer unit Magenta...
User Guide
Page 39
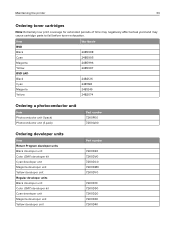
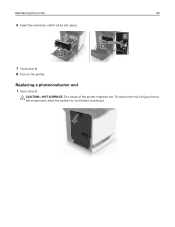
Replacing a photoconductor unit 1 Open door B. To reduce the risk of the printer might be hot. CAUTION-HOT SURFACE: The inside of injury from a hot component, allow the surface to cool before touching it clicks into place. 7 Close door B. 8 Turn on the printer. Maintaining the printer 39 6 Insert the new fuser until it .
Replacing a photoconductor unit 1 Open door B. To reduce the risk of the printer might be hot. CAUTION-HOT SURFACE: The inside of injury from a hot component, allow the surface to cool before touching it clicks into place. 7 Close door B. 8 Turn on the printer. Maintaining the printer 39 6 Insert the new fuser until it .
User Guide
Page 41
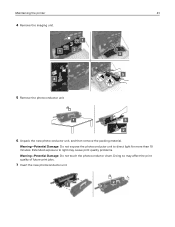
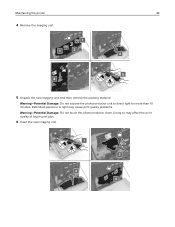
Extended exposure to direct light for more than 10 minutes. Doing so may cause print quality problems. Warning-Potential Damage: Do not touch the photoconductor drum. Maintaining the printer 41 4 Remove the imaging unit. 5 Remove the photoconductor unit. 6 Unpack the new photoconductor unit, and then remove the packing material. Warning-Potential Damage: Do not expose the photoconductor unit to light may affect the print quality of future print jobs. 7 Insert the new photoconductor unit.
Extended exposure to direct light for more than 10 minutes. Doing so may cause print quality problems. Warning-Potential Damage: Do not touch the photoconductor drum. Maintaining the printer 41 4 Remove the imaging unit. 5 Remove the photoconductor unit. 6 Unpack the new photoconductor unit, and then remove the packing material. Warning-Potential Damage: Do not expose the photoconductor unit to light may affect the print quality of future print jobs. 7 Insert the new photoconductor unit.
User Guide
Page 44
Maintaining the printer 44 4 Remove the imaging unit. 5 Unpack the new imaging unit, and then remove the packing material. Doing so may cause print quality problems. Warning-Potential Damage: Do not touch the photoconductor drum. Extended exposure to direct light for more than 10 minutes. Warning-Potential Damage: Do not expose the photoconductor unit to light may affect the print quality of future print jobs. 6 Insert the new imaging unit.
Maintaining the printer 44 4 Remove the imaging unit. 5 Unpack the new imaging unit, and then remove the packing material. Doing so may cause print quality problems. Warning-Potential Damage: Do not touch the photoconductor drum. Extended exposure to direct light for more than 10 minutes. Warning-Potential Damage: Do not expose the photoconductor unit to light may affect the print quality of future print jobs. 6 Insert the new imaging unit.
User Guide
Page 97
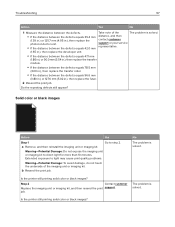
... the distance between the defects. • If the distance between the defects equals 35.4 mm (1.39 in.) or 125.7 mm (4.95 in.), then replace the photoconductor unit. • If the distance between the defects equals 96.6 mm (3.80 in.) or 127.6 mm (5.02 in .), then replace the developer unit. Extended exposure...
... the distance between the defects. • If the distance between the defects equals 35.4 mm (1.39 in.) or 125.7 mm (4.95 in.), then replace the photoconductor unit. • If the distance between the defects equals 96.6 mm (3.80 in.) or 127.6 mm (5.02 in .), then replace the developer unit. Extended exposure...
User Guide
Page 127
...notices 124, 125 O optional card installing 112 options firmware cards 107 memory card 107 ordering developer unit 33 imaging units 34 127 photoconductor unit 33 ordering supplies staple cartridges 34 waste toner bottle 34 organizing cables 11 P paper Universal size setting 19 paper jam in door ... setting 19 paper type setting 19 parallel interface card troubleshooting 80 parts status checking 32 personal identification number method 30 photoconductor unit ordering 33 replacing 39 pick roller replacing 52 port settings configuring 31 power button light printer status 13 power ...
...notices 124, 125 O optional card installing 112 options firmware cards 107 memory card 107 ordering developer unit 33 imaging units 34 127 photoconductor unit 33 ordering supplies staple cartridges 34 waste toner bottle 34 organizing cables 11 P paper Universal size setting 19 paper jam in door ... setting 19 paper type setting 19 parallel interface card troubleshooting 80 parts status checking 32 personal identification number method 30 photoconductor unit ordering 33 replacing 39 pick roller replacing 52 port settings configuring 31 power button light printer status 13 power ...
User Guide
Page 128
... 25 Push Button method 30 Q QR codes adding 17 R recycling Lexmark packaging 63 Lexmark products 63 toner cartridges 63 repeat print jobs 25 printing from a Macintosh computer 25 printing from Windows 25 repeating print defects 96 replacing a developer unit 34 replacing a photoconductor unit 39 replacing a toner cartridge 45 replacing an imaging unit 42...
... 25 Push Button method 30 Q QR codes adding 17 R recycling Lexmark packaging 63 Lexmark products 63 toner cartridges 63 repeat print jobs 25 printing from a Macintosh computer 25 printing from Windows 25 repeating print defects 96 replacing a developer unit 34 replacing a photoconductor unit 39 replacing a toner cartridge 45 replacing an imaging unit 42...
User Guide
Page 129
...74 statement of volatility 28 storing print jobs 25 supplies conserving 62 supplies status checking 32 supplies, ordering developer unit 33 imaging units 34 photoconductor unit 33 staple cartridges 34 waste toner bottle 34 supply notifications configuring 34 supported file types 24 supported fl...19 unlinking trays 22 updating firmware flash file 120 USB port enabling 78 USB ports 11 using genuine Lexmark parts 32 genuine Lexmark supplies 32 using Customer Support 17 using Google Drive 18 using QR Code Generator 17 using the control panel 12 using the home...
...74 statement of volatility 28 storing print jobs 25 supplies conserving 62 supplies status checking 32 supplies, ordering developer unit 33 imaging units 34 photoconductor unit 33 staple cartridges 34 waste toner bottle 34 supply notifications configuring 34 supported file types 24 supported fl...19 unlinking trays 22 updating firmware flash file 120 USB port enabling 78 USB ports 11 using genuine Lexmark parts 32 genuine Lexmark supplies 32 using Customer Support 17 using Google Drive 18 using QR Code Generator 17 using the control panel 12 using the home...


