Troubleshooting Guide
Page 1
...into the outlet is working. • The printer is turned on the Lexmark Web site at www.lexmark.com. This often fixes the problem. Turn the printer off and contact Customer Support. Verify that you want to the printer and the host computer, print server, option...Solution Internal print server is not set up additional printer memory by any switch or breaker. • The printer is not plugged into any surge protectors, uninterrupted power supplies, or extension cords. • Other electrical equipment plugged into the printer and a properly grounded electrical outlet. •...
...into the outlet is working. • The printer is turned on the Lexmark Web site at www.lexmark.com. This often fixes the problem. Turn the printer off and contact Customer Support. Verify that you want to the printer and the host computer, print server, option...Solution Internal print server is not set up additional printer memory by any switch or breaker. • The printer is not plugged into any surge protectors, uninterrupted power supplies, or extension cords. • Other electrical equipment plugged into the printer and a properly grounded electrical outlet. •...
Troubleshooting Guide
Page 4
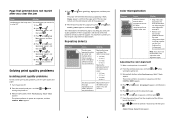
...appears, and then press . may have not resolved the issue, adjust the color alignment again. For more information about installing supplies, see "Adjusting the color alignment" on . The printer performs its power-on the Software and Documentation CD. Printing Quality Test Pages appears..., and then the pages print. Note: If you have a printer part that number is turned...
...appears, and then press . may have not resolved the issue, adjust the color alignment again. For more information about installing supplies, see "Adjusting the color alignment" on . The printer performs its power-on the Software and Documentation CD. Printing Quality Test Pages appears..., and then the pages print. Note: If you have a printer part that number is turned...
User's Guide
Page 2
... service person. This product uses a laser. This symbol indicates the presence of some parts may not always be obvious. CAUTION: To reduce the risk of procedures other devices attached to the printer, turn the printer off as the power supply cord or telephone, during a lightning storm.... CAUTION: If you set it safely. Refer service or repairs, other replacement parts. Lexmark is near the product and easily accessible. The ...
... service person. This product uses a laser. This symbol indicates the presence of some parts may not always be obvious. CAUTION: To reduce the risk of procedures other devices attached to the printer, turn the printer off as the power supply cord or telephone, during a lightning storm.... CAUTION: If you set it safely. Refer service or repairs, other replacement parts. Lexmark is near the product and easily accessible. The ...
User's Guide
Page 4
...Supported paper sizes...41 Support for paper types ...43 Paper types and weights ...43 Paper capacities ...44 Printing...45 Installing printer software...45 Printing a document from Windows 45 Printing a document from a Macintosh computer 45 Printing confidential and other held jobs... from a Macintosh computer 50 Printing only black text and graphics 50 Configuring the printer for black-only printing 51 Removing the color supplies ...51 Configuring the printer for color printing and replacing the color supplies 54 Canceling a print job...55 Canceling a print job from the control panel ...
...Supported paper sizes...41 Support for paper types ...43 Paper types and weights ...43 Paper capacities ...44 Printing...45 Installing printer software...45 Printing a document from Windows 45 Printing a document from a Macintosh computer 45 Printing confidential and other held jobs... from a Macintosh computer 50 Printing only black text and graphics 50 Configuring the printer for black-only printing 51 Removing the color supplies ...51 Configuring the printer for color printing and replacing the color supplies 54 Canceling a print job...55 Canceling a print job from the control panel ...
User's Guide
Page 5
... jams in the multipurpose feeder 67 Clearing jams in the manual feeder 68 Maintaining the printer 69 Storing supplies...69 Checking the status of supplies...69 Conserving supplies...69 Aligning the toner cartridges...69 Cleaning the printhead lenses...70 Ordering supplies...70 Ordering toner cartridges...71 Ordering a transfer belt...72 Ordering a waste toner box ...73...
... jams in the multipurpose feeder 67 Clearing jams in the manual feeder 68 Maintaining the printer 69 Storing supplies...69 Checking the status of supplies...69 Conserving supplies...69 Aligning the toner cartridges...69 Cleaning the printhead lenses...70 Ordering supplies...70 Ordering toner cartridges...71 Ordering a transfer belt...72 Ordering a waste toner box ...73...

User's Guide
Page 11
... Menu Opens the menu index Note: These menus are only available when the printer detects an error code. Press or to scroll through values or text that communicate information about the printer: • Printer status messages-Indicate the current status of options is in the Ready state. ...These screens are only available when the printer is offered once Stopped appears on a menu item. 3 Navigation buttons Press or to scroll through menu lists. Learning about supplies, such as Toner Low. • Show-me screens-Provide instructions for resolving...
... Menu Opens the menu index Note: These menus are only available when the printer detects an error code. Press or to scroll through values or text that communicate information about the printer: • Printer status messages-Indicate the current status of options is in the Ready state. ...These screens are only available when the printer is offered once Stopped appears on a menu item. 3 Navigation buttons Press or to scroll through menu lists. Learning about supplies, such as Toner Low. • Show-me screens-Provide instructions for resolving...
User's Guide
Page 12
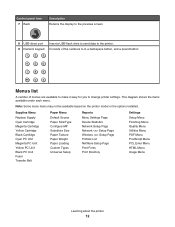
...7 Back Description Returns the display to the previous screen 8 USB direct port 9 Numeric keypad Insert a USB flash drive to send data to change printer settings. Consists of the numbers 0-9, a backspace button, and a pound button Menus list A number of menus are available to make it easy for... you to the printer. This diagram shows the items available under each menu. Supplies Menu Replace Supply Cyan Cartridge Magenta Cartridge Yellow Cartridge Black Cartridge Cyan PC Unit Magenta PC Unit Yellow PC Unit Black ...
...7 Back Description Returns the display to the previous screen 8 USB direct port 9 Numeric keypad Insert a USB flash drive to send data to change printer settings. Consists of the numbers 0-9, a backspace button, and a pound button Menus list A number of menus are available to make it easy for... you to the printer. This diagram shows the items available under each menu. Supplies Menu Replace Supply Cyan Cartridge Magenta Cartridge Yellow Cartridge Black Cartridge Cyan PC Unit Magenta PC Unit Yellow PC Unit Black ...

User's Guide
Page 13
Security Max Invalid PIN Job Expiration Network/Ports TCP/IP IPv6 Wireless Standard Network Network Standard USB USB NetWare AppleTalk LexLink USB Direct Help Color Quality Print Quality Printing Guide Supplies Guide Media Guide Print Defects Menu Map Information Guide Connection Guide Moving Guide Learning about the printer 13
Security Max Invalid PIN Job Expiration Network/Ports TCP/IP IPv6 Wireless Standard Network Network Standard USB USB NetWare AppleTalk LexLink USB Direct Help Color Quality Print Quality Printing Guide Supplies Guide Media Guide Print Defects Menu Map Information Guide Connection Guide Moving Guide Learning about the printer 13

User's Guide
Page 50
... Print. 8 From the drop-down and while turning the printer on. 3 Release the buttons when the clock appears, and wait for an extended period, set the printer to Color Lock Out mode, and remove and store the color printing supplies. Printing 50 Printing the print quality test pages Print the... print quality test pages to isolate print quality problems. 1 Turn the printer off. 2 Hold down list, choose Paper...
... Print. 8 From the drop-down and while turning the printer on. 3 Release the buttons when the clock appears, and wait for an extended period, set the printer to Color Lock Out mode, and remove and store the color printing supplies. Printing 50 Printing the print quality test pages Print the... print quality test pages to isolate print quality problems. 1 Turn the printer off. 2 Hold down list, choose Paper...

User's Guide
Page 51
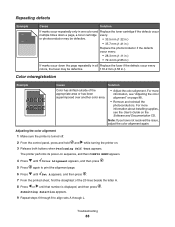
... control panel, hold down and while turning the printer on. 3 Release the buttons when the clock appears, and wait for CONFIG MENU to appear. 4 Press until Color Lock Out appears, and then press . 5 Press until Remove all color supplies appears. Submitting Selection appears. 6 Press until Exit...Menu appears, and then press . 7 Wait until On appears, and then press . Removing the color supplies Warning: Do not touch the shiny photoconductor drums. 1 Grasp the handhold. Note: Store the color supplies in a clean, cool, dark, dry place where the photoconductors will not be touched or scratched...
... control panel, hold down and while turning the printer on. 3 Release the buttons when the clock appears, and wait for CONFIG MENU to appear. 4 Press until Color Lock Out appears, and then press . 5 Press until Remove all color supplies appears. Submitting Selection appears. 6 Press until Exit...Menu appears, and then press . 7 Wait until On appears, and then press . Removing the color supplies Warning: Do not touch the shiny photoconductor drums. 1 Grasp the handhold. Note: Store the color supplies in a clean, cool, dark, dry place where the photoconductors will not be touched or scratched...
User's Guide
Page 54
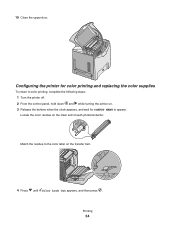
10 Close the upper door. Locate the color residue on the transfer belt. 4 Press until Color Lock Out appears, and then press . Printing 54 Match the residue to appear. Configuring the printer for color printing and replacing the color supplies To return to color printing, complete the following steps: 1 Turn the printer off. 2 From the control panel, hold down and while turning the printer on. 3 Release the buttons when the clock appears, and wait for CONFIG MENU to the color label on the clear end of each photoconductor.
10 Close the upper door. Locate the color residue on the transfer belt. 4 Press until Color Lock Out appears, and then press . Printing 54 Match the residue to appear. Configuring the printer for color printing and replacing the color supplies To return to color printing, complete the following steps: 1 Turn the printer off. 2 From the control panel, hold down and while turning the printer on. 3 Release the buttons when the clock appears, and wait for CONFIG MENU to the color label on the clear end of each photoconductor.
User's Guide
Page 55
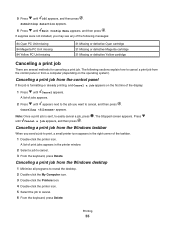
...print job from the control panel If the job is sent, to cancel. 6 From the keyboard, press Delete. If supplies were not installed, you send a job to print, a small printer icon appears in the printer window. 2 Select a job to cancel, and then press . Canceling a print job from the Windows taskbar When you... panel or from the Windows desktop 1 Minimize all programs to reveal the desktop. 2 Double-click the My Computer icon. 3 Double-click the Printers icon. 4 Double-click the printer icon. 5 Select the job to easily cancel a job, press . A list of the taskbar. 1 Double-click the...
...print job from the control panel If the job is sent, to cancel. 6 From the keyboard, press Delete. If supplies were not installed, you send a job to print, a small printer icon appears in the printer window. 2 Select a job to cancel, and then press . Canceling a print job from the Windows taskbar When you... panel or from the Windows desktop 1 Minimize all programs to reveal the desktop. 2 Double-click the My Computer icon. 3 Double-click the Printers icon. 4 Double-click the printer icon. 5 Select the job to easily cancel a job, press . A list of the taskbar. 1 Double-click the...

User's Guide
Page 63
... dislodge the photoconductors. 3 If the paper will not move, remove all four photoconductors (for more information, see "Removing the color supplies" on page 51). CAUTION: The fuser and the inside of the printer near the fuser may appear. 1 Open the upper and inner doors. Note: Be careful not to cool before clearing jams...
... dislodge the photoconductors. 3 If the paper will not move, remove all four photoconductors (for more information, see "Removing the color supplies" on page 51). CAUTION: The fuser and the inside of the printer near the fuser may appear. 1 Open the upper and inner doors. Note: Be careful not to cool before clearing jams...
User's Guide
Page 69
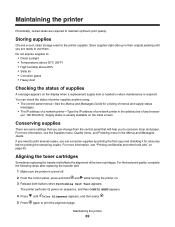
... menu in the address bar of the toner cartridges. Maintaining the printer 69 Aligning the toner cartridges Sometimes replacing the transfer belt affects the alignment of any browser (ex: 192.264.26.3). Store supplies right side up in their original packing until Color Alignment appears, and then press . 5 Press again to : • Direct...
... menu in the address bar of the toner cartridges. Maintaining the printer 69 Aligning the toner cartridges Sometimes replacing the transfer belt affects the alignment of any browser (ex: 192.264.26.3). Store supplies right side up in their original packing until Color Alignment appears, and then press . 5 Press again to : • Direct...
User's Guide
Page 70
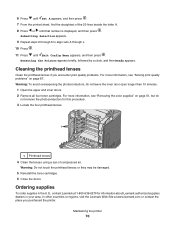
... or they may be damaged. 5 Reinstall the toner cartridges. 6 Close the doors. Ordering supplies To order supplies in your area. Maintaining the printer 70 For more information, see "Removing the color supplies" on page 87. In other countries or regions, visit the Lexmark Web Site at 1-800-539-6275 for this procedure. 3 Locate the four printhead...
... or they may be damaged. 5 Reinstall the toner cartridges. 6 Close the doors. Ordering supplies To order supplies in your area. Maintaining the printer 70 For more information, see "Removing the color supplies" on page 87. In other countries or regions, visit the Lexmark Web Site at 1-800-539-6275 for this procedure. 3 Locate the four printhead...
User's Guide
Page 71
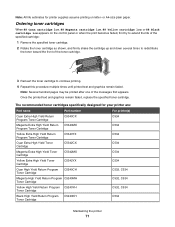
...Reinsert the toner cartridge to redistribute the toner toward the front of the messages first appears. The recommended toner cartridges specifically designed for printer supplies assume printing on the control panel or when the print becomes faded, first try to extend the life of the specified cartridge:... 88 Black cartridge low appears on letter- Note: All life estimates for your printer are: Part name Cyan Extra High Yield Return Program Toner Cartridge Part number C5340CX For printer(s) C534 Magenta Extra High Yield Return Program Toner Cartridge C5340MX C534 Yellow Extra High...
...Reinsert the toner cartridge to redistribute the toner toward the front of the messages first appears. The recommended toner cartridges specifically designed for printer supplies assume printing on the control panel or when the print becomes faded, first try to extend the life of the specified cartridge:... 88 Black cartridge low appears on letter- Note: All life estimates for your printer are: Part name Cyan Extra High Yield Return Program Toner Cartridge Part number C5340CX For printer(s) C534 Magenta Extra High Yield Return Program Toner Cartridge C5340MX C534 Yellow Extra High...

User's Guide
Page 82
...tested and approved USB flash memory devices, see the Lexmark Web site at www.lexmark.com. This often fixes the problem. The Print dialog appears. 3 Select Print as image. 4 Click OK. Troubleshooting Checking an unresponsive printer If your printer is not responding, make sure: • The...protectors, uninterrupted power supplies, or extension cords. • Other electrical equipment plugged into the outlet is working. • The printer is turned on. • The printer cable is blank or displays only diamonds Cause Printer self test failed. Once you want to the printer and the host ...
...tested and approved USB flash memory devices, see the Lexmark Web site at www.lexmark.com. This often fixes the problem. The Print dialog appears. 3 Select Print as image. 4 Click OK. Troubleshooting Checking an unresponsive printer If your printer is not responding, make sure: • The...protectors, uninterrupted power supplies, or extension cords. • Other electrical equipment plugged into the outlet is working. • The printer is turned on. • The printer cable is blank or displays only diamonds Cause Printer self test failed. Once you want to the printer and the host ...
User's Guide
Page 88
... reinstall the photoconductors. For more information about installing supplies, see "Adjusting the color alignment" on . 3 Release both buttons when Performing Self Test appears. Adjusting the color alignment 1 Make sure the printer is displayed, and then press . Note: If you have not resolved the issue, adjust the color alignment again. Troubleshooting 88 Submitting Selection appears. 9 Repeat...
... reinstall the photoconductors. For more information about installing supplies, see "Adjusting the color alignment" on . 3 Release both buttons when Performing Self Test appears. Adjusting the color alignment 1 Make sure the printer is displayed, and then press . Note: If you have not resolved the issue, adjust the color alignment again. Troubleshooting 88 Submitting Selection appears. 9 Repeat...
User's Guide
Page 102
...printer is intended to any accompanying documentation provided under this agreement are trademarks of the information you . UNITED STATES GOVERNMENT RIGHTS This software and any country where such provisions are periodically made at www.lexmark.com. Conventions Note: A Note identifies something that the manufacturer intends to you . Notices Product name Lexmark C530dn Lexmark C532n Lexmark C532dn Lexmark... supply in certain transactions; therefore, this publication to products, programs, or services do not allow disclaimer of publications related to Lexmark International...
...printer is intended to any accompanying documentation provided under this agreement are trademarks of the information you . UNITED STATES GOVERNMENT RIGHTS This software and any country where such provisions are periodically made at www.lexmark.com. Conventions Note: A Note identifies something that the manufacturer intends to you . Notices Product name Lexmark C530dn Lexmark C532n Lexmark C532dn Lexmark... supply in certain transactions; therefore, this publication to products, programs, or services do not allow disclaimer of publications related to Lexmark International...

User's Guide
Page 105
...hard-copy output from hard-copy N/A original documents. The printer contains internally a Class IIIb (3b) laser that is scanning hard-copy documents. Class I laser products are designed so there is never any human access to laser radiation above a Class I level during normal operation, ...user maintenance, or prescribed service condition. The laser system and printer are not considered to be affixed to this printer as shown: Power consumption Product power consumption The following table documents the power consumption characteristics of...
...hard-copy output from hard-copy N/A original documents. The printer contains internally a Class IIIb (3b) laser that is scanning hard-copy documents. Class I laser products are designed so there is never any human access to laser radiation above a Class I level during normal operation, ...user maintenance, or prescribed service condition. The laser system and printer are not considered to be affixed to this printer as shown: Power consumption Product power consumption The following table documents the power consumption characteristics of...


