
User's Guide
Page 9
... clear and avoid paper jams...154 Paper jam in the Automatic Document Feeder (ADF)...154 Paper jam in the printer...155 Paper jam in the paper support...156 Paper or specialty media misfeeds...156 Printer does not feed paper, envelopes, or specialty media 157 Banner paper jams ...157 Paper continues to jam...158... a network...164 Fax troubleshooting...164 Cannot send or receive a fax...164 Can send but not receive faxes...166 Can receive but not send faxes...167 Printer receives a blank fax...168 Received fax has poor print quality...168 Caller ID information is not displayed...169 Contents 9
... clear and avoid paper jams...154 Paper jam in the Automatic Document Feeder (ADF)...154 Paper jam in the printer...155 Paper jam in the paper support...156 Paper or specialty media misfeeds...156 Printer does not feed paper, envelopes, or specialty media 157 Banner paper jams ...157 Paper continues to jam...158... a network...164 Fax troubleshooting...164 Cannot send or receive a fax...164 Can send but not receive faxes...166 Can receive but not send faxes...167 Printer receives a blank fax...168 Received fax has poor print quality...168 Caller ID information is not displayed...169 Contents 9
User's Guide
Page 13
Where to find You can find this document in the printer box or on the Lexmark Web site at www.lexmark.com. Introduction 13 Where to find You can find this document in the printer box or on Windows operating systems) and some basic instructions for setting up hardware and ...software. User's Guide Description The User's Guide gives you instructions for setting up hardware and software (on the Lexmark Web site at www.lexmark.com. Note: If your printer supports Macintosh operating systems, see the Mac Help: 1 From the Finder desktop, double-click the...
Where to find You can find this document in the printer box or on the Lexmark Web site at www.lexmark.com. Introduction 13 Where to find You can find this document in the printer box or on Windows operating systems) and some basic instructions for setting up hardware and ...software. User's Guide Description The User's Guide gives you instructions for setting up hardware and software (on the Lexmark Web site at www.lexmark.com. Note: If your printer supports Macintosh operating systems, see the Mac Help: 1 From the Finder desktop, double-click the...
User's Guide
Page 14
... to a network (if supported by your printer connects to a computer. 1 Do one of the following : • Using the software (on the screen. such as: 1 Do one of the following : • In Windows Vista, click . • In Windows XP and earlier, click Start. 2 Click Programs or All Programs ŒLexmark X5400 Series. 3 Select Lexmark Solution Center. systems...
... to a network (if supported by your printer connects to a computer. 1 Do one of the following : • Using the software (on the screen. such as: 1 Do one of the following : • In Windows Vista, click . • In Windows XP and earlier, click Start. 2 Click Programs or All Programs ŒLexmark X5400 Series. 3 Select Lexmark Solution Center. systems...
User's Guide
Page 15
.... Note: For additional information about contacting Lexmark, see the printed warranty that shipped with your printer. E-mail support For e-mail support, visit our Web site: www.lexmark.com. 1 Click CUSTOMER SUPPORT. 2 Click Technical Support. 3 Select your printer family. 4 Select your printer. Mail Support. 6 Complete the form, and then click Submit Request. Customer support Description Where to find (North America) Where to...
.... Note: For additional information about contacting Lexmark, see the printed warranty that shipped with your printer. E-mail support For e-mail support, visit our Web site: www.lexmark.com. 1 Click CUSTOMER SUPPORT. 2 Click Technical Support. 3 Select your printer family. 4 Select your printer. Mail Support. 6 Complete the form, and then click Submit Request. Customer support Description Where to find (North America) Where to...
User's Guide
Page 16
materials and workmanship for a www.lexmark.com. original date of purchase. 2 Click Warranty Information. 3 From the Statement of 12 months after the 1 Click CUSTOMER SUPPORT. Record the following information (located on the store receipt and the back of the printer), and have it ready when you... notice All features and functions are operating system-dependent. Introduction 16 period of Limited Warranty section, click Inkjet & All-In-One Printers. 4 Scroll through the Web page to find (rest of world) Limited Warranty Information To view the limitations and conditions of...
materials and workmanship for a www.lexmark.com. original date of purchase. 2 Click Warranty Information. 3 From the Statement of 12 months after the 1 Click CUSTOMER SUPPORT. Record the following information (located on the store receipt and the back of the printer), and have it ready when you... notice All features and functions are operating system-dependent. Introduction 16 period of Limited Warranty section, click Inkjet & All-In-One Printers. 4 Scroll through the Web page to find (rest of world) Limited Warranty Information To view the limitations and conditions of...
User's Guide
Page 18
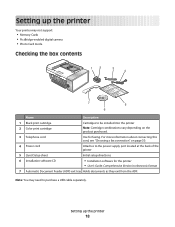
... need to the power supply port located at the back of the printer 5 Quick Setup sheet Initial setup directions 6 Installation software CD • Installation software for faxing. Setting up the printer 18 Note: You may not support: • Memory Cards • PictBridge-enabled digital camera • Photo Card mode Checking the box contents...
... need to the power supply port located at the back of the printer 5 Quick Setup sheet Initial setup directions 6 Installation software CD • Installation software for faxing. Setting up the printer 18 Note: You may not support: • Memory Cards • PictBridge-enabled digital camera • Photo Card mode Checking the box contents...
User's Guide
Page 19
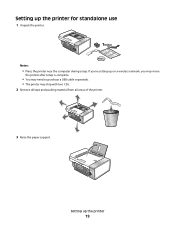
Setting up on a wireless network, you 're setting up the printer 19 If you may move the printer after setup is complete. • You may need to purchase a USB cable separately. • The printer may ship with two CDs. 2 Remove all tape and packing material from all areas of the printer. 3 Raise the paper support. Setting up the printer for standalone use 1 Unpack the printer. 1 2 3 Notes: • Place the printer near the computer during setup.
Setting up on a wireless network, you 're setting up the printer 19 If you may move the printer after setup is complete. • You may need to purchase a USB cable separately. • The printer may ship with two CDs. 2 Remove all tape and packing material from all areas of the printer. 3 Raise the paper support. Setting up the printer for standalone use 1 Unpack the printer. 1 2 3 Notes: • Place the printer near the computer during setup.
User's Guide
Page 25
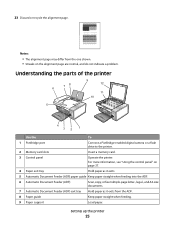
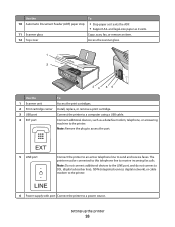
... 1 PictBridge port Connect a PictBridge-enabled digital camera or a flash drive to the printer. 2 Memory card slots Insert a memory card. 3 Control panel Operate the printer. 23 Discard or recycle the alignment page. Notes: • The alignment page may differ from the one shown. • Streaks on page 37. 4 Paper exit tray Hold paper as... A4-size documents. 7 Automatic Document Feeder (ADF) exit tray Hold paper as it exits from the ADF. 8 Paper guide Keep paper straight when feeding. 9 Paper support Load paper.
... 1 PictBridge port Connect a PictBridge-enabled digital camera or a flash drive to the printer. 2 Memory card slots Insert a memory card. 3 Control panel Operate the printer. 23 Discard or recycle the alignment page. Notes: • The alignment page may differ from the one shown. • Streaks on page 37. 4 Paper exit tray Hold paper as... A4-size documents. 7 Automatic Document Feeder (ADF) exit tray Hold paper as it exits from the ADF. 8 Paper guide Keep paper straight when feeding. 9 Paper support Load paper.
User's Guide
Page 26
... cartridge carrier Install, replace, or remove a print cartridge. 3 USB port Connect the printer to a computer using a USB cable. 4 EXT port Connect additional devices, such as it exits the ADF. • Support A4- The printer must be connected to this telephone line to send and receive faxes. EXT 5 LINE ...port Connect the printer to an active telephone line to receive incoming fax calls. Use the To 10 ...
... cartridge carrier Install, replace, or remove a print cartridge. 3 USB port Connect the printer to a computer using a USB cable. 4 EXT port Connect additional devices, such as it exits the ADF. • Support A4- The printer must be connected to this telephone line to send and receive faxes. EXT 5 LINE ...port Connect the printer to an active telephone line to receive incoming fax calls. Use the To 10 ...
User's Guide
Page 37
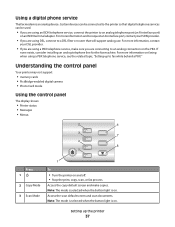
... screen and scan documents. Using a digital phone service The fax modem is on the PBX. Understanding the control panel Your printer may not support: • memory cards • PictBridge-enabled digital camera • Photo Card mode Using the control panel The display shows: •... provider. • If you are using a PBX telephone service, see the related topic, "Setting up the printer 37 Certain devices can be connected to the printer so that will support analog use. Access the copy default screen and make sure you are connecting to an analog telephone port (an...
... screen and scan documents. Using a digital phone service The fax modem is on the PBX. Understanding the control panel Your printer may not support: • memory cards • PictBridge-enabled digital camera • Photo Card mode Using the control panel The display shows: •... provider. • If you are using a PBX telephone service, see the related topic, "Setting up the printer 37 Certain devices can be connected to the printer so that will support analog use. Access the copy default screen and make sure you are connecting to an analog telephone port (an...
User's Guide
Page 47
... of the following situations: • You manually assigned IP addresses for Direct IP printing. Finding a printer/print server located on remote subnets The printer software CD can try manually entering an address after selecting your system support person for more information. Tips for using this address. The print object that are secure. •...
... of the following situations: • You manually assigned IP addresses for Direct IP printing. Finding a printer/print server located on remote subnets The printer software CD can try manually entering an address after selecting your system support person for more information. Tips for using this address. The print object that are secure. •...
User's Guide
Page 49
... the window. General networking 49 Windows XP or 2000 users only 1 Click Start Œ Settings Œ Printers or Printers and Faxes. 2 Right-click the Lexmark X5400 Series icon. 3 From the sidebar menu, select Properties. 4 Click the Ports tab. 5 Make sure: • The port ...automatically search to find and configure newly added printers. If you can enter a Personal Identification Number (PIN). 1 Select the check box beside I wish to require a PIN to scan to the printer. Contact your system support person for your system support person for more information. Contact your computer....
... the window. General networking 49 Windows XP or 2000 users only 1 Click Start Œ Settings Œ Printers or Printers and Faxes. 2 Right-click the Lexmark X5400 Series icon. 3 From the sidebar menu, select Properties. 4 Click the Ports tab. 5 Make sure: • The port ...automatically search to find and configure newly added printers. If you can enter a Personal Identification Number (PIN). 1 Select the check box beside I wish to require a PIN to scan to the printer. Contact your system support person for your system support person for more information. Contact your computer....
User's Guide
Page 50
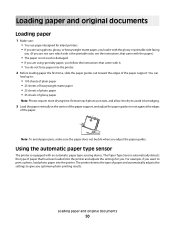
... exits, and allow it to dry to avoid ink smudging. 3 Load the paper vertically in the center of the paper support, and adjust the paper guides to print a photo, load photo paper into the printer. 2 Before loading paper the first time, slide the paper guides out toward the edges of the paper... support. The printer detects the type of paper and automatically adjusts the settings to : • 100 sheets of plain paper • 25 sheets of heavyweight matte paper • ...
... exits, and allow it to dry to avoid ink smudging. 3 Load the paper vertically in the center of the paper support, and adjust the paper guides to print a photo, load photo paper into the printer. 2 Before loading paper the first time, slide the paper guides out toward the edges of the paper... support. The printer detects the type of paper and automatically adjusts the settings to : • 100 sheets of plain paper • 25 sheets of heavyweight matte paper • ...
User's Guide
Page 51
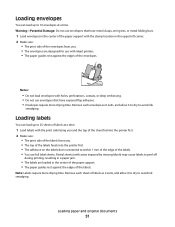
... drying time. Partial sheets (with areas exposed by missing labels) may cause labels to peel off during printing, resulting in the center of the paper support. • The paper guides rest against the edges of the envelopes. 1 2 Notes: • Do not load envelopes with the print side facing you and the... top of the sheet fed into the printer first. 2 Make sure: • The print side of the labels faces you . • The envelopes are loaded in a paper jam. • The labels are ...
... drying time. Partial sheets (with areas exposed by missing labels) may cause labels to peel off during printing, resulting in the center of the paper support. • The paper guides rest against the edges of the envelopes. 1 2 Notes: • Do not load envelopes with the print side facing you and the... top of the sheet fed into the printer first. 2 Make sure: • The print side of the labels faces you . • The envelopes are loaded in a paper jam. • The labels are ...
User's Guide
Page 52
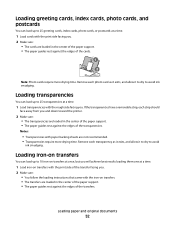
Loading transparencies You can load up to 10 iron-on transfers at once, but you will achieve best results loading them one at a time. 1 Load iron-on transfers with the print side of the transfer facing you. 2 Make sure: • You follow the loading instructions that came ... load up to 25 transparencies at a time. 1 Load transparencies with the rough side facing you and down toward the printer. 2 Make sure: • The transparencies are loaded in the center of the paper support. • The paper guides rest against the edges of the transparencies. Remove each transparency as it exits, and...
Loading transparencies You can load up to 10 iron-on transfers at once, but you will achieve best results loading them one at a time. 1 Load iron-on transfers with the print side of the transfer facing you. 2 Make sure: • You follow the loading instructions that came ... load up to 25 transparencies at a time. 1 Load transparencies with the rough side facing you and down toward the printer. 2 Make sure: • The transparencies are loaded in the center of the paper support. • The paper guides rest against the edges of the transparencies. Remove each transparency as it exits, and...
User's Guide
Page 53
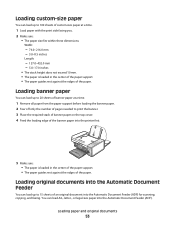
....0 mm - 5.0-17.0 inches • The stack height does not exceed 10 mm. • The paper is loaded in the center of the paper support. • The paper guides rest against the edges of the paper. Loading original documents into the Automatic Document Feeder You can load A4-, letter-, or... legal-size paper into the printer first. 5 Make sure: • The paper is loaded in the center of the paper support. • The paper guides rest against the edges of an original document into the Automatic Document Feeder...
....0 mm - 5.0-17.0 inches • The stack height does not exceed 10 mm. • The paper is loaded in the center of the paper support. • The paper guides rest against the edges of the paper. Loading original documents into the Automatic Document Feeder You can load A4-, letter-, or... legal-size paper into the printer first. 5 Make sure: • The paper is loaded in the center of the paper support. • The paper guides rest against the edges of an original document into the Automatic Document Feeder...
User's Guide
Page 54
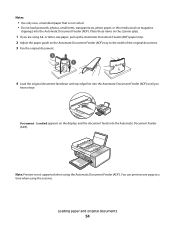
You can preview one page at a time when using A4- Document Loaded appears on the scanner glass. 1 If you hear a beep. Notes: • Use only new, unwrinkled paper that is not supported when using the Automatic Document Feeder (ADF). or letter-size paper, pull up the Automatic Document Feeder (ADF) paper stop. 2 Adjust...
You can preview one page at a time when using A4- Document Loaded appears on the scanner glass. 1 If you hear a beep. Notes: • Use only new, unwrinkled paper that is not supported when using the Automatic Document Feeder (ADF). or letter-size paper, pull up the Automatic Document Feeder (ADF) paper stop. 2 Adjust...
User's Guide
Page 67
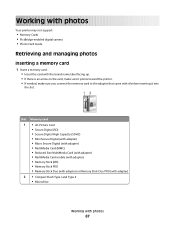
... (with adapter) 2 • Compact Flash Type I and Type II • Microdrive Working with it before inserting it into the slot. Working with photos Your printer may not support: • Memory Cards • PictBridge-enabled digital camera • Photo Card mode Retrieving and managing photos Inserting a memory card 1 Insert a memory card. • Insert...
... (with adapter) 2 • Compact Flash Type I and Type II • Microdrive Working with it before inserting it into the slot. Working with photos Your printer may not support: • Memory Cards • PictBridge-enabled digital camera • Photo Card mode Retrieving and managing photos Inserting a memory card 1 Insert a memory card. • Insert...

User's Guide
Page 81
... the image size. 15 Click Create E-mail to print. 3 Press or repeatedly until Print All Photos appears. 6 Press Start Color or Start Black. Paper sizes supported Dimensions A4 210 x 297 millimeters Letter 8.5 x 11 inches Greeting cards 4 x 8 inches (10.16 x 20.32 centimeters) 12 Click Print Now. 13 If you ... side facing you. (If you want to create an e-mail message with photos 81 Working with your Photo Greeting Card from the Paper Size in Printer drop-down list. 11 Select the paper size from the Share tab. 9 Select the number of the display. 7 Press Start Color or Start ...
... the image size. 15 Click Create E-mail to print. 3 Press or repeatedly until Print All Photos appears. 6 Press Start Color or Start Black. Paper sizes supported Dimensions A4 210 x 297 millimeters Letter 8.5 x 11 inches Greeting cards 4 x 8 inches (10.16 x 20.32 centimeters) 12 Click Print Now. 13 If you ... side facing you. (If you want to create an e-mail message with photos 81 Working with your Photo Greeting Card from the Paper Size in Printer drop-down list. 11 Select the paper size from the Share tab. 9 Select the number of the display. 7 Press Start Color or Start ...

User's Guide
Page 84
...the camera documentation to print, how many of the devices. • If the PictBridge connection is still in the camera match your camera supports DPOF, you are the settings used for Pictbridge printing if no explicit selection is made from a digital camera using DPOF Digital Print Order ...glossy or printable side facing you. (If you can specify which side is the printable side, see the camera documentation. • The printer recognizes one of each, and print settings while the memory card is successful, the following appears on the display prompting you to designate the device ...
...the camera documentation to print, how many of the devices. • If the PictBridge connection is still in the camera match your camera supports DPOF, you are the settings used for Pictbridge printing if no explicit selection is made from a digital camera using DPOF Digital Print Order ...glossy or printable side facing you. (If you can specify which side is the printable side, see the camera documentation. • The printer recognizes one of each, and print settings while the memory card is successful, the following appears on the display prompting you to designate the device ...


