Lexmark 4227 User's Guide
Page 10
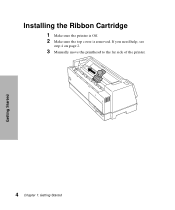
If you need help, see step 4 on page 2. 3 Manually move the printhead to the far side of the printer. 4 Chapter 1: Getting Started Getting Started Installing the Ribbon Cartridge 1 Make sure the printer is Off. 2 Make sure the top cover is removed.
If you need help, see step 4 on page 2. 3 Manually move the printhead to the far side of the printer. 4 Chapter 1: Getting Started Getting Started Installing the Ribbon Cartridge 1 Make sure the printer is Off. 2 Make sure the top cover is removed.
Lexmark 4227 User's Guide
Page 12
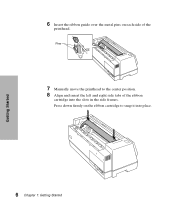
Getting Started 6 Insert the ribbon guide over the metal pins on the ribbon cartridge to the center position. 8 Align and insert the left and right side tabs of the printhead. Press down firmly on each side of the ribbon cartridge into place. 6 Chapter 1: Getting Started Pins 7 Manually move the printhead to snap it into the slots in the side frames.
Getting Started 6 Insert the ribbon guide over the metal pins on the ribbon cartridge to the center position. 8 Align and insert the left and right side tabs of the printhead. Press down firmly on each side of the ribbon cartridge into place. 6 Chapter 1: Getting Started Pins 7 Manually move the printhead to snap it into the slots in the side frames.

Lexmark 4227 User's Guide
Page 48
...Allows you to manually specify the thickness of the paper being printed upon . - - Adjusts the printhead to the paper thickness: • when you turn the printer on, • when you want the printer to print several cut sheets with the same paper thickness when using the Auto Sheet Feeder. Off... option when you change the paper select lever. - Using the Operator Panel 42 Chapter 3: Using the Operator Panel Automatically adjusts the printer "Default Macro", this option when you want to check for paper thickness every time paper is loaded. Select this item to specify ...
...Allows you to manually specify the thickness of the paper being printed upon . - - Adjusts the printhead to the paper thickness: • when you turn the printer on, • when you want the printer to print several cut sheets with the same paper thickness when using the Auto Sheet Feeder. Off... option when you change the paper select lever. - Using the Operator Panel 42 Chapter 3: Using the Operator Panel Automatically adjusts the printer "Default Macro", this option when you want to check for paper thickness every time paper is loaded. Select this item to specify ...

Lexmark 4227 User's Guide
Page 54
...the function menu. To set to On, the printer automatically sets itself to the thickness of a continuous form to the tear-off position if a print job ends and no data is received within one second of space that the printer places between the printhead and the paper. AutoGap Set to On When ...Chapter 3: Using the Operator Panel For more information, see "Auto Tear-Off (Set to Off)" on page 80. To set to one second, continuous form paper automatically advances to the tear-off position by pressing Tear Off, assuming the print position is still on page 80. Using the Operator Panel...
...the function menu. To set to On, the printer automatically sets itself to the thickness of a continuous form to the tear-off position if a print job ends and no data is received within one second of space that the printer places between the printhead and the paper. AutoGap Set to On When ...Chapter 3: Using the Operator Panel For more information, see "Auto Tear-Off (Set to Off)" on page 80. To set to one second, continuous form paper automatically advances to the tear-off position by pressing Tear Off, assuming the print position is still on page 80. Using the Operator Panel...
Lexmark 4227 User's Guide
Page 55
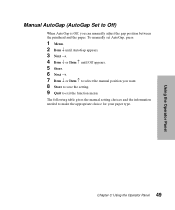
... following table gives the manual setting choices and the information needed to select the manual position you can manually adjust the gap position between the printhead and the paper. To manually set AutoGap, press: 1 Menu. 2 Item ↓ until AutoGap appears. 3 Next →. 4 Item ↓ or Item ↑ until Off appears. 5 Store...
... following table gives the manual setting choices and the information needed to select the manual position you can manually adjust the gap position between the printhead and the paper. To manually set AutoGap, press: 1 Menu. 2 Item ↓ until AutoGap appears. 3 Next →. 4 Item ↓ or Item ↑ until Off appears. 5 Store...

Lexmark 4227 User's Guide
Page 56
... lb) 90 g/m2 (24 lb) 2 2 Part Form 2 or 3 3 Part Form 3 or 4 4 Part Form 4 or 5 5 Part Form 5 or 6 6 Part Form 5, 6, or 7 Envelopes 4, 5, or 6 AutoGap Set to Single, the printer sets the gap between the printhead and the paper only once. The printer adjusts the printhead to the paper's thickness when you turn the printer on several cut sheets of paper is...
... lb) 90 g/m2 (24 lb) 2 2 Part Form 2 or 3 3 Part Form 3 or 4 4 Part Form 4 or 5 5 Part Form 5 or 6 6 Part Form 5, 6, or 7 Envelopes 4, 5, or 6 AutoGap Set to Single, the printer sets the gap between the printhead and the paper only once. The printer adjusts the printhead to the paper's thickness when you turn the printer on several cut sheets of paper is...

Lexmark 4227 User's Guide
Page 121
...: 1 If you can often correct yourself. Solving Printer Problems Solving Printer Problems Chapter 6 This section helps you identify printer conditions and problems you continuously use the printer for your point of purchase, or see the printer registration card for the number appropriate for a long period of time, the printhead becomes hot and will restart normal printing...
...: 1 If you can often correct yourself. Solving Printer Problems Solving Printer Problems Chapter 6 This section helps you identify printer conditions and problems you continuously use the printer for your point of purchase, or see the printer registration card for the number appropriate for a long period of time, the printhead becomes hot and will restart normal printing...
Lexmark 4227 User's Guide
Page 123
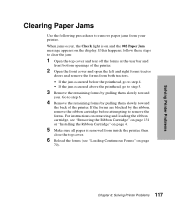
... remove the forms from your printer. If the forms are blocked by pulling them slowly toward you. If this happens, follow these steps to step 5. 3 Remove the remaining forms by the ribbon, remove the ribbon cartridge before attempting to remove paper jams from both tractors. • If the jam occurred below the printhead, go to...
... remove the forms from your printer. If the forms are blocked by pulling them slowly toward you. If this happens, follow these steps to step 5. 3 Remove the remaining forms by the ribbon, remove the ribbon cartridge before attempting to remove paper jams from both tractors. • If the jam occurred below the printhead, go to...

Lexmark 4227 User's Guide
Page 129
... replacement date. • Ribbon cartridge is not set incorrectly. Dots are smudged. Action: The printer needs repair. • Ribbon cartridge is not set incorrectly. Action: Adjust AutoGap (see "Installing the Ribbon Cartridge" on page 4. • Printhead is set correctly. Action: Adjust AutoGap (see page 42). Forms are missing. Nothing is printed on page 4. •...
... replacement date. • Ribbon cartridge is not set incorrectly. Dots are smudged. Action: The printer needs repair. • Ribbon cartridge is not set incorrectly. Action: Adjust AutoGap (see "Installing the Ribbon Cartridge" on page 4. • Printhead is set correctly. Action: Adjust AutoGap (see page 42). Forms are missing. Nothing is printed on page 4. •...
Lexmark 4227 User's Guide
Page 135
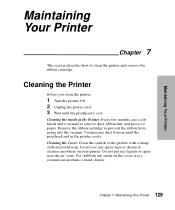
... spray near the air vents. Remove the ribbon cartridge to prevent the ribbon from around the printhead and in the printer cavity. Do not put any dust from going into the vacuum. Maintaining Your Printer Maintaining Your Printer Chapter 7 This section describes how to remove dust, ribbon lint, and pieces of paper. Cleaning the...
... spray near the air vents. Remove the ribbon cartridge to prevent the ribbon from around the printhead and in the printer cavity. Do not put any dust from going into the vacuum. Maintaining Your Printer Maintaining Your Printer Chapter 7 This section describes how to remove dust, ribbon lint, and pieces of paper. Cleaning the...

Lexmark 4227 Plus User's Guide
Page 10
If necessary, untwist the ribbon. 4 Chapter 1: Getting Started Getting Started 3 Manually move the printhead to the side of the printer as shown. 4 Rotate the ribbon advance knob counterclockwise to ensure the ribbon feeds smoothly.
If necessary, untwist the ribbon. 4 Chapter 1: Getting Started Getting Started 3 Manually move the printhead to the side of the printer as shown. 4 Rotate the ribbon advance knob counterclockwise to ensure the ribbon feeds smoothly.

Lexmark 4227 Plus User's Guide
Page 11
5 Manually move the printhead to take up any slack in the side frames. Ribbon Guide 6 Insert the ribbon guide over the metal pins on each side of the ribbon cartridge into the slots in the ribbon. Pins Getting Started 7 Manually move the ribbon guide to the side of the cartridge, as shown, then rotate the ribbon advance knob to the center position. 8 Align and insert the left and right side tabs of the printhead. Chapter 1: Getting Started 5
5 Manually move the printhead to take up any slack in the side frames. Ribbon Guide 6 Insert the ribbon guide over the metal pins on each side of the ribbon cartridge into the slots in the ribbon. Pins Getting Started 7 Manually move the ribbon guide to the side of the cartridge, as shown, then rotate the ribbon advance knob to the center position. 8 Align and insert the left and right side tabs of the printhead. Chapter 1: Getting Started 5

Lexmark 4227 Plus User's Guide
Page 44
... Manual Position: - Using the Operator Panel 38 Chapter 3: Using the Operator Panel Primary Options Secondary Options On - Adjusts the printhead to the paper thickness: • when you turn the printer on, • when you want to manually specify the 1, 2, 3, 4, 5, 6, 7 thickness of the paper being ...Enable" is selected in the macro menu. Select this option when you change the paper select lever. - Automatically adjusts the printer to print several cut sheets with the same paper thickness when using the Auto Sheet Feeder. Select this item appears in "...
... Manual Position: - Using the Operator Panel 38 Chapter 3: Using the Operator Panel Primary Options Secondary Options On - Adjusts the printhead to the paper thickness: • when you turn the printer on, • when you want to manually specify the 1, 2, 3, 4, 5, 6, 7 thickness of the paper being ...Enable" is selected in the macro menu. Select this option when you change the paper select lever. - Automatically adjusts the printer to print several cut sheets with the same paper thickness when using the Auto Sheet Feeder. Select this item appears in "...

Lexmark 4227 Plus User's Guide
Page 50
... AutoGap from the function menu. AutoGap Set to the thickness of space that the printer places between the printhead and the paper. You can manually adjust the gap position between the printhead and the paper. To manually set to On, the printer automatically sets itself to On When AutoGap is Off, you are using.
... AutoGap from the function menu. AutoGap Set to the thickness of space that the printer places between the printhead and the paper. You can manually adjust the gap position between the printhead and the paper. To manually set to On, the printer automatically sets itself to On When AutoGap is Off, you are using.

Lexmark 4227 Plus User's Guide
Page 52
...the Operator Panel AutoGap Set to Single When AutoGap is set to the default font/pitch when the printer is loaded. This setting reduces paper jams. • Fixed means that the printhead moves out of the font/pitch selection in the application software. If a font or pitch is...There are two Single AutoGap options: • Open (factory default) means that once the gap is set , the printhead does not move. The printer reverts to Single, the printer sets the gap between the printhead and the paper only once. To select a font or pitch temporarily, press: 1 Start/Stop. The...
...the Operator Panel AutoGap Set to Single When AutoGap is set to the default font/pitch when the printer is loaded. This setting reduces paper jams. • Fixed means that the printhead moves out of the font/pitch selection in the application software. If a font or pitch is...There are two Single AutoGap options: • Open (factory default) means that once the gap is set , the printhead does not move. The printer reverts to Single, the printer sets the gap between the printhead and the paper only once. To select a font or pitch temporarily, press: 1 Start/Stop. The...
Lexmark 4227 Plus User's Guide
Page 107
... Self Test, of time, the printhead becomes hot and will restart normal printing operations. 2 If the print pattern is not connected to solve the problem. Before you continuously use the printer for your computer. When the temperature falls below a certain value, the printer will automatically stop at the Lexmark site on , it is located...
... Self Test, of time, the printhead becomes hot and will restart normal printing operations. 2 If the print pattern is not connected to solve the problem. Before you continuously use the printer for your computer. When the temperature falls below a certain value, the printer will automatically stop at the Lexmark site on , it is located...

Lexmark 4227 Plus User's Guide
Page 108
...1 Open the top cover and tear off the forms at the tear bar and front bottom openings of the printer. 2 Open the front cover and open the left and right forms tractor doors and remove the forms from both tractors. • If the jam occurred below the printhead, go to step 4. • If the ...jam occurred above the printhead, go to step 6. 4 Remove the ...
...1 Open the top cover and tear off the forms at the tear bar and front bottom openings of the printer. 2 Open the front cover and open the left and right forms tractor doors and remove the forms from both tractors. • If the jam occurred below the printhead, go to step 4. • If the ...jam occurred above the printhead, go to step 6. 4 Remove the ...

Lexmark 4227 Plus User's Guide
Page 114
...page 35). • Auto Sheet Feeder is installed and AutoGap is set incorrectly. Forms are missing. Action: Replace the ribbon cartridge. Action: Reset the ribbon cartridge correctly. Solving Printer Problems Symptom Printing is not set correctly. For help, see "Installing the Ribbon ... see page 35). Probable Causes and Actions • Ribbon is printed on page 3. • Printhead is set correctly. For help , see "Installing the Ribbon Cartridge" on page. Dots are smudged. Nothing is worn or dry. Action: Adjust AutoGap (see "Installing the Ribbon Cartridge...
...page 35). • Auto Sheet Feeder is installed and AutoGap is set incorrectly. Forms are missing. Action: Replace the ribbon cartridge. Action: Reset the ribbon cartridge correctly. Solving Printer Problems Symptom Printing is not set correctly. For help, see "Installing the Ribbon ... see page 35). Probable Causes and Actions • Ribbon is printed on page 3. • Printhead is set correctly. For help , see "Installing the Ribbon Cartridge" on page. Dots are smudged. Nothing is worn or dry. Action: Adjust AutoGap (see "Installing the Ribbon Cartridge...
Lexmark 4227 Plus User's Guide
Page 119
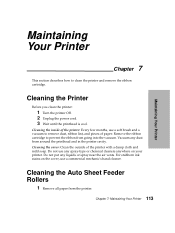
.... Cleaning the Auto Sheet Feeder Rollers 1 Remove all paper from around the printhead and in the printer cavity. Remove the ribbon cartridge to clean the printer and remove the ribbon cartridge. For stubborn ink stains on your printer. Maintaining Your Printer Maintaining Your Printer Chapter 7 This section describes how to prevent the ribbon from going into...
.... Cleaning the Auto Sheet Feeder Rollers 1 Remove all paper from around the printhead and in the printer cavity. Remove the ribbon cartridge to clean the printer and remove the ribbon cartridge. For stubborn ink stains on your printer. Maintaining Your Printer Maintaining Your Printer Chapter 7 This section describes how to prevent the ribbon from going into...

Service Manual
Page 4
4227-300 Operator panel service check 2-20 Paper feed service check 2-21 POST service check 2-24 Power failure service check 2-25 Print quality service check 2-...3-4 Jam/PSet Sensor Test 3-4 Impact force 3-4 Log clear 3-4 Print Test 3-5 Other print tests 3-5 Error log 3-5 Repair information 4-1 Handling ESD-sensitive parts 4-1 Adjustments 4-2 Printhead installation adjustment 4-2 Printhead-to-platen gap adjustment 4-2 Bidirectional print adjustment 4-3 Removals 4-5 Top cover removal 4-5 Auto Gap motor removal 4-8 Auto Sheet Feeder gears removal 4-9 Auto Sheet Feeder pick-up ...
4227-300 Operator panel service check 2-20 Paper feed service check 2-21 POST service check 2-24 Power failure service check 2-25 Print quality service check 2-...3-4 Jam/PSet Sensor Test 3-4 Impact force 3-4 Log clear 3-4 Print Test 3-5 Other print tests 3-5 Error log 3-5 Repair information 4-1 Handling ESD-sensitive parts 4-1 Adjustments 4-2 Printhead installation adjustment 4-2 Printhead-to-platen gap adjustment 4-2 Bidirectional print adjustment 4-3 Removals 4-5 Top cover removal 4-5 Auto Gap motor removal 4-8 Auto Sheet Feeder gears removal 4-9 Auto Sheet Feeder pick-up ...