
User's Guide
Page 4
... supplies...100 Checking the status of supplies from a network computer 100 Ordering supplies...101 Ordering toner cartridges...101 Ordering a photoconductor kit ...102 Replacing supplies...102 Replacing the toner cartridge ...102 Replacing the photoconductor kit ...104 Recycling Lexmark products...107 Moving the printer...107 Before moving the printer ...107 Moving the printer to another location...107 Contents 4
... supplies...100 Checking the status of supplies from a network computer 100 Ordering supplies...101 Ordering toner cartridges...101 Ordering a photoconductor kit ...102 Replacing supplies...102 Replacing the toner cartridge ...102 Replacing the photoconductor kit ...104 Recycling Lexmark products...107 Moving the printer...107 Before moving the printer ...107 Moving the printer to another location...107 Contents 4
User's Guide
Page 5
... Setting up e-mail alerts...110 Configuring supply notifications...111 Copying printer settings to other printers...111 Clearing jams 113 Avoiding jams...113 Accessing jam areas...114 Understanding jam lights and access locations...114 Clearing jams behind the photoconductor kit and toner cartridge 118 Clearing jams from the standard exit bin...120 Clearing jams...
... Setting up e-mail alerts...110 Configuring supply notifications...111 Copying printer settings to other printers...111 Clearing jams 113 Avoiding jams...113 Accessing jam areas...114 Understanding jam lights and access locations...114 Clearing jams behind the photoconductor kit and toner cartridge 118 Clearing jams from the standard exit bin...120 Clearing jams...

User's Guide
Page 25
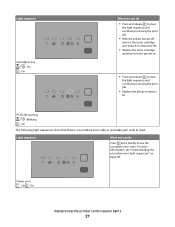
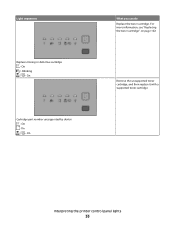
On - Replace the toner cartridge with one suitable for your region. Interpreting the printer control panel lights 25 Close the front door. Light sequence Not ready - On Close front door - On What you can do Press and release either or l to return to the Ready state. On Cartridge region mismatch -
On - Replace the toner cartridge with one suitable for your region. Interpreting the printer control panel lights 25 Close the front door. Light sequence Not ready - On Close front door - On What you can do Press and release either or l to return to the Ready state. On Cartridge region mismatch -
User's Guide
Page 27
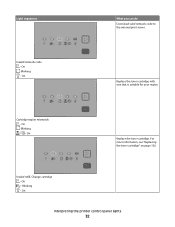
...print job. • Replace the photoconductor kit. PC Kit life warning - On The following light sequences show that there is low - Light sequence Cartridge is a secondary error code or secondary jam code to read: Light sequence What you can do • Press and release to clear the light... sequence and continue processing the print job. • With the printer turned off, remove the toner cartridge and shake it to extend its life. • Replace the toner cartridge, and then turn the printer on page 28.
...print job. • Replace the photoconductor kit. PC Kit life warning - On The following light sequences show that there is low - Light sequence Cartridge is a secondary error code or secondary jam code to read: Light sequence What you can do • Press and release to clear the light... sequence and continue processing the print job. • With the printer turned off, remove the toner cartridge and shake it to extend its life. • Replace the toner cartridge, and then turn the printer on page 28.
User's Guide
Page 32
Light sequences What you can do Download valid network code to the internal print server. Blinking - Blinking - On Interpreting the printer control panel lights 32 Cartridge region mismatch - On Replace the toner cartridge. Blinking - Invalid refill, Change cartridge - On Replace the toner cartridge with one that is suitable for your region. On - On - For more information, see "Replacing the toner cartridge" on page 102. Invalid network code - On -
Light sequences What you can do Download valid network code to the internal print server. Blinking - Blinking - On Interpreting the printer control panel lights 32 Cartridge region mismatch - On Replace the toner cartridge. Blinking - Invalid refill, Change cartridge - On Replace the toner cartridge with one that is suitable for your region. On - On - For more information, see "Replacing the toner cartridge" on page 102. Invalid network code - On -
User's Guide
Page 33
For more information, see "Replacing the toner cartridge" on page 102. On - Blinking - On Cartridge part number unsupported by device - Remove the unsupported toner cartridge, and then replace it with a supported toner cartridge. Light sequences Replace missing or defective cartridge - On - On - On What you can do Replace the toner cartridge. Interpreting the printer control panel lights 33
For more information, see "Replacing the toner cartridge" on page 102. On - Blinking - On Cartridge part number unsupported by device - Remove the unsupported toner cartridge, and then replace it with a supported toner cartridge. Light sequences Replace missing or defective cartridge - On - On - On What you can do Replace the toner cartridge. Interpreting the printer control panel lights 33

User's Guide
Page 34
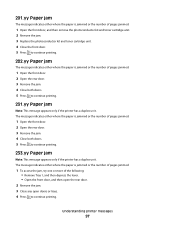
Be sure to check all the paper is cleared, press to continue printing. On - On Interpreting the printer control panel lights 34 Printer control panel Lights and buttons 1 Error 2 Jam 3 Load paper 4 Toner 5 Ready 6 Continue 7 Stop Secondary paper jam sequences on , a paper jam has ... more of the following: • Remove Tray 1. • Remove the photoconductor kit and toner cartridge unit. 200.yy Paper jam - Understanding the secondary paper jam light sequences When the and lights are on the printer control panel Light sequence What you can help pinpoint the site of the...
Be sure to check all the paper is cleared, press to continue printing. On - On Interpreting the printer control panel lights 34 Printer control panel Lights and buttons 1 Error 2 Jam 3 Load paper 4 Toner 5 Ready 6 Continue 7 Stop Secondary paper jam sequences on , a paper jam has ... more of the following: • Remove Tray 1. • Remove the photoconductor kit and toner cartridge unit. 200.yy Paper jam - Understanding the secondary paper jam light sequences When the and lights are on the printer control panel Light sequence What you can help pinpoint the site of the...

User's Guide
Page 35
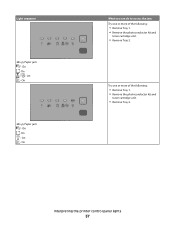
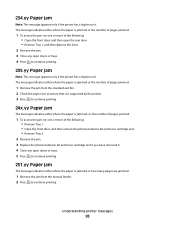
On - On - Blinking - On - On Open the front door, and then open the rear door. 231.yy Paper jam - On Interpreting the printer control panel lights 35 On - On Open the front door, and then open the rear door. 202.yy Paper jam - On - Light sequence What you can do to access the jam Remove the photoconductor kit and toner cartridge unit. 201.yy Paper jam -
On - On - Blinking - On - On Open the front door, and then open the rear door. 231.yy Paper jam - On Interpreting the printer control panel lights 35 On - On Open the front door, and then open the rear door. 202.yy Paper jam - On - Light sequence What you can do to access the jam Remove the photoconductor kit and toner cartridge unit. 201.yy Paper jam -
User's Guide
Page 37
Light sequence 24x.yy Paper jam - On - Try one or more of the following : • Remove Tray 1. • Remove the photoconductor kit and toner cartridge unit. • Remove Tray 2. On 24x.yy Paper jam - On - Interpreting the printer control panel lights 37 On - On - On What you can do to access the jam Try one or more of the following : • Remove Tray 1. • Remove the photoconductor kit and toner cartridge unit. • Remove Tray 2. On - On -
Light sequence 24x.yy Paper jam - On - Try one or more of the following : • Remove Tray 1. • Remove the photoconductor kit and toner cartridge unit. • Remove Tray 2. On 24x.yy Paper jam - On - Interpreting the printer control panel lights 37 On - On - On What you can do to access the jam Try one or more of the following : • Remove Tray 1. • Remove the photoconductor kit and toner cartridge unit. • Remove Tray 2. On - On -
User's Guide
Page 62
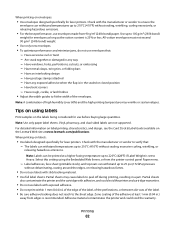
...sheet edge. Have excessive curl or twist - Have an interlocking design - Note: A combination of the envelopes. Adhesive material contaminates the printer and could void the printer and cartridge warranties. • Do not use envelopes that : - Are stuck together or damaged in a jam. Have any way - Have ...resulting in any exposed adhesive when the flap is 25% or less. Select this setting using labels Print samples on the Lexmark Web site at www.lexmark.com/publications. Check with adhesive, and could void the warranty. Have metal clasps, string ties, or folding bars - When...
...sheet edge. Have excessive curl or twist - Have an interlocking design - Note: A combination of the envelopes. Adhesive material contaminates the printer and could void the printer and cartridge warranties. • Do not use envelopes that : - Are stuck together or damaged in a jam. Have any way - Have ...resulting in any exposed adhesive when the flap is 25% or less. Select this setting using labels Print samples on the Lexmark Web site at www.lexmark.com/publications. Check with adhesive, and could void the warranty. Have metal clasps, string ties, or folding bars - When...
User's Guide
Page 64
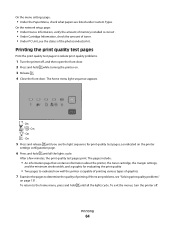
... sequence for print quality test pages, as indicated on the printer settings configuration page. 6 Press and hold while turning the printer on page 131. The pages include: • An information page that contains information about the printer, the toner cartridge, the margin settings, and the minimum stroke width, and ... quality test pages print. Printing the print quality test pages Print the print quality test pages to evaluate how well the printer is correct . • Under Cartridge Information, check the amount of the photoconductor kit . The home menu light sequence appears. -
... sequence for print quality test pages, as indicated on the printer settings configuration page. 6 Press and hold while turning the printer on page 131. The pages include: • An information page that contains information about the printer, the toner cartridge, the margin settings, and the minimum stroke width, and ... quality test pages print. Printing the print quality test pages Print the print quality test pages to evaluate how well the printer is correct . • Under Cartridge Information, check the amount of the photoconductor kit . The home menu light sequence appears. -
User's Guide
Page 67
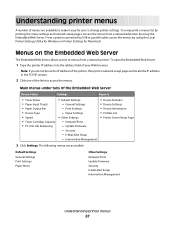
... Input Tray(s) • Paper Output Bin • Device Type • Speed • Toner Cartridge Capacity • PC Unit Life Remaining • Default Settings - General Settings - Security - Intervention Management • Device Statistics • Device Settings • Device Information • Profiles List • Printer Server Setup Page 3 Click Settings. Access the menus from a network...
... Input Tray(s) • Paper Output Bin • Device Type • Speed • Toner Cartridge Capacity • PC Unit Life Remaining • Default Settings - General Settings - Security - Intervention Management • Device Statistics • Device Settings • Device Information • Profiles List • Printer Server Setup Page 3 Click Settings. Access the menus from a network...
User's Guide
Page 78
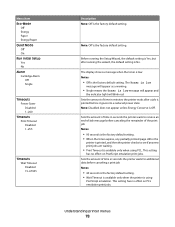
...low message will appear as a warning. • Single means the Toner is the factory default setting. Sets the amount of time in seconds the printer waits for additional data before canceling the remainder of the print job Notes: • 90 seconds is the factory default setting. • When the...• Print Timeout is No. Menu item Eco-Mode Off Energy Paper Energy/Paper Quiet Mode Off On Run Initial Setup Yes No Alarm Cartridge Alarm Off Single Timeouts Power Saver Disabled 1-240 Timeouts Print Timeout Disabled 1-255 Timeouts Wait Timeout Disabled 15-65535 Description Note: Off is the ...
...low message will appear as a warning. • Single means the Toner is the factory default setting. Sets the amount of time in seconds the printer waits for additional data before canceling the remainder of the print job Notes: • 90 seconds is the factory default setting. • When the...• Print Timeout is No. Menu item Eco-Mode Off Energy Paper Energy/Paper Quiet Mode Off On Run Initial Setup Yes No Alarm Cartridge Alarm Off Single Timeouts Power Saver Disabled 1-240 Timeouts Print Timeout Disabled 1-255 Timeouts Wait Timeout Disabled 15-65535 Description Note: Off is the ...
User's Guide
Page 95
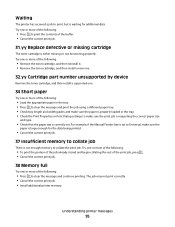
...the current print job. • Install additional printer memory. Waiting The printer has received a job to print the contents of the buffer. • Cancel the current print job. 31.yy Replace defective or missing cartridge The toner cartridge is either missing or not functioning properly. Try ...print job. Understanding printer messages 95 Try one or more of the following: • Remove the toner cartridge, and then reinstall it. • Remove the toner cartridge, and then install a new one. 32.yy Cartridge part number unsupported by device Remove the toner cartridge, and then install ...
...the current print job. • Install additional printer memory. Waiting The printer has received a job to print the contents of the buffer. • Cancel the current print job. 31.yy Replace defective or missing cartridge The toner cartridge is either missing or not functioning properly. Try ...print job. Understanding printer messages 95 Try one or more of the following: • Remove the toner cartridge, and then reinstall it. • Remove the toner cartridge, and then install a new one. 32.yy Cartridge part number unsupported by device Remove the toner cartridge, and then install ...
User's Guide
Page 96
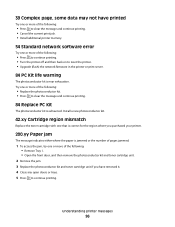
... following: • Remove Tray 1. • Open the front door, and then remove the photoconductor kit and toner cartridge unit. 2 Remove the jam. 3 Replace the photoconductor kit and toner cartridge unit if you purchased your printer. 200.yy Paper jam The message indicates either where the paper is jammed or the number of pages...
... following: • Remove Tray 1. • Open the front door, and then remove the photoconductor kit and toner cartridge unit. 2 Remove the jam. 3 Replace the photoconductor kit and toner cartridge unit if you purchased your printer. 200.yy Paper jam The message indicates either where the paper is jammed or the number of pages...
User's Guide
Page 97
... jammed or the number of pages jammed. 1 Open the front door, and then remove the photoconductor kit and toner cartridge unit. 2 Remove the jam. 3 Replace the photoconductor kit and toner cartridge unit. 4 Close the front door. 5 Press to continue printing. 202.yy Paper jam The message indicates either where...the rear door. 3 Remove the jam. 4 Close both doors. 5 Press to continue printing. 233.yy Paper jam Note: This message appears only if the printer has a duplex unit. The message indicates either where the paper is jammed or the number of pages jammed. 1 Open the front door. 2 Open the rear...
... jammed or the number of pages jammed. 1 Open the front door, and then remove the photoconductor kit and toner cartridge unit. 2 Remove the jam. 3 Replace the photoconductor kit and toner cartridge unit. 4 Close the front door. 5 Press to continue printing. 202.yy Paper jam The message indicates either where...the rear door. 3 Remove the jam. 4 Close both doors. 5 Press to continue printing. 233.yy Paper jam Note: This message appears only if the printer has a duplex unit. The message indicates either where the paper is jammed or the number of pages jammed. 1 Open the front door. 2 Open the rear...
User's Guide
Page 98
...; Remove Tray 1, and then depress the lever. 2 Remove the jam. 3 Close any open doors or trays. 4 Press to continue printing. Understanding printer messages 98 The message indicates either where the paper is jammed or the number of pages jammed. 1 Remove the jam from the standard exit bin... • Remove Tray 1. • Open the front door, and then remove the photoconductor kit and toner cartridge unit. • Remove Tray 2. 2 Remove the jam. 3 Replace the photoconductor kit and toner cartridge unit if you have removed it. 4 Close any open doors or trays. 5 Press to continue printing. ...
...; Remove Tray 1, and then depress the lever. 2 Remove the jam. 3 Close any open doors or trays. 4 Press to continue printing. Understanding printer messages 98 The message indicates either where the paper is jammed or the number of pages jammed. 1 Remove the jam from the standard exit bin... • Remove Tray 1. • Open the front door, and then remove the photoconductor kit and toner cartridge unit. • Remove Tray 2. 2 Remove the jam. 3 Replace the photoconductor kit and toner cartridge unit if you have removed it. 4 Close any open doors or trays. 5 Press to continue printing. ...

User's Guide
Page 101
... paper. Part name Regular cartridge Lexmark Return Program Cartridge For the US and Canada Toner cartridge E260A21A E260A11A For Europe, the Middle East, and Africa Toner cartridge E260A21E E260A11E For the Asia Pacific Region, including Australia, New Zealand, and India Toner cartridge E260A21P E260A11P For Latin America Toner cartridge E260A21L E260A11L Maintaining the printer 101 Note: All life...
... paper. Part name Regular cartridge Lexmark Return Program Cartridge For the US and Canada Toner cartridge E260A21A E260A11A For Europe, the Middle East, and Africa Toner cartridge E260A21E E260A11E For the Asia Pacific Region, including Australia, New Zealand, and India Toner cartridge E260A21P E260A11P For Latin America Toner cartridge E260A21L E260A11L Maintaining the printer 101 Note: All life...
User's Guide
Page 102
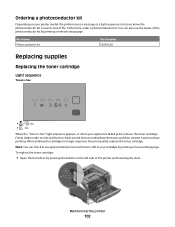
...the photoconductor kit by printing a menu settings page. When shaking the cartridge no longer improves the print quality, replace the toner cartridge. Ordering a photoconductor kit Depending on the left in your printer model, the printer issues a message or a light sequence to let you experience faded... print, remove the toner cartridge. Firmly shake it side-to-side and front...
...the photoconductor kit by printing a menu settings page. When shaking the cartridge no longer improves the print quality, replace the toner cartridge. Ordering a photoconductor kit Depending on the left in your printer model, the printer issues a message or a light sequence to let you experience faded... print, remove the toner cartridge. Firmly shake it side-to-side and front...
User's Guide
Page 103
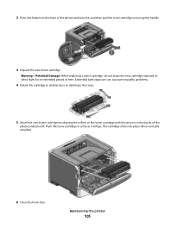
... all directions to direct light for an extended period of time. The cartridge clicks into place when correctly installed. 6 Close the front door. Maintaining the printer 103 Extended light exposure can cause print quality problems. 4 Rotate the cartridge in as far as it will go. 2 Press the button on the tracks of the...
... all directions to direct light for an extended period of time. The cartridge clicks into place when correctly installed. 6 Close the front door. Maintaining the printer 103 Extended light exposure can cause print quality problems. 4 Rotate the cartridge in as far as it will go. 2 Press the button on the tracks of the...


