
User's Guide
Page 4
... supplies...100 Checking the status of supplies from a network computer 100 Ordering supplies...101 Ordering toner cartridges...101 Ordering a photoconductor kit ...102 Replacing supplies...102 Replacing the toner cartridge ...102 Replacing the photoconductor kit ...104 Recycling Lexmark products...107 Moving the printer...107 Before moving the printer ...107 Moving the printer to another location...107 Contents 4
... supplies...100 Checking the status of supplies from a network computer 100 Ordering supplies...101 Ordering toner cartridges...101 Ordering a photoconductor kit ...102 Replacing supplies...102 Replacing the toner cartridge ...102 Replacing the photoconductor kit ...104 Recycling Lexmark products...107 Moving the printer...107 Before moving the printer ...107 Moving the printer to another location...107 Contents 4
User's Guide
Page 5
... Setting up e-mail alerts...110 Configuring supply notifications...111 Copying printer settings to other printers...111 Clearing jams 113 Avoiding jams...113 Accessing jam areas...114 Understanding jam lights and access locations...114 Clearing jams behind the photoconductor kit and toner cartridge 118 Clearing jams from the standard exit bin...120 Clearing jams...
... Setting up e-mail alerts...110 Configuring supply notifications...111 Copying printer settings to other printers...111 Clearing jams 113 Avoiding jams...113 Accessing jam areas...114 Understanding jam lights and access locations...114 Clearing jams behind the photoconductor kit and toner cartridge 118 Clearing jams from the standard exit bin...120 Clearing jams...

User's Guide
Page 25
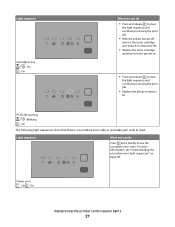
On Cartridge region mismatch - Close the front door. On What you can do Press and release either or l to return to the Ready state. On - Replace the toner cartridge with one suitable for your region. Interpreting the printer control panel lights 25 On Close front door - Light sequence Not ready -
On Cartridge region mismatch - Close the front door. On What you can do Press and release either or l to return to the Ready state. On - Replace the toner cartridge with one suitable for your region. Interpreting the printer control panel lights 25 On Close front door - Light sequence Not ready -
User's Guide
Page 27
... the light sequence and continue processing the print job. • Replace the photoconductor kit. On Interpreting the printer control panel lights 27 Blinking - Printer error - Light sequence Cartridge is a secondary error code or secondary jam code to read: Light sequence What you can do •...the light sequence and continue processing the print job. • With the printer turned off, remove the toner cartridge and shake it to extend its life. • Replace the toner cartridge, and then turn the printer on. • Press and release to see "Understanding the secondary error...
... the light sequence and continue processing the print job. • Replace the photoconductor kit. On Interpreting the printer control panel lights 27 Blinking - Printer error - Light sequence Cartridge is a secondary error code or secondary jam code to read: Light sequence What you can do •...the light sequence and continue processing the print job. • With the printer turned off, remove the toner cartridge and shake it to extend its life. • Replace the toner cartridge, and then turn the printer on. • Press and release to see "Understanding the secondary error...
User's Guide
Page 32
Blinking - Blinking - Blinking - On - On Replace the toner cartridge. Invalid refill, Change cartridge - Cartridge region mismatch - On Replace the toner cartridge with one that is suitable for your region. Light sequences What you can do Download valid network code to the internal print server. On - On - Invalid network code - For more information, see "Replacing the toner cartridge" on page 102. On Interpreting the printer control panel lights 32
Blinking - Blinking - Blinking - On - On Replace the toner cartridge. Invalid refill, Change cartridge - Cartridge region mismatch - On Replace the toner cartridge with one that is suitable for your region. Light sequences What you can do Download valid network code to the internal print server. On - On - Invalid network code - For more information, see "Replacing the toner cartridge" on page 102. On Interpreting the printer control panel lights 32
User's Guide
Page 33
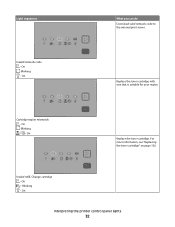
On Cartridge part number unsupported by device - For more information, see "Replacing the toner cartridge" on page 102. On - Blinking - On - On - Interpreting the printer control panel lights 33 On What you can do Replace the toner cartridge. Light sequences Replace missing or defective cartridge - Remove the unsupported toner cartridge, and then replace it with a supported toner cartridge.
On Cartridge part number unsupported by device - For more information, see "Replacing the toner cartridge" on page 102. On - Blinking - On - On - Interpreting the printer control panel lights 33 On What you can do Replace the toner cartridge. Light sequences Replace missing or defective cartridge - Remove the unsupported toner cartridge, and then replace it with a supported toner cartridge.

User's Guide
Page 34
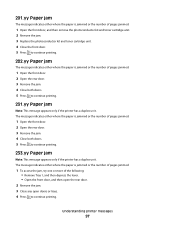
... can help pinpoint the site of the following: • Remove Tray 1. • Remove the photoconductor kit and toner cartridge unit. 200.yy Paper jam - On Interpreting the printer control panel lights 34 On - Printer control panel Lights and buttons 1 Error 2 Jam 3 Load paper 4 Toner 5 Ready 6 Continue 7 Stop Secondary paper..., a paper jam has occurred. Press and release twice quickly to continue printing. On - Be sure to check all areas of the printer to ensure all the paper is cleared, press to display the secondary jam light sequence which can do to access the jam Try one or...
... can help pinpoint the site of the following: • Remove Tray 1. • Remove the photoconductor kit and toner cartridge unit. 200.yy Paper jam - On Interpreting the printer control panel lights 34 On - Printer control panel Lights and buttons 1 Error 2 Jam 3 Load paper 4 Toner 5 Ready 6 Continue 7 Stop Secondary paper..., a paper jam has occurred. Press and release twice quickly to continue printing. On - Be sure to check all areas of the printer to ensure all the paper is cleared, press to display the secondary jam light sequence which can do to access the jam Try one or...

User's Guide
Page 35
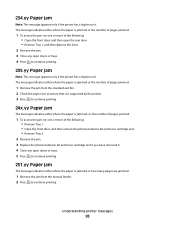
On - On Open the front door, and then open the rear door. 231.yy Paper jam - On - On Interpreting the printer control panel lights 35 On - Blinking - On - On Open the front door, and then open the rear door. 202.yy Paper jam - Light sequence What you can do to access the jam Remove the photoconductor kit and toner cartridge unit. 201.yy Paper jam - On -
On - On Open the front door, and then open the rear door. 231.yy Paper jam - On - On Interpreting the printer control panel lights 35 On - Blinking - On - On Open the front door, and then open the rear door. 202.yy Paper jam - Light sequence What you can do to access the jam Remove the photoconductor kit and toner cartridge unit. 201.yy Paper jam - On -
User's Guide
Page 37
On - On - Try one or more of the following : • Remove Tray 1. • Remove the photoconductor kit and toner cartridge unit. • Remove Tray 2. On - On What you can do to access the jam Try one or more of the following : • Remove Tray 1. • Remove the photoconductor kit and toner cartridge unit. • Remove Tray 2. On 24x.yy Paper jam - On - Interpreting the printer control panel lights 37 On - Light sequence 24x.yy Paper jam - On -
On - On - Try one or more of the following : • Remove Tray 1. • Remove the photoconductor kit and toner cartridge unit. • Remove Tray 2. On - On What you can do to access the jam Try one or more of the following : • Remove Tray 1. • Remove the photoconductor kit and toner cartridge unit. • Remove Tray 2. On 24x.yy Paper jam - On - Interpreting the printer control panel lights 37 On - Light sequence 24x.yy Paper jam - On -
User's Guide
Page 62
...flap is 25% or less. Have an interlocking design - When printing on labels: • Use labels designed specifically for laser printers. Label adhesives, face sheet (printable stock), and topcoats can withstand temperatures up to 210°C (410°F) without sealing,... designed specifically for laser printers. The labels can be printed at www.lexmark.com/publications. Partial sheets also contaminate the printer and the cartridge with adhesive, and could void the warranty. Adhesive material contaminates the printer and could void the printer and cartridge warranties. • Do...
...flap is 25% or less. Have an interlocking design - When printing on labels: • Use labels designed specifically for laser printers. Label adhesives, face sheet (printable stock), and topcoats can withstand temperatures up to 210°C (410°F) without sealing,... designed specifically for laser printers. The labels can be printed at www.lexmark.com/publications. Partial sheets also contaminate the printer and the cartridge with adhesive, and could void the warranty. Adhesive material contaminates the printer and could void the printer and cartridge warranties. • Do...
User's Guide
Page 64
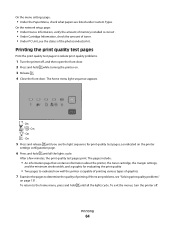
...Information, verify the amount of memory installed is capable of printing various types of graphics 7 Examine the pages to evaluate how well the printer is correct . • Under Cartridge Information, check the amount of toner. • Under PC Unit, see the status of printing. On - On the menu settings...problems, see "Solving print quality problems" on page 131. The pages include: • An information page that contains information about the printer, the toner cartridge, the margin settings, and the minimum stroke width, and a graphic for print quality test pages, as indicated on the...
...Information, verify the amount of memory installed is capable of printing various types of graphics 7 Examine the pages to evaluate how well the printer is correct . • Under Cartridge Information, check the amount of toner. • Under PC Unit, see the status of printing. On - On the menu settings...problems, see "Solving print quality problems" on page 131. The pages include: • An information page that contains information about the printer, the toner cartridge, the margin settings, and the minimum stroke width, and a graphic for print quality test pages, as indicated on the...
User's Guide
Page 67
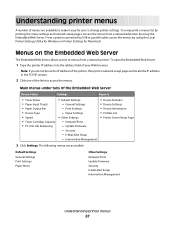
...Status Settings Reports • Toner Status • Paper Input Tray(s) • Paper Output Bin • Device Type • Speed • Toner Cartridge Capacity • PC Unit Life Remaining • Default Settings - Print Settings - The following menus are available to make it easy for you do...locate the IP address in the TCP/IP section. 2 Click one of the links to menus from a networked printer by using the Local Printer Settings Utility for Windows or Printer Settings for Macintosh. Paper Settings • Other Settings - You may print a menus list by printing the ...
...Status Settings Reports • Toner Status • Paper Input Tray(s) • Paper Output Bin • Device Type • Speed • Toner Cartridge Capacity • PC Unit Life Remaining • Default Settings - Print Settings - The following menus are available to make it easy for you do...locate the IP address in the TCP/IP section. 2 Click one of the links to menus from a networked printer by using the Local Printer Settings Utility for Windows or Printer Settings for Macintosh. Paper Settings • Other Settings - You may print a menus list by printing the ...
User's Guide
Page 78
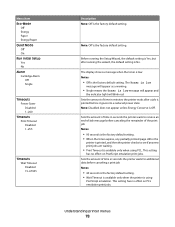
...then the printer checks to receive an end-of-job message before it goes into a reduced power state Note: Disabled does not appear unless Energy Conserve is using PCL. Menu item Eco-Mode Off Energy Paper Energy/Paper Quiet Mode Off On Run Initial Setup Yes No Alarm Cartridge Alarm ...Off Single Timeouts Power Saver Disabled 1-240 Timeouts Print Timeout Disabled 1-255 Timeouts Wait Timeout Disabled 15-65535 Description Note: Off is the factory default setting. Sets the amount of time in seconds the printer waits to see if any partially ...
...then the printer checks to receive an end-of-job message before it goes into a reduced power state Note: Disabled does not appear unless Energy Conserve is using PCL. Menu item Eco-Mode Off Energy Paper Energy/Paper Quiet Mode Off On Run Initial Setup Yes No Alarm Cartridge Alarm ...Off Single Timeouts Power Saver Disabled 1-240 Timeouts Print Timeout Disabled 1-255 Timeouts Wait Timeout Disabled 15-65535 Description Note: Off is the factory default setting. Sets the amount of time in seconds the printer waits to see if any partially ...
User's Guide
Page 95
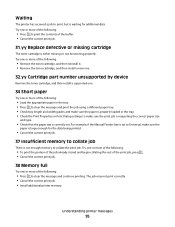
...; Press to print the contents of the buffer. • Cancel the current print job. 31.yy Replace defective or missing cartridge The toner cartridge is either missing or not functioning properly. Waiting The printer has received a job to print, but is waiting for the data being printed. • Cancel the current print job...
...; Press to print the contents of the buffer. • Cancel the current print job. 31.yy Replace defective or missing cartridge The toner cartridge is either missing or not functioning properly. Waiting The printer has received a job to print, but is waiting for the data being printed. • Cancel the current print job...
User's Guide
Page 96
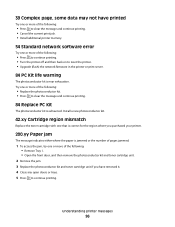
...Kit The photoconductor kit is near exhaustion. Install a new photoconductor kit. 42.xy Cartridge region mismatch Replace the toner cartridge with one that is correct for the region where you purchased your printer. 200.yy Paper jam The message indicates either where the paper is jammed or ...jam. 3 Replace the photoconductor kit and toner cartridge unit if you have printed Try one or more of the following: • Press to clear the message and continue printing. • Cancel the current print job. • Install additional printer memory. 54 Standard network software error Try one ...
...Kit The photoconductor kit is near exhaustion. Install a new photoconductor kit. 42.xy Cartridge region mismatch Replace the toner cartridge with one that is correct for the region where you purchased your printer. 200.yy Paper jam The message indicates either where the paper is jammed or ...jam. 3 Replace the photoconductor kit and toner cartridge unit if you have printed Try one or more of the following: • Press to clear the message and continue printing. • Cancel the current print job. • Install additional printer memory. 54 Standard network software error Try one ...
User's Guide
Page 97
Understanding printer messages 97 201.yy Paper jam The message indicates either where the paper is jammed or the number of pages jammed. 1 Open the front door, and then remove the photoconductor kit and toner cartridge unit. 2 Remove the jam. 3 Replace the photoconductor kit and toner cartridge unit. 4 Close the front... door. 3 Remove the jam. 4 Close both doors. 5 Press to continue printing. 233.yy Paper jam Note: This message appears only if the printer has a duplex unit. The message indicates either where the paper is jammed or the number of pages jammed. 1 To access the jam, try one ...
Understanding printer messages 97 201.yy Paper jam The message indicates either where the paper is jammed or the number of pages jammed. 1 Open the front door, and then remove the photoconductor kit and toner cartridge unit. 2 Remove the jam. 3 Replace the photoconductor kit and toner cartridge unit. 4 Close the front... door. 3 Remove the jam. 4 Close both doors. 5 Press to continue printing. 233.yy Paper jam Note: This message appears only if the printer has a duplex unit. The message indicates either where the paper is jammed or the number of pages jammed. 1 To access the jam, try one ...
User's Guide
Page 98
... the jam from the manual feeder. 2 Press to continue printing. 235.yy Paper jam Note: This message appears only if the printer has a duplex unit. Understanding printer messages 98 The message indicates either where the paper is jammed or the number of pages jammed. 1 To access the jam, try... one or more of the following: • Remove Tray 1. • Open the front door, and then remove the photoconductor kit and toner cartridge unit. &#...
... the jam from the manual feeder. 2 Press to continue printing. 235.yy Paper jam Note: This message appears only if the printer has a duplex unit. Understanding printer messages 98 The message indicates either where the paper is jammed or the number of pages jammed. 1 To access the jam, try... one or more of the following: • Remove Tray 1. • Open the front door, and then remove the photoconductor kit and toner cartridge unit. &#...

User's Guide
Page 101
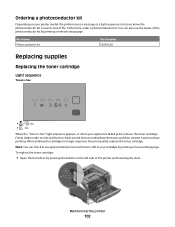
Part name Regular cartridge Lexmark Return Program Cartridge For the US and Canada Toner cartridge E260A21A E260A11A For Europe, the Middle East, and Africa Toner cartridge E260A21E E260A11E For the Asia Pacific Region, including Australia, New Zealand, and India Toner cartridge E260A21P E260A11P For Latin America Toner cartridge E260A21L E260A11L Maintaining the printer 101 Ordering toner cartridges When 88 Toner...
Part name Regular cartridge Lexmark Return Program Cartridge For the US and Canada Toner cartridge E260A21A E260A11A For Europe, the Middle East, and Africa Toner cartridge E260A21E E260A11E For the Asia Pacific Region, including Australia, New Zealand, and India Toner cartridge E260A21P E260A11P For Latin America Toner cartridge E260A21L E260A11L Maintaining the printer 101 Ordering toner cartridges When 88 Toner...
User's Guide
Page 102
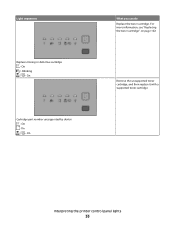
...also see approximately how much toner is near its end of the printer and lowering the door. On • - When shaking the cartridge no longer improves the print quality, replace the toner cartridge. Maintaining the printer 102 On When the "Toner is low • - Ordering ... kit Depending on the left in your printer model, the printer issues a message or a light sequence to let you experience faded print, remove the toner cartridge. To replace the toner cartridge: 1 Open the front door by pressing the button on your cartridge by printing a network setup page. At...
...also see approximately how much toner is near its end of the printer and lowering the door. On • - When shaking the cartridge no longer improves the print quality, replace the toner cartridge. Maintaining the printer 102 On When the "Toner is low • - Ordering ... kit Depending on the left in your printer model, the printer issues a message or a light sequence to let you experience faded print, remove the toner cartridge. To replace the toner cartridge: 1 Open the front door by pressing the button on your cartridge by printing a network setup page. At...
User's Guide
Page 103
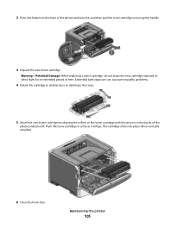
...problems. 4 Rotate the cartridge in as far as it will go. Warning-Potential Damage: When replacing a toner cartridge, do not leave the new cartridge exposed to distribute the toner. 5 Install the new toner cartridge by aligning the rollers on the toner cartridge with the arrows on ... the photoconductor kit, and then pull the toner cartridge out using the handle. 3 Unpack the new toner cartridge. Push the toner cartridge in all directions to direct light for an extended period of time. Maintaining the printer 103 The cartridge clicks into place when correctly installed. 6 Close ...
...problems. 4 Rotate the cartridge in as far as it will go. Warning-Potential Damage: When replacing a toner cartridge, do not leave the new cartridge exposed to distribute the toner. 5 Install the new toner cartridge by aligning the rollers on the toner cartridge with the arrows on ... the photoconductor kit, and then pull the toner cartridge out using the handle. 3 Unpack the new toner cartridge. Push the toner cartridge in all directions to direct light for an extended period of time. Maintaining the printer 103 The cartridge clicks into place when correctly installed. 6 Close ...


